Floor sanding and varnishing: 7 Powerful Steps for Stunning Results 2025
Why Floor Sanding and Varnishing Transforms Your Home
Floor sanding and varnishing is the process of removing the old finish from wooden floors and applying a new protective coat to restore their beauty and extend their lifespan. This refinishing method can completely transform worn, scratched, or dull hardwood floors into stunning focal points in your home.
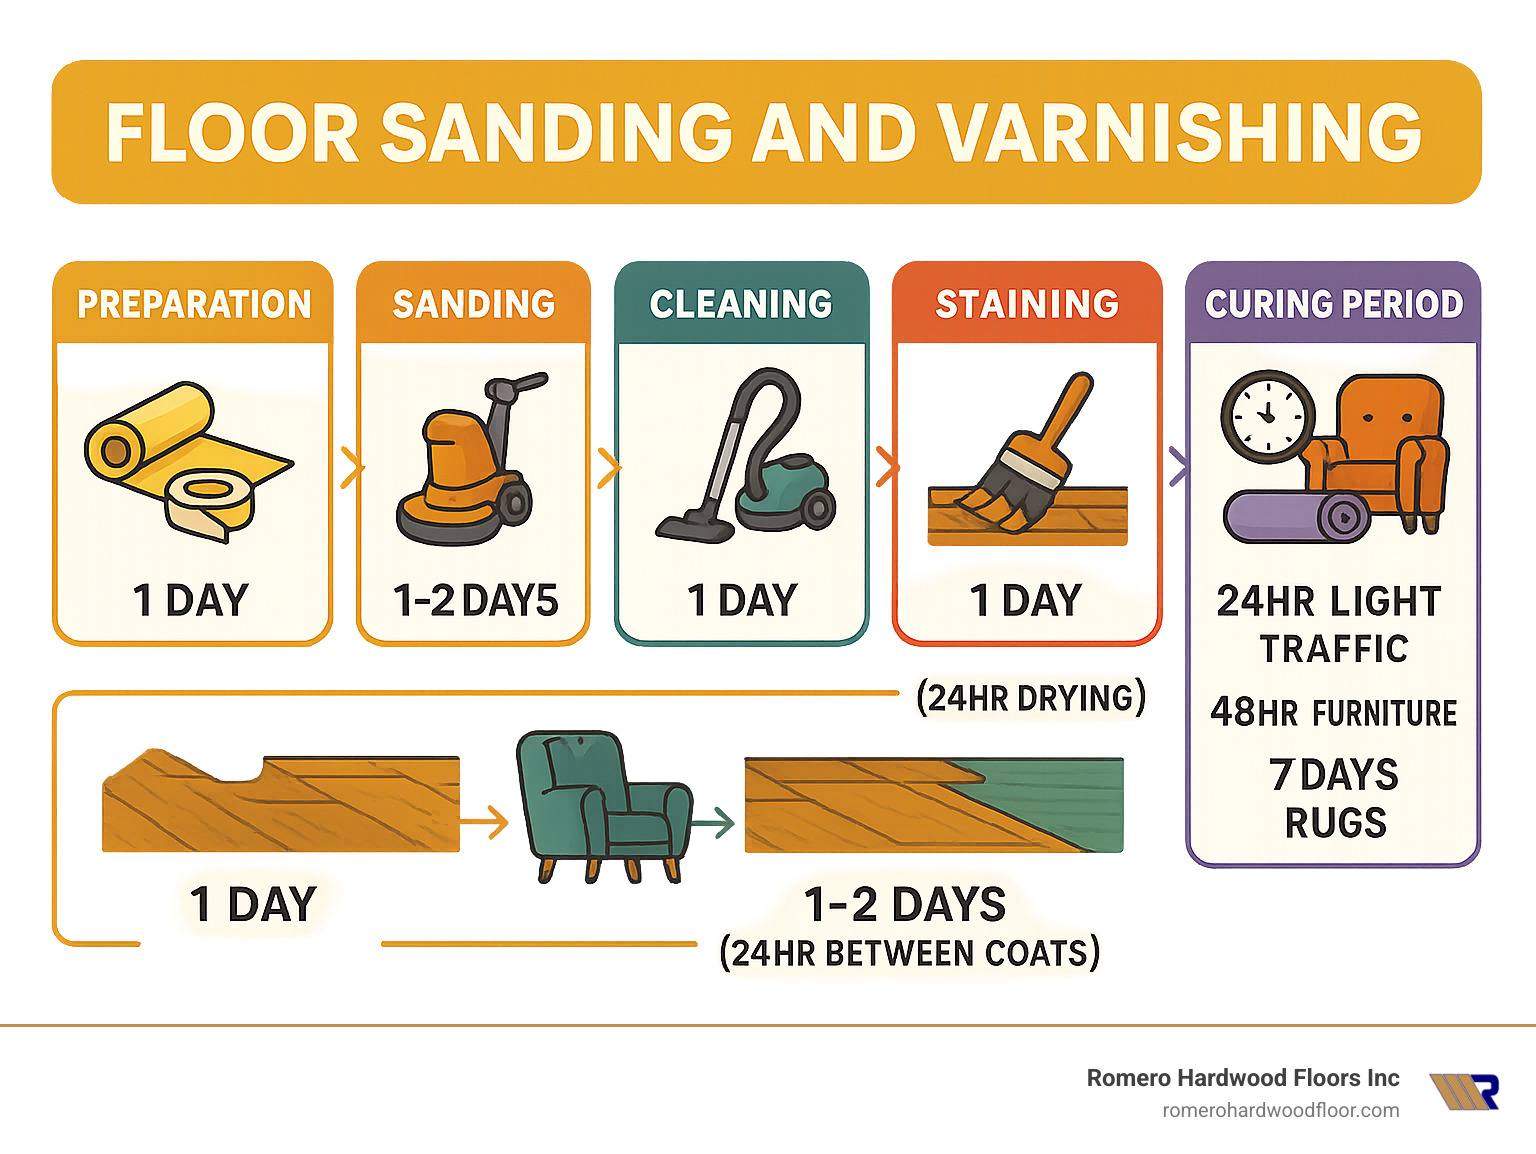
Quick Guide to Floor Sanding and Varnishing:
- Assessment: Check if floor has enough wood thickness (minimum 1/8″ above tongue)
- Preparation: Remove furniture, seal vents, secure loose boards
- Sanding: Progress through grits (36→60→100) using drum sander and edger
- Cleaning: Thoroughly vacuum and tack cloth to remove all dust
- Finishing: Apply 2-3 coats of varnish with light sanding between coats
- Curing: Allow 24 hours before walking, 48 hours for furniture, 7 days for rugs
When done properly, floor sanding and varnishing can breathe new life into hardwood floors that might otherwise need replacement. The process removes surface damage, evens out the color, and provides a fresh protective layer that shields against future wear.
“Refinishing hardwood floors can increase your home’s value and is often more affordable than replacing the floors entirely,” according to flooring experts who note that hardwood floors can last up to 100 years with proper care and periodic refinishing.
I’m Francisco Romero, owner of Romero Hardwood Floors Inc. with over 15 years of experience specializing in floor sanding and varnishing services throughout Revere, MA and surrounding areas. My team and I have transformed thousands of floors from tired and worn to beautifully refinished surfaces that homeowners are proud to showcase.
Simple Floor sanding and varnishing word guide:
– Cost of wood floor repair
– Hardwood Floor Repair Techniques
Why & When to Refinish Wood Floors
Those beautiful hardwood floors beneath your feet aren’t just a surface to walk on—they’re often the heart and soul of your home. With proper care, hardwood can last for generations, with some historic homes showcasing the same floors for over a century! But even the most durable hardwood eventually shows signs that it’s time for some TLC.
You might be wondering when exactly you should consider floor sanding and varnishing. The answer isn’t always obvious, but your floors will give you clear signals when they’re ready for renewal.
One simple way to check is the water droplet test. Just place a small drop of water on your floor—if it beads up nicely, your finish is still doing its job. But if that water quickly soaks in or darkens the wood, your protective barrier has worn away, and it’s definitely refinishing time.
Look down at your floors—do you see visible scratches and gouges? Light surface scratches might only need a screen-and-recoat (a less intensive refreshing process), but those deeper scratches that you can feel with your fingernail? Those call for complete sanding and refinishing.
“I was convinced we needed all new flooring,” shared Michael, one of our Revere clients. “The scratches from my kids’ toys and our dog’s nails made the floors look terrible. I was shocked when Francisco showed me how floor sanding and varnishing could make them look brand new again—and for a fraction of replacement costs!”
Have you noticed areas of your floor turning gray or black? This discoloration isn’t just cosmetic—it signals oxidation from exposure to air and moisture, meaning your protective finish has failed and the wood itself is beginning to deteriorate.
Sunlight can be another culprit, causing UV fading in some wood species. This is especially common near large windows or patio doors, where you might notice uneven coloration compared to other areas of your home.
Sometimes, the issue isn’t damage at all—perhaps you’ve moved into a home with orange-toned oak floors that clash with your modern gray furniture. Changing the color or style of your floors through refinishing can dramatically transform your space without the expense of replacement.
According to the National Wood Flooring Association, hardwood floors can typically be sanded and refinished 4-6 times during their lifespan, depending on their thickness and how aggressively previous sandings were done. The latest research on hardwood lifespan confirms what we’ve seen in our 15+ years of experience: proper refinishing every 7-10 years can extend your floor’s life significantly while boosting your home’s value by 2-5%.
One of our most memorable projects involved a 1920s colonial in Revere with original oak flooring that had been hidden under carpet for decades. The homeowner told us, “I knew there was potential under there, but I was absolutely amazed at how floor sanding and varnishing transformed these 100-year-old boards into what looks like brand-new flooring. Friends can’t believe these aren’t new floors!”
Beyond aesthetics, refinishing is about longevity and value protection. Your hardwood floors are an investment—one that can last a lifetime with proper care and timely refinishing. When those scratches, dullness, or water stains start to appear, it’s not just about beauty—it’s about preserving the value and integrity of one of your home’s most significant features.
Is Your Floor Ready? Inspection & Suitability
Before jumping into a floor sanding and varnishing project, you’ll want to make sure your floors are actually good candidates for refinishing. Not every wooden floor can—or should—be sanded, and a proper check-up now can save you headaches later.
Solid vs. Engineered Wood Flooring
Your floor’s construction makes all the difference when it comes to refinishing potential.
Solid hardwood floors are exactly what they sound like—solid wood from top to bottom. These traditional beauties can typically handle multiple sandings throughout their lifetime and are the ideal refinishing candidates.
On the other hand, engineered hardwood floors are a bit more complicated. They feature a real wood veneer on top of plywood or fiberboard layers. Their refinishing potential depends entirely on that top layer’s thickness:
“I remember visiting a home in Winthrop where the owners were convinced they could sand their engineered floors,” Francisco Romero recalls. “Unfortunately, after measuring the wear layer at less than 2mm, I had to deliver the disappointing news that sanding would damage their floors beyond repair.”
Generally, engineered floors with wear layers under 2mm should never be sanded, those with 3-4mm might handle one or two sandings in their lifetime, while premium options with 4-6mm thick top layers can withstand multiple refinishing projects.
The 1/8″ Rule and How to Check
Here at Romero Hardwood Floors, we follow the industry-standard 1/8″ rule—you need at least 1/8″ (3mm) of solid wood above the tongue-and-groove joint to safely sand a floor. Here’s how we check this:
- Look at a floor register or air vent opening for a cross-section view
- Carefully remove a small section of baseboard to peek at the edge
- Examine the floor’s profile at a doorway threshold
A longtime Revere homeowner called us believing her 80-year-old oak floors needed complete refinishing. After inspection, we finded the floors had been sanded so many times that barely 1/16″ remained above the tongue. Instead of potentially damaging her historic floors, we recommended a less invasive screen-and-recoat process that still gave her the refreshed look she wanted.
Other Inspection Points
Your floor’s thickness isn’t the only thing to consider. We also look for:
Moisture content is critical—we use moisture meters to ensure your wood has a proper reading (typically 6-9% in Massachusetts homes). Higher readings might indicate underlying moisture problems that need fixing before any refinishing begins.
Structural issues like rot, termite damage, or severe water damage can compromise your floor’s integrity. Sometimes we find these problems hiding beneath seemingly minor surface damage.
Loose boards need securing before any sanding begins. Those squeaky spots? They’re usually caused by boards that have come loose from the subfloor and need to be fixed.
Cupping or warping in your boards (where edges are higher than centers) might indicate ongoing moisture issues that need addressing before refinishing.
Protruding nails or staples are sanding machine destroyers and must be set below the surface or removed entirely before work begins.
For more detailed information about removing old finishes before refinishing, check out our comprehensive guide on Removing Old Varnish from Wood Floors.
Essential Tools, Materials & Safety Gear
Proper floor sanding and varnishing requires specialized equipment and materials. Whether you’re hiring professionals like us or considering a DIY approach, understanding these tools will help you appreciate the complexity of the process.
Essential Sanding Equipment
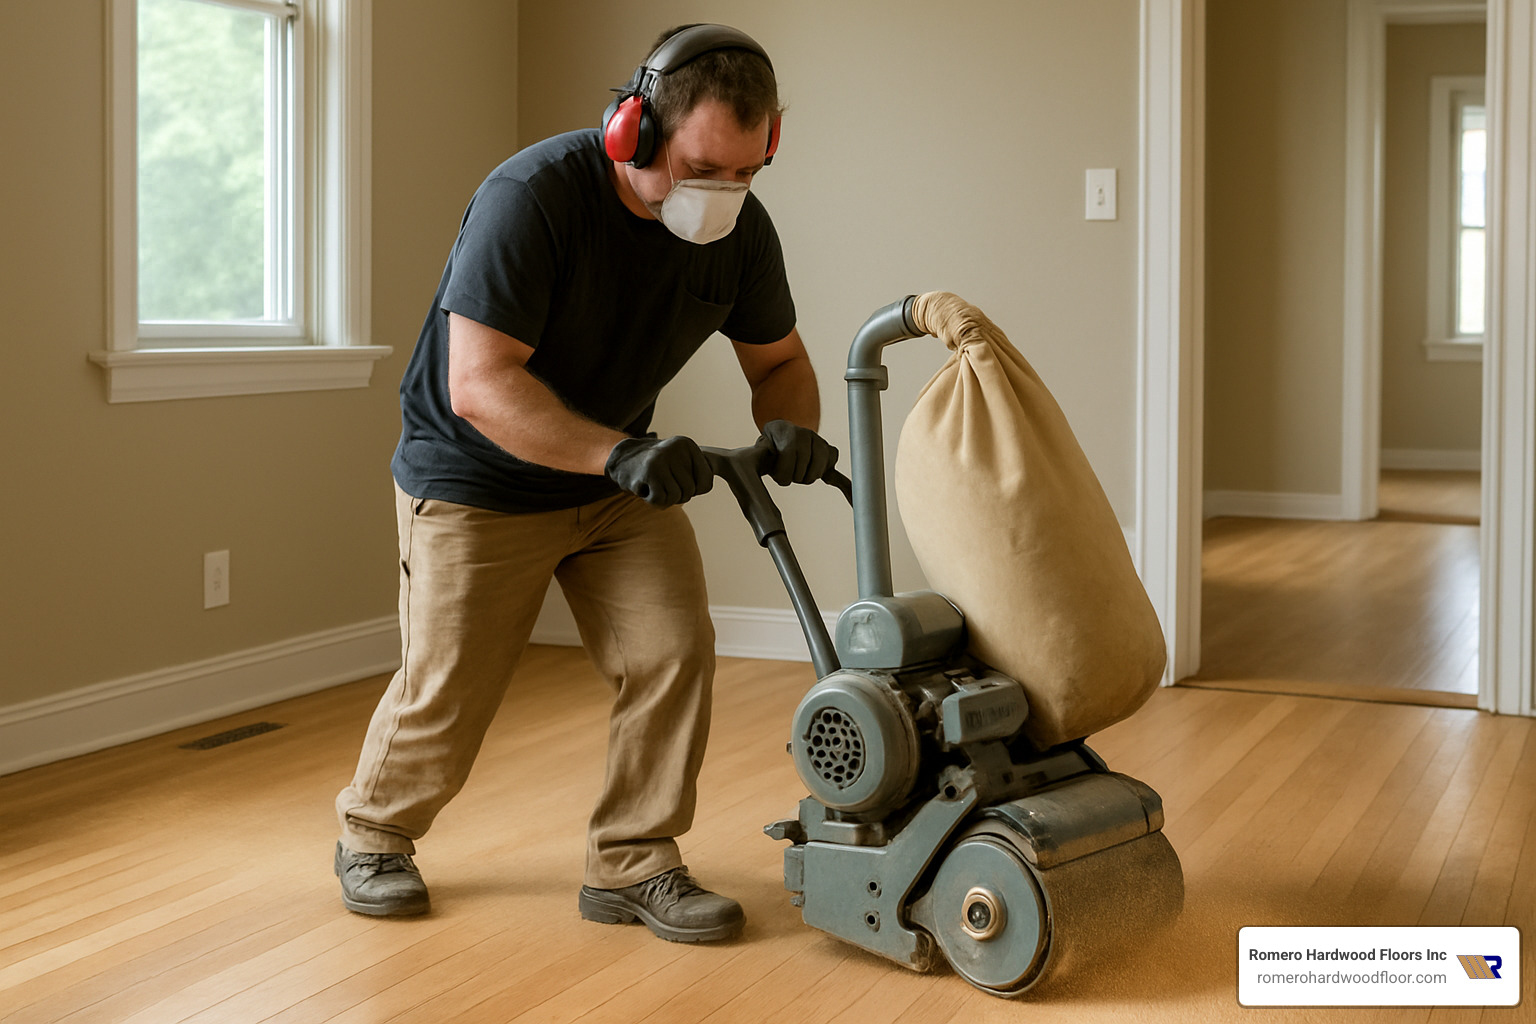
- Drum Sander: The workhorse of floor refinishing, this powerful machine removes the old finish and levels the floor. For professional results, we use commercial-grade drum sanders that provide consistent, even sanding while minimizing the risk of gouging.
- Edge Sander: Since the drum sander can’t reach all the way to walls and corners, an edge sander is essential for these areas. It’s a handheld machine with a rotating disk that requires skill to use properly.
- Detail Sander or Scraper: For tight corners, stair edges, and other hard-to-reach areas where even the edge sander can’t access.
- Buffer with Screening Pad: Used for the final smoothing between sanding and finishing, or for screen-and-recoat jobs where a full sanding isn’t needed.
Sandpaper and Abrasives
Sanding is typically done in a progression of grits:
– Coarse (36-40 grit): Removes old finish and levels the floor
– Medium (60-80 grit): Smooths out scratches left by coarse grit
– Fine (100-120 grit): Provides the final smooth surface for finishing
For each sanding phase, you’ll need appropriate sandpaper for both the drum sander and the edge sander. We recommend changing sanding belts after approximately 250 square feet to maintain effectiveness.
Dust Control Equipment
Dust management is critical for both health and finish quality:
– Dust containment systems: Professional sanders often have built-in dust collection
– Shop vacuum with HEPA filter: For cleanup between sanding stages
– Plastic sheeting and painter’s tape: To seal off doorways and vents
– Box fans with furnace filters: To help capture airborne dust
Safety Equipment
Floor sanding and varnishing involves powerful equipment and potentially harmful materials. Essential safety gear includes:
– Dust mask or respirator: To protect lungs from wood dust
– Safety goggles: To protect eyes from dust and debris
– Ear protection: Sanders are extremely loud
– Knee pads: For detail work and finishing
– Work gloves: For handling equipment and materials
Finishing Materials
- Tack cloths: For removing all dust before applying finish
- Wood filler: For repairing cracks and holes
- Varnish/polyurethane: Water-based or oil-based finish
- Applicators: Lambswool applicators, synthetic pads, or high-quality brushes
- Stain (optional): If changing the color of the wood
A client in Salem recently told us, “I tried the DIY approach and rented a sander from the big box store. After struggling for hours and creating more gouges than smooth surfaces, I called Romero. Their professional equipment and expertise made all the difference—I wish I’d called them first!”
For more information on the sanding process, visit our detailed guide on Hardwood Floor Sanding. For professional projects, we use equipment like the Bona Scorpion floor sander which provides superior dust containment and consistent results.
Floor Sanding and Varnishing: Step-By-Step Process
The floor sanding and varnishing process requires methodical execution and attention to detail. Here’s our professional approach that ensures beautiful, long-lasting results:
1. Room Preparation
Before any sanding begins:
– Remove all furniture, window treatments, and décor
– Remove baseboards if possible (or carefully tape and protect them)
– Check for and set any protruding nails or staples
– Secure loose floorboards with finishing nails
– Seal doorways, vents, and returns with plastic sheeting and tape
– Cover fixed cabinets and immovable items
– Set up dust collection systems
2. Initial Sanding
The first sanding pass removes the old finish and levels the floor:
- Start with coarse-grit sandpaper (typically 36-40 grit)
- Sand diagonally across the grain for the first pass if the floor is significantly uneven
- Follow with a pass parallel to the grain
- Maintain constant motion to prevent the sander from digging into the floor
- Overlap each pass by about 1/3 to avoid visible lines
- Sand in the direction of the boards, never perpendicular to the grain
“The first time you see the raw wood emerge from under years of old finish, it’s like finding hidden treasure,” says our lead technician who has refinished over 1,000 floors in the Revere area. “You get a glimpse of what the final result will be, and it’s always exciting.”
3. Edge and Corner Sanding
While the main sanding progresses:
1. Use an edge sander to reach areas the drum sander can’t access
2. Keep the edge sander moving to prevent gouging
3. Use a detail sander or hand scraper for tight corners and hard-to-reach areas
4. Match the grit sequence of the main floor
For more detailed guidance on the sanding process, visit our comprehensive guide on How to Sand Hardwood Floors.
Floor Sanding and Varnishing – Grit Progression & Techniques
Proper grit progression is essential for achieving a smooth, professional finish:
- Coarse Sanding (36-40 grit):
- Removes old finish, stains, and surface damage
- Levels minor unevenness in the floor
- Should be done carefully to avoid creating deep scratches
- Medium Sanding (60-80 grit):
- Removes scratches left by the coarse grit
- Continues to smooth the floor
- Prepares for the final sanding
- Fine Sanding (100-120 grit):
- Creates the smooth surface needed for finishing
- Removes all visible scratches
- Opens the wood grain for optimal finish adhesion
Between each grit change:
– Vacuum the entire floor thoroughly
– Inspect for missed spots or uneven areas
– Check edges and corners for consistency
Pro Tip: Replace sanding belts and discs regularly. A dull abrasive will burnish the wood rather than sand it, creating problems for finish adhesion later.
Floor Sanding and Varnishing – Edges, Corners & Hard Spots
These areas require special attention and techniques:
- Edges: Use an edge sander with the same grit progression as the main floor. Keep the sander moving in smooth, consistent motions to prevent “dishing” (creating depressions along the edges).
- Corners: Where the edge sander can’t reach, use a detail sander, oscillating multi-tool with a sanding attachment, or hand scraper. Work carefully to match the smoothness of the rest of the floor.
- Stair Treads and Risers: These often require hand sanding or specialized stair edgers. Sand in the direction of the grain, and be especially careful around nosings and edges.
- Around Radiators and Built-ins: Use flexible sanding screens or detail sanders to reach these challenging areas.
A recent project in East Boston involved a 1930s home with original oak floors that had been covered with carpet for decades. The homeowner was concerned about the floor’s condition, especially around the radiators and built-in cabinets. Our specialized techniques for these hard-to-reach areas revealed beautiful, consistent grain throughout the entire space.
For more information on our professional approach to edge and detail work, visit our Floor Sanding Services page.
Gap Filling, Repairs & Surface Prep
That gorgeous, flawless hardwood floor you’re dreaming of? It starts with proper repairs and preparation. Before we even think about applying a beautiful finish, we need to address all the little imperfections that could undermine your results.
Gap Filling Options
Seasonal changes in humidity naturally cause wood floors to expand and contract. While small gaps are normal, larger ones can collect dirt and detract from your floor’s beauty. Here’s how we tackle them:
For those typical small gaps, we often use what I call the sawdust cocktail method. We collect fine sawdust from your final sanding (which perfectly matches your floor’s color) and mix it with clear wood floor filler or resin. This creates a custom-colored filler that blends seamlessly with your specific floor. We work this mixture into the gaps using a plastic putty knife, let it dry completely, and then sand it flush during the final sanding phase.
When dealing with wider gaps (those bigger than 3/8″), we typically recommend the wood strip method. I remember a project in a historic Revere home where the original pine floors had gaps you could drop a quarter through! For these situations, we custom-cut thin wood strips matching your flooring, apply wood glue, and tap them into place. Once dry, we sand them flush with the surrounding floor, creating a seamless repair.
Of course, there are also plenty of commercial wood fillers available in various wood tones. These pre-mixed options work well for smaller projects and can be applied according to the manufacturer’s instructions. The key is choosing products specifically designed for hardwood floors.
Addressing Common Floor Issues
Floor sanding and varnishing isn’t just about making your floors look pretty – it’s also about fixing functional issues. Those annoying squeaks that wake up the baby? We can fix those by locating the source and securing loose boards with finishing nails. For issues stemming from the subfloor, we use specialized screws to secure the floor from above without damaging the visible surface.
Minor damage like dents and gouges gets filled with appropriate wood filler, while deeper damage might require wood patch kits that allow us to cut out and replace small sections. One client in Winthrop had a floor with damage from an old radiator leak – we were able to patch in new boards so seamlessly that even she couldn’t tell which ones were replaced!
After all repairs are complete, patience becomes crucial. We allow all fillers to dry thoroughly before proceeding with final sanding. This ensures everything is flush with the surrounding floor. A thorough vacuuming follows, creating the perfect foundation for the finishing process.
“The difference between an amateur and professional floor sanding and varnishing job often comes down to the repair phase,” our senior technician Francisco likes to say. “Taking the time to properly address every imperfection creates a foundation for a flawless finish.”
I’ve seen countless DIY projects where homeowners rush through repairs or skip them entirely, only to have those imperfections magnified once the finish is applied. Varnish doesn’t hide flaws – it highlights them! That’s why we carefully address every crack, gap, and imperfection before moving forward.
For more information on our comprehensive approach to floor preparation and repair, visit our Timber Flooring Sanding and Polishing Service page. A proper foundation of repairs will ensure your refinished floors not only look beautiful but stand the test of time.
Choosing & Applying the Perfect Varnish Finish
After all that sanding work, it’s time for the exciting part – choosing the finish that will bring your floors back to life! This decision is more important than many homeowners realize. The finish you select determines not just how your floors will look, but how they’ll stand up to daily life and what kind of maintenance they’ll need in the years ahead.
Types of Wood Floor Finishes
When clients ask me about finishes, I always start by understanding their lifestyle. Do they have pets that race across the floors? Young children? Or is this a formal space that sees gentle use? These questions help guide us to the perfect choice.
Oil-Based Polyurethane remains a popular traditional option. It gives wood a warm, amber glow that many homeowners love, especially on darker woods like walnut or cherry. It’s incredibly durable and typically needs just 2-3 coats for excellent protection. The downside? It’s the “tortoise” in the race – very slow to dry, with 24+ hours needed between coats. It also has higher VOCs (those are the chemicals that create that strong smell), and it yellows over time, which can be either charming or problematic depending on your preference.
Water-Based Polyurethane is the modern alternative that’s gaining popularity every year. It dries crystal clear, preserving the natural color of lighter woods like maple or ash. If you’ve got a busy household, you’ll appreciate that it dries in just 2-4 hours between coats. It also has much lower odor – no need to evacuate the house while finishing! The trade-offs? It’s less durable than oil-based (though modern formulations are getting better), requires more coats (usually 3-4), and comes with a higher price tag.
Hard-Wax Oils offer a different approach altogether. These natural-looking finishes bring out the beauty of wood grain in a way that’s truly special. They’re low in VOCs and offer the unique advantage of easy spot repairs – if damage occurs, you can often just reapply to that area without redoing the entire floor. The catch is they need more frequent maintenance and don’t offer the same scratch resistance as polyurethanes.
A client in Medford recently told me, “Francisco, I was so worried about choosing the wrong finish. But you were right about the water-based poly – with three active kids and a dog, I needed that faster drying time, and the floors still look amazing two years later!”
Sheen Options
Beyond the type of finish, you’ll need to decide on a sheen level:
High Gloss creates a dramatic, reflective surface that can make a space feel more formal. It’s beautiful but shows every scratch and speck of dust.
Semi-Gloss offers a good middle ground with some shine while being more forgiving than high gloss.
Satin has become our most requested finish because it provides a subtle luster while hiding minor imperfections and footprints. It’s neat without being flashy.
Matte finishes have a contemporary look with minimal reflection. They’re excellent at concealing scratches and perfect for achieving that modern, European aesthetic.

For more information on durable options, check out our guide on Hard-Wearing Wood Floor Varnish.
| Feature | Oil-Based Polyurethane | Water-Based Polyurethane |
|---|---|---|
| Drying Time | 24+ hours between coats | 2-4 hours between coats |
| Number of Coats | 2-3 coats | 3-4 coats |
| Color | Amber tone (yellows with age) | Clear (minimal color change) |
| Odor | Strong, requires ventilation | Mild |
| VOCs | Higher | Lower |
| Durability | Very high | High |
| Cost | Lower | Higher |
| Best Applications | Traditional homes, darker woods | Modern spaces, lighter woods |
Coats, Drying & Curing Timeline
The floor sanding and varnishing process isn’t complete until the finish has fully cured – and this takes patience! Here’s what to expect:
For Oil-Based Polyurethane, we typically start with a first coat thinned with about 10% mineral spirits. This helps it penetrate deeper into the wood for better adhesion. Then comes the waiting game – 24 to 48 hours before we can lightly sand with 220-grit sandpaper or #000 steel wool. The second coat goes on at full strength, followed by another long waiting period. High-traffic areas benefit from a third coat for maximum protection.
Even after that final coat looks dry, the curing continues. You’ll need to wait at least 72 hours before bringing furniture back in (with felt pads, of course!), and a full 7-14 days before placing area rugs.
With Water-Based Polyurethane, things move faster. After applying the first coat, you’ll only wait 2-4 hours before light sanding and applying the second coat. This process repeats for the third and usually fourth coats. While you can walk on the floor with socks after 24 hours and replace furniture after 48 hours, the finish continues hardening for days. I always recommend waiting a full week before placing rugs.
“I can’t tell you how many beautiful floor sanding and varnishing jobs I’ve seen ruined by impatience,” says our finishing specialist. “A client once dragged a heavy table across a three-day-old water-based finish, leaving permanent scratch marks. The finish felt dry to the touch, but it hadn’t reached full hardness yet.”
A Boston homeowner recently shared: “Waiting those extra days was tough with all our furniture in the garage, but five years later, our floors still look perfect. The patience paid off!”
For more details on our professional varnishing process, visit our Hardwood Floor Varnishing page.
Cleanup, Maintenance & Long-Term Care Tips
When you’ve invested in floor sanding and varnishing, the right aftercare makes all the difference between floors that look gorgeous for years and ones that need refinishing again too soon. Think of your newly refinished floors like a fine car—with proper maintenance, they’ll keep their showroom shine much longer.
Immediate Post-Finishing Care
Those first few days after finishing are critical for your floor’s long-term performance. Your patience now pays dividends later! Even though your floor might feel dry to the touch, the finish is still curing and vulnerable underneath.
Tread lightly for the first 24 hours—literally! Only sock feet should touch your floor during this time. Keep the kids’ toys, the dog’s claws, and definitely any shoes far away from your beautiful new finish. After 48-72 hours, you can carefully (with help!) bring furniture back in, but make sure every piece has felt pads attached to prevent scratches.
“I tell all my clients to wait the full seven days before putting down area rugs,” says Francisco Romero. “I’ve seen too many beautiful refinishing jobs ruined by impatience. One client in Winthrop couldn’t wait to set up her living room again and ended up with a perfect outline of her area rug permanently visible in the finish.”
Regular Maintenance Routine
The secret to floors that stay beautiful isn’t complicated—it’s consistency. Daily dust removal prevents tiny particles from scratching your finish over time. A good microfiber dust mop becomes your floor’s best friend, capturing dust rather than just pushing it around. For deeper cleaning, less is more when it comes to moisture.

Your floor’s worst enemies? Water, harsh chemicals, and abrasive cleaners. Spills happen, but how quickly you respond makes all the difference. Keep a soft cloth handy to immediately blot (never rub!) any liquid that hits your floor. For monthly cleaning, use only products specifically formulated for your finish type—what works for oil-based polyurethane might damage water-based finishes.
Humidity control matters more than most homeowners realize. Wood is naturally hygroscopic—it absorbs and releases moisture based on environmental conditions. Maintaining indoor humidity between 35-55% year-round prevents the expansion and contraction that can damage even the best finish. In our New England climate, this typically means running a humidifier in winter and air conditioning in summer.
Long-Term Maintenance
Floor sanding and varnishing is a significant investment, but you can extend its lifespan dramatically with preventative maintenance. The screen-and-recoat process is your secret weapon—it’s like giving your floor a rejuvenating facial rather than a complete makeover.
Every 3-5 years (depending on foot traffic), having professionals lightly abrade the top layer of finish and apply a fresh coat can add years before a complete refinishing is needed. At Romero Hardwood Floors, we find this service typically costs about one-third of a complete refinishing project while adding years of protection.
“The water droplet test never lies,” Francisco often tells clients. “Place a few drops of water on your floor in high-traffic areas. If they bead up, your finish is still doing its job. If they soak in or create a white spot, it’s time to recoat before damage reaches the wood itself.”
One of our long-term clients in Revere has original oak floors from 1942 that still look spectacular because she follows our maintenance recommendations religiously. “My neighbors have replaced their floors twice in the time I’ve maintained mine,” she told us. “The screen and recoat service every five years has been the best investment in my home’s value.”
For more detailed guidance on maintaining your refinished floors and choosing finishes that match your lifestyle needs, visit our guide on the Best Hardwood Floor Finish for expert advice custom to New England homes.
DIY vs Hiring a Pro: Costs, Time & Risk
Deciding whether to tackle floor sanding and varnishing yourself or hire professionals like us at Romero Hardwood Floors is a significant choice that affects your wallet, schedule, and the final results. After refinishing thousands of floors throughout Massachusetts, I’ve seen both successful DIY projects and, well, some that needed professional rescue missions.
Cost Comparison
The financial difference between DIY and professional services is substantial, but there’s more to consider than just the bottom line.
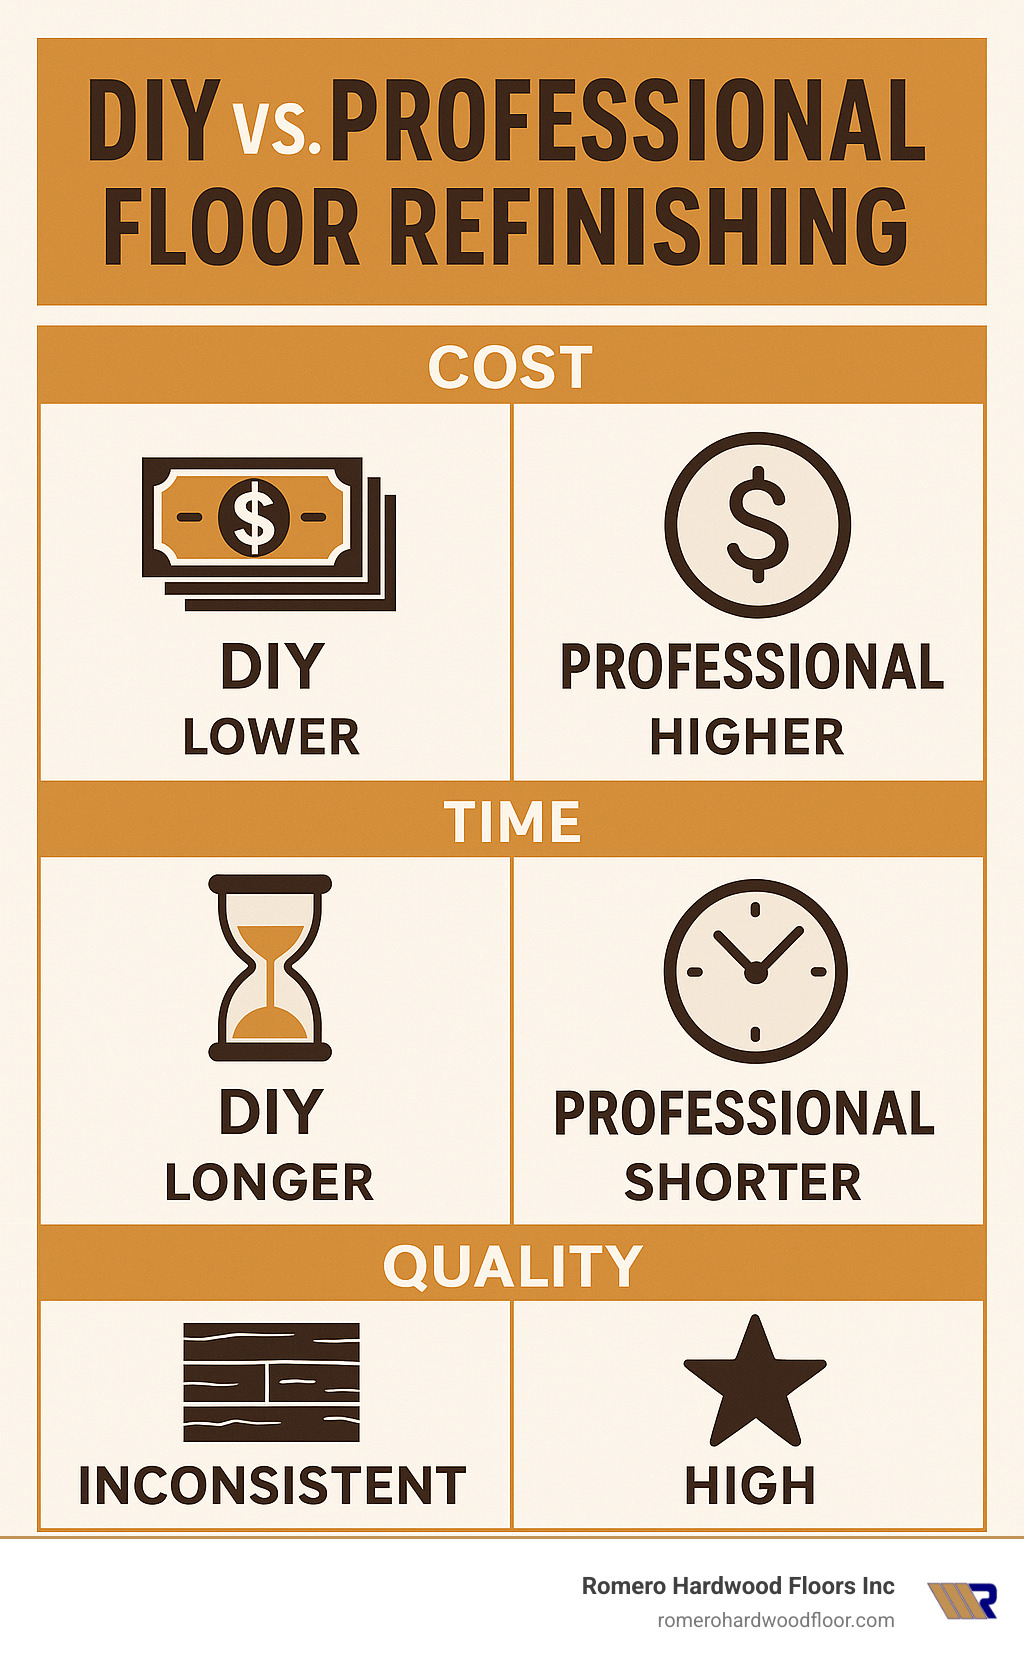
For a typical 500 square foot area, DIY costs usually run between $1.20-$2.30 per square foot. You’ll need to rent a drum sander and edger ($200-400), purchase various grits of sandpaper ($100-200), invest in fillers and repair materials ($50-100), buy polyurethane finish ($150-300), and acquire applicators, cleaning supplies, and safety equipment ($100-150). All told, expect to spend $600-1,150 for a DIY project.
Professional services generally range from $5-$15 per square foot, meaning that same 500 square foot project would cost between $2,500-$7,500. Please note: These are average costs based on internet data and not actual costs for Romero Hardwood Floors. For an accurate quote, please contact us directly.
Time Investment
Time is another crucial factor. DIY refinishing projects typically take 7-12 days from start to finish for first-timers. This includes research and learning (1-2 days), equipment setup (half day), floor preparation (1 day), the actual sanding process (2-3 days for beginners), thorough dust cleanup (1 day), and finishing application with proper drying time (2-4 days).
Professional services compress this timeline significantly. After an initial consultation (about an hour), our experienced team at Romero can complete the entire project in just 3-5 days, including drying time. This means less disruption to your daily life and quicker enjoyment of your beautifully refinished floors.
Quality and Risk Factors
The quality gap between DIY and professional work often comes down to experience and equipment. Floor sanding and varnishing requires skill developed over hundreds of projects.
DIY enthusiasts face several common challenges. The drum sander has a steep learning curve, and a moment’s hesitation can create visible gouges that are difficult to fix. Achieving consistent sanding between the main floor and edges is particularly tricky, often resulting in noticeable “waves” or “dips” along the perimeter. Dust control in DIY projects is typically less effective, leading to dust particles settling in the finish. And speaking of finish, applying polyurethane evenly without bubbles, streaks, or lap marks requires technique and the right environmental conditions.
“I thought I’d save money going the DIY route,” shared a client from Medford who eventually called us. “But after renting equipment for additional days and still getting uneven results, I realized professionals were worth it. Romero completed my floor in three days with far better results than I could have achieved after a week of trying. The peace of mind was worth every penny.”
Professional refinishing brings several advantages. Our team has refined their technique over thousands of projects, eliminating common mistakes. We use commercial-grade equipment with superior dust containment systems that keep your home cleaner. Our experience ensures even, consistent sanding across your entire floor, including those tricky edges and corners. We’ve developed expertise in finish application techniques that result in a smooth, durable surface. Perhaps most importantly, we know how to handle unexpected issues like hidden damage or unusual wood characteristics that often derail DIY projects.
For homeowners who enjoy hands-on projects, DIY refinishing can be rewarding. But for those who value consistent, professional results and less disruption to their lives, professional services offer significant advantages. For more information about our professional approach, visit our Timber Flooring Sanding and Polishing Service page.
Frequently Asked Questions about Floor Sanding and Varnishing
How many times can my hardwood floor be sanded?
The life of your hardwood floors is longer than you might think! Solid hardwood floors typically can be sanded and refinished 4-6 times throughout their lifespan. This number isn’t set in stone, though, as several factors come into play:
The original thickness of your flooring makes a big difference. Standard 3/4″ solid hardwood gives you more opportunities for refinishing than thinner options. How aggressive previous sandings were also matters—gentler sanding preserves more wood for future refinishing. And don’t forget that wood species plays a role too, with softer woods like pine potentially wearing faster than harder options like oak.
Each time we sand a floor, we typically remove about 1/32″ of wood. The key is maintaining at least 1/8″ above the tongue and groove to preserve structural integrity.
I recently worked on a gorgeous 120-year-old floor in a historic Revere home that had been sanded only twice in its entire lifetime. Because the previous owners and refinishers had been careful, we were able to restore those floors beautifully—and they still have plenty of wear layer remaining for future generations to enjoy.
What if my finish looks uneven or cloudy?
Nothing’s more disappointing than completing your floor sanding and varnishing project only to find an uneven or cloudy finish. This frustrating issue usually stems from one of several common causes:
Inadequate surface preparation is often the culprit. Even tiny dust particles or debris left on the floor before finishing can ruin the appearance. If you catch this while the finish is still wet, you might be able to remove and reapply it. For dried finish, light sanding and recoating may be your best option.
Application issues can also create problems. Applying too thick a coat or working in poor lighting makes it difficult to spot inconsistencies. The solution is to apply thin, even coats using proper lighting that helps you see problems before they dry.
Temperature and humidity matter more than most people realize. Ideally, maintain room temperature between 65-80°F and humidity between 35-55% during application. Outside these ranges, your finish might not cure properly.
Sometimes the product itself is the issue. Finish that was improperly mixed or has expired can cause cloudy results. Always use fresh product and remember to stir (never shake) polyurethane to avoid creating bubbles.
If you’re facing finish problems, I’d recommend consulting a professional before attempting fixes. I’ve seen well-intentioned DIY fixes that unfortunately made the situation worse and more expensive to correct.
When can pets walk on the newly finished floor?
This is probably the most common question I hear from pet owners, and it’s an important one! Your furry family members can unintentionally damage newly finished floors in several ways if they’re allowed on them too soon.
Sharp claws can easily scratch uncured finish, leaving permanent marks. Pet accidents are particularly problematic on fresh finishes—urine can cause permanent staining and discoloration in partially cured finishes. And believe it or not, pet fur can actually become permanently embedded in tacky finish!
For water-based finishes, keep Fido and Fluffy completely off the floors for at least 48 hours. Oil-based finishes require even more patience—72 hours minimum, but longer is better. The ideal solution, when possible, is to board your pets during refinishing. This eliminates stress for both you and your pets.
A client in Swampscott with three large dogs shared a brilliant approach. She scheduled her floor sanding and varnishing project during a planned family vacation. “Having the floors done while we were away with the dogs gave the finish plenty of time to cure,” she told me. “When we returned after a week, the floors were perfectly hardened and have held up beautifully to our active pets.”
When you do reintroduce pets to your newly finished floors, keep those nails trimmed and supervise them initially as they get used to the new surface and scent.
For more information about hardwood floor repairs and maintenance, visit our More info about hardwood floor repairs page.
Conclusion
Floor sanding and varnishing transforms tired, worn hardwood floors into stunning focal points that improve your entire home. After guiding countless homeowners through this rejuvenating process, I’ve seen how proper refinishing not only restores natural beauty but creates a foundation for your home that can last for generations.
At Romero Hardwood Floors Inc., our 15+ years of experience throughout Revere and surrounding communities has taught us that the best results come from meticulous attention to detail and genuine care for each client’s home. When we finish a project and see the homeowner’s face light up at their transformed floors, it reminds us why we’re passionate about this craft.
The journey doesn’t end when we pack up our sanders and finish the final coat. Your newly refinished floors need ongoing care to maintain their beauty. Think of your floors like a classic car – regular maintenance keeps them looking showroom-new for years to come. Keep up with regular dusting and proper cleaning, schedule a screen-and-recoat every 3-5 years, and consider full professional refinishing when the water droplet test shows it’s time (typically every 7-10 years).
I still remember a client in Danvers who called us back five years after we refinished her floors. “Francisco,” she said, “my friends still ask if I’ve just had my floors done. That’s how beautiful they’ve stayed with your maintenance plan.” Stories like these make our work meaningful.
Your hardwood floors aren’t just a surface to walk on – they’re the literal foundation of your home’s character and a significant investment in your property value. With proper care and periodic refinishing, they’ll continue telling your home’s story for decades.
If you’re considering bringing your hardwood floors back to life with floor sanding and varnishing, we’d love to help. Our team serves communities throughout the greater Boston area, including Beverly, Chelsea, Danvers, East Boston, Gloucester, Lynnfield, Malden, and beyond. We offer free consultations and would be delighted to help you uncover the hidden potential in your floors.
For more information about hardwood floor restoration or to schedule an estimate, please visit our website or give us a call. Your beautiful floors are waiting to shine again!
