Engineered Hardwood Over Concrete: 7 Powerful Reasons for Success 2025
Transform Your Concrete Slab with Engineered Hardwood Flooring
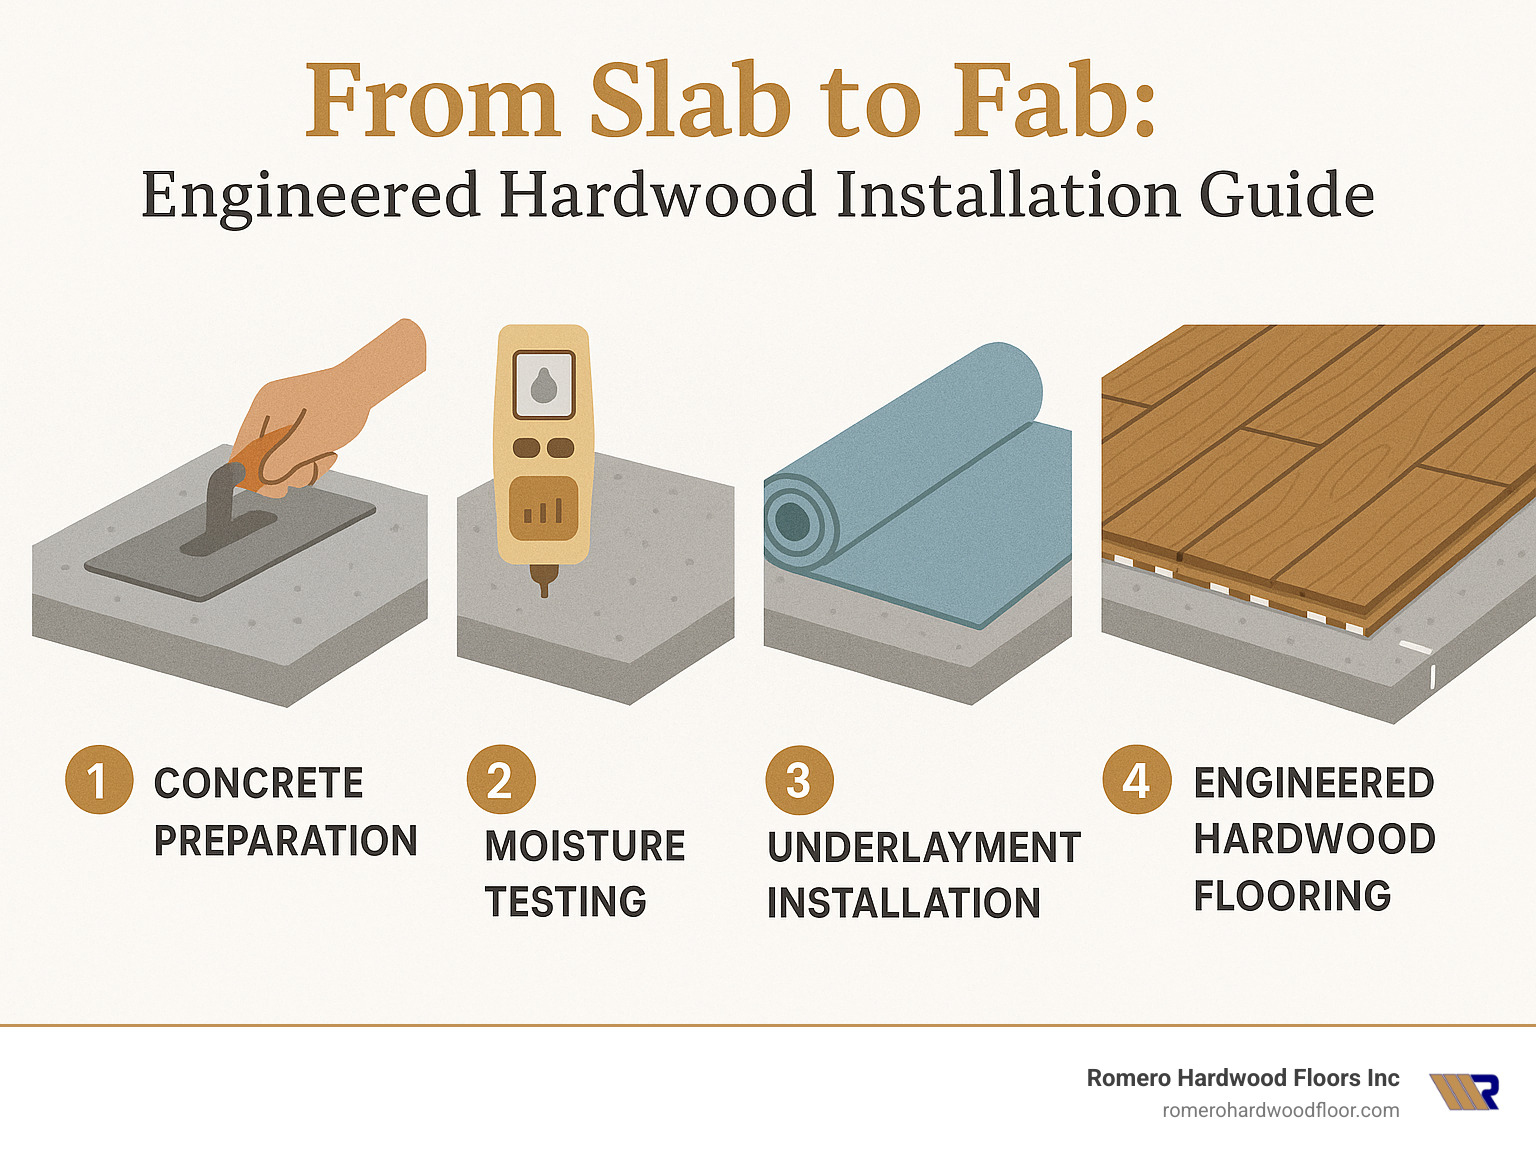
Engineered hardwood over concrete is one of the most practical and attractive flooring solutions for homes with concrete subfloors. Here’s what you need to know:
| Installation Method | Suitability | Moisture Concerns | Pros | Cons |
|---|---|---|---|---|
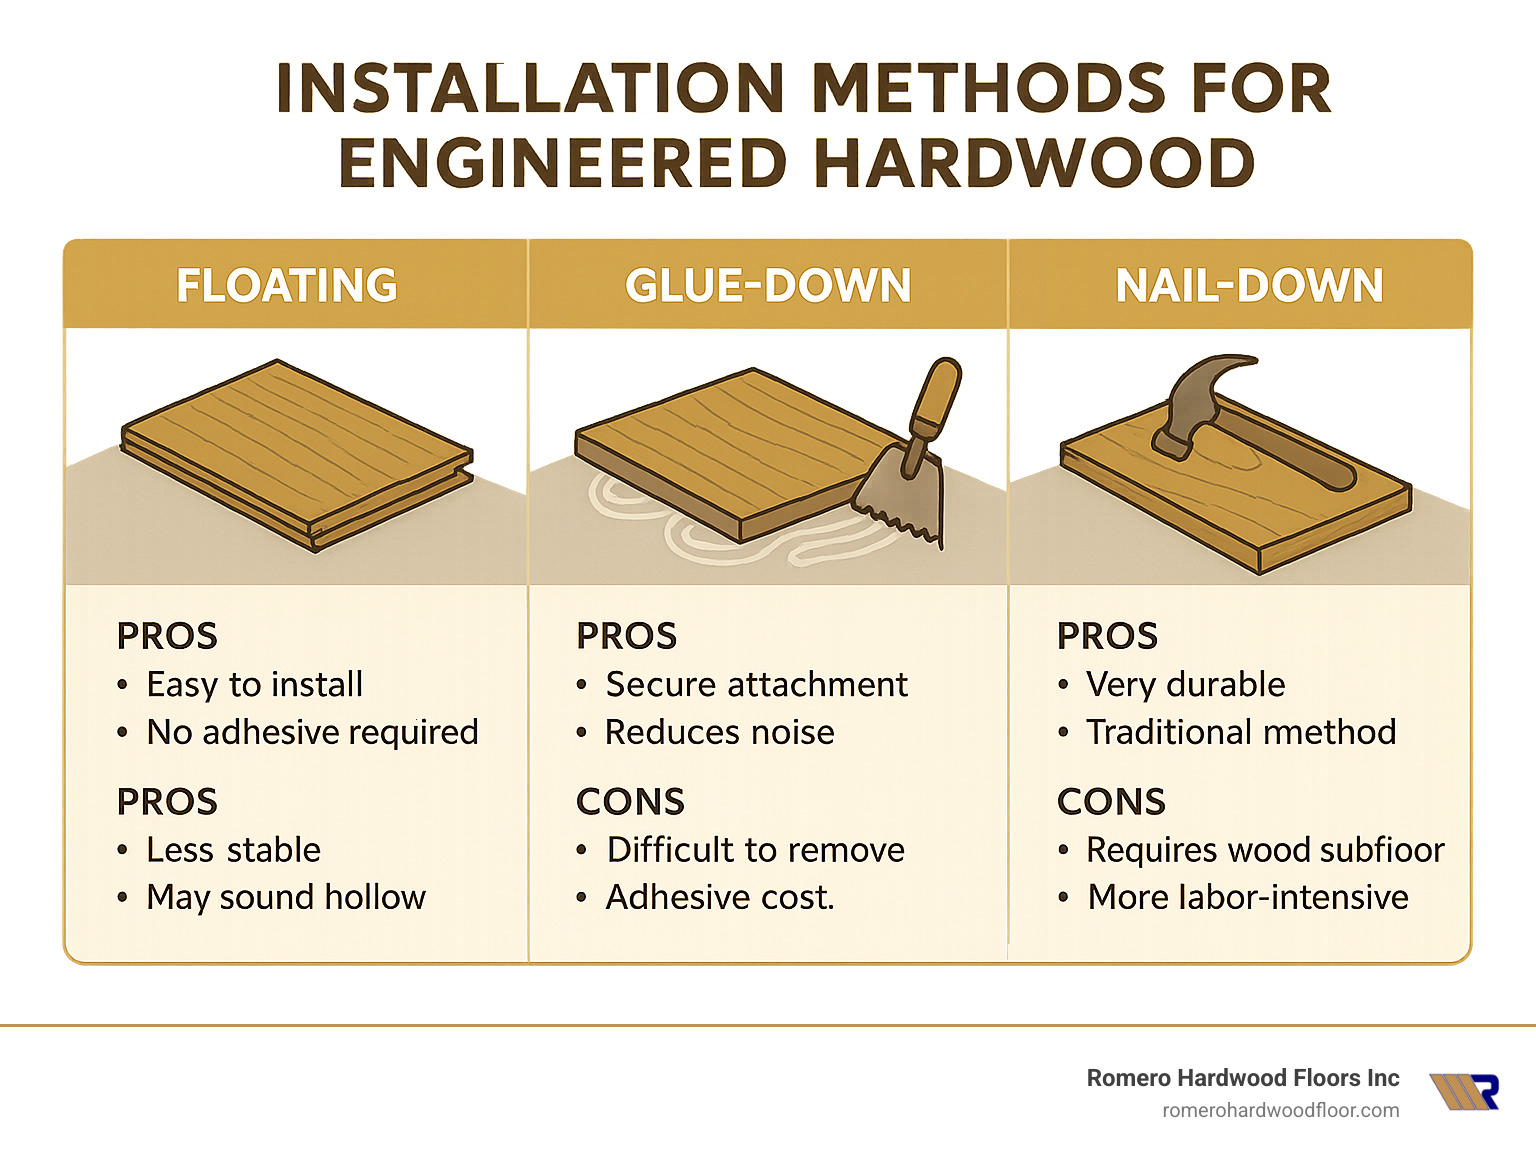
| Floating | Excellent | Requires moisture barrier | DIY-friendly, no adhesive | May sound hollow |
| Glue-Down | Excellent | Use moisture-blocking adhesive | Solid feel, best stability | More complex installation |
| Nail-Down | Not recommended directly | Requires plywood subfloor | Not advised for direct concrete | Adds height to floor |
There’s no better way to transform a cold, unwelcoming concrete floor than by installing cozy and warm engineered hardwood. Unlike solid hardwood, engineered products are specifically designed to perform over concrete slabs, even in below-grade spaces like basements. Their multi-layered construction provides exceptional dimensional stability, making them resistant to the moisture and humidity issues that would destroy traditional hardwood.
Installing engineered hardwood over concrete requires proper preparation and technique, but the results are worth the effort. Whether you’re a DIY enthusiast or considering professional installation, this guide will walk you through every step of the process to ensure your new floors look stunning and perform beautifully for years to come.
My name is Francisco Romero, owner of Romero Hardwood Floors Inc., and with over 15 years of experience installing engineered hardwood over concrete slabs throughout Massachusetts, I’ve refined the techniques that ensure a successful installation even in our challenging Northeast climate.
Simple engineered hardwood over concrete word guide:
– gluing solid hardwood floors to concrete
– heated hardwood floors on concrete
– floating wood floor over concrete
Engineered Hardwood 101 – Why It Beats Solid Wood on Concrete
“Engineered wood is less sensitive to humidity changes and can be installed at any grade level,” notes the National Wood Flooring Association. This critical difference is why engineered hardwood over concrete has become the go-to solution for homeowners with slab foundations.
But what exactly makes engineered hardwood so special? Let’s break it down.
Anatomy & Benefits
Think of engineered hardwood as nature’s beauty with a technical upgrade. Unlike solid hardwood, engineered planks feature a sandwich-like construction that gives them superpowers on concrete.
The top layer is genuine hardwood – the same beautiful oak, maple, or exotic wood you’d find in traditional flooring. This veneer typically ranges from 1/16″ to 1/8″ thick, giving you the authentic look and feel of real wood. Beneath this pretty face lies the secret to its success: multiple layers of plywood or high-density fiberboard arranged in opposing directions. This cross-grain construction fights against the natural tendency of wood to expand and contract with moisture changes. A stabilizing backing layer completes the package.
“We’ve installed engineered hardwood in hundreds of homes throughout Revere, Salem, and surrounding areas,” says Francisco Romero. “The difference in performance over concrete is night and day compared to solid wood.”
Most engineered products measure between 3/8″ and just over 1/2″ thick, making them perfect for situations where floor height matters – like meeting existing tile or avoiding door trimming. And you won’t sacrifice variety for performance – engineered options come in virtually every wood species from classic oak to exotic Brazilian cherry.
Solid vs. Engineered Performance
When it comes to concrete slabs, the battle between solid and engineered isn’t even close:
| Feature | Solid Hardwood | Engineered Hardwood |
|---|---|---|
| Moisture Resistance | Poor – expands/contracts significantly | Excellent – minimal movement |
| Below-Grade Installation | Not recommended | Suitable with proper moisture control |
| Radiant Heat Compatibility | Limited | Excellent (most products) |
| Refinishing Potential | Multiple times (3-7) | Limited (1-3 times depending on wear layer) |
| Installation Over Concrete | Requires sleeper system | Direct glue-down or floating |
| Typical Lifespan | 30-100+ years | 20-80 years |
Real-world experience confirms what the specs suggest. “One Swampscott client called us after their solid hardwood floor buckled just six months after another contractor installed it directly on concrete,” recalls Romero. “We replaced it with engineered hardwood using proper moisture mitigation, and five years later, it still looks perfect.”
The cupping risk with solid hardwood on concrete is substantial – those beautiful planks can warp dramatically when they encounter even small amounts of moisture. Engineered products, with their cross-layered construction, stay remarkably stable under the same conditions.
While solid hardwood can typically be refinished more times over its lifespan, engineered hardwood over concrete provides significantly better stability where moisture is a concern. For concrete slabs, especially at or below grade level, engineered hardwood isn’t just a good option – it’s the smart, reliable choice that will save you headaches and money in the long run.
Want to dive deeper into the differences? Check out our detailed comparison of Engineered vs Solid Hardwood.
Moisture & Slab Preparation Essentials
“Preparation is more than half the job when installing over concrete,” says Francisco Romero. This couldn’t be more true. The success of your engineered hardwood over concrete installation depends largely on proper slab preparation and moisture control.
Step-by-Step Slab Prep Checklist
Before you even think about laying down that first beautiful plank, your concrete needs to be in perfect condition. I’ve seen too many gorgeous floors fail simply because someone rushed through prep work.
Start by thoroughly cleaning the concrete surface. This means removing all traces of paint, old adhesives, sealers, and debris. Those stubborn spots? A good scraper and elbow grease will take care of them. Finish with a thorough vacuuming to remove all dust particles.
Next comes the flatness check. Grab a 10-foot straightedge and place it across your floor in multiple directions. You’re looking for any gaps larger than 1/8″ between the straightedge and the concrete. This industry standard ensures your floor won’t bounce, squeak, or wear unevenly later.
When you find high spots (and you probably will), it’s time to grind them down with a concrete grinder. For those low areas, apply a quality cementitious patching compound. If your floor has significant unevenness throughout, you might need to apply a self-leveling underlayment – it’s worth the extra effort, I promise.
Don’t forget to repair any cracks wider than 1/8″. These seemingly small imperfections can lead to big problems if left untreated. A good concrete patch will prevent future movement that could damage your beautiful new floor.
“I once had a client in Medford who wanted to skip the leveling process to save money,” Romero shares. “I showed him how uneven floors would cause premature wear, noise issues, and even plank separation. The extra day of prep work saved thousands in potential repairs.”
For homes with radiant heating, remember to turn off the system 24 hours before installation begins, keep it off during installation, and wait another 24 hours after completion before turning it back on. This prevents substrate movement and moisture issues during this critical time.
Moisture Mitigation Options
Here in New England, especially in coastal towns like Revere and Winthrop, moisture is our constant companion – and your floor’s worst enemy. Testing and controlling moisture is non-negotiable.
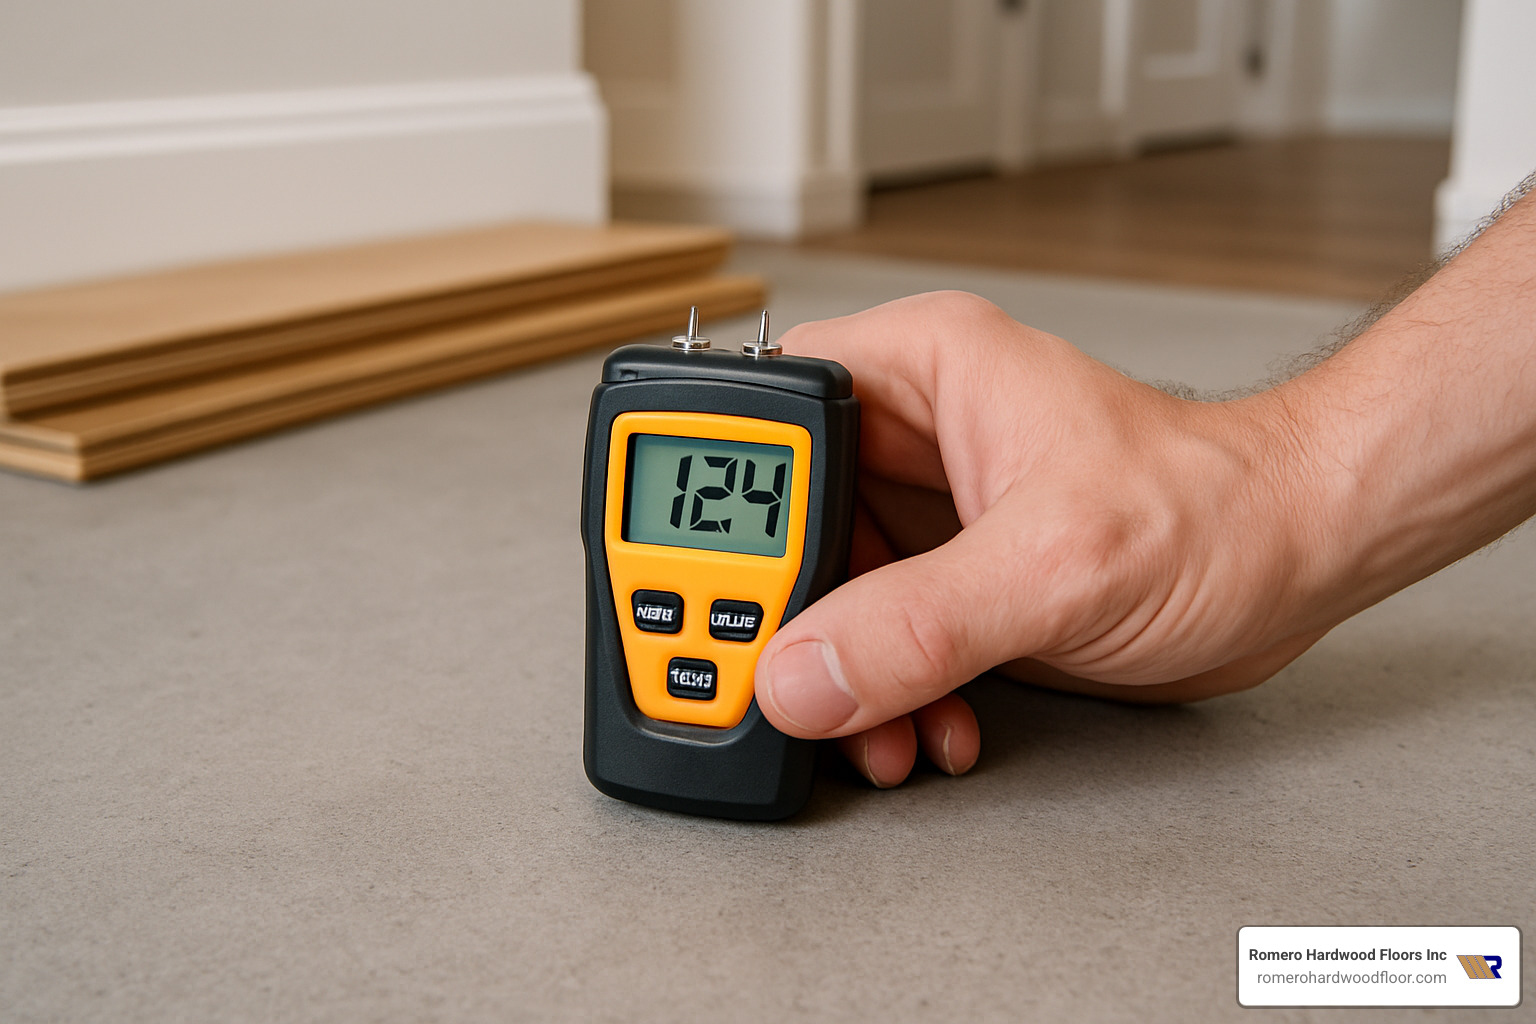
The gold standard for moisture testing is the Relative Humidity (RH) Test (ASTM F2170). This involves drilling small holes in your concrete and inserting probes to measure the internal moisture content. Most manufacturers want to see RH levels below 75-85% before installation.
Another reliable option is the Calcium Chloride Test, which measures the moisture vapor emission rate (MVER) in pounds per 1,000 square feet per 24 hours. Your readings should typically fall below 3-5 lbs for safe installation.
For quick checks, a moisture meter can give you surface readings, though these aren’t as comprehensive as the methods above.
When your tests reveal moisture levels above manufacturer specifications (which happens quite often in our region), you’ll need to implement a moisture mitigation system:
Two-part epoxy systems create an impermeable barrier but require significant preparation and skill to apply properly. For serious moisture issues, these heavy-duty solutions are often worth the extra effort.
Urethane membranes offer excellent moisture protection while being somewhat easier to apply than epoxy systems. They’re a popular choice for residential projects.
Many professionals, myself included, often prefer combination adhesive products like STAUF 960 that serve as both glue and moisture barrier in a single application. These products simplify the process while providing excellent protection.
“In Massachusetts, especially in coastal areas like Revere and Winthrop, ground moisture is a constant challenge,” notes Romero. “We often use combination adhesives with moisture-blocking properties to ensure long-term performance.”
The permeability rating of your moisture treatment must be lower than that of the flooring to prevent moisture from becoming trapped. Always follow the specific recommendations from your product manufacturers – they’ve tested these systems extensively and know what works.
Installing Engineered Hardwood on Concrete
If you’re considering using a moisture mitigation system, the initial investment might seem steep, but I’ve seen too many beautiful floors ruined by skipping this step. Trust me, proper moisture control is absolutely worth it.
Installing Engineered Hardwood Over Concrete – Method by Method
Once your concrete slab is properly prepared, it’s time to bring your vision to life by installing your beautiful new engineered hardwood. I’ve installed hundreds of these floors throughout Massachusetts, and I can tell you that choosing the right method makes all the difference in how your floor performs over time.
For a successful installation, you’ll need some essential tools regardless of which method you choose: a tape measure, pencil, saw for cutting planks, spacers for maintaining expansion gaps, and a tapping block. Having a rubber mallet, pull bar, and 100-pound roller on hand will also make your job much easier. Those expansion gaps aren’t optional—they’re absolutely necessary to allow your floor to naturally expand and contract with seasonal changes.
Floating Installation: Engineered Hardwood Over Concrete in a Snap
The floating method is my top recommendation for homeowners brave enough to tackle a DIY project. With click-lock planks that connect to each other rather than to the subfloor, this approach is forgiving for beginners while still delivering beautiful results.
“My first DIY floating floor was nerve-wracking,” one Revere homeowner told me, “but once I got the hang of clicking those boards together, it was actually kind of fun—like a giant puzzle!”
Start by laying down a quality foam underlayment with an integrated vapor barrier (or install a separate 6-mil polyethylene sheet first if your underlayment doesn’t include one). This critical layer not only blocks moisture but also helps reduce noise and provides a bit of cushioning underfoot.
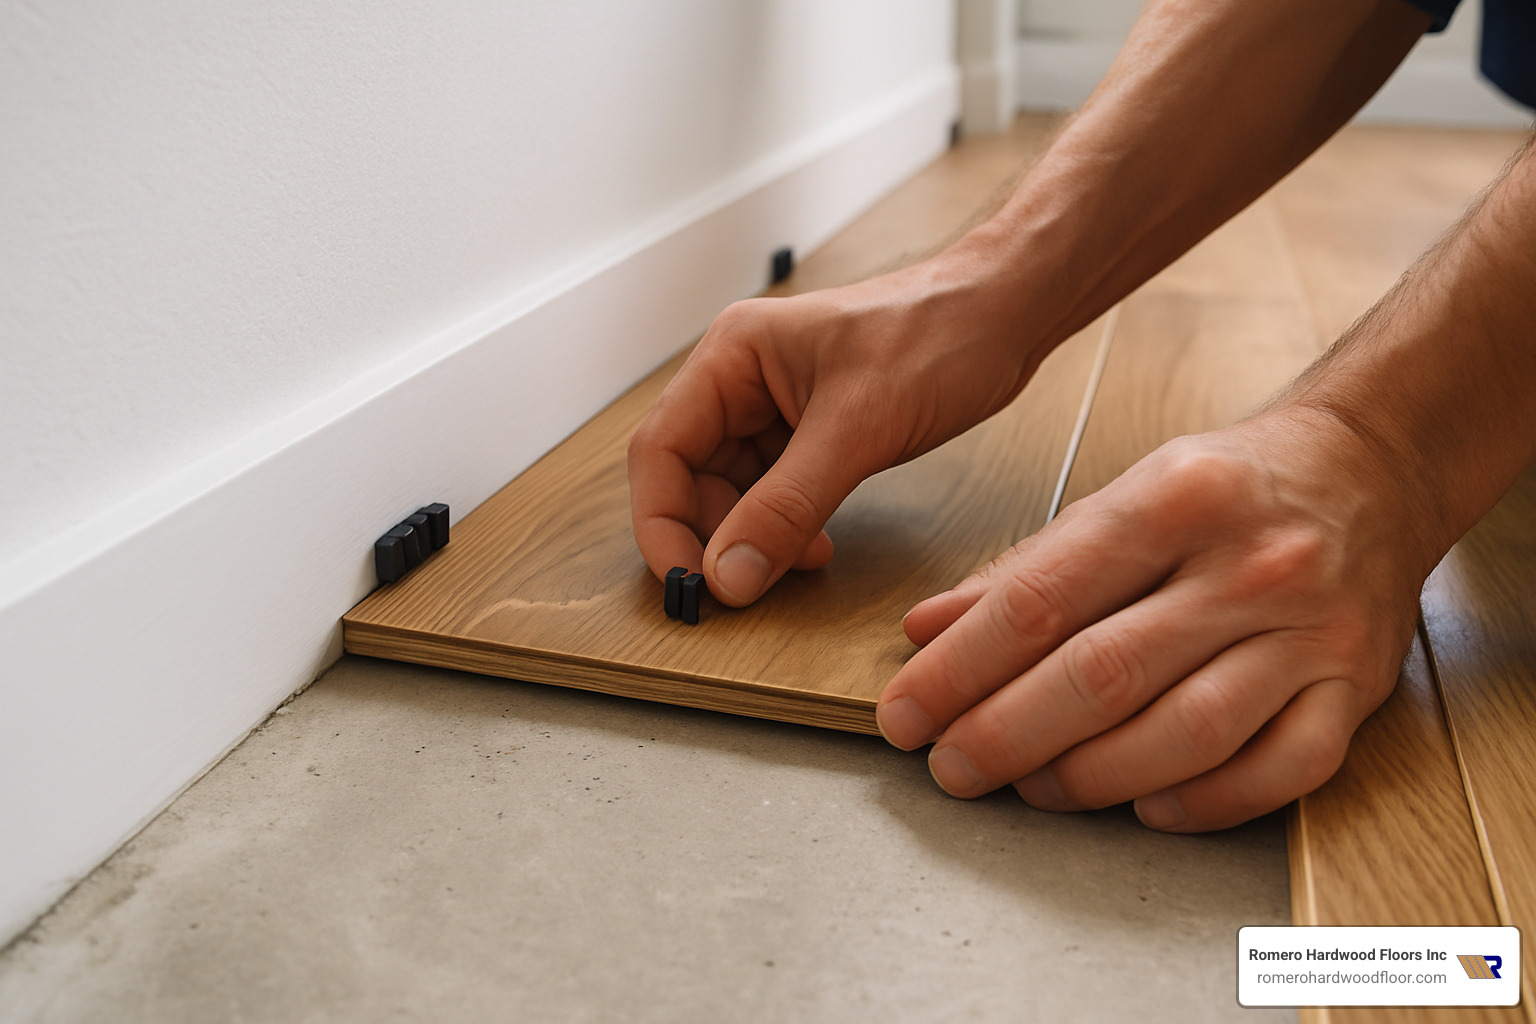
Begin installation along your longest, straightest wall, using spacers to maintain that crucial 1/4″ to 1/2″ expansion gap. Connect each plank by inserting the end at a slight angle, then laying it flat. A gentle tap with your mallet and tapping block ensures tight connections. Remember to stagger your joints by at least 6″ between rows for the strongest, most attractive installation.
While floating floors are wonderfully DIY-friendly, they can sometimes sound a bit hollow if your subfloor isn’t perfectly flat. That’s why we often recommend professional installation for the most solid-feeling results with engineered hardwood over concrete.
Floating Wood Floor Over Concrete
Glue-Down Mastery: Engineered Hardwood Over Concrete That Lasts
For the most solid feel and best stability, nothing beats a glue-down installation. This is our preferred method at Romero Hardwood Floors for most concrete slab projects, especially in high-traffic areas.
The secret to a successful glue-down installation lies in your adhesive selection and application technique. Use a high-quality urethane adhesive specifically designed for wood flooring—many modern formulations include moisture-barrier properties that can save you an entire installation step. Apply it with the manufacturer-recommended notched trowel, working at a 45° angle to ensure proper coverage.
Start with a perfectly straight chalk line as your guide, then place your first row of planks with the tongue facing toward the center of the room. Work in manageable sections—about enough space for 3-4 rows at a time—to prevent the adhesive from drying before you can place your boards.
“I always check for proper adhesive transfer,” shares Francisco from our installation team. “Lift up an occasional board right after placing it—you should see at least 90% adhesive coverage on the back. That’s how you know you’re doing it right.”
Once you’ve installed a large section, roll it with a 100-150 pound roller to ensure perfect adhesive transfer and bonding. Then give your new floor time to cure—keep foot traffic off for at least 8-10 hours, and heavy furniture should wait a full 24 hours.
A properly glued-down floor feels incredibly solid underfoot and will maintain its stability for decades, making it worth the extra effort and skill required. For the best products, check out options like Bostik Pro-Cure for professional-grade results.
Engineered Wood Floor Adhesive
Nail-Down/Hybrid on Sleeper Systems
While not ideal for direct concrete installation, there are times when a nail-down approach makes sense—particularly when working with an existing sleeper system or when you need to match the height of adjacent flooring.
This method involves creating a wood subfloor system over your concrete slab. Start with a reliable 6-mil polyethylene moisture barrier, then install pressure-treated 2×4 sleepers (or specialized systems designed for this purpose) laid flat and spaced 16″ on center. Top this framework with at least 5/8″ plywood to create a suitable nailing surface for your engineered hardwood.
The biggest drawback? Height. This approach adds about 1.5″ or more to your floor level, which can create tricky transitions to other rooms and may require door adjustments. In basements with already-low ceilings, those precious inches might be too valuable to sacrifice.
“We installed a sleeper system for a client in Salem who needed to match their existing hallway height,” I recall. “It was more work than a direct glue-down, but sometimes that perfect transition between rooms is worth the extra effort.”
When using this method, be careful with fastener selection—you’ll need staples or cleats that won’t penetrate through the plywood and damage your moisture barrier. The right fastener length is crucial for long-term performance.
For most engineered hardwood over concrete installations, however, we typically recommend either floating or glue-down methods as more practical, cost-effective solutions.
Acclimation, Expansion & Finishing Touches
Patience truly pays off when installing engineered hardwood over concrete. Taking the time for proper acclimation and expansion planning might feel tedious, but skipping these steps is like asking for trouble down the road.
Your beautiful new floors need time to adjust to their forever home. Most manufacturers recommend a 2-5 day acclimation period, where you’ll store the boxes flat in the room where they’ll be installed. Keep the room at normal living conditions—temperatures between 60-80°F and humidity between 30-50%—and open the box ends to let air circulate around the planks.
“I can’t stress acclimation enough,” says Francisco Romero. “We once rushed an installation in Somerville before the homeowners moved in. By cutting corners on acclimation time, some boards developed noticeable gaps during the first winter. That’s a mistake we only needed to make once.”
Wood, even engineered products, naturally expands and contracts with environmental changes. That’s why maintaining a ¼” to ½” expansion gap around the entire perimeter of your floor is absolutely essential. Those little plastic spacers aren’t just installation aids—they’re protecting your investment by giving your floor room to breathe. For larger rooms exceeding 20′ x 20′, you might need additional expansion space or transition strips to prevent buckling.
Once your floor is installed, it’s time for those finishing touches that transform a good installation into a great one. Reinstall baseboards to cover those expansion gaps, or add quarter-round molding if your baseboards stayed in place. Proper transition strips between your hardwood and other flooring materials not only look professional but prevent edge damage and tripping hazards.
“A Peabody client of ours had radiant heat under their concrete slab,” Romero shares with a smile. “We selected engineered oak specifically rated for radiant heat applications and followed the acclimation and heat-up protocols to the letter. Years later, they still call to tell us how much they love walking barefoot on their warm, beautiful floors, even in January.”
If you do have radiant heat, remember to restart it gradually over several days after installation. And regardless of your installation method, be gentle with your new floors initially. For glue-down installations, restrict foot traffic for at least 24 hours while the adhesive cures. With floating floors, you can walk on them right away, but always lift furniture rather than dragging it across your beautiful new surface.
These seemingly small details—proper acclimation, consistent expansion gaps, and thoughtful finishing touches—are what separate a professional installation from an amateur one. They’re the difference between floors that last for decades and those that develop problems within months.
Heated Hardwood Floors on Concrete
Costs, Comfort & Long-Term Care
When considering engineered hardwood over concrete, homeowners often wonder about the financial investment, comfort benefits, and how to keep their floors looking beautiful for years to come.
Cost Considerations:
The price of changing your concrete floor with engineered hardwood varies widely depending on several factors. Material costs typically range between $3 and $13 per square foot, with premium species and thicker wear layers commanding higher prices. Professional installation adds another $3 to $10 per square foot to your project, with glue-down methods generally costing more than floating installations due to adhesive expenses and increased labor.
If your concrete tests high for moisture, plan for an additional $2 to $6 per square foot for proper moisture mitigation systems. High-end projects with premium materials, complex layouts, or extensive prep work can easily cost three times these average figures.
Note: These are average costs based on internet data and not actual costs for Romero Hardwood Floors. Actual costs may vary significantly depending on specific project requirements, location, and current market conditions.
“I always tell my clients to budget properly for preparation work,” Francisco shares with a smile. “I’ve seen too many beautiful floors fail prematurely because someone tried to save a few dollars on moisture testing or proper subfloor prep. It’s like building a house on sand – you’re just asking for trouble down the road.”
Comfort Benefits:
The change that happens when you replace cold concrete with warm, inviting wood is truly remarkable. Engineered hardwood provides natural thermal insulation that concrete simply cannot match. On chilly Massachusetts mornings, your feet will thank you for the upgrade!
Beyond temperature, engineered wood offers a subtle resilience underfoot that makes standing more comfortable compared to tile or polished concrete. This slight give reduces fatigue during long periods of standing – something many homeowners notice in kitchens and other high-use areas.
“One of my favorite client reactions was from a family in Beverly,” Francisco recalls. “They had lived with ceramic tile in their basement for years and couldn’t believe the difference when we installed engineered oak. Not only was it warmer underfoot, but the whole space felt cozier and more inviting. The acoustics improved dramatically too – no more echoey conversations or amplified footsteps.”
Long-Term Care:
With proper maintenance, your engineered hardwood floors can remain beautiful for decades. Start with regular sweeping or vacuuming (without a beater bar) to prevent grit from scratching the surface. For deeper cleaning, use only manufacturer-recommended products and a slightly damp mop – never wet mop or steam clean engineered wood.
Maintaining proper indoor humidity between 30-50% is crucial for wood floor longevity. During Massachusetts winters, this often means running a humidifier to prevent excessive drying and potential gapping between boards.
Protect your investment by using felt pads under furniture legs and lifting (never dragging) heavy items. Area rugs in high-traffic zones can prevent premature wear, though be sure to use rug pads without rubber backing that could trap moisture.
Unlike solid hardwood that can be refinished numerous times, engineered products typically support only one or two sandings during their lifetime, depending on the wear layer thickness. Products with 3mm or thicker top layers offer more refinishing potential than thinner options.
“Most homeowners don’t realize how important humidity control is for their floors,” notes Francisco. “We recommend inexpensive humidity monitors in several rooms to help maintain ideal conditions. And for busy families, scheduling a professional deep cleaning once a year can remove embedded dirt that regular maintenance might miss, extending the life of your finish significantly.”
Always follow manufacturer maintenance guidelines to maintain warranty coverage. Most warranties require specific cleaning products and prohibit certain actions that could void your protection.
Engineered Hardwood Benefits
Latest research on floor comfort
Frequently Asked Questions about Engineered Hardwood Over Concrete
How do I test and control moisture in my concrete slab?
Moisture testing isn’t just recommended before installing engineered hardwood over concrete – it’s absolutely essential. Without proper testing, you’re basically gambling with your new floor’s future.
“I remember a client in Winthrop who skipped moisture testing because their basement ‘felt dry,'” Francisco shares with a knowing smile. “Six months later, we were replacing buckled flooring that had been damaged by invisible moisture coming through the slab.”
The gold standard for testing is the Relative Humidity (RH) test (ASTM F2170), which uses probes inserted into drilled holes to measure moisture inside the concrete rather than just the surface. This gives you the true picture of what’s happening in your slab.
For DIYers, you can purchase test kits online or rent moisture meters from home improvement stores. However, professional installers have specialized equipment that provides more accurate readings. The safe zone for most engineered products is below 75-85% RH, though always check your specific manufacturer’s recommendations.
If your readings exceed these limits, don’t panic! There are several effective moisture mitigation options:
– Two-part epoxy systems create an impermeable barrier (best for severe moisture issues)
– Urethane membranes offer excellent protection with easier application
– Combination adhesives that both secure the floor and block moisture in one step
The right solution depends on your specific moisture readings and budget. Whatever you do, don’t skip this critical step – moisture problems are much easier to prevent than to fix.
Do I really need to acclimate engineered planks if they’re factory-sealed?
“Even the most stable engineered hardwood needs to get comfortable in its new home before installation,” Francisco explains with a chuckle. “Think of it like introducing a new pet to the family – they need time to adjust!”
Yes, absolutely acclimate your engineered hardwood, even high-quality factory-sealed products. Wood is naturally hygroscopic, meaning it absorbs and releases moisture based on the surrounding environment. While engineered products are more stable than solid hardwood, they still need time to adjust to your home’s specific conditions.
Proper acclimation isn’t complicated, but it is crucial:
1. Store boxes flat (never on edge) in the actual room where they’ll be installed
2. Open box ends to allow air circulation without unpacking completely
3. Maintain normal living conditions (65-75°F with 30-50% humidity)
4. Allow 2-5 days for the wood to reach equilibrium
“One of our Salem clients was in a rush to complete their renovation before a holiday party,” recalls Francisco. “They convinced another contractor to skip acclimation, and by New Year’s, they were already seeing gaps between some boards. Patience pays off with wood flooring.”
Can I install over a slab with radiant heat already running?
No – and this is one rule you don’t want to break. Your radiant heating system should be completely turned off for at least 24 hours before installation begins.
“Radiant heat changes everything about your concrete slab,” Francisco explains. “Temperature, moisture movement, expansion characteristics – installing over an active system is asking for trouble.”
Follow this simple protocol for successful installation with radiant heat:
– Turn off the system completely 24 hours before installation
– Keep it off during the entire installation process
– After completion, wait at least 24 hours before gradually increasing temperature (no more than 5°F per day)
– Never exceed 85°F surface temperature, even in winter
It’s also crucial to verify that your specific engineered product is rated for radiant heat systems. While most engineered hardwood works beautifully with radiant heat, some products have limitations or special requirements. Check your warranty information, as using non-approved flooring over radiant heat often voids manufacturer guarantees.
“A Medford family with radiant heat followed our acclimation and temperature protocols perfectly,” shares Francisco with pride. “Five years later, their floors still look brand new, even after Massachusetts winters that had them running that heat constantly!”
Conclusion
Installing engineered hardwood over concrete transforms cold, utilitarian spaces into warm, inviting environments that instantly lift your home’s value and comfort. I’ve seen countless basements, ground floors, and living spaces completely reimagined once those beautiful wood planks replace the stark concrete beneath.
Remember the “Three Negative R’s” that I always caution my clients about: Repair, Revise, and Redo. “Investing time in proper planning and preparation prevents these costly outcomes,” I often tell homeowners. “When done correctly, engineered hardwood over concrete is one of the most durable and beautiful flooring solutions available.”
The journey we’ve covered together – from understanding why engineered wood outperforms solid hardwood on concrete, to testing for moisture, preparing your slab, and choosing the right installation method – creates the foundation for floors that will serve your home beautifully for decades.
I’ll never forget a Salem client who hesitated about the cost of proper moisture mitigation. After seeing samples of failed floors in our showroom (complete with cupping, buckling and mold), they understood the value of doing things right the first time. Three years later, they called to thank us for insisting on proper preparation – while their neighbor’s DIY floor was already failing.
At Romero Hardwood Floors Inc., we’ve been installing engineered hardwood over concrete throughout Revere, Beverly, Salem, and surrounding Massachusetts communities since 2006. Our experienced team understands the unique challenges of New England’s climate and how to ensure your floors perform beautifully year-round, through humid summers and dry winters alike.
The change is always worth it. Cold, echoing concrete becomes warm, inviting wood. Unfinished spaces become favorite gathering spots. Your home gains not just beauty, but value and comfort that your family will appreciate every day.
Whether you’re considering a DIY project or professional installation, I hope this guide has provided valuable insights into creating stunning, long-lasting engineered hardwood floors over your concrete slab. Preparation is key, moisture control is non-negotiable, and proper installation techniques will determine how your floors look and perform for years to come.
Ready to transform your concrete slab into a beautiful hardwood floor? Contact Romero Hardwood Floors Inc. today for a free consultation and estimate. Our team serves communities throughout Massachusetts, including Revere, Salem, Beverly, Peabody, and beyond.
More info about professional installation
