Can You Install Hardwood Floors Over Tile? 7 Powerful Benefits
Transform Your Tile Without the Demolition Mess
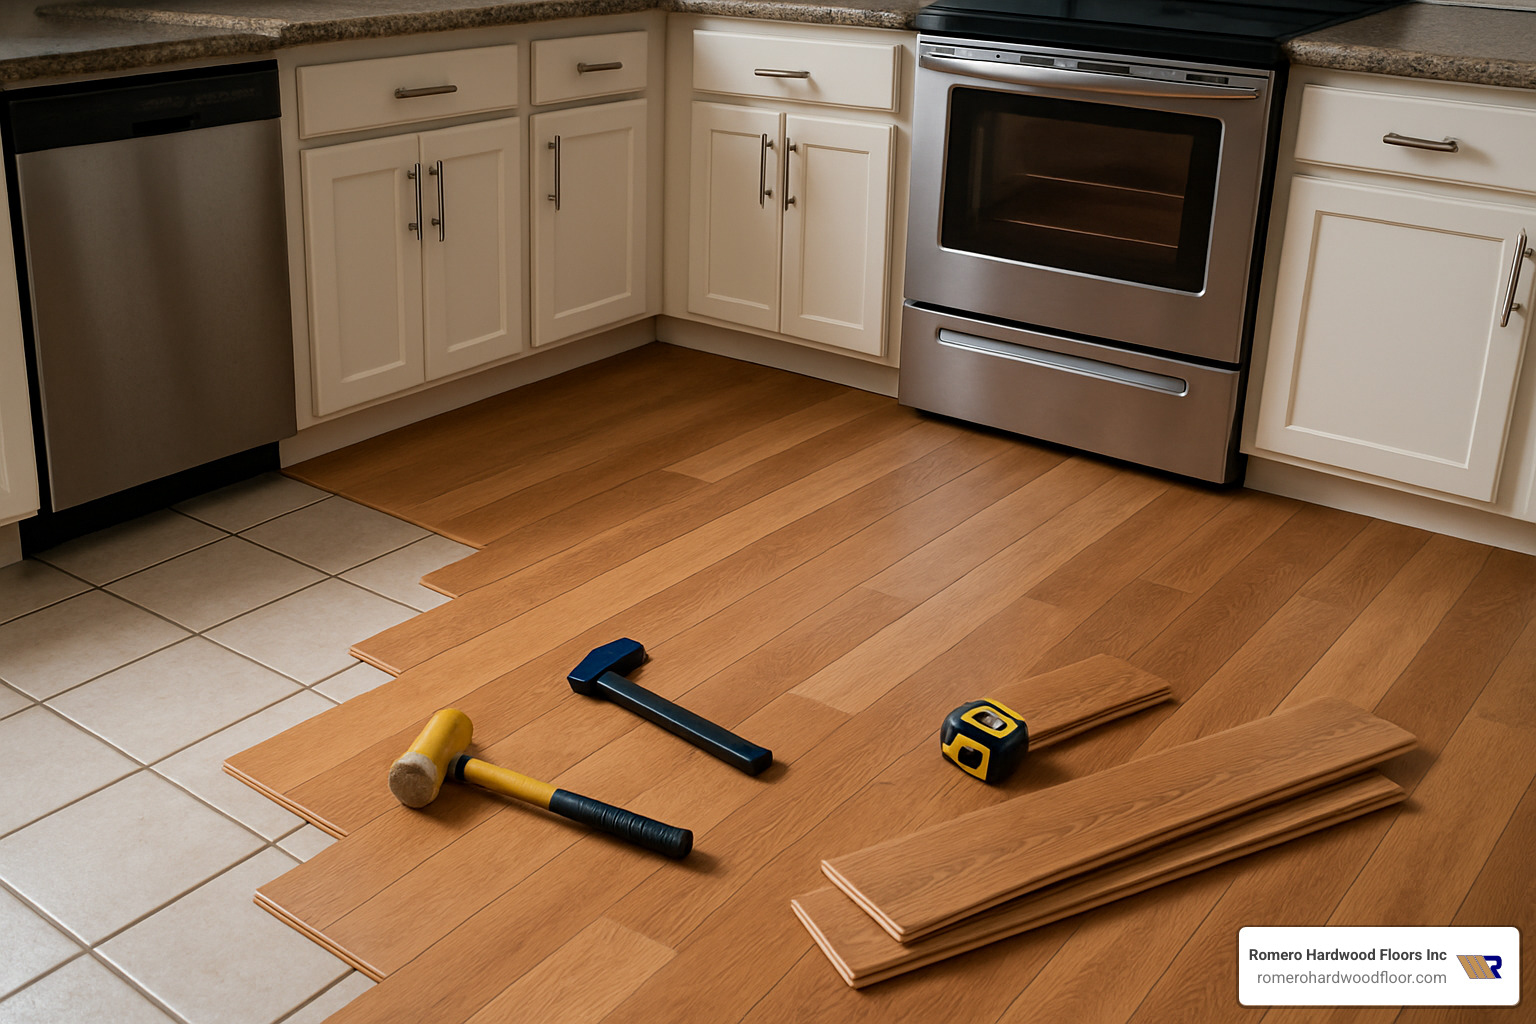
Can you install hardwood floors over tile? Yes, you absolutely can install hardwood floors over existing tile, saving approximately 30% in labor costs while avoiding the mess of tile removal. This approach is particularly effective when the existing tile is in good condition with no significant cracks or loose pieces.
| Quick Answer: Installing Hardwood Over Tile |
|---|
| ✅ Feasible? Yes, with proper preparation |
| 🌟 Best Type: Engineered hardwood (70% more dimensionally stable than solid) |
| 🔨 Installation Method: Floating floor is easiest (no nails/minimal adhesive) |
| 📏 Height Increase: Typically adds 3/8″ to 1/2″ to floor height |
| 🔍 Tile Requirements: Must be stable, level, and free of cracks |
| 💧 Moisture Concerns: Critical to test and address before installation |
The ability to install beautiful hardwood directly over existing tile has become a game-changer for homeowners looking to update their spaces without the dust, debris, and extended timeline of traditional demolition. While not every situation is ideal for this approach, many homes with well-adhered, level tile can be transformed with minimal disruption.
When considering this installation method, it’s important to understand that not all hardwood flooring types are suitable. Over 90% of professional installers recommend engineered hardwood or laminate rather than solid hardwood for installations over tile due to moisture and height concerns.
I’m Francisco Romero, owner of Romero Hardwood Floors Inc., and throughout my 15+ years of experience installing hardwood floors over tile, I’ve helped countless homeowners transform their dated tile floors into stunning hardwood surfaces without the demolition nightmare.

Can you install hardwood floors over tile word roundup:
– engineered hardwood flooring installation
– hardwood floor installation patterns
– diy hardwood floor installation
Can You Install Hardwood Floors Over Tile?
Yes, you can install hardwood floors over tile with the right preparation and conditions. This approach has become increasingly popular among our Massachusetts clients from Beverly to Woburn who want beautiful new floors without the headache of demolition.
At Romero Hardwood Floors, we carefully evaluate each potential overlay project by checking several critical factors first:
Your existing tile must be firmly attached to the subfloor—no wobbling or loose pieces allowed. When we walk across your floor, we shouldn’t hear hollow sounds that indicate poor adhesion underneath. Any cracked tiles need attention before we proceed, and those grout lines can’t be too deep or wide (though we can fill them if needed).
Moisture is hardwood’s natural enemy, so we always conduct thorough moisture testing. Your readings should be 4% or lower for most hardwood installations. And of course, your home’s structure needs to support the combined weight of both flooring systems.
One of our Revere clients put it perfectly: “I was dreading the mess of ripping up my old tile. When Romero suggested installing engineered hardwood directly over it, I was skeptical. But the results are beautiful, and we saved at least a week of demolition work!”
Key Benefits of Skipping Tile Demolition
The advantages of installing hardwood directly over existing tile go beyond just convenience. You’ll save approximately 30% in labor costs by avoiding tile removal—money you can invest in higher-quality flooring materials instead.
Your family won’t have to deal with the fine dust that seems to find its way into every corner of your home during demolition. Your timeline shrinks significantly too—most overlay projects finish 2-5 days faster than traditional removal and replacement.
Surprisingly, adding hardwood over tile often improves your room’s acoustics. That hollow echo common in tiled rooms transforms into a warmer, more pleasant sound environment. Your subfloor remains protected, and your feet will thank you during those cold Massachusetts winter mornings when the warmth of wood replaces the chill of ceramic tile.
Risks & Challenges to Address First
Before we grab our tools, let’s be honest about the challenges you’ll face when installing wood over tile:
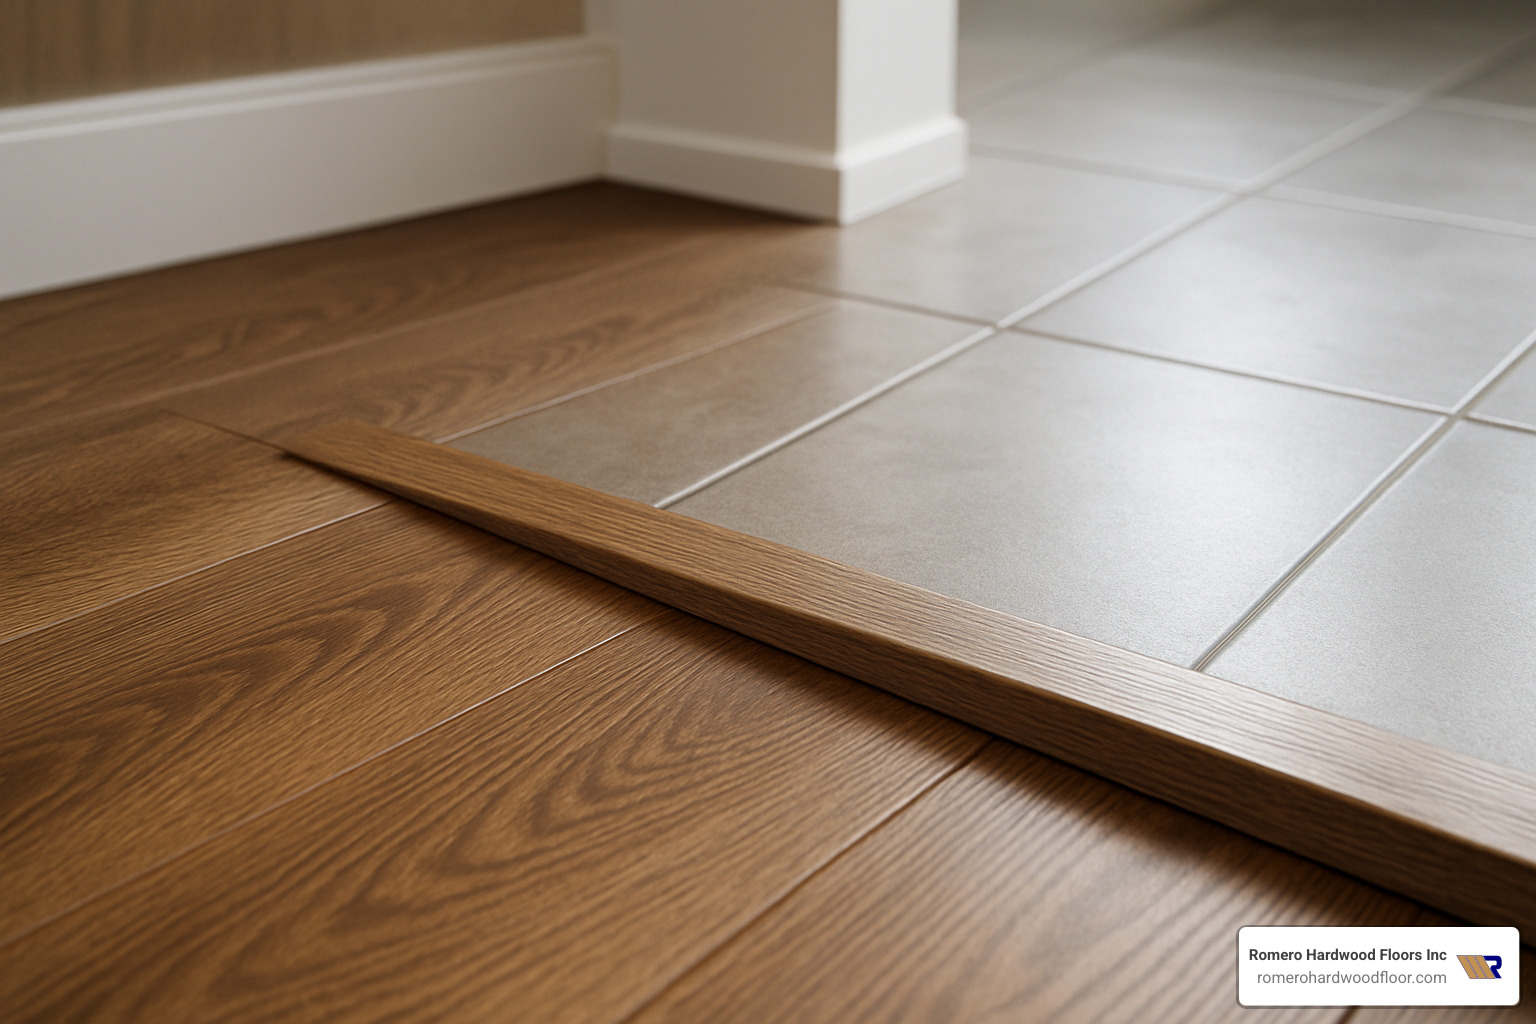
Your floor height will increase by about 3/8″ to 1/2″—which might not sound like much until you try closing that bathroom door or sliding out your dishwasher. We often need to trim doors, create custom transitions to other rooms, and sometimes adjust appliance heights in kitchens. Stair transitions require special attention for both safety and aesthetics.
Any loose or hollow tiles must be addressed before installation begins. We can’t build a stable floor over an unstable foundation. Since tile is often installed in moisture-prone areas like kitchens and entryways, we need to implement proper moisture barriers to protect your new hardwood investment.
Some manufacturers limit warranty coverage for installations over tile, so we’ll help you select products that maintain their guarantees in this application. Proper subfloor preparation is non-negotiable for success, which may add some cost to your project—but it’s far less expensive than fixing problems later.
At Romero Hardwood Floors, we’ve been perfecting the art of hardwood-over-tile installation since 2006. We’ll give you an honest assessment of whether this approach makes sense for your specific situation. In some homes, particularly where multiple risk factors exist, traditional tile removal might still be your best path forward.
Choosing the Right Hardwood (Solid vs Engineered vs Laminate)
When installing over tile, the type of wood flooring you select is crucial to the project’s success. Not all wood flooring products are suitable for installation over tile.
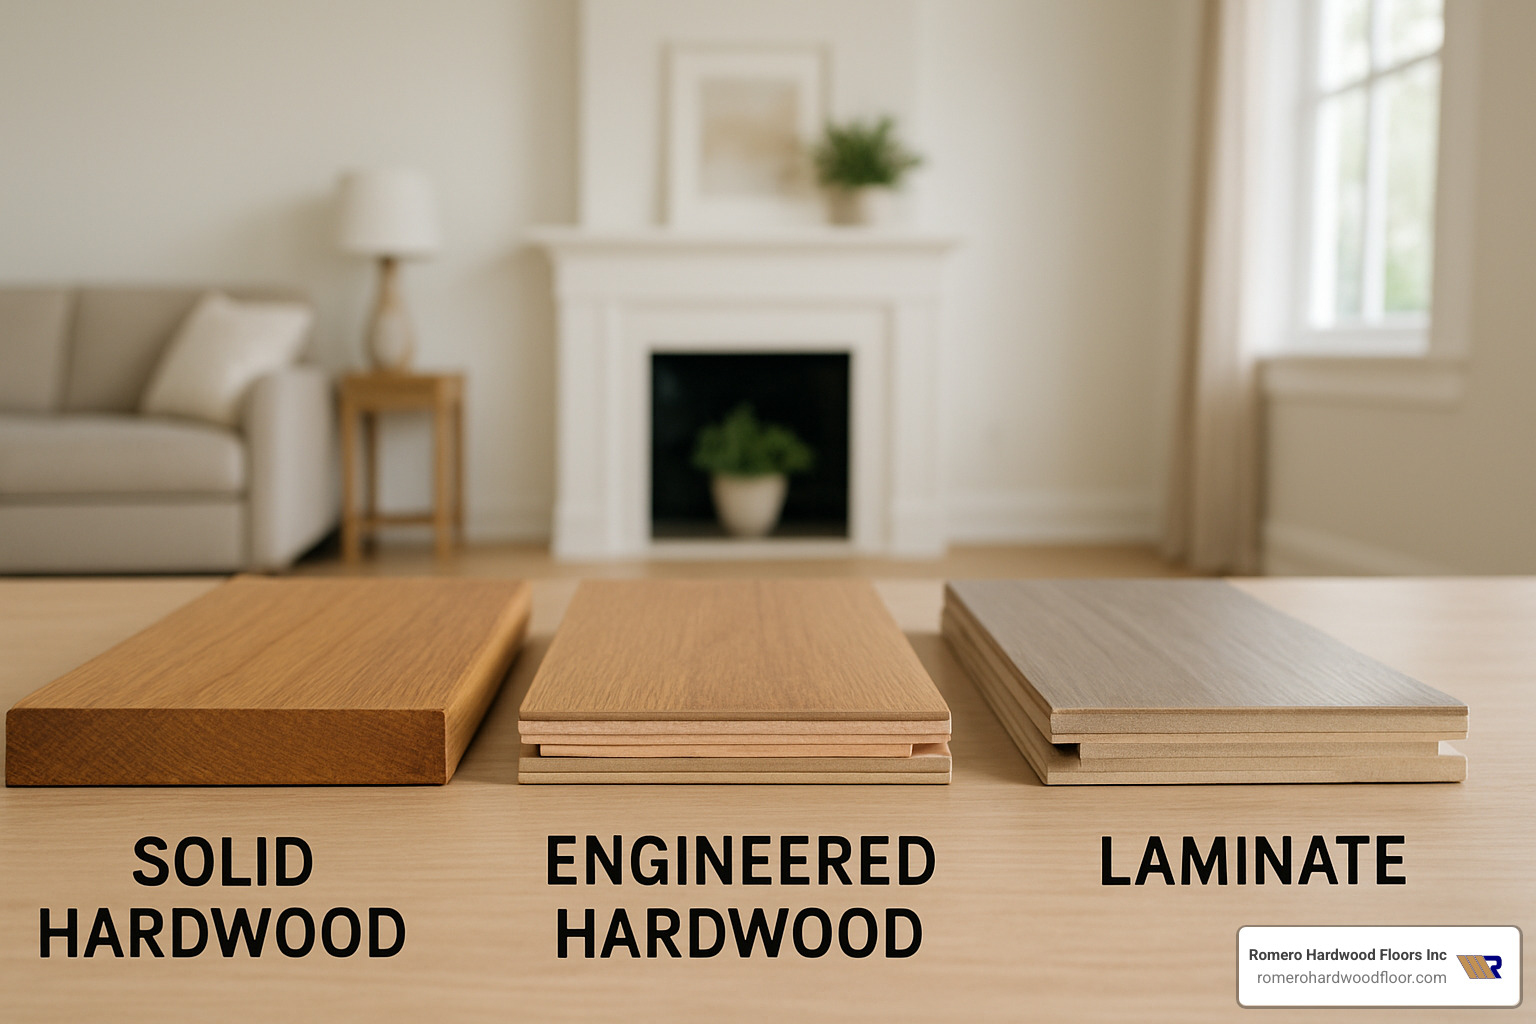
Solid Hardwood
Traditional solid hardwood flooring is typically not recommended for installation directly over tile for several reasons:
I often have to disappoint homeowners who have their hearts set on solid hardwood over tile. The reality is that solid hardwood and tile just don’t play well together. Solid hardwood needs to be nailed into a wood subfloor—something you simply can’t do with tile underneath. Plus, solid wood is incredibly sensitive to moisture, which is often present in tile installations, especially in basements or ground-floor rooms. The natural expansion and contraction of solid wood with humidity changes can lead to buckling or warping when installed over tile.
Engineered Hardwood
Engineered hardwood is the preferred choice for installation over tile, offering:
When clients ask me, “Can you install hardwood floors over tile?”, I immediately steer them toward engineered hardwood. This remarkable product gives you the best of both worlds—real wood beauty with practical performance. The layered construction makes engineered hardwood about 70% more dimensionally stable than solid wood, which is crucial when installing over tile.
You’ve got installation options too—either as a floating floor where the pieces lock together or glued directly to properly prepared tile. The top layer is genuine wood, so you’re not sacrificing that authentic look and feel. Many of our Revere and Beverly clients are surprised to learn they can even refinish higher-quality engineered floors 1-2 times over their lifespan.
What really sets engineered hardwood apart is its versatility. Unlike solid hardwood, you can install it in basements and other below-grade spaces where moisture might be an issue. For Massachusetts homeowners dealing with our humid summers and dry winters, this stability is priceless.
Laminate and Luxury Vinyl Plank (LVP)
These alternatives to traditional hardwood offer specific advantages for tile overlay projects:
Sometimes engineered hardwood isn’t the right fit for every situation. That’s when we discuss laminate and luxury vinyl plank options with our clients. Modern laminate has come a long way from the cheap-looking products of the past, and LVP is 100% waterproof—a game-changer for bathrooms or homes with young children.
The click-lock installation systems make these perfect for handy homeowners who want to tackle installation themselves. They’re typically thinner than engineered products, which helps when you’re concerned about door clearances after raising your floor height. Budget-conscious clients appreciate that these options generally cost less while still providing beautiful wood-look finishes. For families with pets or active children, the superior scratch and dent resistance of quality laminate or LVP is often the deciding factor.
Why Engineered Hardwood Shines Over Tile
Engineered hardwood is particularly well-suited for installation over tile for several reasons:
The magic of engineered hardwood over tile is in the details. The cross-layered construction resists the warping and buckling that would plague solid wood in the same application. I’ve installed engineered hardwood in hundreds of homes throughout Massachusetts, and the results speak for themselves—beautiful, stable floors that stand the test of time.
What my clients love most is the authentic wood experience. Unlike synthetic alternatives, you’re walking on real wood, with all the warmth and character that implies. The versatility is remarkable too—engineered hardwood works beautifully with radiant heat systems that might be under your existing tile.
With proper care, engineered hardwood over tile can last 20+ years. I’ve visited clients in Woburn and Beverly whose engineered floors still look gorgeous after decades of family life. It’s truly an investment that pays dividends in both enjoyment and home value.
When Laminate or Luxury Vinyl Might Be Smarter
While engineered hardwood is an excellent choice, there are situations where laminate or luxury vinyl plank (LVP) flooring might be preferable:
“We initially wanted engineered hardwood in our sunroom, but with three dogs and the room’s exposure to moisture, Romero recommended a high-quality LVP instead. Three years later, it still looks perfect despite all the traffic!” This testimonial from a Revere homeowner perfectly illustrates when alternatives make sense.
In bathrooms, laundry rooms, or homes with frequent spills, the 100% waterproof nature of LVP provides peace of mind that engineered wood simply can’t match. Budget-conscious renovations often benefit from the lower cost of quality laminate or LVP while still achieving a beautiful wood look.
Pet owners, take note: even the most durable engineered hardwood will show wear from dog claws faster than a quality LVP product. For DIY enthusiasts, the click-lock systems of laminate and LVP are significantly more forgiving for first-time installers than engineered hardwood options.
When dealing with extremely uneven tile that would require extensive leveling work, the flexibility and thinner profile of LVP products can sometimes save both time and money while still delivering gorgeous results.
At Romero Hardwood Floors, we’ll help you steer these options to find the perfect solution for your home, lifestyle, and budget when considering whether can you install hardwood floors over tile.
Preparing Your Tile Subfloor for Wood Success
Proper preparation of your tile subfloor isn’t just important—it’s absolutely essential for a successful hardwood overlay installation. At Romero Hardwood Floors, we’ve seen how thorough prep work makes the difference between a stunning, long-lasting floor and one plagued with problems.
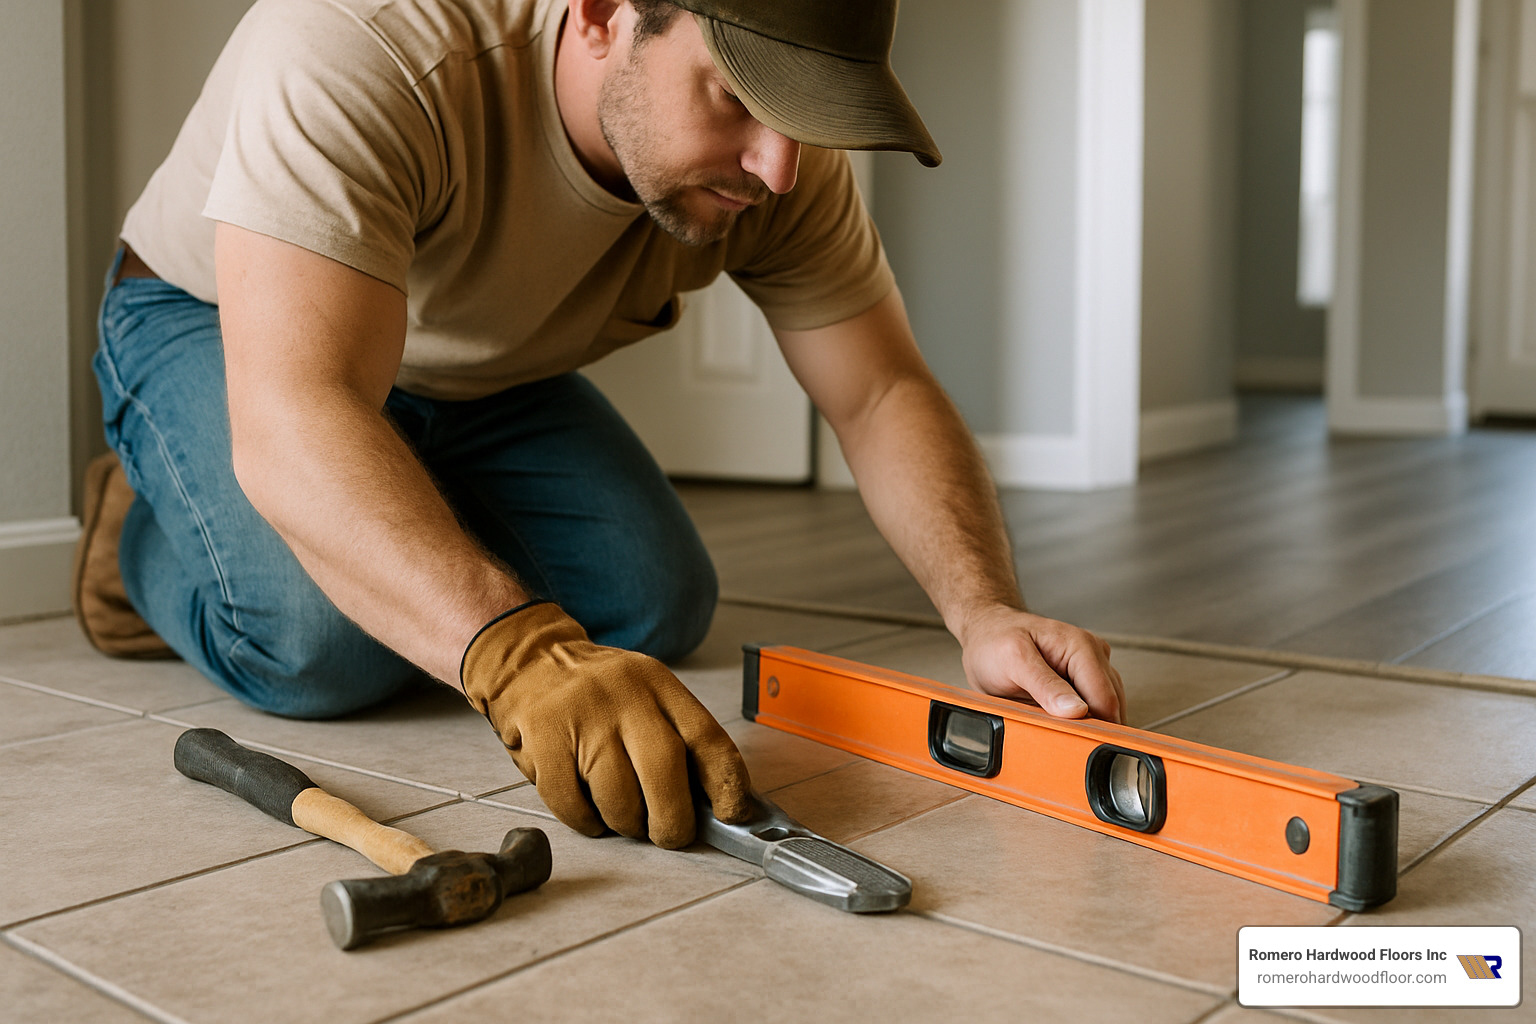
Tile Condition Checklist Before Installation
Before we even think about laying that first hardwood plank, we need to make sure your existing tile is up to the task. We’ve developed a thorough assessment process that leaves nothing to chance.
First, we check that every tile is firmly attached to the subfloor. This isn’t as simple as it sounds—we literally tap each tile, listening for that hollow sound that signals poor adhesion. It’s a bit like playing a strange percussion instrument across your floor!
Next comes a detailed inspection for cracks, chips, or damaged tiles. Even small imperfections can cause big problems later, so we identify anything that needs repair or replacement. We also use a long straight edge to check for lippage—those annoying height differences between adjacent tiles that can create an uneven surface under your new hardwood.
Moisture testing is non-negotiable when you’re asking “can you install hardwood floors over tile?” We take multiple readings with a moisture meter, ensuring levels are below 4% (or whatever your specific manufacturer requires). Excess moisture is the number one enemy of any wood floor installation.
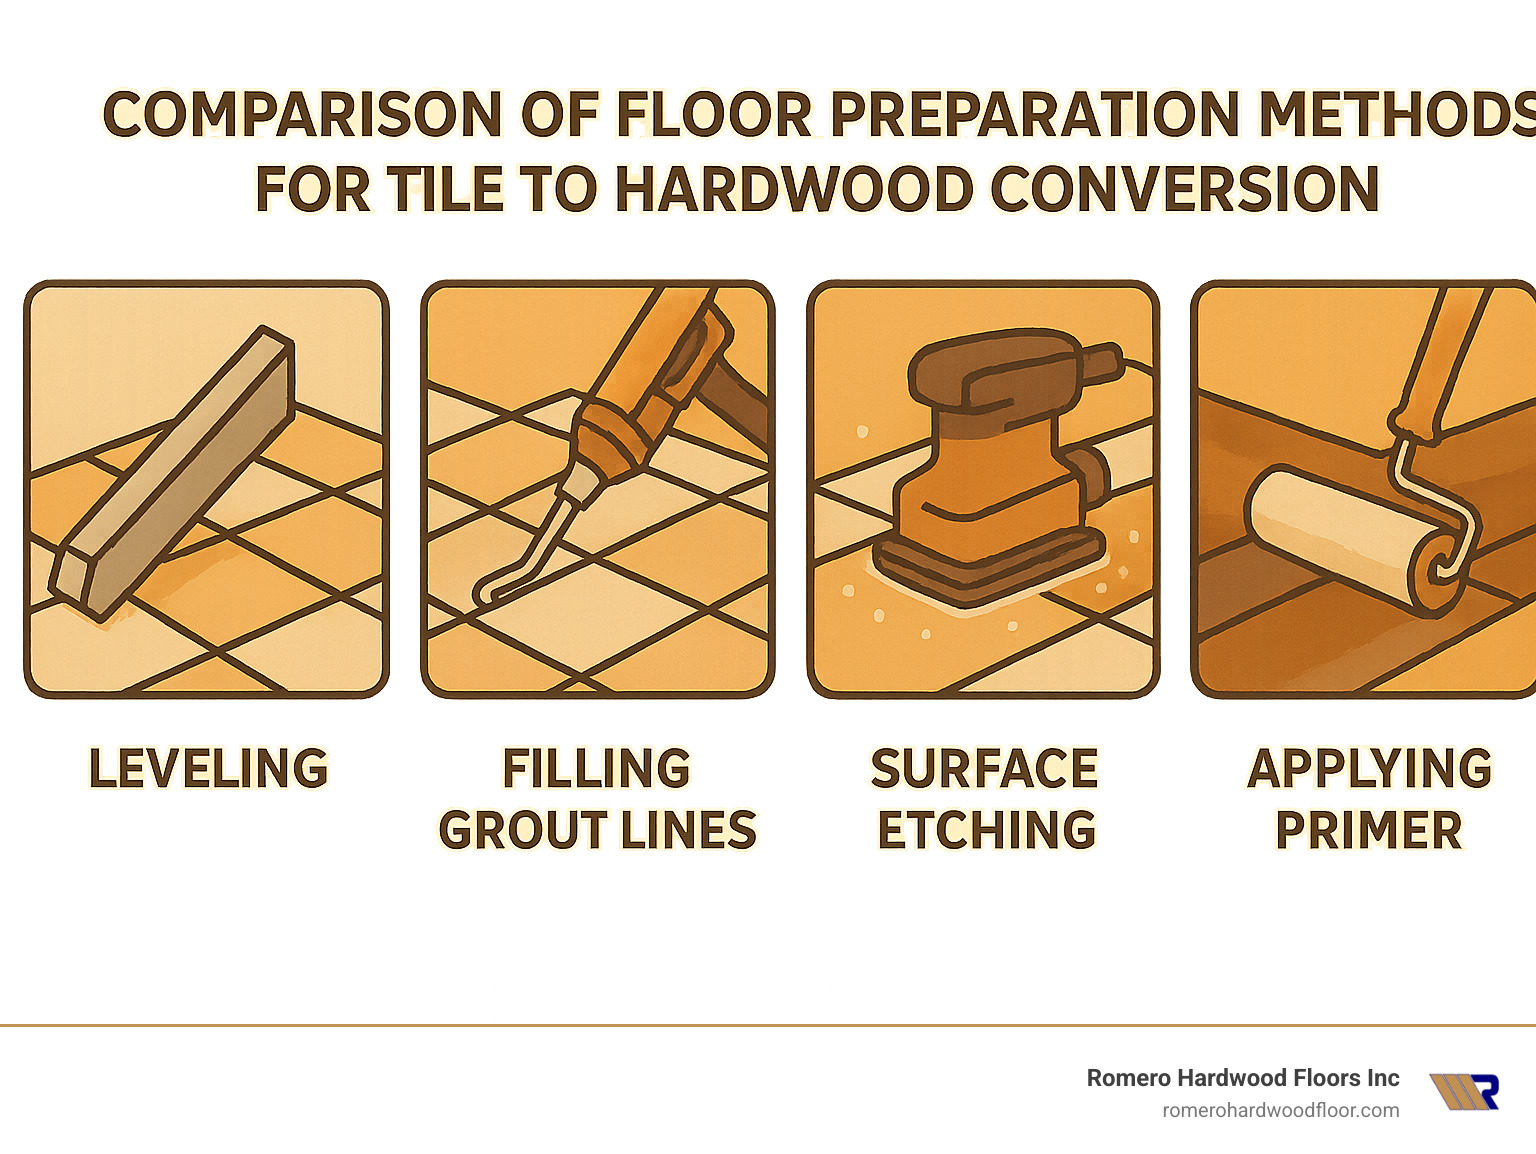
We also evaluate your grout lines—if they’re too deep or wide, they’ll need to be filled to create a stable surface. And finally, we verify that your underlying substrate is structurally sound enough to support both your existing tile and the new hardwood layer.
Leveling & Priming Steps
Once we’ve confirmed your tile is a suitable candidate for overlay, we roll up our sleeves for the real preparation work.
Everything starts with a deep cleaning—and I mean deep. Any dirt, grease, or residue left behind will interfere with adhesion, so we thoroughly clean the entire surface. For tiles with deep or wide grout lines, we apply a fiber-reinforced self-leveling compound like Mapei Ultraplan Renovation to create a smooth, even surface.
If we’re planning a glue-down installation, we’ll lightly sand or etch the tile surface. This might seem counterintuitive—deliberately roughing up your tile?—but this micro-abrasion significantly improves adhesive bonding. For particularly glossy tiles, this step is absolutely crucial.
For non-porous tile surfaces (which is most ceramic and porcelain tile), we apply a specialized primer designed specifically for these challenging substrates. Products like Acouslime Bond Primer create a “grippy” surface that gives the adhesive something to hold onto.
Floors with significant unevenness need special attention. We’ll apply a self-leveling compound across the entire surface, carefully working to ensure proper coverage and smoothness. These compounds, like Arditex NA, are remarkable—they seek out low spots and create a perfectly level surface as they cure.
For below-grade installations or areas with potential moisture concerns, we install an appropriate moisture barrier. And for floating floor installations, we add a quality underlayment that provides cushioning, sound absorption, and minor leveling benefits.
These preparation steps typically take 1-2 days, including drying time. I won’t sugarcoat it—proper preparation adds time to your project. But as we tell all our Massachusetts clients from Beverly to Woburn, this is absolutely not the place to cut corners. The few extra hours spent on proper preparation will save you years of headaches down the road.
Want to learn more about the installation process itself? Check out our comprehensive How to Install Hardwood Flooring guide for the next steps in your flooring journey.
Installation Methods & Transition Solutions
When you’re ready to install hardwood floors over tile, you’ve got three main installation methods to consider. At Romero Hardwood Floors, we help homeowners across Massachusetts choose the right approach based on their specific needs and circumstances.
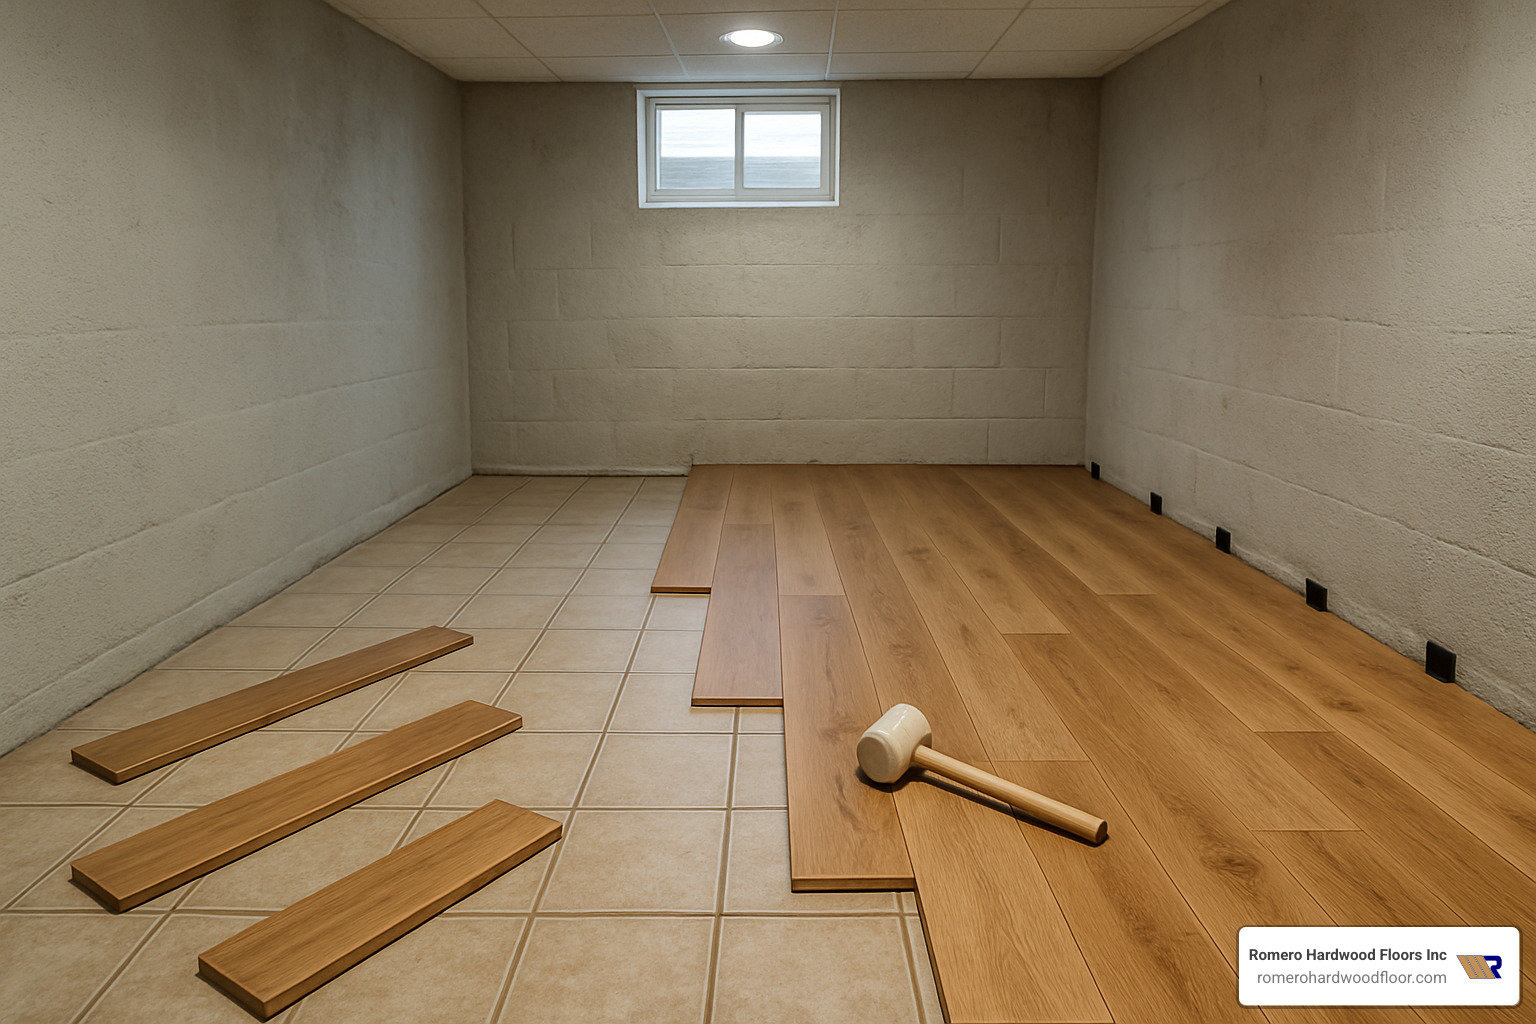
Floating Floors: The Go-To Over Tile
Floating floor installation has become our most recommended method for installing hardwood over tile—and with good reason! This approach doesn’t attach the flooring directly to your tile but instead creates a “floating” system where planks connect to each other.
“My husband and I were nervous about covering our kitchen tile,” shares Maria from Lynn, “but the floating floor Romero installed feels solid underfoot and looks absolutely gorgeous.”
Floating floors offer remarkable benefits when installing over tile. The foam or cork underlayment provides a cushioning layer that not only feels comfortable but also absorbs sound and helps smooth out minor imperfections in your tile surface. Most of our installations can transform a medium-sized room in just a single day, making this the quickest path to your new hardwood look.
What homeowners particularly love is the reversibility factor—if needed, a floating floor can be removed without damaging the underlying tile. This makes it an excellent option if you might want to return to tile someday or are in a rental property. Of all installation methods, floating floors are also the most accessible for skilled DIYers, though professional installation ensures the best results.
Glue-Down Engineered: When You Need Zero Hollow Sound
If you’re concerned about potential “hollow” sounds when walking across a floating floor, a glue-down installation might be your perfect solution. This method creates a solid, connected feel that many homeowners prefer.
The process requires proper preparation: first, we thoroughly etch or roughen the tile surface to create a mechanical bond for the adhesive. We then select high-quality MS polymer adhesives specifically designed for non-porous substrates like tile. The engineered hardwood is directly adhered to your prepared tile surface using a carefully troweled adhesive layer.
After installation, we use rollers or weights to ensure proper adhesive transfer and create a rock-solid bond between your new hardwood and existing tile.
The benefits are noticeable immediately—no hollow sounds when walking, superior stability, and a slightly reduced floor height compared to floating installations with underlayment. However, this method is more labor-intensive, typically costs more, and isn’t easily reversible if you change your mind later.
Managing Added Floor Height Like a Pro
A challenge when installing can you install hardwood floors over tile is dealing with the added height—typically an extra 3/8″ to 1/2″ above your existing floor. This might seem minor, but it affects several aspects of your home.
Interior doors often need trimming to swing freely over the new floor height. We carefully remove doors, trim the bottoms precisely, and rehang them for perfect clearance. Where your new hardwood meets different flooring materials, we install specialized reducer strips or transition moldings that create a smooth, safe transition while looking intentional and designed.
Kitchen installations require special consideration for appliances. That extra half-inch can sometimes affect dishwashers or refrigerators fitting under countertops. We’ll help you plan for these challenges before installation begins.
Stair transitions demand particular attention to ensure safety and code compliance. Our team creates custom solutions where your new flooring meets stairs, preventing trip hazards while maintaining a cohesive look.
For baseboards and trim, we typically remove existing baseboards and reinstall them at the new height. If you prefer not to disturb your baseboards, we can add quarter-round molding to cover the required expansion gap while providing a finished appearance.
“I was worried about how the new floor would meet my existing hardwood in the dining room,” recalls a homeowner from Medford, “but Romero’s custom transition solution looks like it was always meant to be there.”
At Romero Hardwood Floors, we don’t just install flooring—we solve problems. Our comprehensive approach addresses all these height transition challenges before we begin installation, ensuring a seamless result that looks intentional rather than retrofitted. For more installation insights, check out our guide on How to Install Hardwood Flooring or learn about common Hardwood Floor Installation Mistakes to avoid.
Room-by-Room Considerations & Long-Term Care
Different rooms in your home present unique challenges when installing hardwood over tile. Let’s explore the specific considerations for each space to ensure your new floors perform beautifully for years to come.
Kitchens
Kitchens are among the most popular spaces for hardwood-over-tile changes, but they require careful planning:
Appliance clearance is a critical concern in kitchens. Before installation, we measure carefully to ensure your dishwasher, refrigerator, and range will still fit properly with the additional floor height. As one Arlington homeowner finded: “We had to modify our dishwasher space slightly, but Romero anticipated this and had solutions ready before it became a problem.”
Islands and cabinetry need special attention too. Fixed islands may require custom transition treatments around their perimeter, while toe kicks on cabinetry might need adjustment to accommodate the new floor height.
For water protection, we typically recommend waterproof or water-resistant engineered products in kitchens. Modern engineered hardwoods with aluminum oxide finishes provide excellent resistance against the occasional spill, though prompt cleanup remains important.
Don’t forget about heat considerations near cooking areas. We always ensure adequate expansion space around heat-generating appliances to prevent buckling or warping over time.
Basements
Basements present unique moisture challenges that require extra precautions when installing hardwood over tile:
Thorough moisture testing is non-negotiable for basement installations. At Romero Hardwood Floors, we conduct multiple tests to ensure substrate moisture levels are within acceptable ranges before proceeding.
Quality vapor barriers between the tile and new flooring are essential in below-grade spaces. These barriers prevent ground moisture from affecting your beautiful new hardwood.
Product selection is particularly important in basements. We recommend engineered hardwood specifically rated for below-grade installation, with improved dimensional stability to withstand the higher humidity often found in basement environments.
Ongoing dehumidification is worth considering as a permanent solution to protect your investment. Many of our clients install dehumidifiers that maintain optimal humidity levels year-round.
Bathrooms (With Caution)
While not ideal, limited hardwood-over-tile installations in bathrooms are possible with the right approach:
Product selection is crucial – we only recommend highly moisture-resistant engineered products or waterproof luxury vinyl plank for bathroom installations. Standard hardwood, even engineered varieties, may not be suitable for full bathrooms with showers or tubs.
Perimeter sealing provides additional protection. We apply silicone sealant around edges to prevent water infiltration beneath the flooring surface.
Consider limiting wood to non-wet areas of the bathroom, such as the vanity area, while maintaining tile in shower and tub surrounds.
Proper ventilation is essential in bathroom installations. A good exhaust fan, used consistently, helps minimize humidity that could damage wood flooring.
Living Areas
Living rooms, dining rooms, and hallways are excellent candidates for hardwood-over-tile installations:
Furniture placement should account for the slight height increase. Heavy furniture may need adjustable feet or additional felt pads to remain level on the new surface.
Seamless transitions between rooms create a cohesive look throughout your home. We carefully plan transition solutions where your new hardwood meets different flooring materials.
Traffic patterns influence product selection. In high-traffic areas like hallways, we recommend harder wood species or engineered products with thicker wear layers for extended durability.
Moisture & Waterproofing in Challenging Spaces
Moisture management is critical when installing hardwood over tile, especially in challenging spaces:
Quality vapor barriers are essential in below-grade installations or areas with potential moisture issues. These membranes prevent vapor transmission that could damage your new flooring over time.
Scientific moisture testing helps us identify potential problems before installation. We use calcium chloride or relative humidity testing to ensure substrate moisture levels meet manufacturer requirements.
Strategic dehumidification protects your investment in humid environments. As one Chelsea homeowner shared: “After a pipe burst in our kitchen, we were relieved to find that the moisture barrier Romero installed under our engineered hardwood prevented any damage to the wood itself. The barrier caught all the water, saving us thousands in repairs.”
Improved finishes provide additional protection in moisture-prone areas. We can apply supplemental waterproof topcoats to engineered hardwood in kitchens or other spaces where spills are likely.
Careful perimeter detailing prevents water infiltration. In bathrooms or kitchens, we seal the perimeter of the installation, providing an additional barrier against moisture intrusion.
Maintenance Tips for Hardwood Installed Over Tile
Proper maintenance extends the life of your hardwood-over-tile installation:
Regular gentle cleaning keeps your floors looking beautiful. Sweep or vacuum with a soft brush attachment regularly and clean with a slightly damp (never wet) microfiber mop using only cleaners specifically formulated for hardwood.
Avoid excess moisture at all costs. Never wet mop or steam clean hardwood floors, as excess moisture can penetrate seams and damage the wood. Steam cleaners are particularly harmful as they force moisture into the flooring.
Maintain consistent indoor humidity between 35-55% to prevent seasonal expansion and contraction. Consider using humidifiers in winter and dehumidifiers in summer if needed.
Protect against scratches by using felt pads under furniture legs and taking shoes off at the door. Area rugs in high-traffic zones provide additional protection but should have breathable backing.
Address spills immediately to prevent moisture damage. Even water-resistant finishes can be compromised by standing liquids over time.
Schedule annual inspections to catch potential issues early. Check for any signs of moisture problems or loose areas, particularly at room perimeters where problems typically first appear.
Plan for eventual refinishing of engineered hardwood every 7-10 years, depending on wear and the thickness of the wear layer. Quality engineered products with thicker wear layers (3mm+) can typically be refinished 1-3 times during their lifespan.
With proper installation and maintenance, your hardwood floors installed over tile can provide decades of beauty and performance. At Romero Hardwood Floors, we’re committed to helping you enjoy flawless wood floors without the mess of tile demolition.
Frequently Asked Questions About “Can You Install Hardwood Floors Over Tile?”
When considering a hardwood-over-tile installation, our customers at Romero Hardwood Floors often come to us with similar questions. Let’s address the most common concerns we hear from homeowners throughout Massachusetts:
Does installing wood over tile void warranties?
Warranty coverage varies significantly between manufacturers, which can cause confusion for homeowners. Some engineered hardwood companies explicitly approve installation over tile in their guidelines, while others may place limitations or even void coverage entirely.
At Romero Hardwood Floors, we take several steps to protect your investment:
First, we carefully select products that have explicit manufacturer approval for tile overlay installations. Second, we carefully follow all manufacturer specifications during installation. Third, we thoroughly document the entire installation process with photos and moisture readings. Finally, we provide our own workmanship warranty regardless of the manufacturer’s position.
“I was concerned about warranty issues,” shared one Woburn homeowner, “but Francisco provided documentation from the manufacturer specifically approving installation over my ceramic tile, which gave me complete peace of mind.”
Before proceeding with any installation, we’ll always review the specific warranty terms for your chosen flooring to ensure you understand any potential limitations.
Will the new floor feel hollow or echo?
This is perhaps the most common concern we hear about floating floor installations over tile. The acoustic properties of your new floor will depend on several key factors:
Underlayment quality makes a tremendous difference – premium cork or high-density foam underlayments significantly reduce hollow sounds compared to basic options. Installation method also matters, as glue-down installations virtually eliminate hollow sounds by creating direct contact with the substrate. Proper subfloor preparation, especially filling grout lines and leveling uneven areas, reduces echo potential dramatically. Flooring thickness plays a role too, as thicker engineered products (3/8″ or greater) generally produce less hollow sound than thinner options.
Most of our customers report that any subtle acoustic differences become barely noticeable within a few weeks as they adjust to their new floors. As one Malden customer told us after their living room installation: “I was worried about the hollow sound, but after Romero installed a premium cork underlayment, our engineered hardwood feels and sounds just like our original hardwood floors.”
Can I DIY this or should I hire a pro?
While installing a floating floor over tile is within reach of skilled DIYers, especially those with previous flooring experience, we generally recommend professional installation for several important reasons:
Proper substrate evaluation requires experience to identify potential problems that might not be obvious to homeowners. Even minor issues with the tile substrate can lead to major problems down the road. Moisture testing and remediation is critical by DIYers, potentially leading to warping or mold issues later.
Creating seamless transitions between different floor heights requires specialized tools and materials that professionals already have on hand. Many manufacturers require professional installation to maintain warranty coverage, which could save you significantly if problems arise later.
The specialized tools needed (moisture meters, laser levels, leveling compounds, etc.) are expensive to purchase for a single project. And finally, what might take a DIYer several weekends can often be completed by our professional team in just 1-2 days, minimizing disruption to your home life.
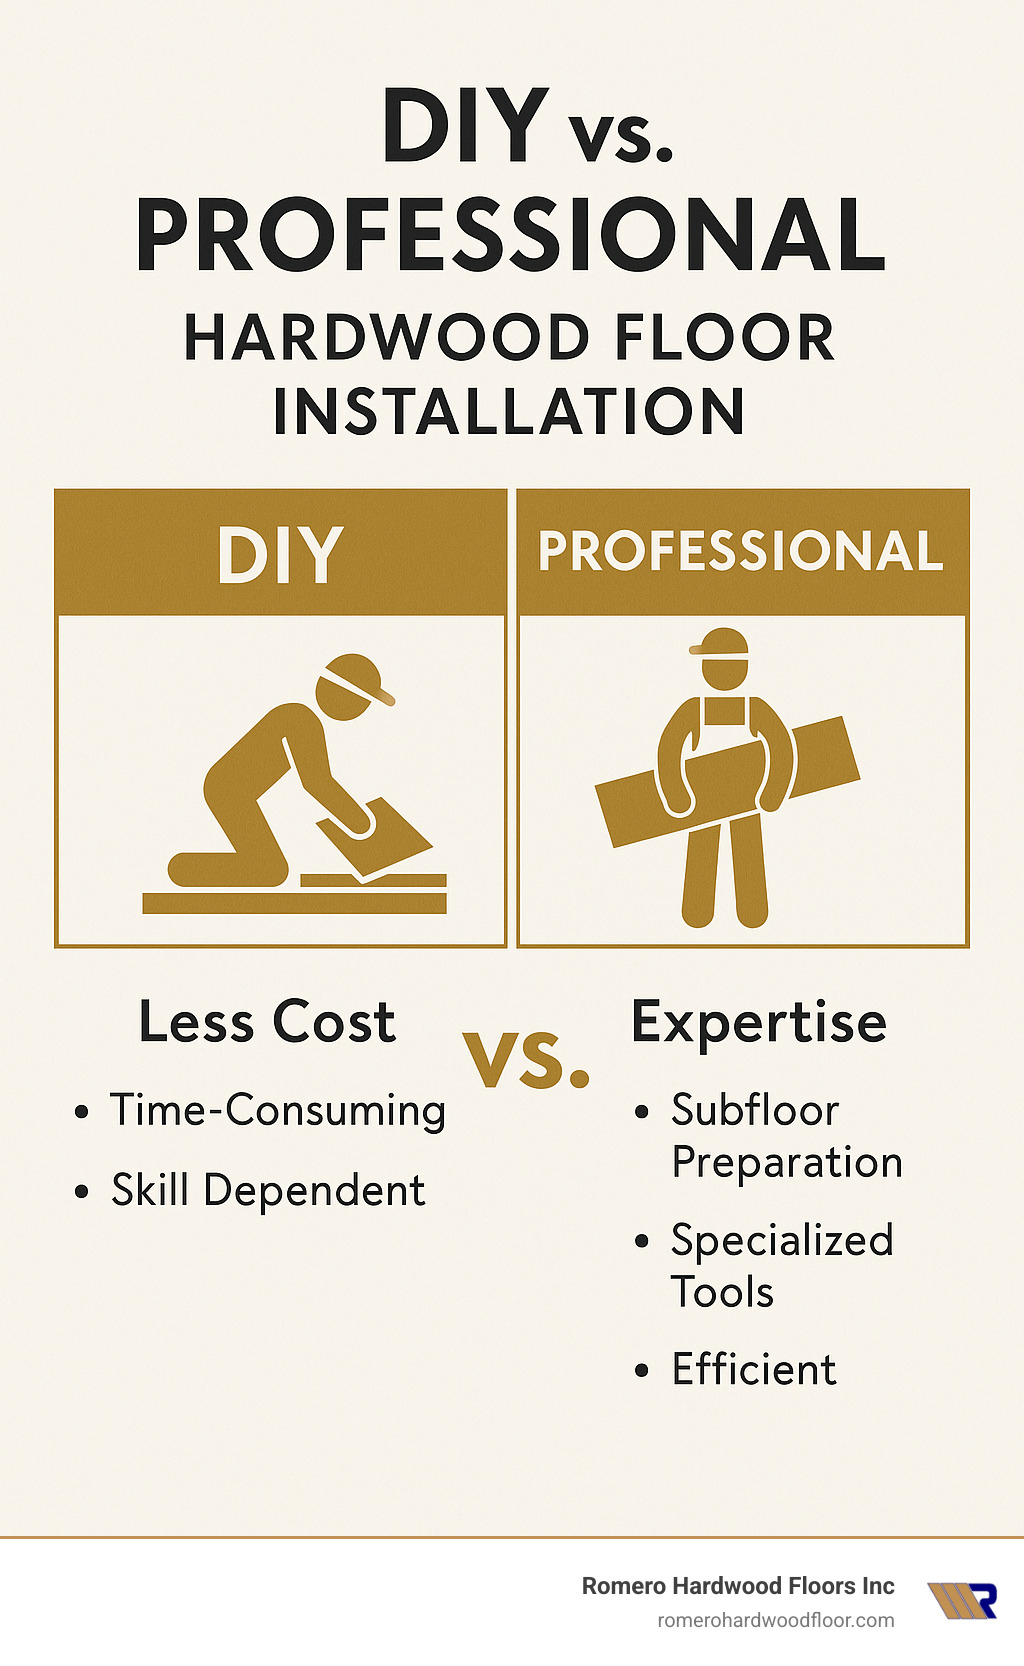
If you’re still considering the DIY route, we recommend at minimum scheduling a professional consultation to assess your specific situation. We can identify potential challenges you might face and provide guidance on whether your project is suitable for DIY installation or would benefit from professional expertise.
Many customers tell us they initially planned to DIY but ultimately chose professional installation after understanding the complexities involved. As one Beverly homeowner put it: “The peace of mind knowing it was done right the first time was worth every penny.”
Conclusion
Changing your dated tile floors into stunning hardwood surfaces doesn’t have to involve dusty demolition and lengthy timelines. As we’ve seen, can you install hardwood floors over tile? Absolutely—and when done right, it’s a game-changer for homeowners looking to refresh their spaces.
Throughout my years installing hardwood over tile in homes across Massachusetts, I’ve watched countless homeowners’ faces light up when they see the dramatic change without having endured weeks of messy tile removal. It’s truly one of the most satisfying renovations we offer at Romero Hardwood Floors.
The key to success lies in the details—proper assessment, appropriate product selection, and meticulous preparation. When these elements come together, your new hardwood-over-tile floor can provide decades of beautiful, warm, and inviting surfaces for your family to enjoy.
Let’s recap what we’ve learned:
Engineered hardwood typically outperforms other options for tile overlay installations thanks to its remarkable dimensional stability and flexible installation methods. The cross-layered construction provides that perfect balance of authentic wood beauty with practical performance over tile substrates.
Floating floor installations give most homeowners the sweet spot of simplicity and performance, while glue-down methods offer that solid, non-hollow feel underfoot that some homeowners prefer. Your specific situation and preferences will guide this choice.
Managing the increased floor height requires thoughtful planning—from door clearances to appliance fits—but these challenges are entirely manageable with proper transitions and modifications.
Moisture management remains critical, especially in potentially damp areas like basements and kitchens. The right barriers and products make all the difference between a lasting installation and potential problems down the road.
Based on internet averages (not Romero Hardwood Floors pricing), installing hardwood over tile typically ranges between $6-$18 per square foot, with high-end custom installations potentially reaching $25+ per square foot. These costs include materials and labor but will vary based on your specific home conditions and product selections.
Since 2006, our team at Romero Hardwood Floors Inc. has been helping homeowners throughout Massachusetts communities—from Beverly to Woburn—transform their spaces with beautiful hardwood installations. We take pride in providing honest assessments, quality craftsmanship, and guaranteed results that stand the test of time.
Ready to explore whether a hardwood-over-tile installation is right for your home? We’d love to help. Contact us for a free consultation where we’ll assess your specific situation, recommend appropriate products and methods, and provide a detailed estimate custom to your project.
Romero Hardwood Floors Inc. is ready to help you enjoy flawless wood floors without the mess of tile demolition. Reach out today, and let’s transform your space together!
More info about hardwood flooring contractors
