Chip in wooden floor: 3 Flawless Fixes
That Sinking Feeling of a Newly Chipped Floor
It’s a sound every homeowner dreads: the sharp crack of something heavy hitting the floor, followed by a moment of silence. One dropped cast-iron pan, a piece of furniture dragged incorrectly, or even an over-eager pet with its toys, and suddenly you have a chip in wooden floor that seems to draw every eye in the room. That single imperfection can feel like a spotlight on an otherwise beautiful surface. But don’t panic. A chip doesn’t mean your floor is ruined. With a few basic products, a little patience, and the right technique, you can make that damage vanish and protect the long-term value of your hardwood investment.
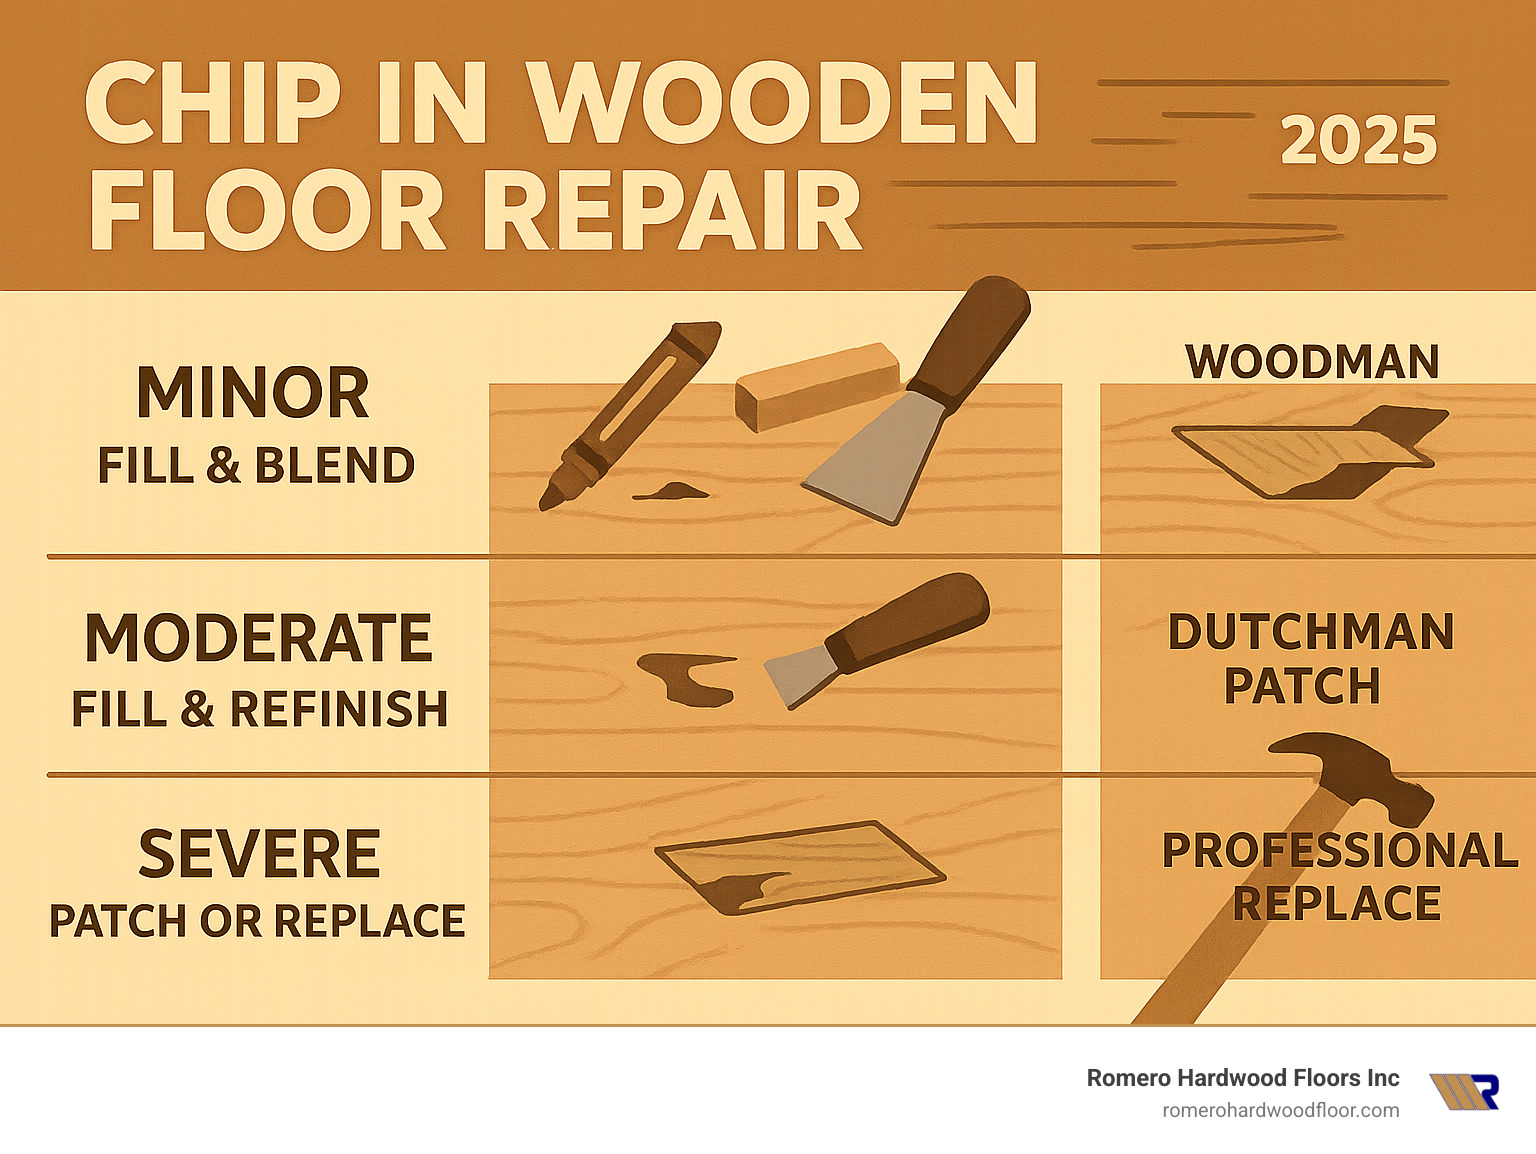
Quick-Fix Reference:
- Minor surface scratches: Wood-stain markers or wax sticks ($5-15)
- Deeper gouges: Wood putty, light sanding, refinish ($25-50)
- Severe damage: Dutchman patch or professional service ($50-500+)
- DIY time: 1-4 hours, depending on severity
A viral 29-million-view video proves that floor chips are a universal homeowner frustration—and entirely fixable. My name is Francisco Romero, founder of Romero Hardwood Floors Inc. here in Revere, MA. Since 2006, my team and I have mended thousands of boards across the North Shore, from minor scuffs to major repairs. We understand the pride you take in your home, and we’ve created this streamlined guide to show you the exact steps for a successful repair. We’ll help you identify when to try it yourself and when it’s time to call in a pro for a flawless finish.
Key repair vocabulary:
First, Assess the Damage: What Can You Fix Yourself?
Before you reach for any tools, take a moment to play detective. A proper assessment is the most critical step, determining whether you’re facing a quick cosmetic fix or a more involved repair that might require professional help. Get down close to the floor and examine the damage in good light.
Minor Scrapes & Surface Scratches
These are the most common and easiest flaws to fix. A surface scratch only affects the top protective layer of the floor—the polyurethane or wax finish.
- The Fingernail Test: Gently run your fingernail across the mark. If it doesn’t catch or only catches slightly, the damage is likely confined to the finish.
- Visual Cues: The scratch may appear as a white or light-colored line, but you won’t see the raw wood underneath. A $10 wood stain marker or a wax filler stick can often make these disappear in minutes.
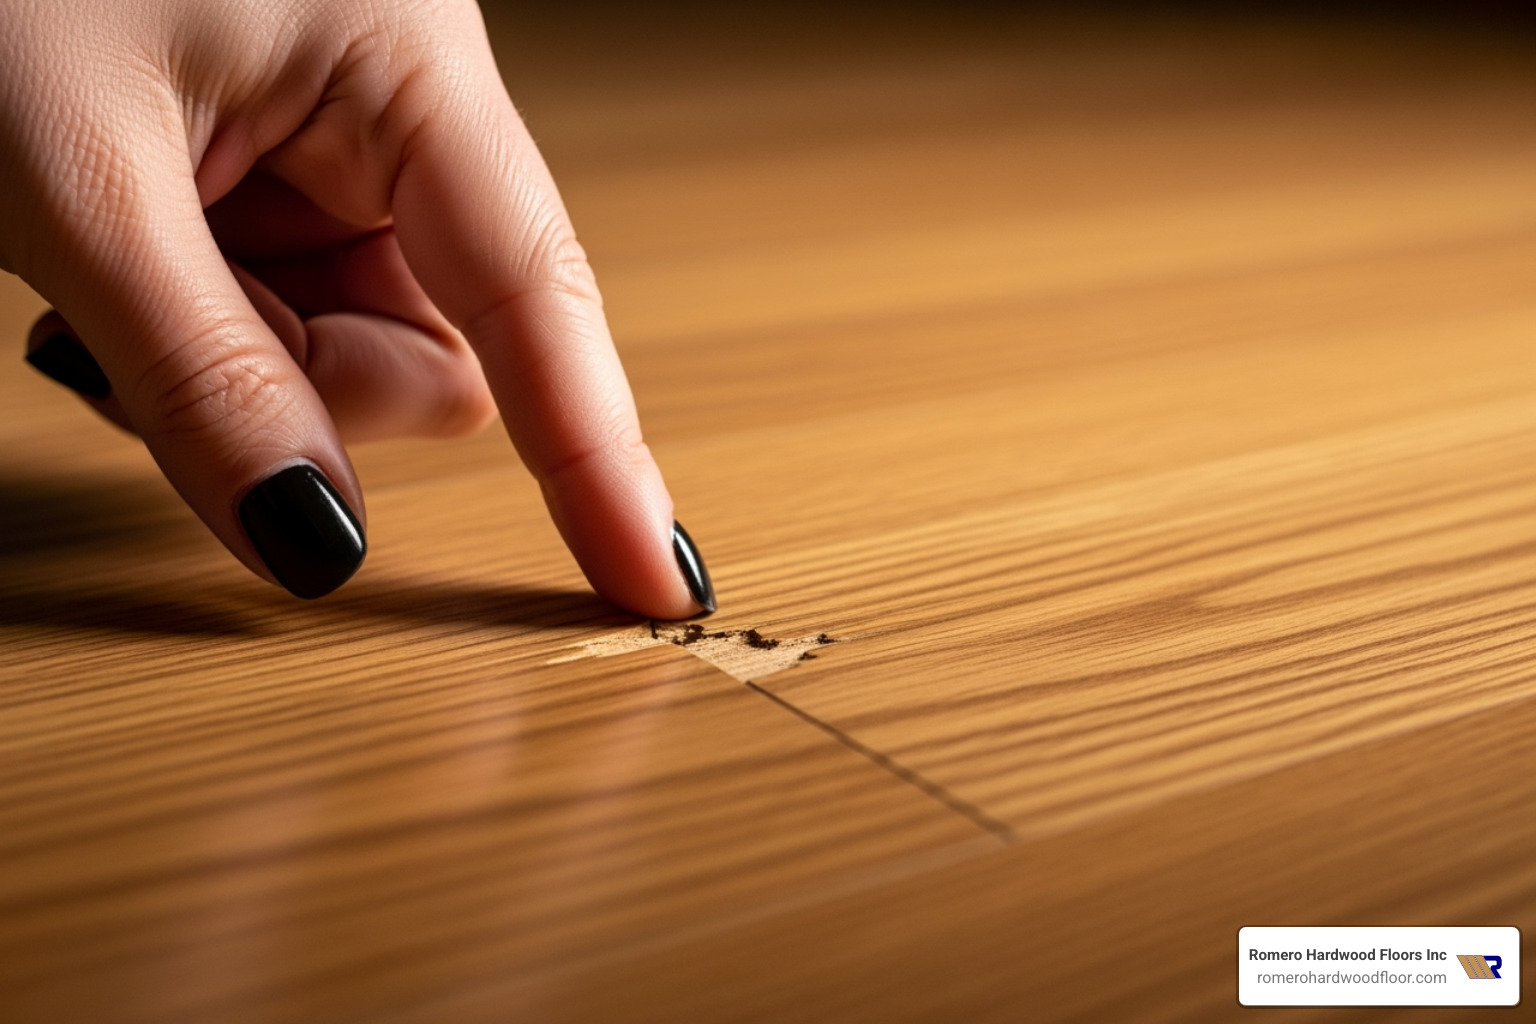
Deeper Gouges & Chipped Edges
This type of damage has penetrated the finish and removed a small amount of the actual wood.
- The Fingernail Test: Your fingernail will definitely catch in the groove.
- Visual Cues: You’ll see exposed, lighter-colored wood fibers. There might be small splinters around the edge of the chip, and you’ll feel a distinct depression. These incidents, often caused by dropped objects, require a filler like wood putty, followed by sanding and sealing. While more involved, they are still very manageable DIY projects for a patient homeowner.
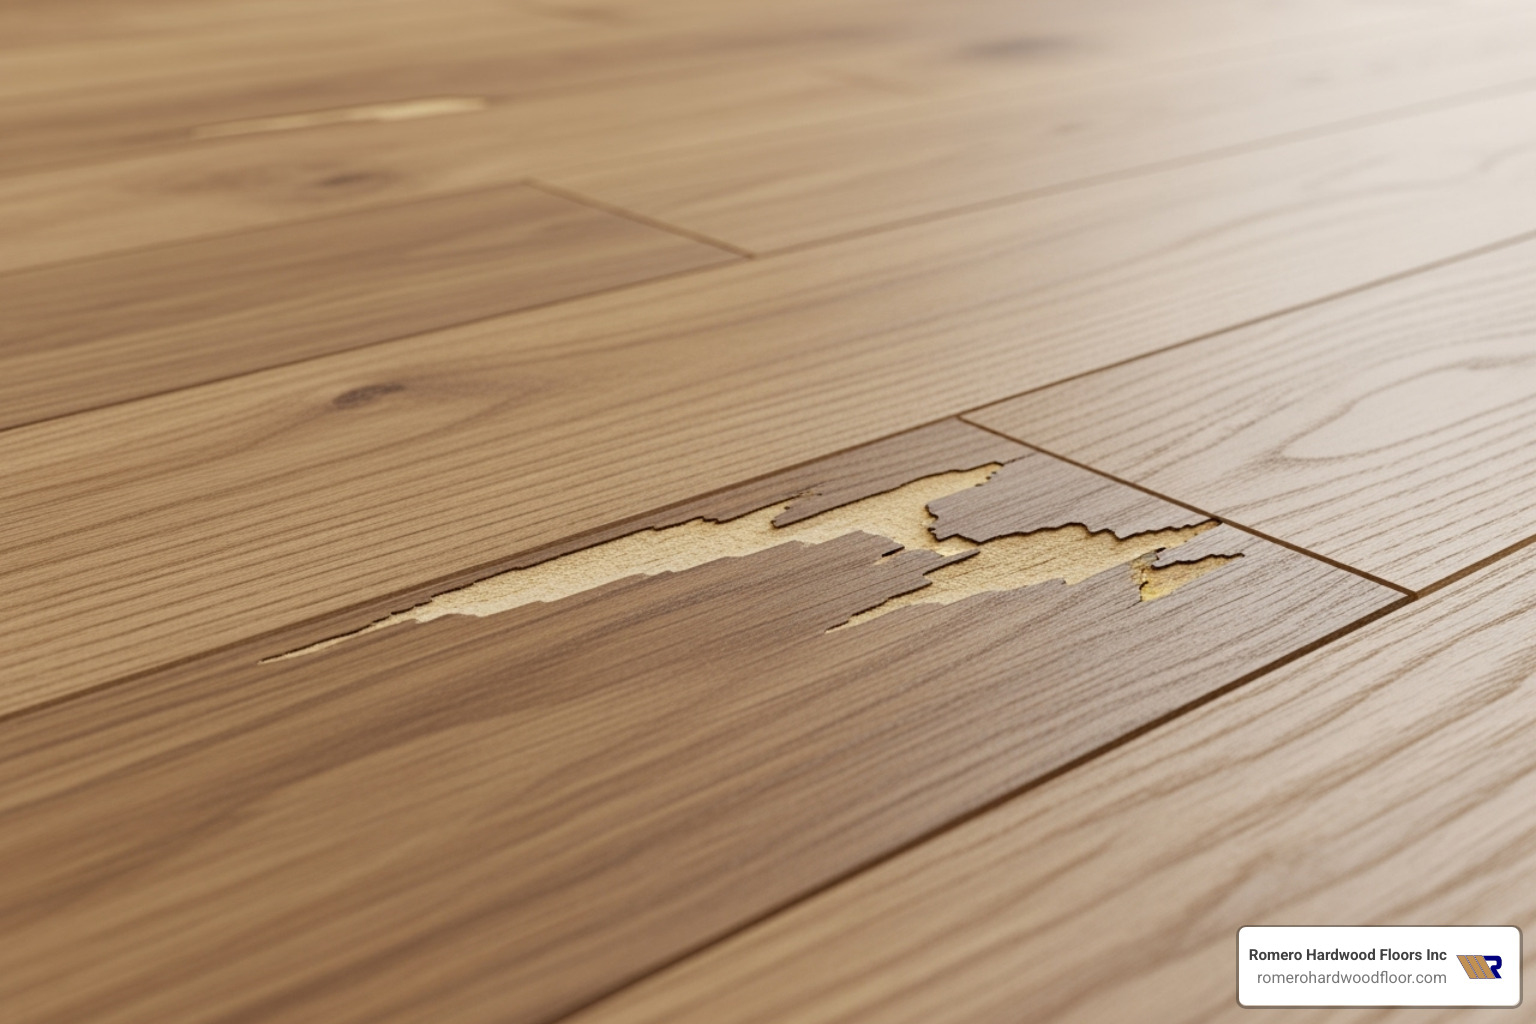
Severe Damage: Missing Wood or Multiple Layers Affected
This is the category where caution is paramount. Severe damage involves significant wood loss or hints at a more serious underlying issue.
- Visual Cues: Look for holes larger than a quarter, deep craters where you can see the layers of the wood plank, or entire corners of boards that have splintered off. Other red flags include boards that are lifted, cracked all the way through, or feel spongy when you press on them. This could indicate sub-floor problems or moisture damage. For this level of repair, an advanced technique like a Dutchman patch is needed, and it’s often best to consult a flooring contractor. Our Hardwood Floor Gouge Repair team is equipped to handle these complex situations daily.
When in doubt—or if the floor is antique, water-stained, in a high-traffic focal point like an entryway, or made of a soft wood like pine—it’s always wisest to bring in a pro for peace of mind and a guaranteed result.
Your Repair Toolkit: Gathering the Right Supplies

Proper preparation is 90% of the job, and that starts with having the right tools on hand. Taking the time to gather these supplies before you begin will save you from frustrating mid-project trips to the hardware store. Most items are inexpensive and widely available.
For Minor Scratches & Scuffs
- 220-320-grit sandpaper: Use this very fine-grit paper to lightly scuff the area, which helps the new finish adhere properly.
- Microfiber cloths & mineral spirits: Mineral spirits are excellent for cleaning the area of any wax, grease, or oils, ensuring your repair doesn’t fail. Microfiber cloths are perfect for application because they don’t leave lint behind.
- Wood-stain markers: The key to success is to buy a kit with two or three shades close to your floor’s color. This allows you to blend them to create a perfect match.
- Wax filler sticks: These are like crayons for your floor. They fill shallow scratches and are buffed to blend in. A small amount of paste wax can be used to seal the repair.
For Deeper Chips & Gouges
- Wood putty or epoxy filler: Choose a stainable wood putty that closely matches your floor’s color. Epoxy fillers are stronger and more durable but can be harder to stain, so they’re best for areas you plan to paint or for use under an opaque finish.
- Hard-wax repair kit: These kits come with several colors of wax sticks and a battery-powered melting tool. They provide a very durable, color-matched repair.
- Flexible putty knife: A small, flexible knife is essential for pressing filler into the chip without scratching the surrounding floor.
- Sandpaper (120, 180, 220 grit) & sanding block: You’ll need a progression of grits to smooth the hardened filler perfectly flush with the floor. The block ensures a flat, even surface.
- Tack cloth: A sticky cloth that is invaluable for removing every last speck of sanding dust before you apply stain or finish.
For a Dutchman Patch (Advanced)
- Chisel set, handsaw or oscillating tool: For precisely cutting out the damaged section of wood.
- Block plane & drill with Forstner bits: To shape the new wood patch for a perfect, tight fit.
- Polyurethane wood glue: Provides a strong, lasting bond for the new wood piece.
- Matching wood off-cut: The patch must be the same species and grain pattern as your floor.
A Critical Note on Safety: Your well-being is paramount. Always wear safety glasses to protect your eyes from dust and debris. When sanding or using solvent-based products like mineral spirits or certain finishes, wear a dust mask or respirator and ensure the room is well-ventilated by opening windows or using a fan.
Step-by-Step Guide to Fixing a Chip in a Wooden Floor
For a complete video library and more in-depth tutorials, you can always visit our Hardwood Floor Repair Techniques page. For now, here is a concise and effective walkthrough for the most common repairs.
1. Prepare the Area (The Most Important Step)
Do not skip this step! A clean, stable base is essential for a durable repair.
- Clean Thoroughly: Vacuum the chip and the surrounding area to remove all dust and debris. Use a small pick or tweezers to carefully remove any loose splinters from inside the chip.
- Tape Off: Use painter’s tape to create a small perimeter around the damage. This protects the undamaged part of your floor from accidental scratches, filler smudges, or stain marks.
- Degrease: Dampen a clean microfiber cloth with mineral spirits and wipe the taped-off area. This removes any cleaning residue or oils that could prevent the filler or finish from adhering. Let it evaporate completely, which usually takes 15-20 minutes.
2. Repair Minor Scratches or Shallow Chips
For damage that’s only skin-deep, a cosmetic touch-up is all you need.
- Using a Stain Marker: First, test the marker color in an inconspicuous spot (like inside a closet or under a large piece of furniture). Apply the color in the direction of the wood grain, using light, feathery strokes. Immediately wipe away any excess with a clean cloth. It’s better to build up the color in several light passes than to apply one heavy, dark coat. Let it dry and buff with a clean cloth. For more tips, see our Hardwood Floor Scratch Repair guide.
- Using a Wax Stick: For slightly deeper abrasions, rub the wax stick firmly across the grain to fill the scratch. Use the edge of a plastic card or a plastic putty knife to scrape away the excess, leaving the wax only in the damaged area. Buff vigorously with a soft cloth to blend the repair.
3. Fill Deeper Gouges & Chipped Edges
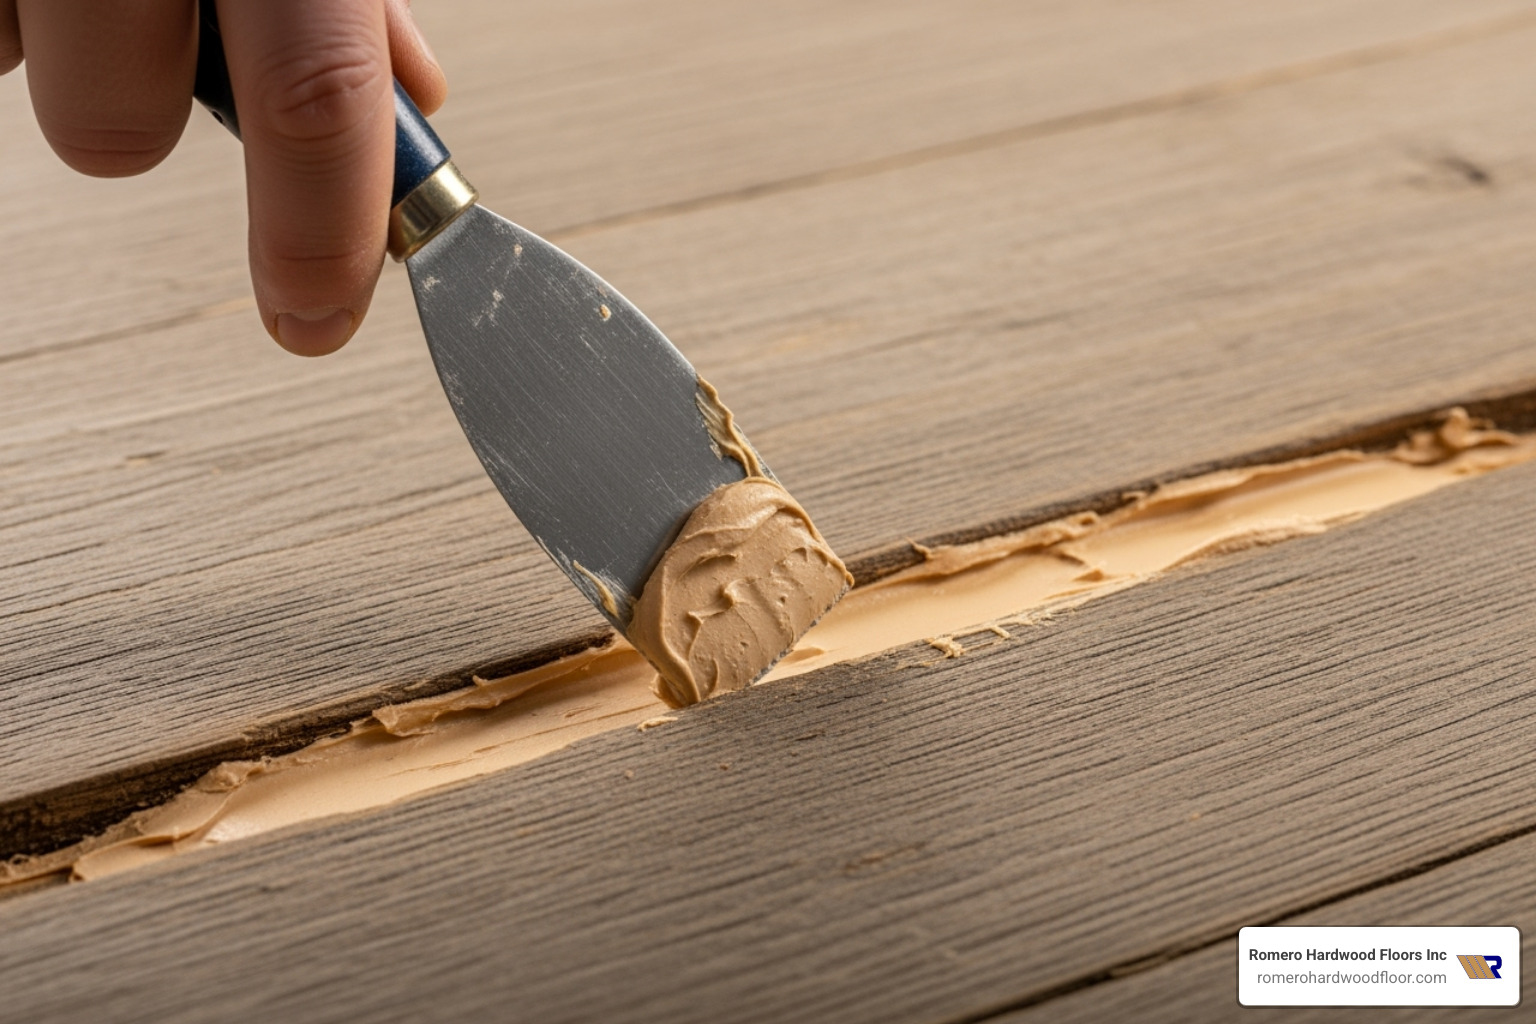
This is where your patience pays off.
- Apply Filler: Using a flexible putty knife, press your chosen wood putty or hard wax into the chip. Apply it in thin layers, ensuring you press firmly to eliminate any air pockets. Overfill the chip slightly, so the filler sits just proud of the floor’s surface. This is crucial because most fillers shrink a bit as they dry.
- Cure Completely: This is a waiting game. Check the product’s instructions for curing times, which can range from a few hours to a full day. Rushing this step will ruin your repair.
- Sand Flush: Start with 120-grit sandpaper on a sanding block to level the hardened filler. Once it’s nearly flush, switch to 180-grit, and then finish with 220-grit to make it perfectly smooth. Always sand with the grain of the wood.
- Finish and Seal: Use a tack cloth to remove all dust. Carefully apply a matching stain to the patch, feathering the edges. Once dry, apply a matching top coat (e.g., polyurethane) to seal the repair and match the sheen of the surrounding floor.
4. Dutchman Patch for Severe Damage
This is a true woodworking technique that replaces the damaged wood entirely. It involves using a chisel to cut a clean, square-edged mortise around the damage. Then, a perfectly matching piece of wood (the ‘Dutchman’) is shaped to fit snugly into the mortise. It’s glued in place with a strong adhesive like Gorilla Glue, clamped for 24 hours, and then sanded flush and finished to match the floor. For a detailed visual guide, we recommend the This Old House Dutchman tutorial. This method provides the strongest, most invisible repair for severe damage.
Taking your time with preparation and allowing for full curing are the two factors that separate a successful DIY repair from a failed one.
Pro Tips for an Invisible Repair
Getting the chip filled is only part of the battle. The final touches are what make the difference between a repair that looks “fixed” and one that looks like it “never happened.” Here are some professional secrets we use at Romero Hardwood Floors.
Color & Sheen Matching is an Art
- Test Everything: Never apply a stain or finish directly to your repair. Test it on a scrap piece of wood or a hidden area first. Wood filler and new wood often absorb stain differently than the aged floorboards around them.
- Layer Your Colors: It’s rare to find a perfect single-color match. Use multiple stain markers or mix small amounts of stain to build up to the correct hue. Start light and go darker.
- Use a Conditioner: For soft woods like pine or maple, applying a Pre-Stain Wood Conditioner before staining prevents a blotchy, uneven appearance.
- Feather the Finish: When applying the final top coat (polyurethane, etc.), use a small artist’s brush to lightly feather the edges of the new finish onto the old. This avoids creating a hard, visible line around your patch.
Re-Create Grain & Texture
A perfectly smooth, glass-like patch on a textured wood floor is a dead giveaway. The goal is imperfect realism.
- Score the Filler: While the wood putty is still slightly soft (but not wet), you can use a fine-tipped tool like a needle or the edge of a razor blade to lightly etch in fake grain lines that match the surrounding wood.
- Add Texture: For rustic or wire-brushed floors, you can gently press a stiff wire brush onto the semi-cured filler to mimic the original texture. This small detail makes a huge difference.
Durability & Long-Term Maintenance
- Respect the Cure Time: This is worth repeating. Do not walk on the repair or place furniture over it for at least 24–48 hours, or whatever the finish manufacturer recommends. A fully hardened finish is a durable finish.
- Prevent Future Damage: Place felt pads on the bottom of all furniture legs. Use area rugs in high-traffic zones. Control your home’s humidity to stay within the 45-65% range to prevent wood from becoming brittle.
- Keep a Touch-Up Kit: Save a small, well-sealed container of your leftover custom-mixed stain and a bit of the top coat. This makes future touch-ups from minor scuffs incredibly fast and easy.
When to Call the Professionals
While DIY repairs can be incredibly rewarding, it’s equally important to recognize their limits. A failed DIY attempt can sometimes make the problem worse, leading to a more complex and expensive professional fix down the line. Contact a professional flooring contractor when you encounter the following situations:
- Widespread or Multiple Damaged Boards: If you have more than two or three significant chips, or if boards are lifted, cracked, or buckling, this often points to a systemic issue rather than an isolated accident.
- Suspected Water Damage or Mold: If the wood is dark-stained, soft, spongy, or if you notice a musty smell, do not attempt to cover it up. This requires professional assessment to address potential mold and subfloor rot, which can affect your home’s structural integrity and air quality.
- Antique or High-Value Exotic Wood: Floors in historic homes in places like Salem or Manchester-by-the-Sea, or floors made of irreplaceable exotic woods, require a specialist’s touch. The wood itself may be brittle, and the original finish can be difficult to match without expert knowledge.
- Previous DIY Fixes Have Failed: If a patch is failing, chipping, or is highly visible, it’s best to have a professional remove it and repair the area correctly.
- The Damage is in a High-Visibility Area: For a chip right in the middle of your entryway or the center of the living room, the demand for a perfect, invisible repair is high. Professionals have the tools and experience to guarantee a seamless result.
Understanding the Costs:
- DIY materials: $5-150
- Professional spot repair: $150-500+ (complex repairs or multiple areas can range from $300-1,500+)
These ranges are internet averages and are for informational purposes only; they are not official pricing from Romero Hardwood Floors Inc.
Often, if your floor has widespread issues—numerous chips, deep scratches, and areas of worn finish—a full sand and refinish can be more cost-effective and will restore the entire surface to a like-new condition. You can learn more about this comprehensive solution in our Hardwood Floor Repair and Refinishing service guide.
Conclusion: Restore Beauty & Value
A chip in wooden floor is an annoying but almost inevitable part of homeownership. As we’ve shown, however, it’s rarely a crisis. The key to a successful outcome is to start with an honest assessment of the damage, gather the right materials for the job, and work methodically through the steps. A simple surface scratch can disappear in minutes with a stain marker. A moderate chip or gouge can be made invisible with the careful application of wood putty and a bit of sanding. Even severe damage can be perfectly rectified with advanced techniques or professional intervention.
Your hardwood floors are a significant feature that adds warmth, character, and tangible value to your home. Maintaining them protects that investment. Whether you live in Beverly, Revere, Somerville, or any of the beautiful North Shore towns we serve, taking care of these small imperfections keeps your entire home looking its best. If you’ve assessed the damage and feel it’s beyond a DIY fix, or if you’d simply rather trust the work to seasoned experts, don’t hesitate to reach out. Schedule professional hardwood floor repair with Romero Hardwood Floors, and let our team put our years of experience to work making that damage disappear for good.
