Fixing Floorboard Squeaks: 7 Powerful Solutions for Peaceful Homes
The Science of Silence: Understanding Floorboard Squeaks
Fixing floorboard squeaks is one of those home maintenance tasks that delivers instant gratification – the annoying noise stops, and your home instantly feels more peaceful. If you’re looking for the quickest solution to quiet your noisy floors, here’s what you need to know:
Quick Guide to Fixing Floorboard Squeaks:
1. Identify the source by walking on the floor while someone listens below
2. For access from below: Insert shims with wood glue into gaps between joists and subfloor
3. For access from above: Drive specialized screws through carpet or hardwood (use breakaway screws for finished floors)
4. Quick temporary fix: Apply talcum powder or powdered graphite between boards to reduce friction
5. When to call a pro: If DIY attempts fail or you need to repair large areas (typical professional cost: $500-$1,500)
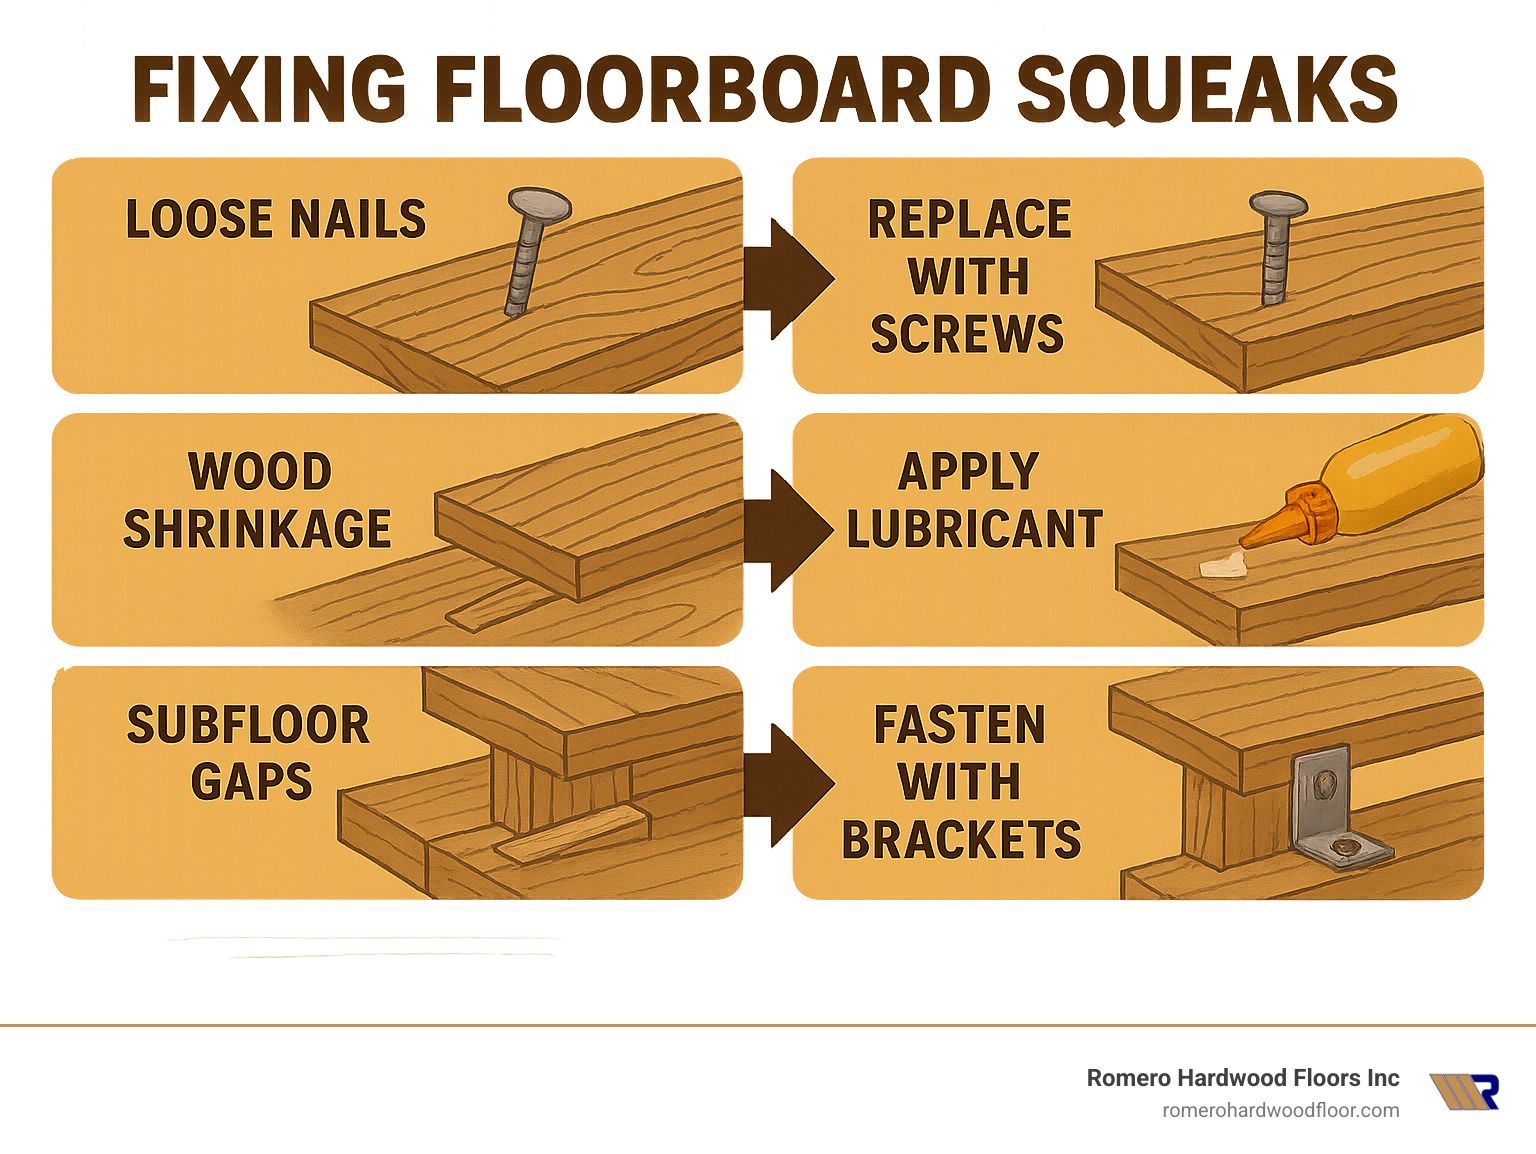
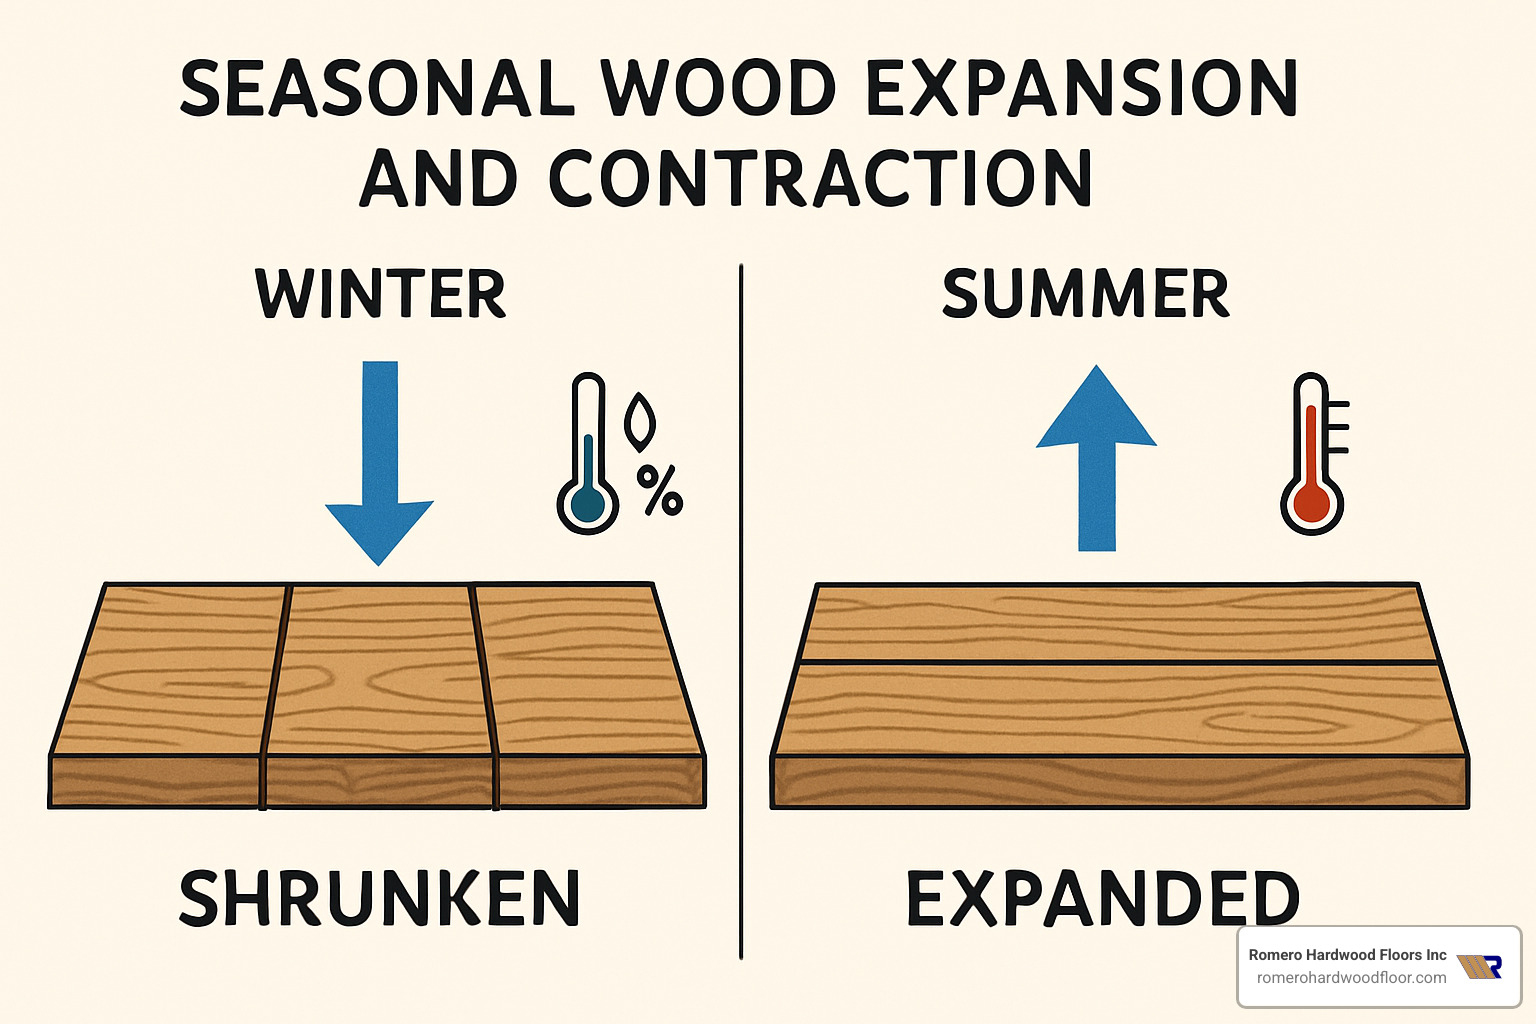
That annoying squeak under your feet isn’t just a nuisance – it’s actually the sound of wood rubbing against wood or against metal fasteners. As wood naturally expands and contracts with seasonal humidity changes, gaps form between your floorboards, subfloor, and joists. When you step on these loose connections, friction creates that classic creaking sound.
Most squeaky floor cases are simpler to fix than they appear, and with the right approach, you can silence those irritating noises without major demolition or expense.
I’m Francisco Romero, owner of Romero Hardwood Floors Inc., and with over 15 years of experience in hardwood flooring installation and repair, I’ve tackled countless cases of fixing floorboard squeaks for homeowners throughout Revere, MA and beyond.
Basic fixing floorboard squeaks vocab:
– fixing dents in wood
– flooring restoration and refinishing
– hardwood floor lifting repair
What Makes Floors Squeak? The Science Behind the Noise
Ever wonder what’s really happening when your floor sounds like it’s hosting a tiny mouse concert? Though one homeowner hilariously described her squeaky floors as “a flock of angry geese following me around the house,” the science behind these noises is actually quite straightforward.
Wood Shrinkage and Expansion
“In my 15 years of experience, I’ve found that most squeaky floor cases trace back to seasonal changes,” says Francisco Romero, owner of Romero Hardwood Floors. “Wood is hygroscopic – fancy talk for saying it’s like a sponge for moisture. It absorbs and releases water based on the surrounding humidity.”
During those cold Massachusetts winters, your heating system creates a desert-like environment indoors. This low humidity causes wood to shrink, creating tiny gaps between floorboards and loosening connections between the subfloor and joists. When summer rolls around with its humidity, the wood expands again – but often not exactly into its original position.
Loose Subfloor Connections
That subfloor beneath your visible flooring connects to floor joists with nails or screws. Over time, as your house gently settles (like we all do after a big meal) and the wood repeatedly swells and shrinks, these fasteners can loosen their grip.
Here’s something that might blow your mind: at normal room temperature (72°F), wood at 60% relative humidity holds over 3 pints of water per cubic foot. Drop that humidity to 10%, and it holds less than 1 pint. This dramatic moisture variation causes significant size changes – and that movement creates opportunities for squeaks.
Joist Gaps and Movement
Floor joists are the backbone of your floor system. When gaps form between the subfloor and these joists, the subfloor can move up and down when walked upon – creating that classic squeak that wakes up the whole house during your midnight snack run.
Nail or Screw Movement
As one straight-talking DIY expert told us during our research, “Nails can rub and cause squeaks; screws won’t.” Many traditional hardwood installations used nails, which can work loose over time, creating friction points that sound off with every step.
The Role of Humidity
The New England climate is about as predictable as a toddler’s food preferences. These dramatic swings in humidity are tough on your floors. Maintaining consistent indoor humidity (ideally 30-50%) can significantly reduce floor squeaking. Many of our Revere clients have found that simply adding a humidifier in winter months reduces squeaking dramatically – a simple fix before diving into more involved fixing floorboard squeaks projects.
Want to see exactly what’s happening beneath your feet? This tutorial video on floor squeaks from This Old House shows the mechanics in action and might help you better understand what’s happening beneath your squeaky boards.
Fixing Floorboard Squeaks: Step-by-Step Checklist
Before you grab your tools and get to work fixing floorboard squeaks, let’s make sure you have everything you need. Think of this as preparing for a mini home improvement trip – one that ends with blessed silence underfoot!
You’ll want to gather these trusty companions for your squeak-busting mission:
– Wood shims (those tapered exterior siding shingles work wonderfully)
– Construction adhesive (the stickier, the better)
– Wood screws ranging from 1½” to 3″ (your floor’s new best friends)
– Powdered graphite or talcum powder (for those friction points)
– A drill with screwdriver bits (your right-hand tool)
– Stud finder (to locate those hidden joists)
– Hammer (sometimes a gentle tap is all you need)
– Wood filler that matches your beautiful floor color
Now let’s silence those noisy boards once and for all!
Fixing Floorboard Squeaks from Below
If you’re lucky enough to have basement or crawl space access, you’ve hit the jackpot! Working from below is like having a backstage pass to your floor problems – less invasive and often more effective.
Step 1: Locate the Squeak
This is where teamwork shines. Have someone walk across your floor upstairs while you play detective below with a flashlight. When that telltale squeak sounds off, mark the spot. I like to tap the subfloor to signal my helper, who then marks the spot from above. It’s like a home repair treasure hunt!
Step 2: Identify the Gap
Shine your light along the joists and look for tiny spaces between the subfloor and floor joists. Even gaps as small as 1/16 inch can create an impressive symphony of squeaks when you walk overhead.
Step 3: Insert Shims with Adhesive
For those pesky small gaps, here’s a trick we use at Romero Hardwood Floors all the time: coat a thin wood shim with carpenter’s glue and gently tap it into the gap. The key is restraint – don’t force it all the way in or you might create a bump in your floor above. Once the glue sets, simply score and snap off any excess shim.
One homeowner in Revere told me, “I was amazed that something as simple as a little wooden wedge could fix a squeak that had been driving me crazy for years!”
Step 4: Use Construction Adhesive for Longer Gaps
When you spot a gap that runs along a joist like a tiny canyon, construction adhesive is your best friend. Apply a careful bead along both sides where the joist meets the subfloor. For best results, have your helper stand on the floor above to press everything together while the adhesive sets. Think of it as giving your floor a firm handshake while the glue dries.
Step 5: Secure with Screws
For a fix that really means business, drive a 1¼-inch drywall screw at an angle through the joist and into the subfloor. If you’ve used a shim, send that screw right through the joist, shim, and into the subfloor for maximum stability. Just be careful not to use screws that are too long – nobody wants screw tips poking through their beautiful hardwood!
Step 6: Add Blocking for Severe Squeaks
Some squeaks are more stubborn than others. For these troublemakers, solid blocking between joists works wonders. Cut 2×4 blocks to fit snugly between joists, apply construction adhesive to the top edge, and install them perpendicular to the joists, right under the problem area. Secure with screws, and voilà – silence!
A client in Revere had a dining room squeak that simply wouldn’t quit. After we installed solid blocking, they called three years later to say, “Not a single squeak since you fixed it – even during Thanksgiving dinner with the whole family!”
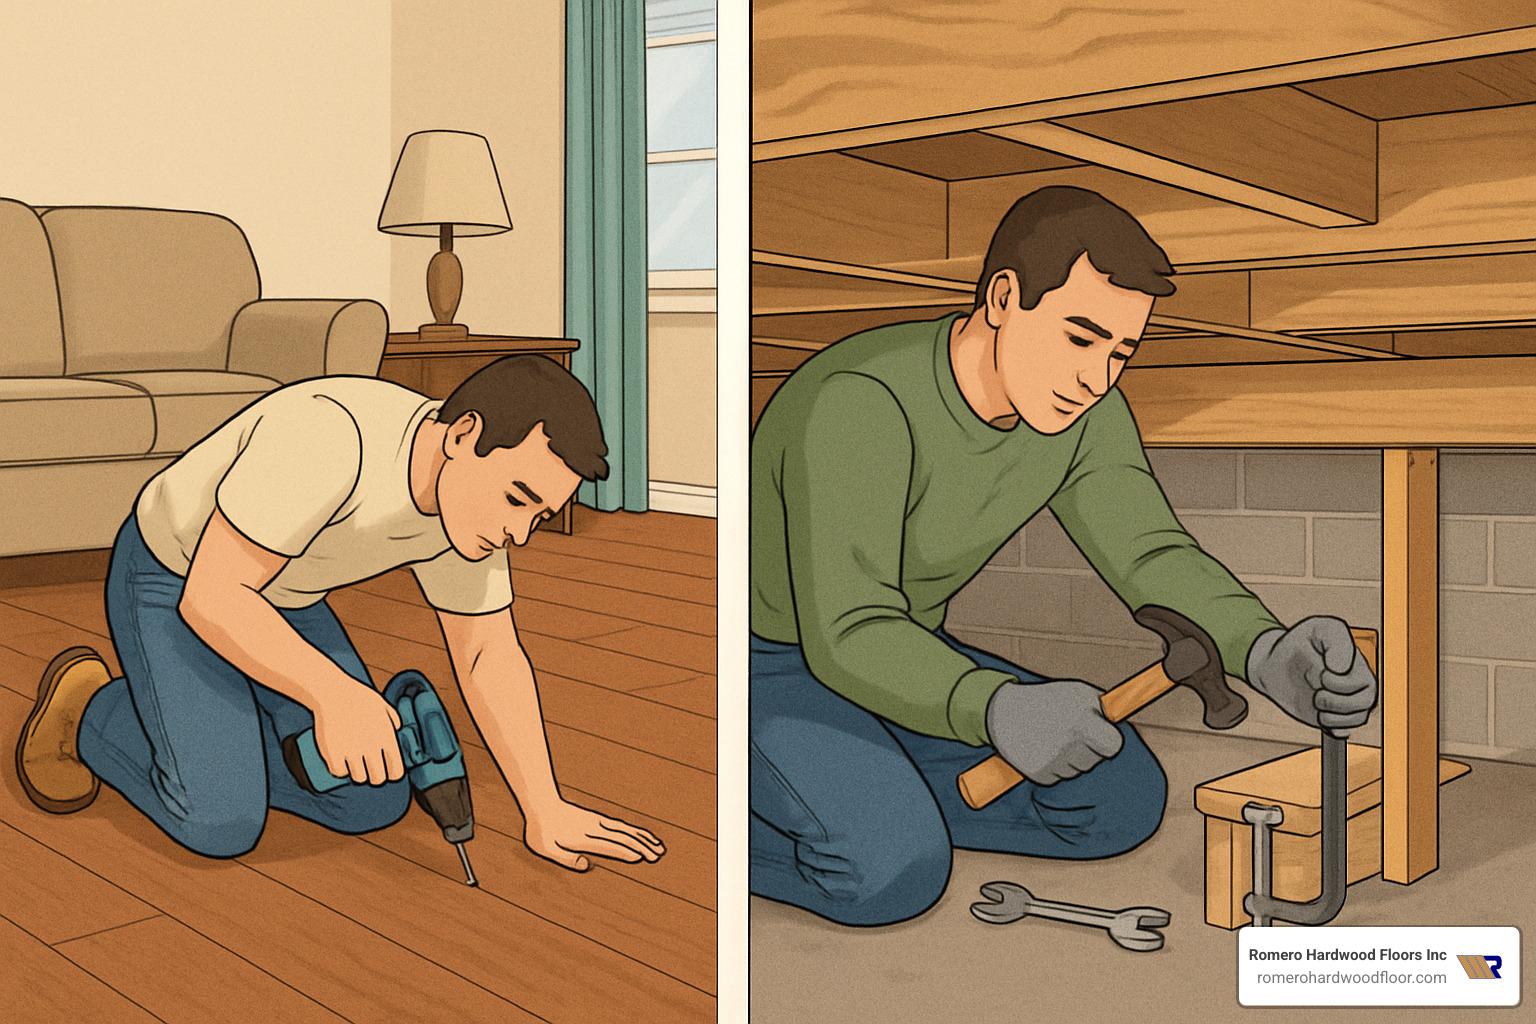
Fixing Floorboard Squeaks from Above
When you can’t access the floor from below – perhaps because of a finished ceiling or concrete slab foundation – you’ll need to work your magic from above. The approach varies depending on your flooring type.
For Hardwood Floors:
First, locate the squeak by walking slowly across the floor. I like to mark these spots with painter’s tape – it’s like creating a map of annoying sounds! Next, find the joists using a stud finder or by looking for existing nail lines.
For minor squeaks, try lubrication first. Sprinkle some talcum powder, powdered graphite, or dry lubricant into the seams between boards. Cover with a towel and walk back and forth to work the powder into the joints. This simple trick works surprisingly often for new squeaks.
When lubrication isn’t enough, counter-snap screws are your next option. Drill a 3/32-inch pilot hole through the floorboard into the joist (stay at least ½ inch from the board edge). Then drive a specialized breakaway screw until the head snaps off below the surface. A dab of matching wood putty makes the repair virtually invisible.
For those truly stubborn squeaks, try the cross-nailing technique. Drill pairs of angled pilot holes in opposing directions, drive 8d galvanized finishing nails along these angles, set them slightly below the surface, and fill with matching wood putty. It’s like creating a tiny wooden lock that prevents movement.
For Carpeted Floors:
Working through carpet might seem daunting, but specialized kits make it surprisingly easy. Start by locating the squeak and finding the joists with your stud finder. Then use a kit like Squeeeeek-No-More, which includes a depth-control fixture and special breakaway screws.
Position the fixture over the squeaky spot, drive the screw through the carpet, pad, and subfloor into the joist, and continue tightening until the screw head breaks off below the carpet surface. The beauty of this system is that the screw remains completely hidden – no one will ever know it’s there!
A homeowner in Malden shared with me: “I was terrified of ruining my carpet, but after using the kit you recommended, my floors are completely silent. You can’t even tell where I put the screws!”
Need more guidance on fixing your floors? Check out our detailed guide to Hardwood Floor Squeak Repair or learn more about solving other common issues with our DIY Guide to Hardwood Floor Scratch Repair.
With these techniques in your DIY toolkit, you’re well on your way to a peaceful, squeak-free home. And remember, if you hit a roadblock, Romero Hardwood Floors is just a phone call away!
Above or Below? Choosing the Right Repair Method
Deciding whether to tackle your squeaky floors from above or below isn’t just a technical choice – it’s about finding the solution that works best for your home’s specific situation. Let’s explore both approaches to fixing floorboard squeaks and help you make the right call.
Accessibility Considerations
If you’re lucky enough to have access to the underside of your squeaky floor, you’ve hit the repair jackpot! Working from below offers several clear advantages:
Below-floor repairs keep your beautiful finished flooring completely untouched. You’ll also get a clearer view of what’s actually causing the squeak, which means you can address the root problem directly. Plus, you’ll have more reinforcement options at your disposal – from shims to blocking to bridging.
As one of our Revere clients put it: “I was dreading having to mess with my newly refinished maple floors. When Francisco suggested fixing from the basement instead, I was so relieved!”
Of course, below-floor access isn’t always in the cards, especially if you’re dealing with:
– Multi-story homes where one floor’s ceiling is another’s floor
– Finished basements with drywall ceilings
– Slab-on-grade foundations with no crawl space
Time and Skill Requirements
When weighing your options, consider both your DIY comfort level and how much time you can devote to the project:
| Repair Method | Time Required | Skill Level | Visibility of Repair | Long-Term Durability |
|---|---|---|---|---|
| Below Floor: Shims & Adhesive | 1-2 hours | Beginner | Completely hidden | Excellent |
| Below Floor: Blocking/Bridging | 2-3 hours | Intermediate | Completely hidden | Excellent |
| Above Floor: Lubrication | 15-30 minutes | Beginner | Completely hidden | Temporary (3-6 months) |
| Above Floor: Screws (Hardwood) | 1-2 hours | Intermediate | Minimal (filled holes) | Very good |
| Above Floor: Screws (Carpet) | 30-60 minutes | Beginner | Completely hidden | Very good |
“If you’re in a hurry and just need a quick fix before a dinner party, the lubrication method might be your best friend,” says Francisco Romero. “But if you want something that’ll last for years, taking the time for a proper structural fix will pay off.”
Finish Disruption Concerns
Let’s be honest – the biggest worry with above-floor repairs is damaging your beautiful hardwood. Working from above does carry some risk of visible marks, but with careful technique and matching wood filler, repairs can be nearly invisible.
“The key is taking your time with the wood filler,” our finishing expert always tells clients. “Choose a filler that matches your floor color exactly, and apply it carefully with a putty knife. Once sanded and sealed, most people won’t notice the repair.”
For carpeted floors, special repair kits make the process virtually invisible – the screws break off below the carpet surface, leaving no trace of your handiwork.
Long-Term Durability Considerations
In our 15+ years of fixing floorboard squeaks at Romero Hardwood Floors, we’ve found that below-floor repairs typically last longer because they address the structural cause of the squeak. When you can actually see the gap between joist and subfloor, you can fix it directly.
However, don’t discount above-floor techniques. Modern specialized screws provide excellent long-term results, especially when you can locate and secure directly to the joists. As one contractor in our research noted, “The contractor is ‘right on the money’ recommending the above-floor approach when below access isn’t available.”
Many of our Massachusetts clients have been surprised at how effective and durable the right above-floor repair can be, especially when done correctly with the proper tools and techniques.
The goal is silence – and both approaches can get you there when applied correctly to the right situation. If you’re still unsure which approach is best for your specific squeaky floor situation, we’re always happy to provide a professional assessment.
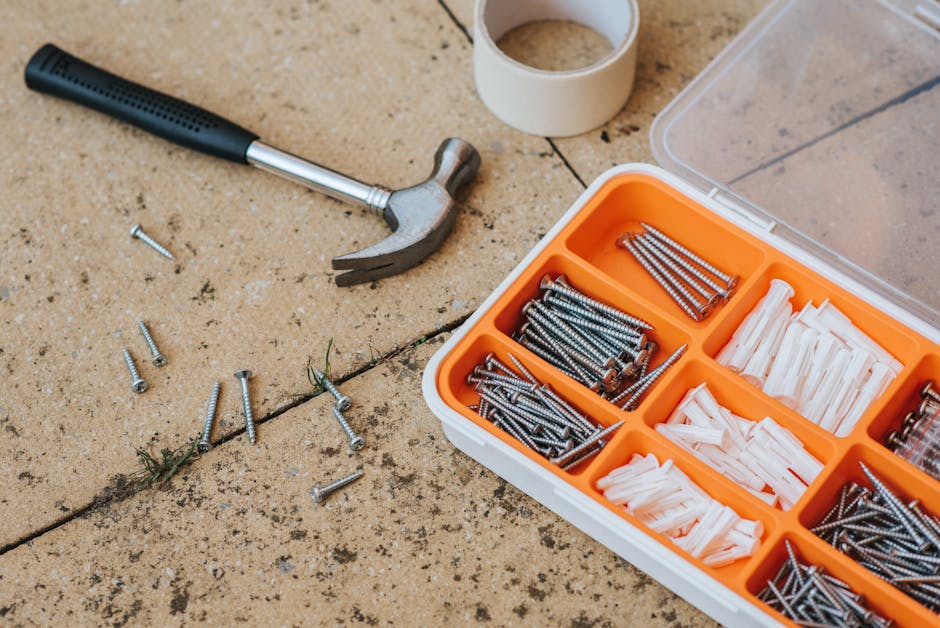
Tools, Materials & Safety Gear You’ll Need
Getting ready to silence those squeaky floors? Let’s make sure you have everything you need before you start fixing floorboard squeaks. Having the right tools on hand will make your repair go much more smoothly!
When I visit homes around Revere for floor repairs, homeowners often ask what they should have ready if they want to tackle this project themselves. Here’s my tried-and-true list of essentials:
Essential Tools:
Your toolbox for this job doesn’t need to be fancy, but a few specific items will make all the difference. A good drill/driver is your best friend for this project – you’ll use it constantly for driving screws and creating pilot holes. Pair that with a reliable stud finder to locate those hidden floor joists, and you’re halfway there!
“I always tell my clients that a good stud finder is worth its weight in gold,” says our senior technician. “Finding those joists accurately the first time saves so much frustration later.”

Don’t forget safety gear – your eyes, ears and hands deserve protection! Safety goggles shield your eyes from wood splinters (which love to fly when you’re driving screws into old wood), while work gloves protect your hands from scratches and blisters during longer repair sessions.
For measuring and marking, a simple tape measure and pencil will do the trick. Add a hammer and nail set if you’re working with finishing nails, plus a putty knife for applying wood filler to those finished hardwood repairs.
Materials for Below-Floor Repairs:
If you’re lucky enough to have access from below, grab some tapered wood shims (cedar exterior siding shingles work perfectly) and a tube of fast-setting construction adhesive. You’ll need a caulking gun to apply that adhesive precisely between joists and subfloor.
Wood screws are essential – I recommend having various lengths from 1¼” to 3″ on hand, as the right length depends on your specific floor construction. For serious squeaks, pick up some 2×4 lumber for blocking or steel bridging if you prefer a metal solution.
Materials for Above-Floor Repairs:
Working from above requires some specialized materials, especially for finished floors. For hardwood, the Counter-Snap Kit includes breakaway screws designed to snap off below the surface, leaving your beautiful floors unmarred. For carpeted areas, the Squeeeeek-No-More kit works wonders with its special depth-control fixture.
Don’t overlook the importance of matching wood putty if you’re working on visible hardwood. As one homeowner in Malden told me, “The repair was completely invisible after using the exact shade of putty for my oak floors.”
For quick, temporary fixes, some powdered graphite or even regular talcum powder can reduce friction between boards. A roll of painter’s tape is handy for marking squeak locations as you test the floor.
Safety First
I can’t stress enough how important safety is when fixing floorboard squeaks. Crawl spaces and basements can be hazardous work environments with poor lighting, exposed nails, and sometimes electrical or plumbing obstacles.
Always ensure you have adequate lighting – a good headlamp keeps your hands free while illuminating your work area. If you’ll be spending time on your knees (and you probably will), invest in some comfortable knee pads to prevent unnecessary pain the next day.
Your eyes and ears are irreplaceable. Wear those safety glasses when driving fasteners, as even experienced professionals can have a screw or nail break unexpectedly. And if you’re using power tools in enclosed spaces, hearing protection is a must!
For more detailed guidance on floor repair techniques, check out our Step-by-Step Hardwood Floor Repair Techniques guide.
Cost, Prevention & When to Call a Pro
DIY Cost Considerations
Silencing those annoying squeaks doesn’t have to break the bank. If you’re tackling the project yourself, here’s what you might spend:
The simplest approach—sprinkling some talcum powder or graphite between boards—will only set you back about $5-$15. This might be all you need for minor squeaks!
For more persistent problems, specialized repair kits like Squeeeeek-No-More or Counter-Snap typically cost between $20-$50. These kits include everything you need to secure loose boards from above.
If you’re working from below your floor, expect to spend $25-$100 on shims, construction adhesive, screws, and blocking materials. And if you’re starting from scratch with no tools, a comprehensive DIY toolkit might run $75-$200.
Compare these modest DIY costs to hiring a professional, which according to internet averages ranges from $500-$1,500 for typical homes. More extensive repairs or luxury flooring could potentially reach $3,000-$4,500 based on industry averages. (These figures represent internet research averages and not Romero Hardwood Floors Inc.’s actual pricing.)
Preventing Future Squeaks
“The best repair is the one you never have to make,” as Francisco often tells our clients. Here are some simple ways to keep your floors quiet for years to come:
Maintain consistent humidity in your home between 30-50% year-round. In our New England winters, this usually means running a humidifier, while summer might require dehumidifiers or air conditioning. Stable humidity prevents the wood expansion and contraction cycle that leads to squeaks.
Be gentle with water when cleaning hardwood floors. A slightly damp mop is fine, but avoid soaking your beautiful hardwoods. Excess moisture can seep between boards and create movement as it dries.
Check and tighten any visible fasteners periodically, especially in high-traffic areas where movement is most common. This five-minute maintenance task can prevent squeaks before they start.
Address small squeaks early rather than waiting until they drive you crazy. Minor issues are almost always easier and less expensive to fix than problems that have persisted for years.
One Peabody homeowner shared a success story after our visit: “Following Romero’s advice about installing a whole-house humidifier not only kept new squeaks from forming, but my furniture and woodwork throughout the house stopped cracking too. Best investment I’ve made in home maintenance.”
When to Call a Professional
While many homeowners successfully tackle squeaky floors themselves, some situations definitely call for professional expertise:
When you’re dealing with multiple widespread squeaks throughout large areas of flooring, a pro can systematically address the entire floor system rather than just treating symptoms.
If you notice excessive bouncing or sagging along with the squeaks, this could indicate structural issues that require expert evaluation. Don’t risk making things worse.
For valuable or historic hardwood flooring, professional repair techniques can preserve your floor’s beauty and value. We’ve restored century-old floors in Guide Hill homes where visible repairs would have drastically reduced the property’s value.
Specialized flooring types like engineered hardwood, bamboo, or exotic species often require specific techniques that differ from traditional hardwood approaches.
And of course, if you’ve already attempted DIY fixes but the squeaks return, it’s probably time to call in reinforcements. At Romero Hardwood Floors Inc., we’ve developed specialized techniques for fixing floorboard squeaks without damaging your valuable flooring—combining traditional craftsmanship with modern materials for results that truly last.
Preventive maintenance is always less expensive than repairs. Consider scheduling a professional inspection every 5-7 years to catch developing issues before they become noisy problems.
Frequently Asked Questions about Fixing Floorboard Squeaks
What tools are essential for a quick DIY fix?
That annoying squeak doesn’t have to haunt you forever, and you probably already have most of what you need in your toolbox. For the simplest fixing floorboard squeaks project, grab a stud finder (to locate those hidden joists), a drill with appropriate bits, and screws that are the right length for your specific flooring system. Don’t forget wood filler that matches your floor color and a putty knife for a clean finish.
“I was surprised that I already had most of the tools I needed in my garage,” shared one Revere homeowner who followed our advice. “The only thing I had to buy was the special breakaway screws.”
If you’re tackling the job from below, you’ll also want construction adhesive and some thin wood shims. For a super quick temporary fix, even just some talcum powder or powdered graphite can buy you some peace and quiet for a few months.
Can I silence squeaks under carpet without removing it?
Absolutely! This is actually one of our most frequently asked questions at Romero Hardwood Floors. You don’t need to rip up your beautiful carpet to silence what’s underneath. Specialized kits like Squeeeeek-No-More are perfect for this situation.
These clever kits include a tripod fixture that lets you drive screws to a precise depth, special scored screws that break off below the carpet surface, and a screw gripper that prevents your carpet fibers from snagging during installation.
The process is beautifully simple: locate the floor joist under the carpet with your stud finder, position the tripod over the squeaky area, drive the special screw through the carpet, pad, and subfloor into the joist, and continue until the screw snaps off below the carpet surface. Once done, the repair is completely invisible as the carpet fibers naturally close over the screw location. No one will ever know you were there – except your grateful family members who no longer have to listen to that midnight squeak!
How do I know it’s time to hire a professional?
While DIY approaches to fixing floorboard squeaks work wonderfully in many situations, there are definite signs it’s time to call in the experts. If you’ve already tried lubricant, screws, or shims and that stubborn squeak persists, it might be time for professional help. Similarly, when squeaking is widespread across large sections of flooring, you’ll benefit from a systematic approach that professionals can provide.
Pay special attention if your floor feels bouncy or uneven in addition to squeaking – these could indicate structural issues that require expert assessment. And if you have valuable hardwood flooring, professional repairs can be nearly invisible, preserving both your sanity and your investment.
“I tried fixing my squeaky dining room floor twice on my own,” admitted one client from Malden. “After Romero’s team fixed it in under an hour with no visible evidence of repair, I wished I’d called them first!”
Sometimes it simply comes down to tools or confidence – if you’re unsure about what you’re doing, professional help can save you time, money, and frustration in the long run.
How long do DIY squeaky floor fixes typically last?
The staying power of your fixing floorboard squeaks project depends entirely on which method you choose. Simple lubrication with talcum powder or graphite typically lasts 3-6 months, sometimes stretching to a year if you’re lucky. Screw-based repairs from above tend to hold strong for 5-10+ years when properly installed.
For more permanent solutions, shims and adhesive applied from below typically last 10-20+ years in most cases. The gold standard remains blocking and bridging from below, which often lasts the lifetime of the floor.
One of our clients in Salem confirmed this longevity: “The blocks Romero installed between my floor joists five years ago are still doing their job perfectly. Not a single squeak has returned.”
Will fixing squeaks damage my hardwood floors?
We hear this concern frequently, and we’re happy to reassure you: when done properly, fixing floorboard squeaks causes minimal to no visible damage to your beautiful hardwood floors.
Lubrication methods cause absolutely no damage at all – they simply reduce friction between moving parts. Screw-based repairs leave tiny holes that we fill with carefully matched wood putty, making them virtually invisible once complete. And our below-floor repairs leave no visible evidence whatsoever on your finished floor.
The secret is using the right techniques and materials for your specific flooring type. At Romero Hardwood Floors Inc., we take special care to match wood filler to your exact floor color and finish. Our meticulous approach ensures repairs blend seamlessly with your existing floor, preserving both its beauty and your peace of mind.
Whether you choose to tackle the squeaks yourself or bring in our experienced team, saying goodbye to those annoying floor noises is absolutely possible without compromising your floor’s appearance.
Conclusion
Ah, the sweet sound of silence! Fixing floorboard squeaks is truly one of home maintenance’s most immediately rewarding projects. There’s something deeply satisfying about silencing that persistent creak that’s been driving you crazy during midnight snack runs or when you’re trying to tiptoe past a sleeping baby’s room.
After helping hundreds of homeowners throughout Massachusetts solve their squeaky floor problems, I can tell you that most fixes are simpler than they first appear. Whether you’ve tackled the project yourself using our guide or called in our team at Romero Hardwood Floors Inc., you’ve not only created a more peaceful home environment but also prevented potential long-term damage to your flooring system.
Wood is always in motion with the seasons. Those beautiful hardwood floors are constantly responding to the environment around them, which is why maintaining consistent indoor humidity levels (30-50%) is one of the smartest preventive measures you can take. As one of our long-time clients in Beverly puts it, “My whole house just feels better since installing that humidifier – not just my floors!”
For homeowners throughout Revere, Chelsea, Danvers, and surrounding communities, we at Romero Hardwood Floors Inc. have developed specialized squeak repair techniques over our 15+ years in business. We understand that every home and every floor tells its own story, and sometimes that story includes a few unwanted sound effects that we can help eliminate.
The techniques outlined in this guide should serve most homeowners well for DIY repairs. But if you find yourself facing particularly stubborn squeaks or just prefer the confidence of professional work, we’re always here to help restore peace and quiet to your home.
Don’t let those annoying squeaks become the soundtrack of your daily life. With a few simple tools and techniques – or with professional help when needed – you can enjoy the blissful silence of squeak-free floors once again.
For more information about our hardwood floor repair services, visit our hardwood floor repair page or contact us for a consultation. Your floors (and your sanity) will thank you!
