Fixing Scratched Floors: 7 Powerful Ways to Instantly Restore
The Reality of Scratched Floors: Quick Solutions for Every Homeowner
Fixing scratched floors is a common challenge for homeowners, but many scratches can be repaired without professional help. Here’s a quick guide to addressing different types of scratches:
| Scratch Type | Best DIY Fix | Materials Needed |
|---|---|---|
| Surface Scuffs | Buff with microfiber cloth | Microfiber cloth, floor cleaner |
| Light Scratches | Stain marker or walnut | Stain pen, walnut, cloth |
| Medium Scratches | Wax stick or crayon | Matching wax stick, soft cloth |
| Deep Gouges | Wood filler | Wood filler, sandpaper, stain |
If you have hardwood floors, scratches are almost inevitable despite your best efforts. Whether it’s from your pet’s enthusiastic dash across the room, furniture being moved during spring cleaning, or a dropped kitchen utensil, these marks can detract from your floor’s natural beauty.
Fixing scratched floors doesn’t have to mean an expensive professional refinishing job. In fact, many scratches can be effectively concealed or repaired using simple household items or affordable products from your local hardware store.
The good news is that most minor scratches affect only the finish layer, not the wood itself, making them relatively easy to address. For deeper gouges that penetrate the wood, there are still several DIY approaches that can restore your floor’s appearance before considering more extensive refinishing.
I’m Francisco Romero, owner of Romero Hardwood Floors Inc., and with over 15 years of experience fixing scratched floors throughout Revere, MA, I’ve developed practical solutions for every type of floor damage you might encounter.

Fixing scratched floors vocab explained:
– fixing floorboard squeaks
– hardwood floor lifting repair
– flooring restoration and refinishing
Spot the Scratch: Types & Severity Assessment
Before rolling up your sleeves and fixing scratched floors, let’s take a moment to properly identify what you’re dealing with. Think of this as your scratch detective work – the more accurately you diagnose the problem, the more effective your repair will be.
Surface & Finish-Only Scratches
Those faint white lines catching the light when you walk into the room? These are typically just surface scratches that haven’t penetrated your floor’s protective armor:
“Surface scratches are like paper cuts to your floor’s finish,” we often tell our clients in Beverly and Revere. “They look worse than they are and can usually be fixed with minimal effort.”
These superficial scratches only affect the topcoat (polyurethane, varnish, or wax) and haven’t reached the actual wood beneath. Here’s a simple test: run your fingernail gently across the scratch. If your nail glides smoothly without catching, you’re in luck! You’re dealing with a finish-only scratch that can typically be buffed out with a microfiber cloth or treated with a finish restorer.
These lighter scratches often appear as white or light-colored lines because they’re reflecting light differently than the surrounding finish. With the right approach, they can virtually disappear.
Deep Scratches, Gouges & Dents
When your fingernail catches on the scratch, you’ve entered deeper territory. These scratches have broken through the protective finish and reached the actual wood beneath:
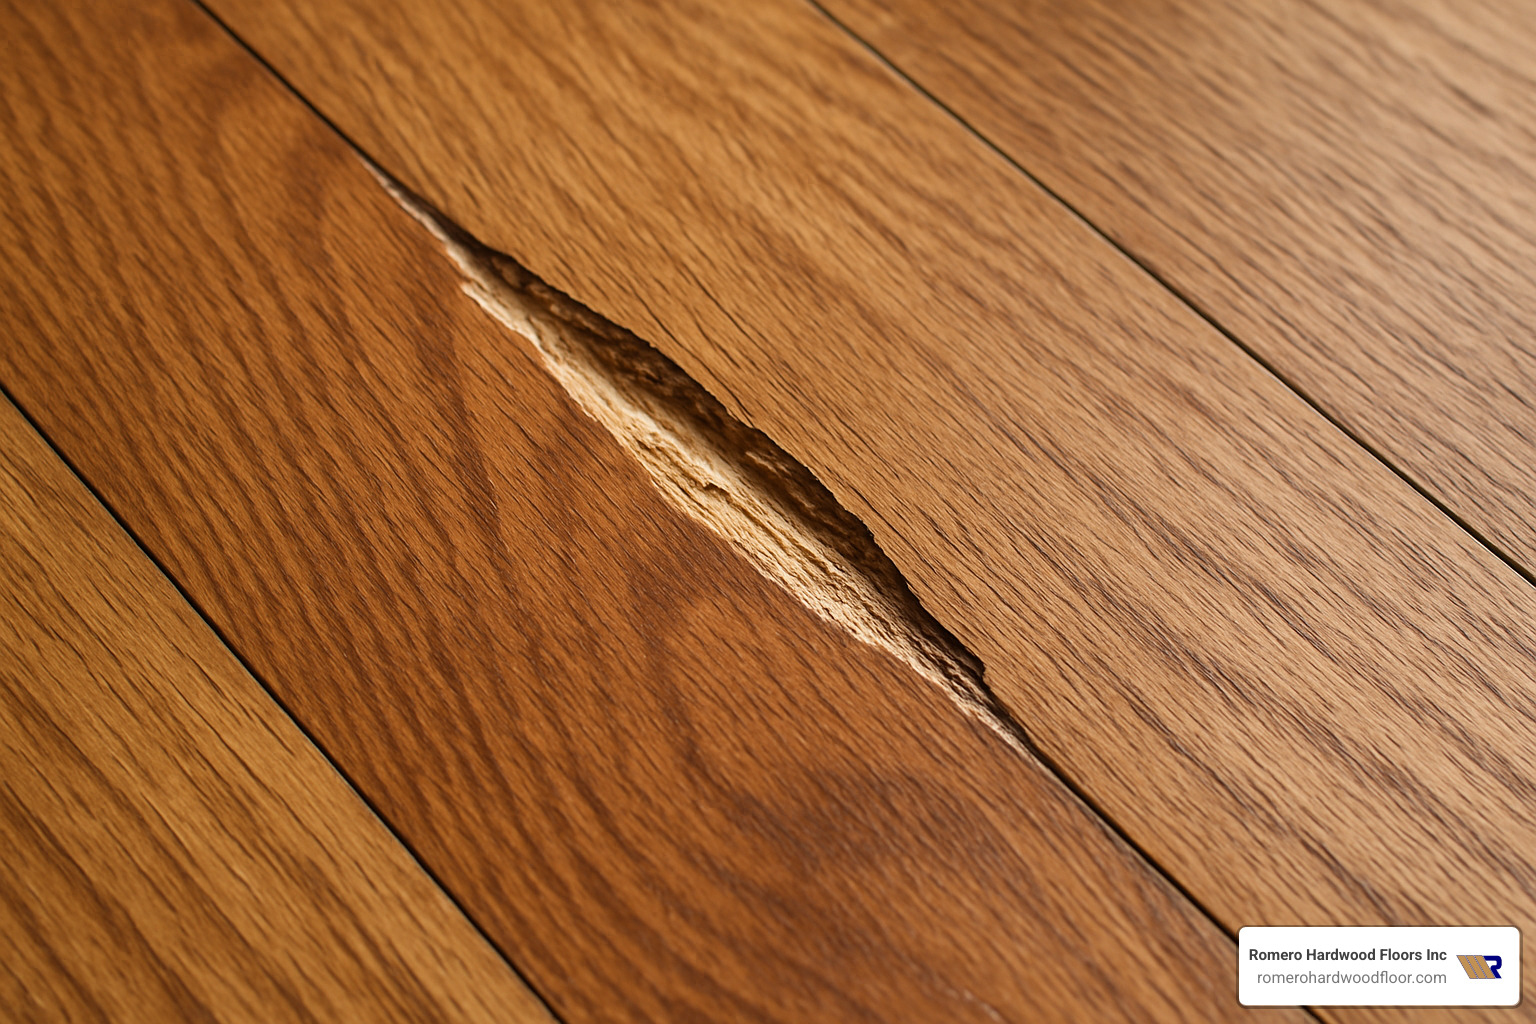
Deep scratches often expose bare, unfinished wood and may appear darker or a different color than your floor’s surface. They require more attention and a different repair approach than surface scratches. You might be dealing with:
Gouges – where wood has actually been removed from the floor, leaving a valley or depression
Dents – where the wood fibers have been compressed but not removed
Interestingly, wood has a remarkable “memory.” With dents, we’ve helped homeowners from Medford to Marblehead coax compressed wood back to its original shape using steam – a bit like magic for your floors!
Pay attention to the direction of the wood grain when assessing scratches. Those running against the grain tend to be much more noticeable (and sometimes more challenging to repair) than those that follow along with it. This grain direction can influence which repair technique will give you the most natural-looking results.
When examining your floor, good lighting is essential – try using a flashlight held at an angle to make even subtle scratches more visible. The more accurately you can assess the damage, the better prepared you’ll be for fixing scratched floors effectively.
DIY Toolkit & Color-Matching Basics
Successfully fixing scratched floors doesn’t require professional training, but it does need the right tools and a bit of patience. I’ve helped countless homeowners in Revere and beyond tackle their floor scratches with just a few essential items.
Must-Have DIY Kit
Your floor repair journey starts with proper cleaning. Always vacuum with a soft brush attachment to remove any debris that could cause more scratches during your repair work. A good microfiber mop and a quality hardwood floor cleaner (avoid anything with wax, oil, or silicone) will prepare your surface perfectly.
For the actual repairs, you’ll want lint-free cloths that won’t leave fibers behind, some ultra-fine steel wool (0000 grade), and sandpaper in the 180-320 grit range. Painter’s tape is your friend for protecting adjacent areas, while a putty knife or even an old credit card works wonders for applying fillers. For those detailed touch-ups, small artist’s brushes are worth their weight in gold.
“Don’t forget your safety gear,” I always remind my clients in Winchester. Disposable gloves, a dust mask for sanding, and eye protection aren’t just professional recommendations—they’re essentials for keeping your DIY project comfortable and safe.
The heart of your repair kit should include materials that match your specific floor: stain markers, wax sticks, stainable wood filler, touch-up pens, clear nail polish for quick fixes, and polyurethane finish that matches your existing floor’s base (water or oil).
Color-Matching Secrets
The difference between an obvious repair and one nobody notices often comes down to color matching. After working on floors throughout Salem and Swampscott, I’ve finded that testing in an inconspicuous area first—under furniture or in a closet—saves heartache later.
Most natural wood contains beautiful variations in tone. Don’t be afraid to blend two or more colors of stain markers or wax sticks to capture your floor’s unique character. I’ve helped homeowners in Woburn create custom color blends that perfectly match their century-old oak floors.
The sheen matters just as much as the color. Your floor might be matte, satin, semi-gloss, or high-gloss, and your repair should match not just the wood tone but also how light reflects off the surface. This detail makes all the difference in older homes in Swampscott with their distinctive character-rich flooring.
Always check your color match in different lighting conditions. What looks perfect under your bright workshop light might stand out like a sore thumb in natural daylight or evening lamp light.
Remember to layer colors gradually—it’s much easier to add more color than to remove excess. Start lighter than you think you need and build up slowly to the desired shade. This approach has saved many of my Revere customers from repair regret.
“Take your time with color matching,” I often tell homeowners. “The ten extra minutes you spend getting the color just right will reward you every day when you walk across that invisible repair.”
Fixing Scratched Floors at Home: Light to Moderate Damage
Now that you’ve assessed your scratches and gathered your supplies, let’s roll up our sleeves and start fixing scratched floors with some methods that have worked wonders for our customers:
Quick Conceal Hacks for Fixing Scratched Floors Naturally
Who knew your kitchen pantry could hold the secret to floor repair? For our eco-conscious homeowners in Somerville and Stoneham, these natural remedies have saved many floors without harsh chemicals.
The walnut method is almost magical to watch. Simply crack open a walnut and rub the meat directly on the scratch. The natural oils and color penetrate the wood, and after buffing with a soft cloth, many scratches seem to disappear before your eyes. This works beautifully on light to medium woods, and I’ve seen children be absolutely amazed at this “magic trick.”
For a more intensive treatment, try the olive oil and baking soda paste. Equal parts mixed together create a natural filler that works particularly well on medium-toned woods. Let it sit for about 5-10 minutes before buffing away. One of our Revere clients called this her “wood floor facial treatment.”
Tea lovers, rejoice! The tea bag technique puts those black tea bags to work. The tannins in black tea can darken exposed wood in deeper scratches. Just steep a tea bag, let it cool slightly, and carefully apply to the scratch with a cotton swab. It’s especially effective on darker woods where light scratches stand out.
My personal favorite for shallow scratches is the coconut oil treatment. A little goes a long way – just apply a small amount, let it soak in for 10-15 minutes, and buff with a soft cloth. As we tell our Chelsea clients, “Your thirsty wood will drink this up like a tropical vacation.”
These natural approaches are perfect for homes with pets and children since they’re non-toxic and generally quite effective for minor damage.
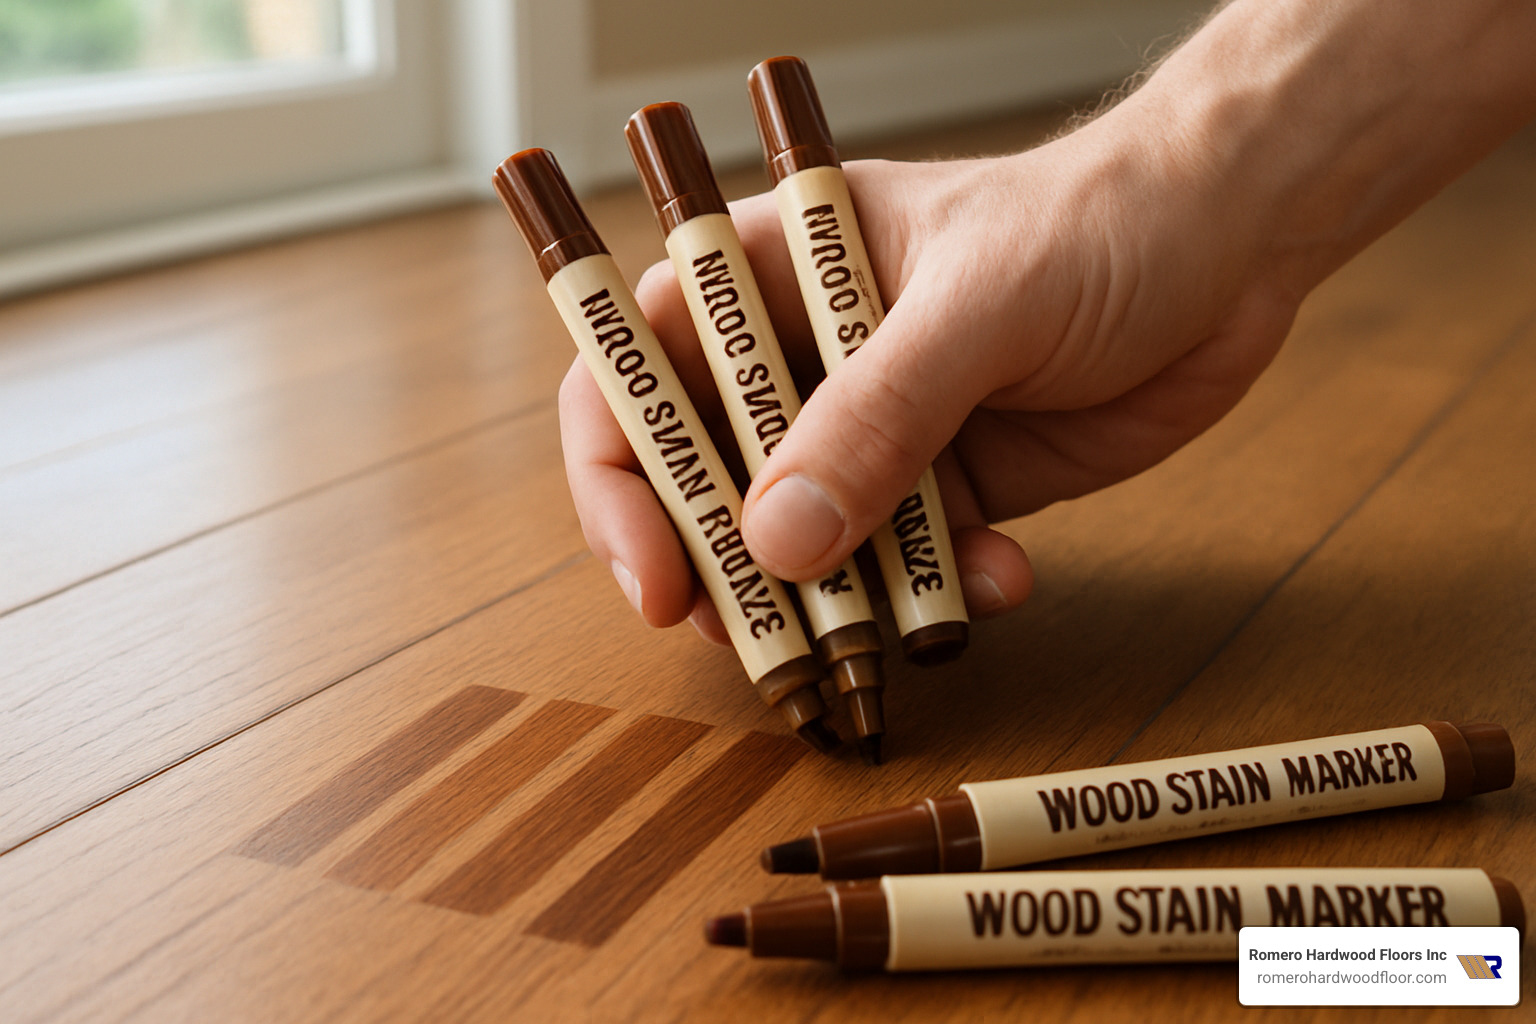
Stain Marker & Wax Stick Method for Fixing Scratched Floors
When natural remedies aren’t quite enough, commercial products can save the day:
Stain markers are like makeup for your floor (as we explain to our East Boston clients). Clean the scratch thoroughly, select a marker matching your floor color, and apply following the grain. The key is to wipe away excess quickly before it dries, then let it set for 1-2 hours. For the perfect match, don’t be afraid to blend multiple colors – most natural wood has color variations.
For slightly deeper scratches, wax fill sticks are your best friend. Products like Waxstix Timbermate Touch Up Crayons are designed specifically for this purpose. Rub the stick firmly into the scratch, scrape off excess with a credit card, and buff until it blends. The change can be remarkable, especially when you take time to match colors properly.
I always recommend testing these products in an inconspicuous area first – perhaps under a sofa or in a closet – before tackling visible scratches. For more detailed guidance, check out our DIY Guide to Hardwood Floor Scratch Repair.
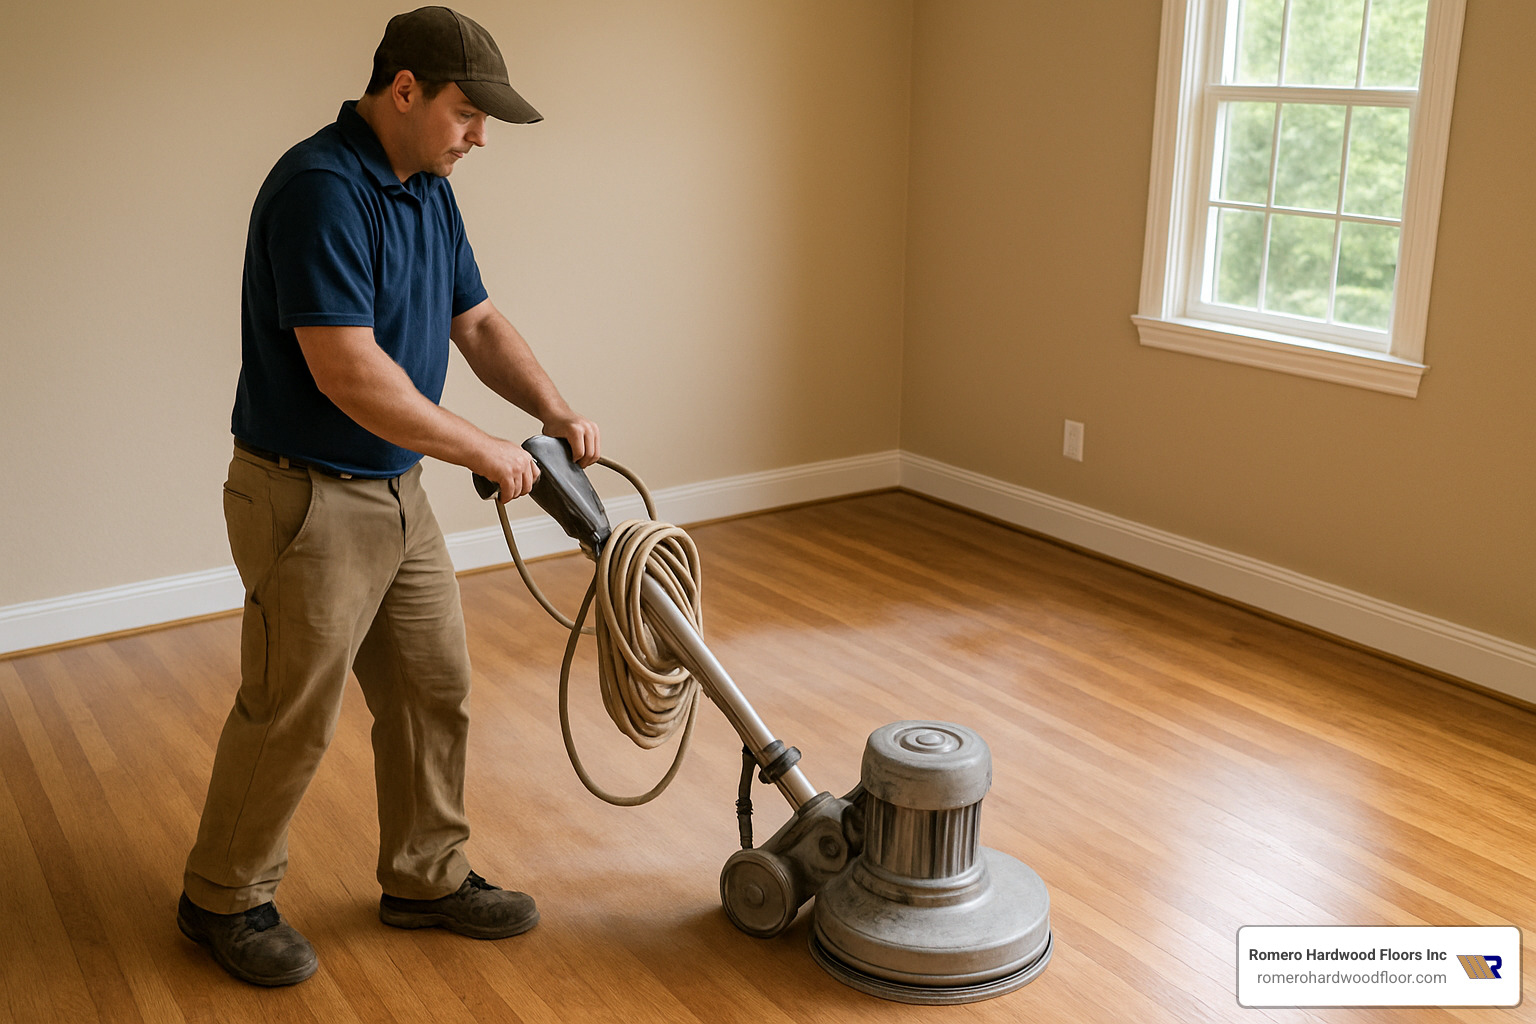
Buff & Recoat for Widespread Surface Wear
When your floor looks like a roadmap of tiny scratches, individual repairs become impractical. That’s when a buff and recoat (or screening) becomes your most efficient option.
The screening process creates a textured surface for new finish to bond to without removing the existing finish entirely. After thorough cleaning, we use a floor buffer with a fine screening pad to lightly abrade the surface. This step is critical – if your floor has ever been treated with wax, oil, or silicone products, the new finish won’t adhere properly.
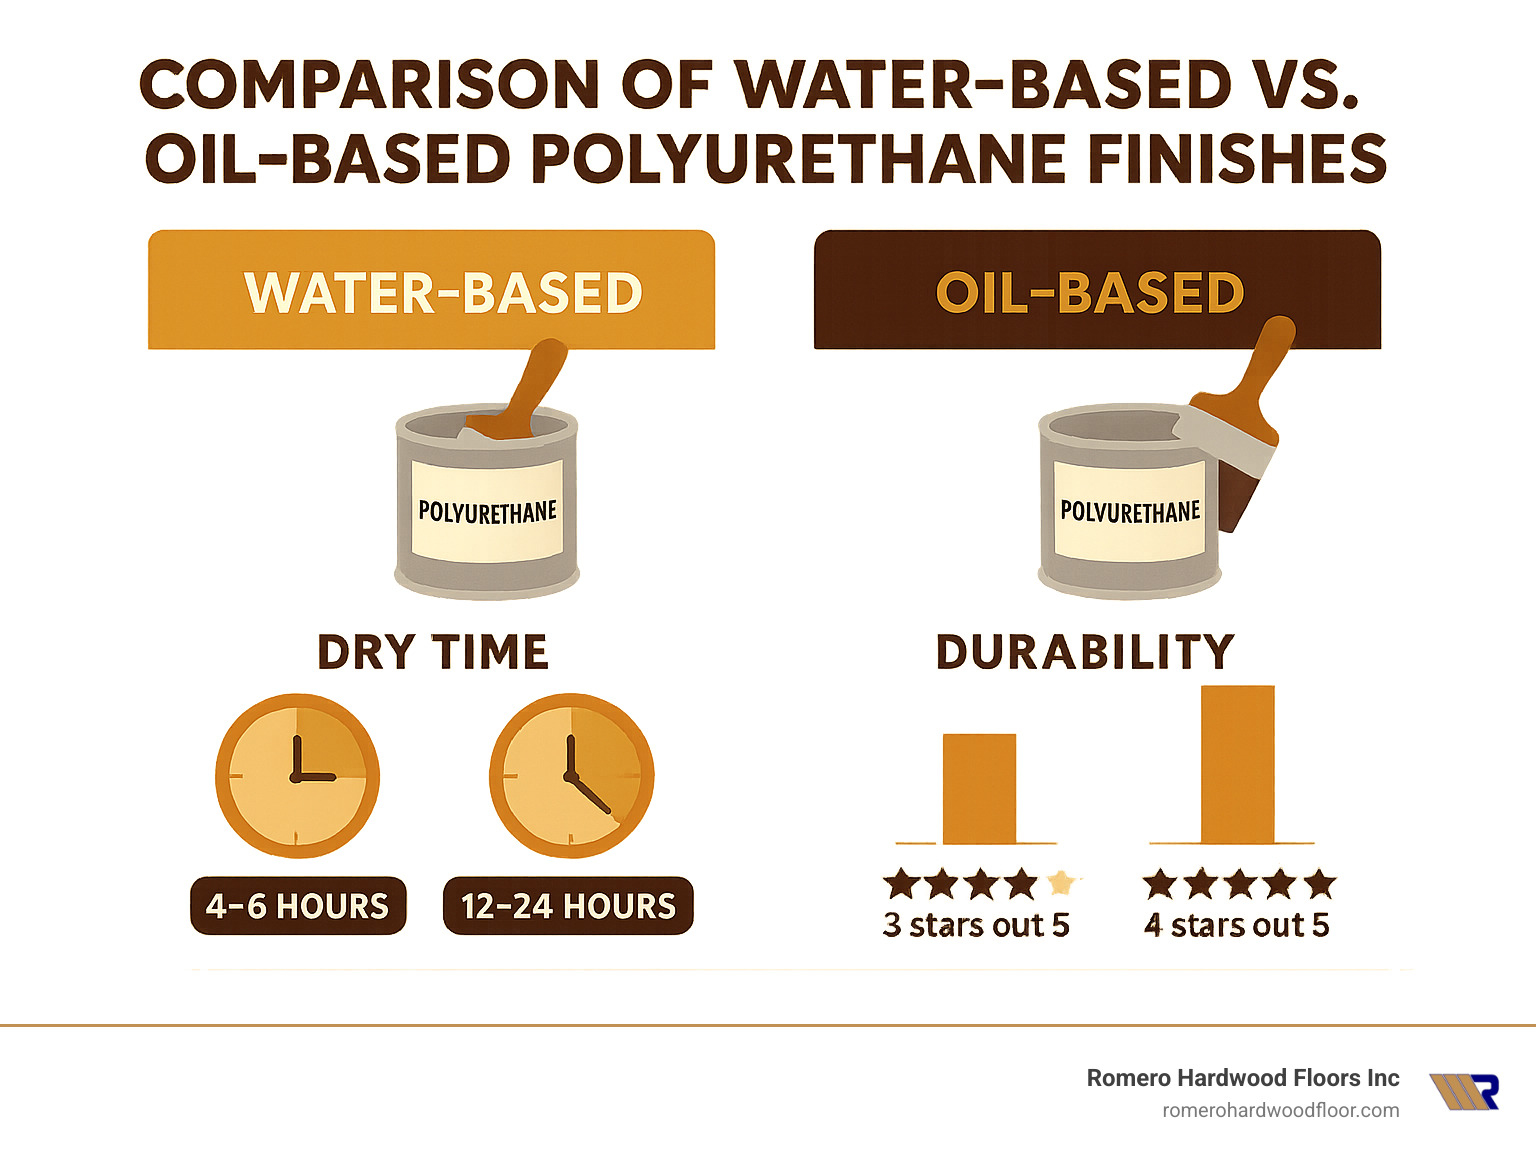
After screening and careful dust removal, apply a thin, even coat of water-based polyurethane with a proper applicator. Water-based formulas dry quickly – usually within 3-8 hours – allowing you to apply a second coat the same day. Most rooms can be completely transformed in about a day.
We’ve performed this process in hundreds of homes from Lynnfield to Lynn, and the before-and-after difference often has homeowners wondering why they waited so long. One Revere client told me her recoated floors looked better than they had in the 15 years she’d owned her home!
Going Deeper: Gouge Repair, Sanding & Prevention
When fixing scratched floors with deeper damage, you’ll need to roll up your sleeves and get a bit more serious about your repair approach. Don’t worry though – even significant damage can often be remedied with some patience and the right techniques.
Wood Filler & Spot Touch-Up
Those deeper gouges that have cut into the actual wood need special attention. Here’s how we tackle them in homes from Revere to Marblehead:
First, thoroughly clean the damaged area and make sure it’s completely dry. Wood and moisture don’t mix well when you’re making repairs!
Next, select a stainable wood filler that matches your floor’s color. Using a putty knife or even an old credit card, press the filler firmly into the gouge. It’s actually better to slightly overfill the area since most fillers shrink a bit as they dry. Then comes the hard part – waiting. Most fillers need about 24 hours to dry completely.
Once dry, grab some 180-220 grit sandpaper and gently sand the repair until it’s level with the surrounding floor. The trick here is to “feather” the edges by sanding in ever-widening circles. This creates a smooth transition between your repair and the existing floor.
“The secret to invisible gouge repair is patience,” I often tell customers in Malden. “Rush any step and your repair will stand out like a sore thumb.”
After sanding, wipe away all dust with a tack cloth, then apply stain to match your floor color. Once that’s dry, finish with a clear polyurethane that matches your floor’s existing sheen. For a truly seamless look, extend the finish slightly beyond the repair area.
When to Sand, Refinish, or Call a Pro
Sometimes those DIY fixes just won’t cut it. You might need to consider more comprehensive solutions when:
Your floor has scratches covering large areas, multiple deep gouges, or worn-through finish in walking paths. Sometimes you might simply want to change your floor’s color, or you’re dealing with water damage that’s caused gray discoloration.
Full refinishing costs vary widely. Based on internet averages (not Romero Hardwood Floors Inc. pricing), DIY refinishing typically runs $2-$8 per square foot for materials and equipment rental. Professional refinishing generally costs $6-$24 per square foot depending on your floor’s condition, wood species, and the type of finish you choose.
It’s definitely time to call a professional when your floor is engineered hardwood with a thin veneer (these can usually only be sanded 1-2 times in their lifetime), when your floor has already been refinished multiple times, or if you have exotic or rare wood species. Structural issues like warping or loose boards also call for professional help.
I’ve seen many well-intentioned DIY refinishing attempts in homes from Nahant to Peabody that unfortunately made the problem worse. Professional equipment removes wood at a controlled rate that’s hard to achieve with rental sanders.
Preventing the Next Scratch
The best repair is the one you never have to make! Here are some proven prevention strategies:
Entryway protection makes a huge difference. Place outdoor and indoor mats at all entrances and consider implementing a no-shoes policy. This simple step has saved countless floors in Revere homes.
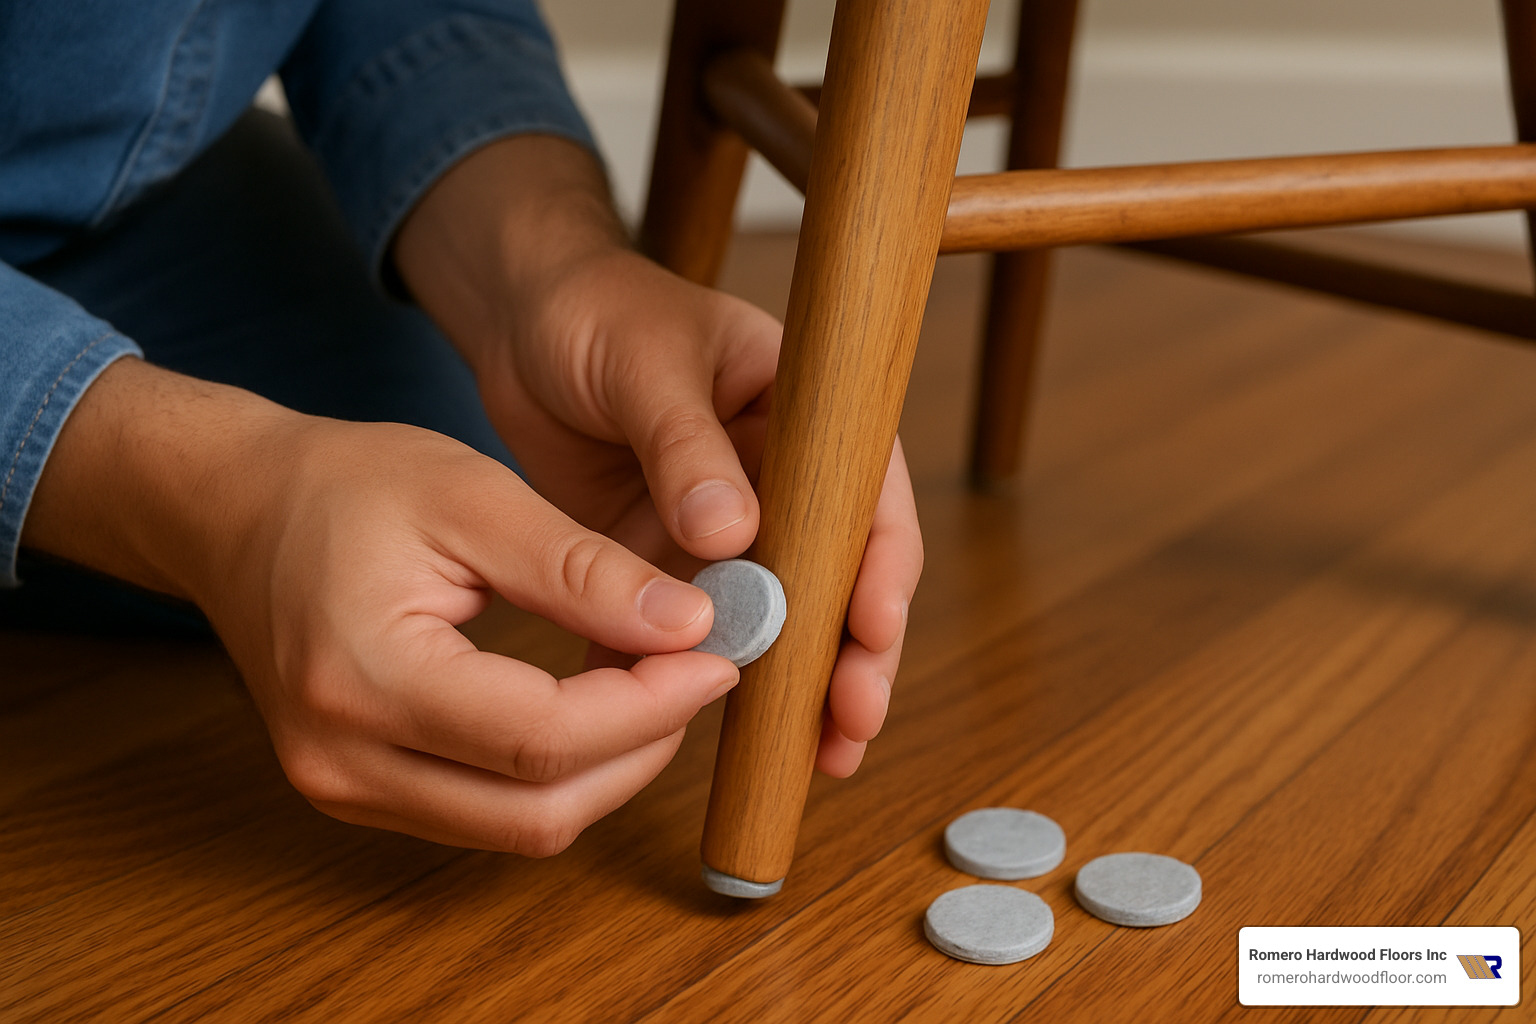
For furniture protection, apply heavy-duty felt pads to all furniture legs and replace them every few months as they collect debris. Always use furniture sliders when moving heavy pieces – never drag furniture directly on hardwood.
If you have pets, keep their nails trimmed regularly. Consider dog booties for larger breeds or use runners in high-traffic pet pathways. One client in Saugus saw scratches decrease by 80% just by keeping up with their Great Dane’s nail trimming schedule!
Humidity control is often overlooked but critical. Maintain indoor humidity between 35-55% using humidifiers in winter and dehumidifiers in summer if needed. Proper humidity prevents wood from expanding and contracting, which can lead to finish failure.
Finally, establish a regular maintenance routine: sweep or vacuum with a soft brush attachment frequently, use only hardwood-specific cleaners, and consider scheduling professional maintenance coatings every 3-5 years.
FAQs & Conclusion
What’s the easiest DIY fix for hairline scratches?
Those frustrating hairline scratches that seem to jump out only when the light hits just right? You’ve got two fantastic options that work wonders in most homes.
First, try the walnut method – it sounds a bit like kitchen magic, but it truly works! Simply take the meat of a walnut (yes, the actual nut) and gently rub it along the scratch. The natural oils seep into the wood, while the walnut’s color helps conceal the mark. Let it sit for about five minutes, then buff with a soft cloth. We’ve seen homeowners in Reading absolutely amazed at how well this natural solution works.
If you’re looking for something a bit more precise, grab a color-matched stain pen. Apply it carefully along the scratch line and immediately wipe away any excess with a clean cloth. When done right, these tiny imperfections practically vanish before your eyes – something our Rockport clients are always delighted to find.
Can I repair engineered or laminate floors the same way?
When it comes to engineered hardwood, you can generally use the same techniques as solid hardwood, but you’ll need to tread carefully:
Engineered hardwood considerations:
The veneer layer on these floors is quite thin (typically just 1/16″ to 1/8″), so aggressive sanding is a big no-no. Light scratches respond well to stain markers and wax sticks, while deeper gouges might need wood filler – just be extremely cautious with any sanding. For overall surface wear, a buff and recoat can breathe new life into these floors without risking that precious veneer layer.
Laminate floors need different treatment:
Laminate requires specialized approaches since it’s not actually wood. Look for laminate-specific repair kits with color-matching compounds and fill materials designed for this surface. When laminate suffers deep damage, individual plank replacement is usually your best bet, as these floors can’t be sanded or refinished like hardwood.
“I always tell my clients in Manchester-by-the-Sea to double-check their floor type before attempting any repairs,” I often share. “The wrong technique on the wrong floor can turn a small problem into a much bigger one.”
How long should I wait before walking on a refinished area?
Patience truly pays off when it comes to floor repairs. Here’s what we recommend:
For simple stain marker and wax stick repairs, give them a full 24 hours before resuming normal foot traffic. This ensures the products fully set and bond with your floor.
With polyurethane finish applications, wait at least 24-48 hours before walking on the area, and then only in clean socks. Hold off on regular shoes for about 72 hours to prevent marking the surface before it’s fully cured.
For complete floor refinishing, light sock-only traffic can resume after 24 hours, but wait a full 72 hours before bringing furniture back (with felt pads, of course!). Keep area rugs off for a full 7 days to allow proper curing and prevent moisture trapping.
While water-based finishes typically dry faster than their oil-based counterparts, both need adequate time to reach their full hardness and durability. Rushing this process is one of the most common mistakes we see in homes throughout Revere.
Conclusion & Professional Help
Fixing scratched floors is definitely something many homeowners can tackle themselves, especially when dealing with minor to moderate damage. The techniques we’ve shared have helped countless families throughout Revere, Beverly, Chelsea and surrounding communities restore their floors without the expense of professional refinishing.
That said, there comes a point when calling in the pros makes sense – whether because the damage is extensive, the repairs need specialized equipment, or you simply want the peace of mind that comes with expert craftsmanship.
At Romero Hardwood Floors Inc., we’ve been working with Massachusetts homeowners since 2006, providing everything from simple scratch repair to complete floor restoration. We understand the unique characteristics of New England homes – from the historic properties in Salem with their wide-plank antique flooring to modern constructions in Medford with engineered hardwood.
Not sure if your floor scratches need professional attention? We’re happy to provide a free assessment. Sometimes a quick visit can save you hours of frustration and potentially costly DIY mistakes.
Wood floors are meant to be lived on, and some character marks are part of their charm and story. But when scratches cross the line from character to eyesore, these repair techniques – or our professional services – can bring back your floor’s natural beauty.
For more serious hardwood floor issues or professional refinishing services in Revere and surrounding areas, contact Romero Hardwood Floors Inc. for a consultation. We’re committed to helping you maintain beautiful, durable hardwood floors that your family will enjoy for generations to come.
