Hard Floor Refinishing: 7 Best Proven Steps for Amazing Results
Why Hard Floor Refinishing Transforms Your Home
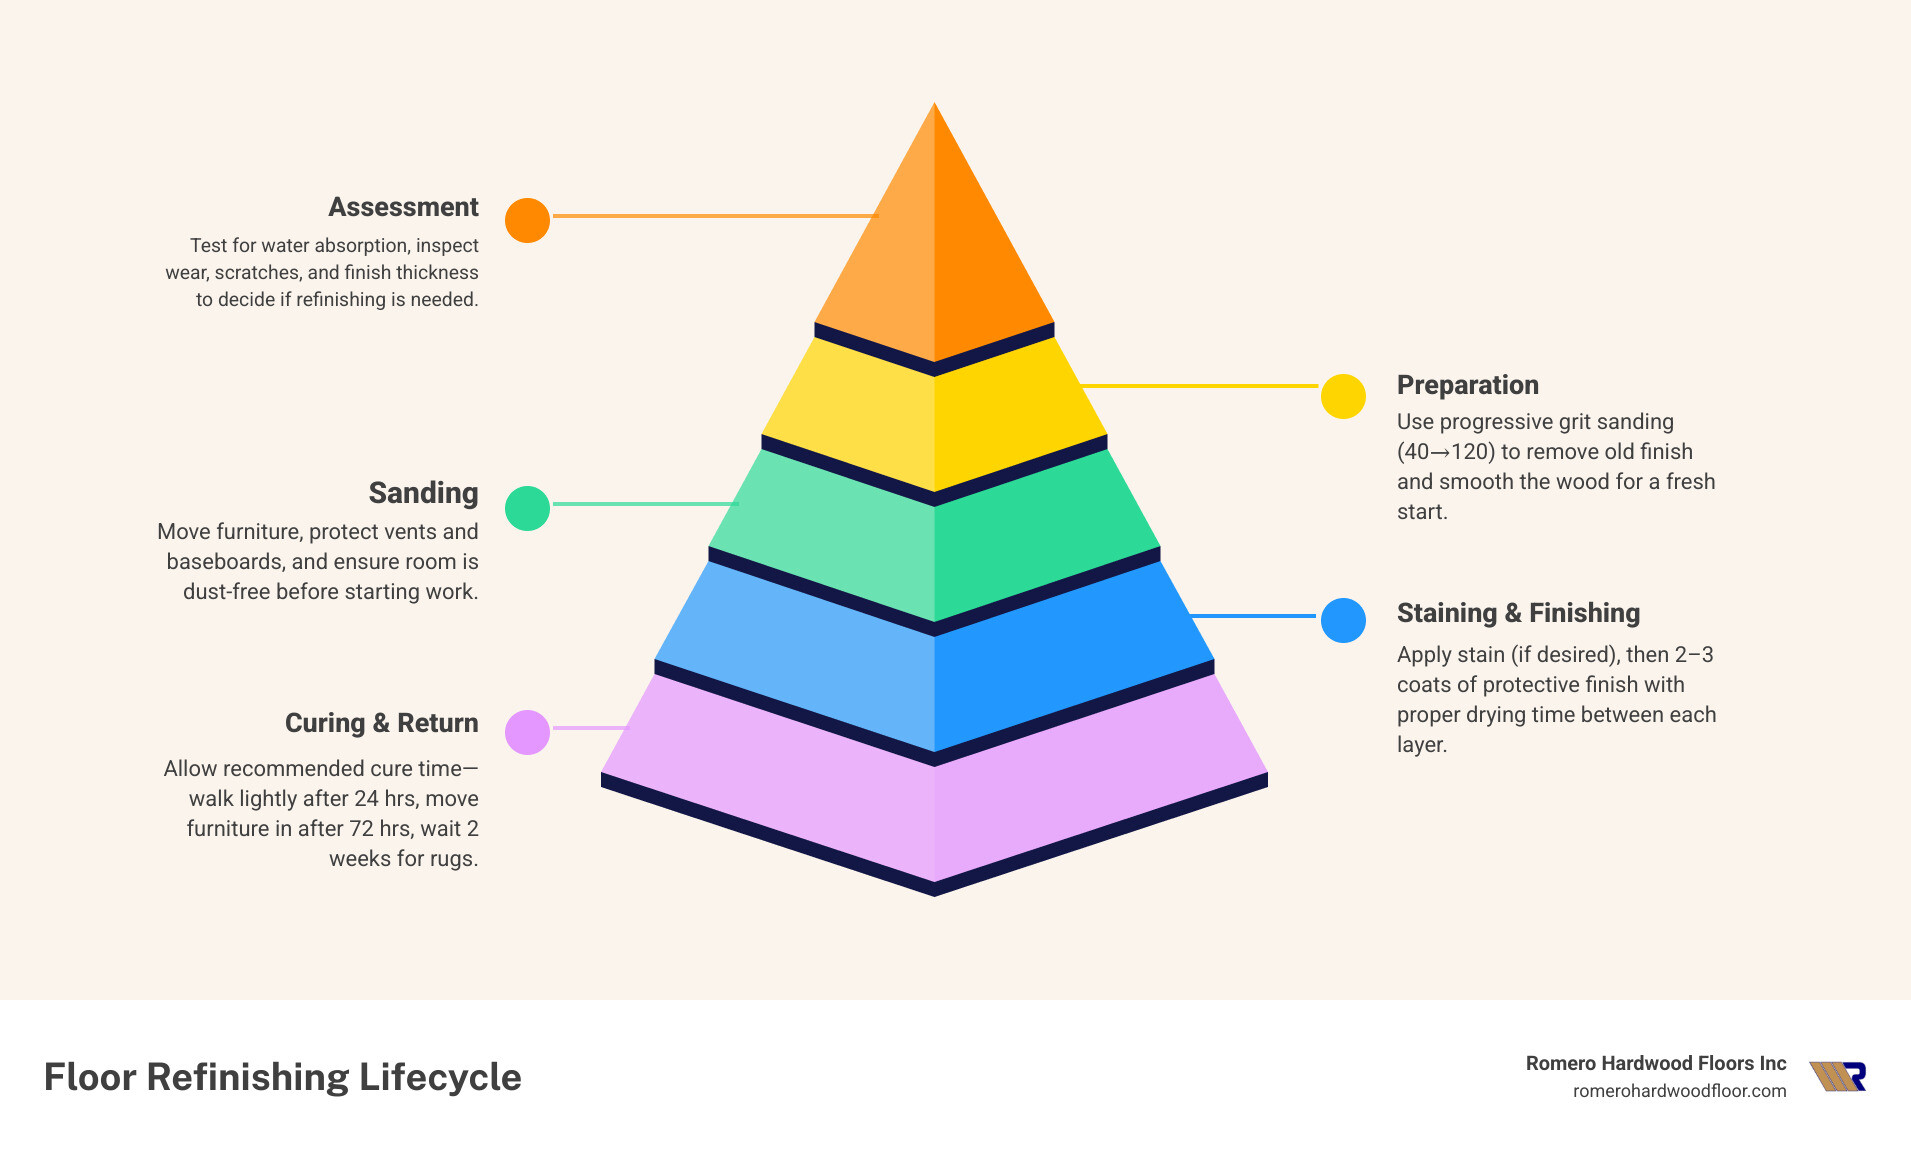
Hard floor refinishing is the process of sanding away the old finish and imperfections from your hardwood floors, then applying fresh stain and protective coatings to restore their original beauty. This cost-effective solution can make your floors look brand new without the expense of full replacement.
Quick Overview: Hard Floor Refinishing Basics
– When to refinish: Every 7-10 years or when water soaks into wood immediately
– Cost range: $1-4 per sq ft (DIY) vs $3-10 per sq ft (professional)
– Timeline: 3-5 days for most rooms
– Best candidates: Solid hardwood with at least 1/8″ wear layer remaining
– Key methods:* Full sanding, sandless refinishing, or buff-and-recoat
*Average costs based on internet data, not actual Romero Hardwood Floors pricing
Whether you’re dealing with scratches from pet nails, sun-faded boards, or simply want to change your floor’s color, refinishing breathes new life into tired hardwood. The process removes years of wear while adding a protective barrier that can last another decade.
Modern refinishing techniques offer dust-free options and low-VOC finishes that make the project less disruptive to your daily life. You can even choose between DIY approaches that cost around $700 for a 2,000 sq ft home or professional services that guarantee flawless results.
As Francisco Romero, owner of Romero Hardwood Floors Inc., I’ve guided countless homeowners through hard floor refinishing projects over my 15+ years in the business. My experience has shown me that understanding the process upfront helps you make smart decisions about timing, methods, and whether to tackle it yourself or hire professionals.
Terms related to hard floor refinishing:
– floor resurfacing cost
– new hardwood flooring
– sanding new hardwood floors
When & Why Your Floors Need Refinishing
Your floors are practically begging for help, but they’re not exactly great at speaking up. Fortunately, there’s a simple water drop test that acts like a translator between you and your hardwood. Just place a few drops of water on different spots across your floor and watch what happens.
If that water soaks right in like a sponge, your protective finish has packed its bags and left town. Time for hard floor refinishing. But if the water just sits there looking confused (forming little beads), your finish is still doing its job. You might just need a good cleaning and some TLC.
Most hardwood floors hit their refinishing sweet spot every 7-10 years, though this really depends on how much action they see daily. Think of it like getting a fresh coat of paint on your house – it’s all about protection and looking good.
Here’s where things get interesting: solid hardwood floors are the marathon runners of the flooring world. They can handle 4-6 refinishing cycles during their lifetime because they start thick and stay strong. Engineered hardwood is more like a sprinter – if it has at least a 3mm wear layer (about 1/8 inch), you can usually refinish it once or twice before calling it a day.
Beyond the water test, your floors send other signals when they’re ready for a makeover. Scratches that catch your socks, minor dents from dropped items, and that general tired look from years of faithful service all respond beautifully to refinishing.
Sun fading is another telltale sign, especially in rooms where afternoon light streams through windows. Your once-uniform floor color starts looking like a patchwork quilt, with some boards darker or lighter than others. It’s not your floor’s fault – UV rays are just really persistent.
Early water damage shows up as grayish spots where moisture has snuck past your finish. Catch this early, and refinishing can work magic. Wait too long, and you’re looking at bigger problems.
Signs You Can’t Ignore
Some floor problems wave red flags that scream “refinishing alone won’t cut it!” Gray or black boards mean water has moved in permanently, deep into the wood fibers. These boards need replacement before any refinishing work begins.
Deep gouges that you can feel with your fingernail, pet stains that have soaked clear through to the subfloor, and persistent squeaking from loose boards all need repair work first. It’s like trying to paint over rust – you’ve got to fix the underlying issue.
Cupping and buckling are the drama queens of floor problems. When boards start warping, separating, or creating little hills and valleys, there’s usually a moisture issue hiding somewhere. These structural problems need professional detective work to find and fix the root cause before anyone thinks about refinishing.
Hard Floor Refinishing Frequency
The magic number for refinishing eligibility is maintaining at least 1/8 inch of wood above the tongue and groove connection. You can check this by peeking under an air vent or carefully removing a small section of baseboard to see your floor’s profile.
Solid hardwood typically starts at 3/4 inch thick, which gives you plenty of material to work with over the decades. Each sanding removes about 1/16 to 1/8 inch of material, so spacing out your refinishing projects properly keeps your floors strong for generations.
There’s even scientific research on indoor air quality showing that well-maintained hardwood floors contribute to healthier homes by reducing the allergen buildup that carpets love to collect. Your floors aren’t just beautiful – they’re working hard to keep your air clean too.
Choosing the Best Hard Floor Refinishing Method
When it comes to hard floor refinishing, you’ve got three main paths to choose from, and picking the right one can save you both time and money. Think of it like choosing between a complete makeover, a refresh, or just touching up your makeup – each approach serves different needs.
Full sanding is the heavy-duty option that strips everything down to bare wood. This method tackles the tough stuff – deep scratches from your dog’s enthusiastic greetings, stubborn water stains from that plant you forgot to water properly, and color changes when you’re tired of that honey oak from the ’90s. The process removes about 1/16 to 1/8 inch of wood surface, which sounds scary but gives you a completely fresh start.
Modern dustless systems have revolutionized full sanding, capturing up to 99.9% of dust particles. Gone are the days when refinishing meant plastic sheeting over everything and finding sawdust in your coffee mug weeks later.
Sandless refinishing works more like a deep conditioning treatment for floors that still look pretty good. This chemical etching process gently prepares your existing finish to bond with new protective coatings. It’s perfect when your floors just look tired rather than damaged, and you can walk on them the same day instead of camping out in your living room for a week.
The buff and recoat method sits right in the middle – think of it as a spa day for your floors. Light screening with fine abrasives removes surface wear before applying fresh polyurethane. This approach costs significantly less than full refinishing while extending your floors’ life by several years.
| Method | Timeline | Dust Level | Best For | Cost Range* |
|---|---|---|---|---|
| Full Sanding | 3-5 days | Minimal (with dustless) | Deep damage, color changes | $3-10 per sq ft |
| Sandless | 1 day | None | Surface wear, minor scratches | $2-6 per sq ft |
| Buff & Recoat | 1-2 days | Light | Intact finish with wear patterns | $1-4 per sq ft |
*Average costs based on internet data, not actual Romero Hardwood Floors pricing
Sanding Basics
Professional sanding follows a careful grit progression that would make any perfectionist proud. We start aggressive with 40-grit paper to strip away old finish and battle scars, then gradually work through 60-grit for smoothing, 80-grit for blending, and finish with 120-grit for that silky-smooth surface.
The drum sander handles the main floor area with serious cutting power, while the edge sander gets into those tight spots where the big machine can’t reach. It’s like using a lawn mower for the yard and scissors for around the flower beds – each tool has its job.
Screening provides the final touch, using a buffer with fine-grit pads to remove any tiny scratches and create the perfect canvas for stain and finish. This step separates the pros from the weekend warriors – it’s all about that smooth, even surface.
Sandless & Buff-Only Options
The wet process used in sandless refinishing chemically opens up your existing finish just enough for new coatings to grab hold. It’s gentler on your floors and your schedule, preserving every bit of wood thickness while giving you that fresh-floor feeling.
Ideal floor conditions for sandless include surfaces with intact finish that just show normal wear patterns. If you can run your fingernail across a scratch without it catching, sandless can probably handle it. Deep gouges or water damage? You’ll need the full sanding treatment.
Quick turnaround makes this method perfect for busy families. Most rooms get completed in a single day, and you can walk on them within hours. No need to explain to your kids why they can’t use the bathroom upstairs for three days.
The color-refresh only limitation means you can improve your existing stain slightly but can’t go from dark walnut to natural maple. Think improvement, not change.
Finish Types & Sheens
Oil-based polyurethane remains the gold standard for durability, adding that rich amber glow that makes wood look expensive. It takes longer to dry between coats (about 8 hours), but the scratch resistance and longevity make the wait worthwhile. Your floors will literally get tougher with age.
Water-based polyurethane dries faster (around 3 hours between coats) and won’t yellow over time like oil-based finishes can. It’s perfect when you want to preserve your wood’s natural color or when you need the project done quickly. The trade-off is slightly less durability, but we’re talking about lasting 8 years instead of 10.
Hard-wax oil gives you that authentic European look with a natural matte finish that actually improves with wear. It’s easier to spot-repair too – just sand the damaged area lightly and reapply. Think of it as the cast-iron skillet of floor finishes – gets better with use.
Low-VOC finishes in both oil and water-based formulas reduce fumes and environmental impact without sacrificing protection. Your family (and the planet) will thank you.
Sheen levels affect both appearance and practicality. Matte finishes hide scratches beautifully but show dirt more easily. Gloss finishes reflect light gorgeously but reveal every speck of dust. Satin finishes hit the sweet spot for most homes – enough shine to look polished without being a maintenance nightmare.
More info about floor finishes
DIY vs. Professional: Costs, Tools & Timeline
Choosing between DIY and professional hard floor refinishing can feel overwhelming, but it really comes down to your budget, available time, and comfort level with power tools. Both paths can give you beautiful floors – the trick is picking the one that matches your situation.
Let’s talk money first. For a typical 275 square foot room, you’re looking at under $500 if you tackle it yourself. Scale that up to a 2,000 square foot home, and you’re still around $700 total for the DIY route. Sounds pretty good, right?
Here’s the catch: those numbers don’t include your time. And trust me, this isn’t a weekend project you knock out between Netflix episodes. Plan on 4-5 full days of intensive work, plus prep and cleanup time. Your back might remind you about this decision for weeks afterward.
Professional services tell a different story. Based on internet data (not actual Romero Hardwood Floors pricing), you’ll see costs ranging from $3-10 per square foot, with some premium services reaching even higher. That 2,000 square foot home could run anywhere from $6,000 to $20,000 professionally.
Before you faint at those numbers, consider what you’re getting: guaranteed results, insurance coverage, dust-free equipment that actually works, and the ability to leave town while someone else handles the mess.
DIY Cost Breakdown
Equipment rental typically runs $150-250 for a weekend package that includes a drum sander, edge sander, and buffer. Here’s a pro tip from my years in the business: spend the extra money for professional-grade equipment from a reputable rental center. Those beat-up sanders at the discount place will make your life miserable.
Materials and supplies add another $200-300 to your budget. You’ll need sandpaper in multiple grits (and trust me, you’ll use more than you think), wood filler for repairs, stain if you’re changing colors, and quality polyurethane finish. Don’t cheap out on materials – your floors will show the difference for years to come.
Safety equipment is non-negotiable and costs around $50-100. We’re talking respirator masks, safety glasses, ear protection, and knee pads. Sanding creates harmful dust particles that can seriously mess with your lungs, so proper protection isn’t optional.
Professional Pricing & Value
Professional pricing varies wildly depending on your floor’s condition, local market rates, and what’s included in the service. Basic sanding and refinishing typically starts around $3-4 per square foot, while premium services with all the bells and whistles can hit $8-10 per square foot or more.
What makes the difference? Dust containment systems that actually capture 99.9% of sanding dust instead of coating everything in your house with fine powder. This technology isn’t available to DIY refinishers, and if you’ve ever lived through a dusty renovation, you know it’s worth every penny.
Professional warranties typically cover workmanship for 1-5 years, and contractors carry liability insurance. If something goes wrong with a DIY job, you’re on your own. If a professional messes up, they fix it at no charge.
Decision Checklist
Time availability is the biggest factor for most homeowners. Can you realistically dedicate 4-5 full days to this project? And I mean full days – not a few hours here and there. The sanding process can’t be stopped and started without creating visible lines in your floors.
Floor condition matters too. If your floors just need a basic refresh, DIY can work well. But if you’re dealing with deep scratches, water damage, or color changes, professional expertise becomes much more valuable.
Health concerns shouldn’t be ignored, especially if anyone in your family has respiratory issues. Professional dust containment systems provide dramatically cleaner air during the project compared to DIY methods.
Equipment access can be tricky. Quality sanders are heavy, loud, and require some skill to operate safely. If you’re not comfortable handling powerful equipment, or if getting rental tools to your location is difficult, professional service makes more sense.
Hardwood Floor Refinishing Cost
Step-by-Step Hard Floor Refinishing Process
Think of hard floor refinishing like giving your floors a complete makeover – it’s transformative, but only when you follow the right steps in the right order. Each stage builds on the previous one, so patience really pays off here.
The timeline for most rooms spans 4-5 days from start to finish. Day one covers preparation and rough sanding, day two handles the progressive sanding sequence and any repairs, day three is for staining (if you’re changing colors), and days four and five involve applying protective finish coats. Then comes the hardest part – waiting for everything to cure properly before moving furniture back in.
Here’s something many DIYers don’t realize: temperature and humidity matter more than you’d think. Keep your home between 65-75°F and aim for around 50% humidity throughout the project. Too cold and your finish won’t flow smoothly. Too humid and it won’t cure properly. Too dry and you’ll get dust nibs in your final coat.
The beauty of following a systematic approach is that each step makes the next one easier. Proper preparation means your sanding goes smoothly. Thorough sanding means your stain applies evenly. Even stain application means your finish looks professional. Skip a step or rush through it, and you’ll see the shortcuts in your final results.
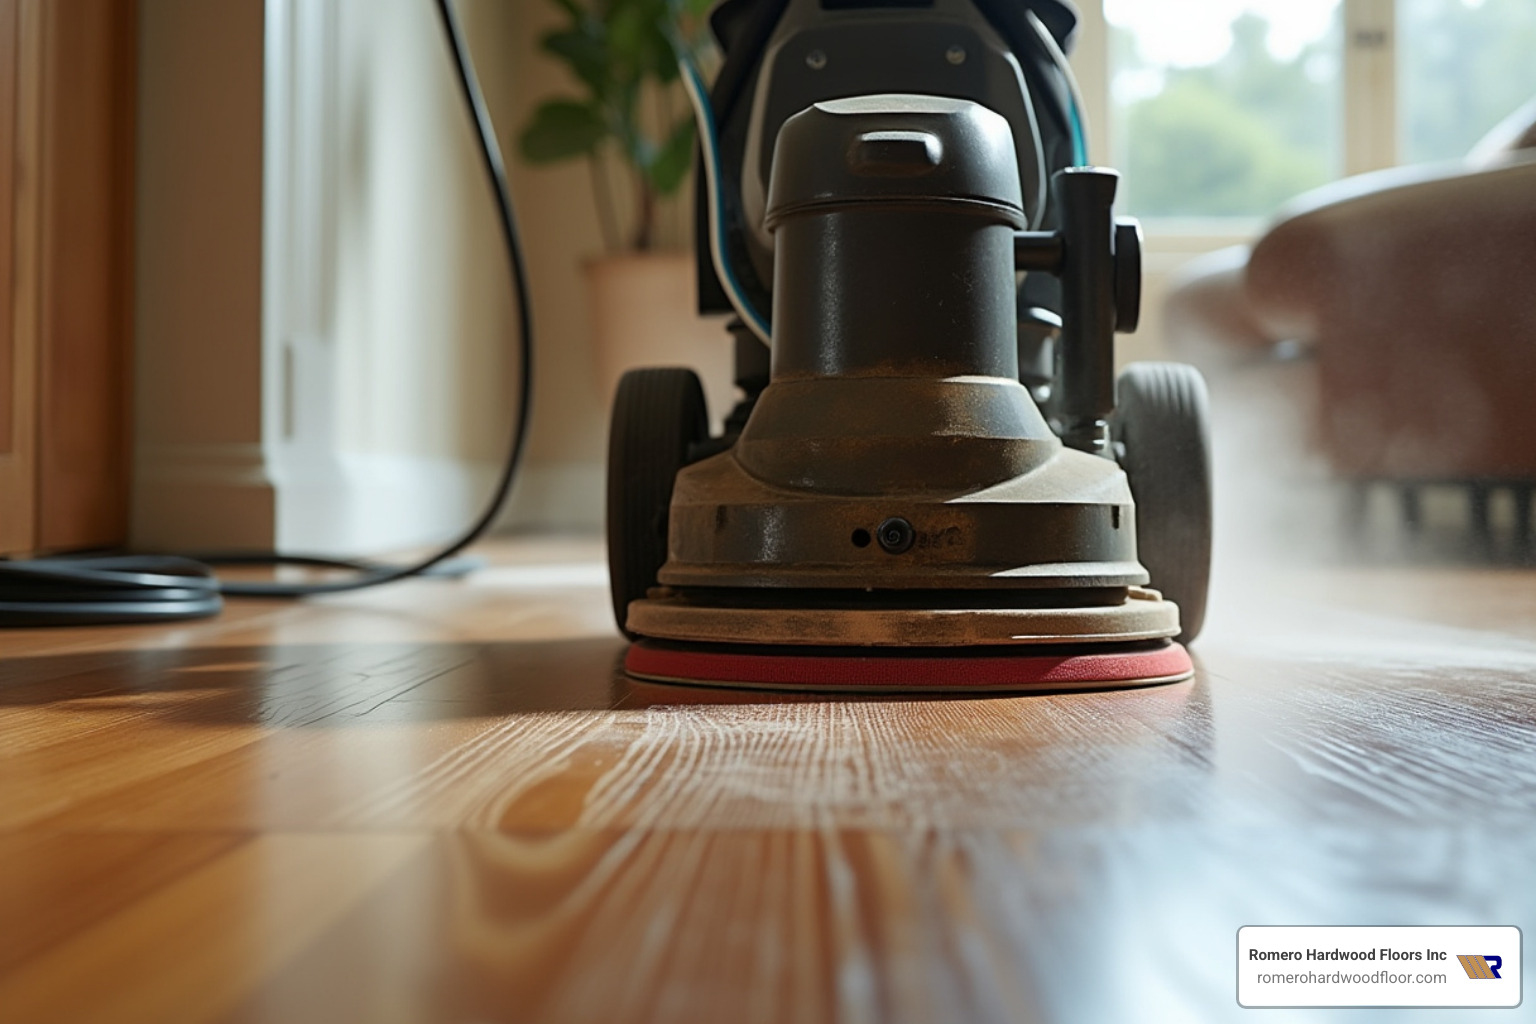
Most homeowners are surprised by how physical the process is, especially the sanding phases. That drum sander in the photo? It’s doing the heavy lifting, but you’re still guiding 100+ pounds of machine across your entire floor. By day two, you’ll understand why professional crews stay in such good shape!
The good news is that modern equipment and techniques make hard floor refinishing more predictable than ever. With dust containment systems and improved finishes, even first-time DIYers can achieve results that would have required a professional crew just a decade ago.
1. Prep & Protect
Think of this stage as setting the foundation for your entire hard floor refinishing project. Just like you wouldn’t paint a room without covering the furniture, proper preparation protects your belongings and ensures professional-quality results.
Remove all furniture from the room, including those small decorative items you might be tempted to leave behind. Picture frames, lamps, and knick-knacks become dust magnets during sanding, and you’ll thank yourself later for taking the extra time to clear everything out. Store these items in rooms that won’t be affected by dust migration – even with good containment, some particles always find their way around.
If you’re planning to remove baseboards and trim, take a moment to label each piece before you start. A simple numbering system with painter’s tape saves hours of confusion during reinstallation. Some experienced refinishers work around existing trim, but removing it gives you much better access to sand right up to the edges where wear is often heaviest.
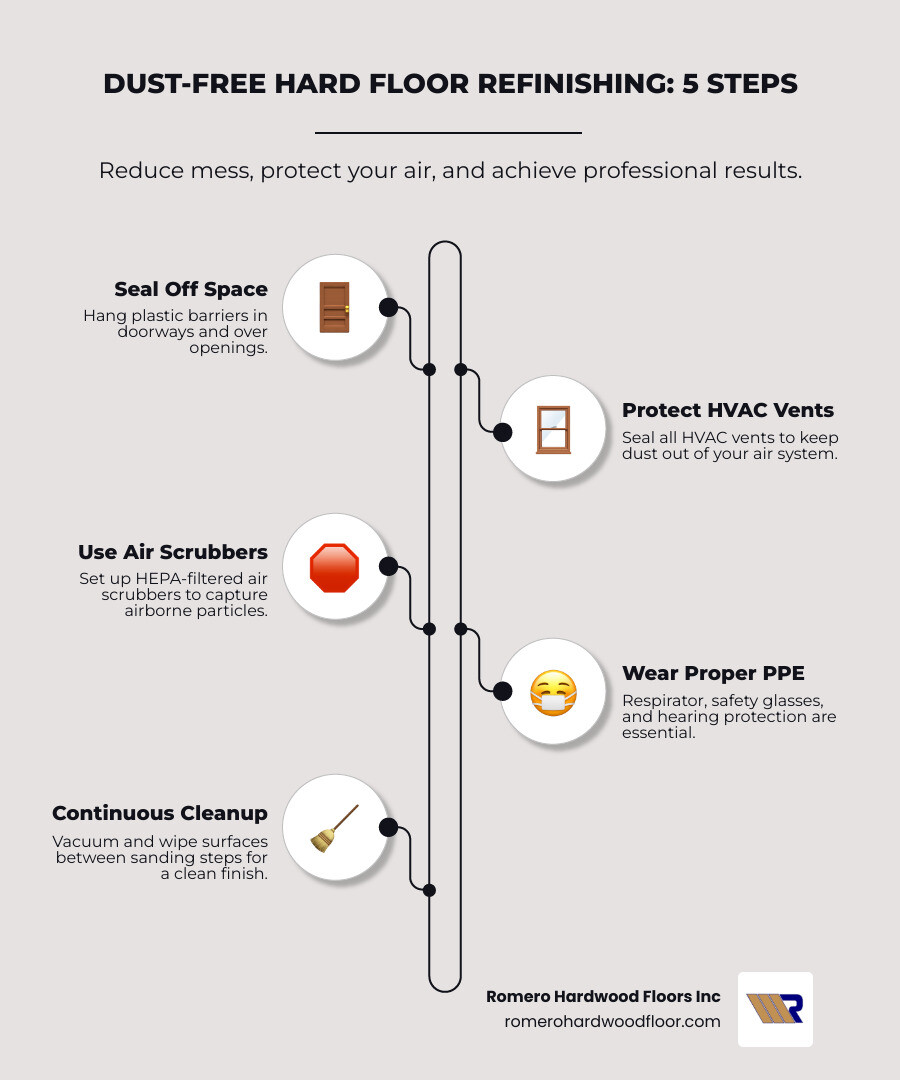
Dust containment is where the pros really shine, but DIYers can still create effective barriers. Cover all air vents with plastic sheeting and painter’s tape to keep sanding dust out of your HVAC system – trust me, cleaning dust from ductwork is a nightmare you want to avoid. Seal doorways to adjacent rooms with plastic barriers, essentially creating a contained work zone.
Before you even think about firing up that sander, HEPA vacuum the entire floor to remove surface debris. Those innocent-looking bits of dirt can actually damage expensive sanding equipment. While you’re at it, walk the room looking for protruding nails or staples – hammer them below the surface or you’ll be buying new sandpaper sooner than expected.
The extra time spent on thorough preparation pays dividends throughout the rest of your project. Your equipment will run smoother, your results will look cleaner, and you’ll spend less time on cleanup.
2. Repair & Fill
Before you can create that beautiful, smooth finish, you need to address every imperfection in your floor. Think of this step as giving your hardwood a clean slate – hard floor refinishing only looks as good as the preparation work that goes into it.
Wood filler becomes your best friend for tackling nail holes, small gaps between boards, and those annoying little gouges that seem to appear out of nowhere. Here’s the trick most DIYers miss: choose a filler that matches your intended stain color, not your current floor color. Some fillers absorb stain differently than the surrounding wood, creating obvious patches that scream “amateur hour.”
Apply the filler with a putty knife, pressing firmly to eliminate air bubbles. Overfill each imperfection slightly – most fillers shrink as they dry, and you’d rather sand down a proud spot than find a depression after staining.
For larger gaps and cracks that make your floor look like a jigsaw puzzle, trowel filler offers a better solution. This liquid product flows into cracks and self-levels, creating repairs that virtually disappear after sanding. The consistency is similar to thick paint, making it perfect for gaps wider than a credit card.
Allow 24 hours drying time before moving to the sanding phase. I know it’s tempting to rush, especially when you’re eager to see progress, but wet filler will gum up your sandpaper and create a mess that’s harder to fix than the original problem.
Board replacement enters the picture when individual planks are beyond saving – think deep pet stains that have penetrated through to the subfloor, or boards that have been severely gouged or cracked. This advanced technique requires matching wood species, grain patterns, and board dimensions, which can be trickier than it sounds.
If you’re facing more than a few board replacements, consider getting professional help for this phase. A skilled craftsman can weave new boards into your existing floor so seamlessly that even you’ll forget where the repairs were made.
Step-by-Step Hardwood Floor Repair Techniques
3. Sand Like a Pro
The sanding phase of hard floor refinishing separates amateur results from professional-quality floors. Think of it like painting a masterpiece – you need the right technique, proper tools, and patience to create something beautiful.
Start with 40-grit sandpaper for your first pass, especially if you’re removing old finish or dealing with significant scratches. This coarse grit does the heavy lifting, stripping away years of wear and old polyurethane. Don’t worry if the floor looks rough at this stage – that’s exactly what should happen.
Progress through each grit level systematically: 40, then 60, then 80, and finally 120. Each grit removes the scratches from the previous level while preparing the surface for the next finer pass. Skipping grits is like trying to jump three steps at once – you’ll stumble and create more work for yourself.
Move with the grain during every pass. Your drum sander should travel parallel to the wood boards, never diagonally or across the grain. Cross-grain scratches show through even multiple coats of finish, creating that telltale amateur appearance that screams “DIY gone wrong.”
Keep your sander moving whenever the drum is engaged. Stopping in one spot for even a few seconds creates gouges that are difficult to sand out. Think of it like ironing a shirt – steady, overlapping motions prevent damage.
Overlap each pass by one board width to ensure even coverage. This technique prevents the wavy patterns that occur when you leave gaps between sanding passes. The goal is creating one smooth, uniform surface across the entire floor.
Edge blending requires extra attention where your drum sander meets the areas you’ve worked with the edge sander. These transition zones can create visible lines in your finished floor if not properly feathered together. Take your time here – it’s worth the extra effort.
Finish with pole-screen buffing using 120-grit screens attached to a buffer. This final step removes any minor scratches from the sanding sequence and opens the wood grain perfectly for stain penetration. The screening also creates the slightly textured surface that helps your finish coats adhere properly.
Between each grit change, vacuum thoroughly with a shop vacuum. Even small debris left behind can create scratches during the next sanding pass, undoing all your careful work.
4. Clean & Water-Pop
This stage might seem simple, but proper cleaning and preparation can make or break your hard floor refinishing project. Even tiny dust particles will show up like glitter in your final finish, so take your time here.
Start with a thorough tack cloth cleaning to remove every trace of sanding dust. First, vacuum the entire floor carefully, getting into corners and along baseboards where dust loves to hide. Then wipe down the entire surface with a high-quality tack cloth using long, smooth strokes that follow the wood grain.
Don’t rush this step – it’s amazing how much dust can remain even after vacuuming. Replace your tack cloth when it becomes loaded with particles, and make sure to clean the walls and any remaining trim too. Dust has a sneaky way of falling back onto your perfectly clean floor.
Water-popping is an optional but valuable technique that opens up the wood grain for more even stain absorption. This process prevents the blotchy, uneven staining that can ruin an otherwise perfect refinishing job, especially on tricky woods like maple or cherry.
Mix a solution of roughly one part denatured alcohol to three parts water in a spray bottle. Lightly mist the floor in sections, then spread the solution evenly with a clean mop. The alcohol and water mixture raises the wood fibers slightly, creating tiny channels that help stain penetrate uniformly.
Allow the floor to dry completely before moving to the staining phase – typically 2-4 hours depending on humidity levels. The wood should feel completely dry to the touch, with no cool spots that indicate remaining moisture. This extra step takes time, but it’s the difference between professional-looking results and a DIY project that screams “amateur.”
5. Stain & Finish
The staining and finishing phase transforms your freshly sanded floors into the beautiful surface you’ve envisioned. This stage requires patience and attention to detail, as any mistakes here become permanent features of your hard floor refinishing project.
Start with a color test in a closet or under where a large piece of furniture will sit. Wood species react differently to stains, and what looks perfect on a sample chip might surprise you on your actual floors. Apply your chosen stain to several test boards and let them dry completely – wet stain always looks darker than the final result.
Temperature and humidity matter more during staining than any other phase. Keep your room between 65-75°F with humidity around 50%. Too hot and the stain dries before you can work it properly. Too cold or humid and it won’t penetrate evenly.
When you’re ready for the real thing, maintain wet edges as you work across the room. This means never letting the stain dry where you’ll need to overlap with the next section. Work in manageable sections of 3-4 boards at a time, applying stain with the grain using a brush or rag, then wiping off excess before it gets tacky.
Poor stain technique creates permanent color variations that no amount of topcoat can hide. If you notice blotchy areas developing, work quickly to blend them while the stain is still workable. Some woods like pine and maple are notorious for blotchy staining, which is why the water-popping step from earlier helps so much.
Once your stain has cured completely (usually 8-12 hours), it’s time for the protective finish. The first sealer coat locks in your stain color and creates a stable base for subsequent coats. Some modern finishes combine sealer and topcoat in one product, while traditional approaches use separate sealer and finish products.
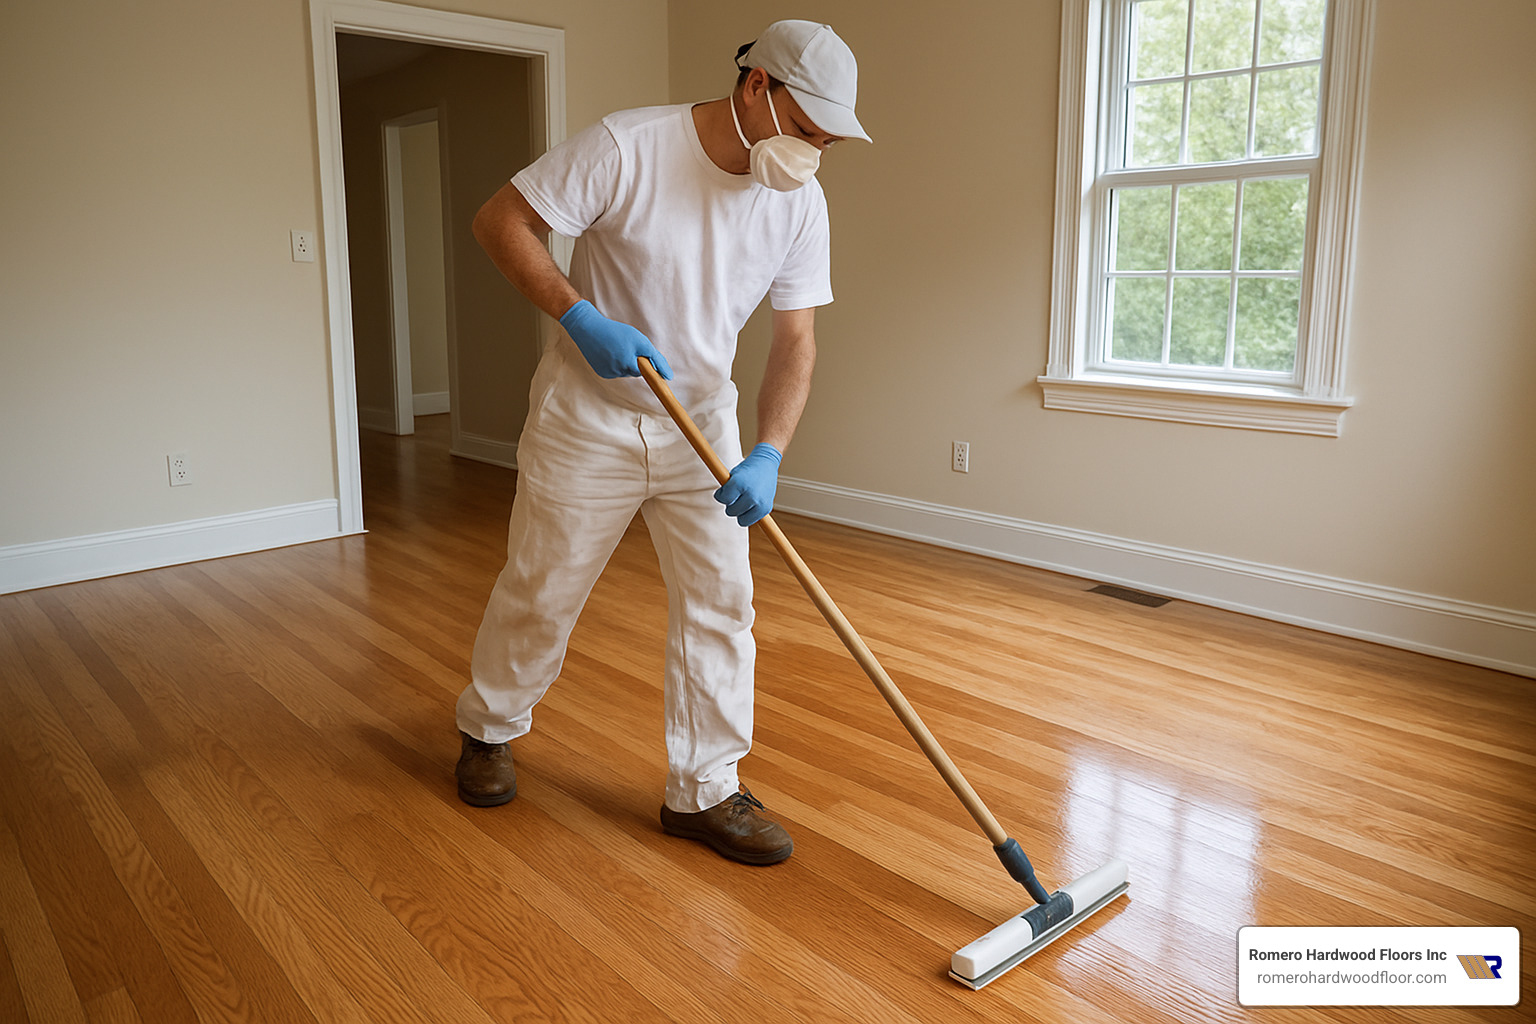
Apply finish coats with a high-quality brush or applicator pad, working systematically across the room to avoid missed spots. Two to three polyurethane coats build the protective barrier that will preserve your floors for years to come. Most floors need at least two coats, while high-traffic areas benefit from a third.
Light buffing between coats with 220-grit sandpaper ensures proper adhesion and removes any dust nibs or brush marks from the previous coat. Don’t skip this step – it’s what separates professional-looking results from amateur work.
Cure times test your patience, but rushing this stage ruins everything you’ve accomplished. Water-based finishes typically allow light foot traffic after 24 hours and full use after 48-72 hours. Oil-based products need longer – often 72 hours before walking and up to a week before heavy furniture placement.
Resist the urge to test whether the finish is ready by walking on it. When manufacturers say 72 hours, they mean it. Premature foot traffic leaves permanent marks in partially cured finish, forcing you to sand and recoat affected areas.
6. Reinstall & Re-Enter
The final stage of hard floor refinishing requires patience – your beautiful new floors need time to fully cure before returning to normal use. Think of this period as the final investment in protecting all your hard work.
Felt pads are your floors’ best friends during the transition back to daily life. Before moving even the smallest piece of furniture back into the room, attach quality felt pads to every leg, corner, and contact point. These simple protectors prevent scratches and dents that would otherwise mar your perfect finish. Replace the pads every few months as they wear down – it’s much cheaper than refinishing again.
Gradual furniture return protects your investment during the critical curing period. After 24-48 hours, you can carefully move lightweight items like lamps and decorative pieces back into the room. Wait another day or two before returning chairs and small tables. Heavy furniture like sofas, dressers, and dining tables should wait at least 72 hours, or even longer for oil-based finishes.
When you do move furniture back, lift rather than drag everything across the floor. Even with felt pads, dragging can create micro-scratches in the still-curing finish. Get help with heavy pieces – your back and your floors will thank you.
Area rugs should wait at least 14 days before making their appearance. This waiting period isn’t just a suggestion – it’s crucial for proper finish curing. Placing rugs too early can cause the finish to stick to the rug backing, creating permanent marks when you eventually move the rug. The finish continues curing for several weeks, becoming harder and more durable each day.
During these first two weeks, keep foot traffic light and remove shoes when possible. Your floors can handle normal walking, but avoid high heels, pet claws, and anything that might dent or scratch the surface while it’s still vulnerable.
The wait is worth it – properly cured floors will serve your family beautifully for the next 7-10 years before needing attention again.
Common Mistakes, Safety & Eco-Friendly Tips
Even experienced DIYers can stumble on hard floor refinishing projects, but knowing the common pitfalls helps you avoid costly mistakes that show up permanently in your finished floors.
Start and stop marks are the most visible rookie mistake. These permanent gouges happen when you pause the drum sander in one spot or begin sanding randomly in the middle of the room. Always start your first pass at one wall and maintain steady, consistent movement. Think of it like mowing a lawn – you wouldn’t stop the mower halfway across and expect a smooth result.
Swirl scratches tell everyone you rushed the job. These circular marks come from moving the sander in arcs instead of straight lines, or from using contaminated sandpaper that’s picked up debris. Replace your sandpaper frequently – it’s cheap insurance against ruining hours of work. Keep your passes straight and overlapping, like painting a fence board by board.
Skipping grits might seem like a time-saver, but it creates scratch patterns that telegraph through even multiple coats of finish. Each grit level serves a specific purpose in preparing your floor. Going from 40-grit straight to 120-grit is like trying to shave with a chainsaw – the results won’t be pretty.
Inadequate cure time ruins more floors than you’d expect. Just because the finish feels dry doesn’t mean it’s ready for furniture. Oil-based finishes need 72 hours minimum, and even water-based products benefit from 48 hours of patience. I’ve seen beautiful refinishing jobs ruined by homeowners who couldn’t wait to move their dining table back.
Safety isn’t optional in hard floor refinishing – it’s what keeps you healthy enough to enjoy your beautiful floors. Proper respirator use means wearing an N95 or P100 mask during all sanding operations, not just when you remember. Wood dust is a known carcinogen, and the fine particles from sanding can cause permanent lung damage.
Safety glasses protect against flying debris that can seriously injure your eyes, while ear protection prevents hearing damage from hours of loud sander operation. Professional contractors wear this gear for a reason – they’ve learned that shortcuts aren’t worth the consequences.
One safety hazard that surprises many homeowners is spontaneous combustion from oil-soaked rags. Stain and finish-soaked rags can literally burst into flames if wadded up in a pile. Spread used rags flat outdoors to dry completely, or store them in a water-filled metal container before disposal. This isn’t paranoia – it’s fire prevention.
Low-VOC products represent the eco-friendly evolution of floor finishes. These water-based options emit fewer volatile organic compounds, improving indoor air quality during application and for years afterward. They’re especially important if you have family members with respiratory sensitivities or chemical allergies.
Dust containment protects both your health and your home’s air quality. Professional-grade HEPA filtration systems capture 99.9% of sanding dust, while DIY projects often spread fine particles throughout the house. If you’re going the DIY route, invest in plastic barriers and quality air filtration – your lungs and your spouse will thank you.
Maintaining Your Newly Refinished Floors
Your beautiful hard floor refinishing project deserves proper care to protect that investment for years to come. Think of maintenance as insurance – a little effort now prevents costly repairs later.
Weekly cleaning keeps your floors looking their best without damaging the finish. Grab a microfiber mop and a pH-neutral cleaner specifically designed for hardwood floors. These gentle products clean effectively without stripping away your protective coating.
Skip the harsh chemicals, steam mops, and abrasive scrubbers that can dull or damage your finish. Even “wood-safe” products from the grocery store often contain ingredients that build up over time, creating a cloudy appearance that’s tough to remove.
Pet owners face unique challenges, but simple precautions make a huge difference. Regular nail trimming for dogs and cats prevents the scratches that account for most floor damage. If your pets resist nail care, consider soft nail caps that protect your floors while keeping your furry friends comfortable.
Place quality mats at every entrance – both inside and outside your doors. These catch the dirt, salt, and moisture that otherwise get tracked across your beautiful floors. Wash or replace mats regularly so they continue doing their job effectively.
Sun damage happens gradually, so you might not notice fading until it’s too late. UV protection through window treatments, blinds, or UV-filtering film preserves your floor’s color and prevents the uneven fading that makes rooms look tired and worn.
Rearrange area rugs and furniture occasionally to ensure even aging across your entire floor. That gorgeous sunbeam streaming through your living room window can create permanent color differences if the same boards get exposed day after day.
Recoating every 2-5 years might sound like a hassle, but it’s actually a smart financial move. This maintenance process involves light screening of the existing finish and applying a fresh topcoat – much less expensive and disruptive than full refinishing.
The frequency depends on your household’s foot traffic, pet activity, and how well you maintain the floors between recoating. High-traffic areas like entryways and hallways typically show wear first, giving you advance warning when it’s time for maintenance.
Professional recoating costs a fraction of full hard floor refinishing while extending your floors’ life significantly. It’s like getting a fresh manicure instead of completely redoing your nails – same beautiful results with much less time and expense.
Frequently Asked Questions about Hard Floor Refinishing
How soon can I walk on the floors?
This is probably the most common question I hear from homeowners eager to get back to normal life after hard floor refinishing. The answer depends on your finish type, but patience here really pays off.
Water-based finishes typically allow light foot traffic after 24 hours, while oil-based products need a full 48 hours before you should walk on them. But here’s the thing – just because you can walk on them doesn’t mean they’re fully cured.
The finish continues hardening for several weeks after application. During the first 72 hours, stick to soft-soled shoes or socks and avoid anything that might dent or scratch the surface. Heavy furniture should wait at least three days, and even then, use furniture pads religiously.
Full cure takes 2-4 weeks depending on temperature, humidity, and the specific products used. During this time, your floors are gradually becoming more durable, so treat them gently. Think of it like a healing process – rushing back to normal use too quickly can cause permanent damage that shows up months later.
Can all wood species be refinished?
The short answer is that most hardwood floors can be refinished, but there are definitely some important exceptions and considerations.
Solid hardwood species like oak, maple, cherry, walnut, and most domestic woods refinish beautifully. These classic choices were designed for multiple refinishing cycles over their lifetime. Exotic species can be trickier – some have oils or densities that require special stains or techniques, but they’re usually manageable with the right approach.
Engineered hardwood is where things get interesting. If your engineered floors have a wear layer of at least 3mm thick (about 1/8 inch), they can typically handle one refinishing. Thinner wear layers risk sanding through to the plywood core, which ruins the floor completely.
Here’s what definitely cannot be refinished: laminate flooring, vinyl plank, and bamboo floors. These products might look like hardwood, but they’re manufactured differently and must be replaced when they show significant wear.
If you’re unsure about your floor type, check an inconspicuous area like under a heat register or in a closet. You can often see the construction and thickness from the side profile.
How do I match new boards to old flooring?
Matching new boards to existing flooring during hard floor refinishing is part art, part science, and honestly, one of the trickier aspects of floor work.
Wood species matching comes first – you need the exact same type of wood for any hope of a good blend. But even then, age differences between old and new wood create challenges. Older wood has oxidized and changed color over time, while fresh boards look completely different.
The sanding process helps tremendously here because it removes the aged surface layer from existing boards while preparing new ones. This brings both old and new wood closer to their natural color, creating a better starting point for staining.
Grain pattern selection matters too. When choosing replacement boards, look for similar grain characteristics – tight grain matches with tight grain, dramatic patterns with dramatic patterns. Wood suppliers can often help you select boards that blend well with your existing floor.
Staining technique becomes crucial for the final blend. Sometimes you need to apply different stain concentrations to old versus new areas, or use multiple stain colors to create seamless transitions. This is honestly where professional experience makes a huge difference.
Perfect matches are rarely possible, especially if you’re replacing just a few boards. But skilled application can create pleasing blends that look intentional rather than patchy. The goal is harmony, not perfection.
Conclusion
Hard floor refinishing transforms tired, worn floors into stunning centerpieces that can make your entire home feel brand new. It’s honestly one of the smartest investments you can make – not only does it dramatically improve your living space, but it also adds real value to your property.
The beauty of refinishing lies in giving your floors a complete second life. Those scratches from years of family memories, the fading from sunny afternoons, and the general wear from daily living all disappear under skilled refinishing work. What emerges is a floor that looks like it was just installed, ready to serve your family for another decade or more.
Choosing between DIY and professional refinishing really comes down to your comfort level, available time, and budget. DIY projects can save you thousands of dollars and give you the satisfaction of completing a major home improvement yourself. But let’s be honest – it’s hard work that requires patience, the right tools, and attention to detail.
Professional services bring expertise, advanced equipment, and guaranteed results to the table. Those dust-free systems alone can save you weeks of cleanup, and there’s real peace of mind in knowing the job will be done right the first time.
The environmental angle makes refinishing an easy choice for eco-conscious homeowners. Instead of sending perfectly good wood to landfills and harvesting new trees, you’re preserving existing materials while maintaining that authentic hardwood character that never goes out of style.
Here at Romero Hardwood Floors Inc, we’ve been helping families throughout the Beverly, Chelsea, Danvers, East Boston, Gloucester, Lynnfield, Malden, Manchester by the Sea, Marblehead, Medford, Melrose, Nahant, Peabody, Reading, Revere, Rockport, Salem, Saugus, Somerville, Stoneham, Swampscott, Wakefield, Winchester, Winthrop, and Woburn areas achieve beautiful floors since 2006. Our experience with hard floor refinishing projects has taught us that the best results come when homeowners understand the process and make informed decisions.
Take your time with this project. Whether you’re doing it yourself or hiring professionals, rushing leads to mistakes that can last for years. Choose quality materials, follow proper techniques, and respect the curing times. Your floors will thank you with decades of beauty and durability.
Refinishing is both an art and a science – but the results speak for themselves. There’s nothing quite like walking across a freshly refinished floor and knowing you’ve preserved something beautiful for years to come.
More info about our hardwood floor refinishing near you
