Hardwood floor damage repair: 10 Proven Steps for Amazing Results 2025
Understanding Hardwood Floor Damage
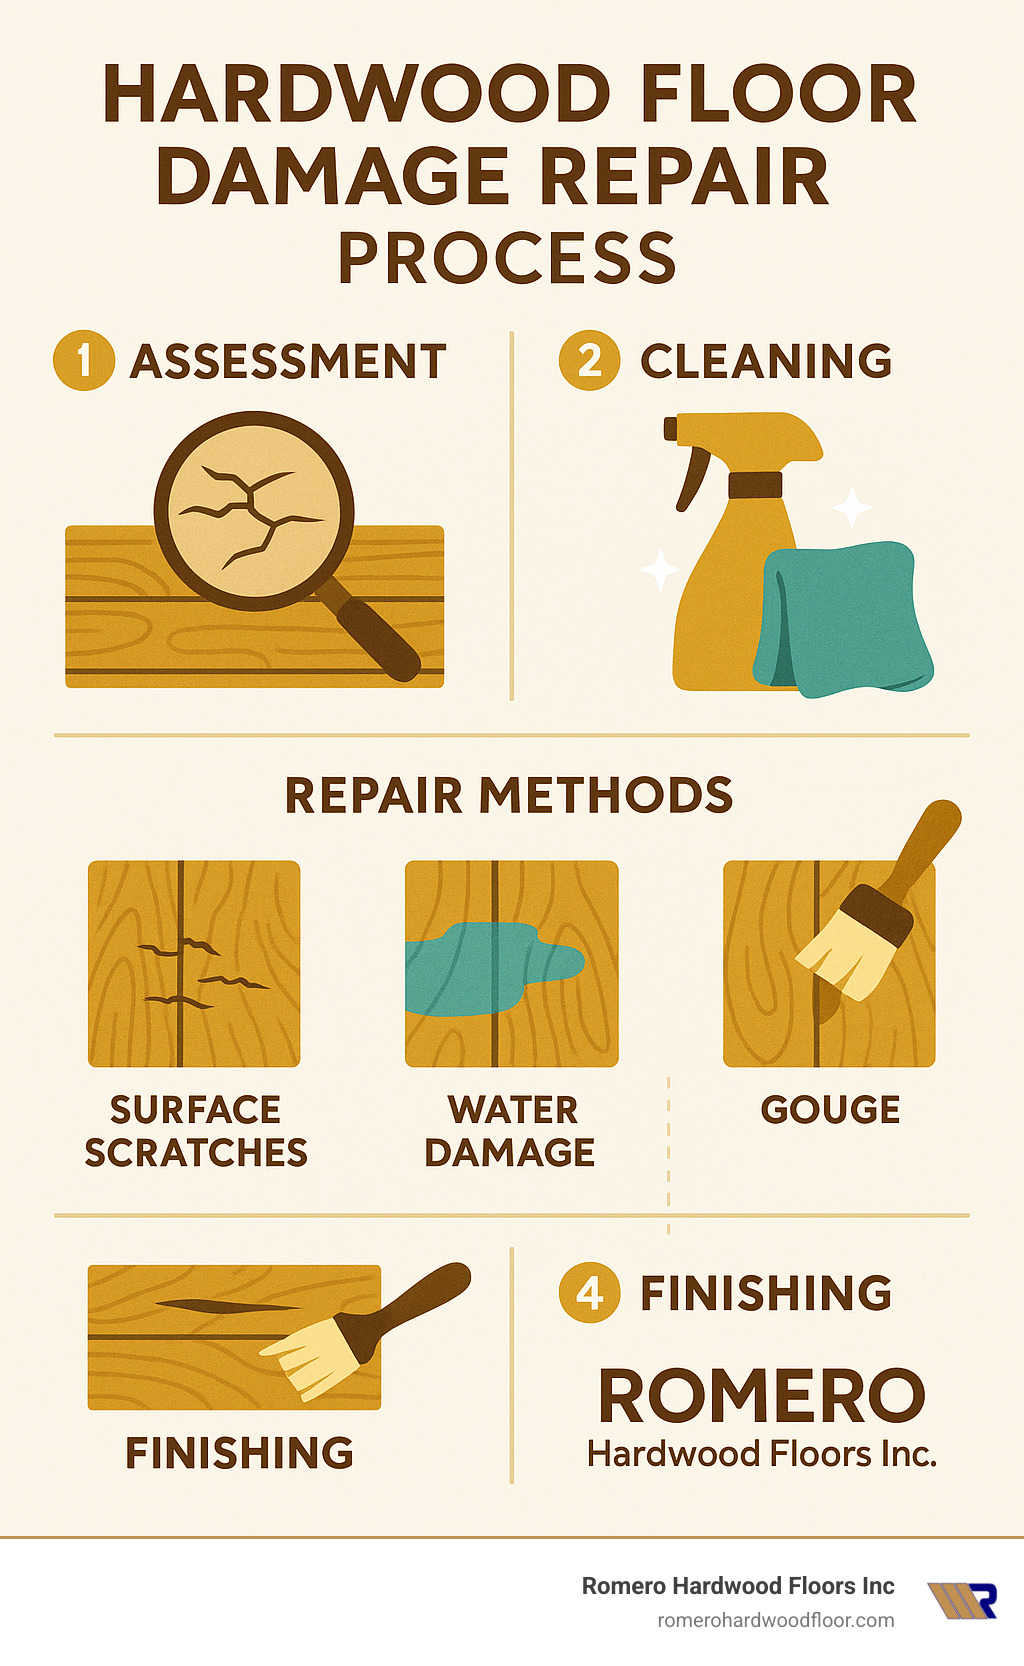
Hardwood floor damage repair can seem overwhelming, but most issues can be fixed without replacing your entire floor. Here’s a quick solution guide to common problems:
| Damage Type | DIY Solution | Professional Solution | Average Cost |
|---|---|---|---|
| Surface Scratches | Buff with #0000 steel wool, apply matching stain pen | Screen and recoat | $1-8/sq ft |
| Deep Gouges | Fill with wood putty, sand, stain to match | Board replacement | $10-20/sq ft |
| Water Damage | Dry thoroughly with fans, sand lightly when dry | Replace affected boards, refinish | $8-100/sq ft |
| Warping/Cupping | Dehumidify area, allow to settle (1+ week) | Replace boards if severe | $8-25/sq ft |
| Gaps | Fill with wood putty or sawdust/resin mix | Replace boards if gaps exceed 1/4″ | $5-15/sq ft |
Your beautiful hardwood floors add warmth and value to your home, but daily life takes its toll. Pets, furniture, high heels, and spills can all leave their mark over time. Hardwood floor damage repair doesn’t have to be complicated or expensive when addressed promptly and properly.
Most minor hardwood floor repairs can be completed within 30 minutes to 2.5 hours, with DIY costs ranging from $5 to $20 for supplies. Compare this to the $2,480 to $7,028 average cost of replacing hardwood floors, and repair becomes an attractive option.
I’m Francisco Romero, owner of Romero Hardwood Floors Inc. with over 15 years of experience in hardwood floor damage repair throughout Revere, MA and surrounding areas. I’ve personally restored thousands of damaged floors, from minor scratches to severe water damage, helping homeowners save thousands while extending the life of their investments.
Essential Hardwood floor damage repair terms:
– Cost of wood floor repair
– Floor sanding and varnishing
Assessing Damage & Costs
Before diving into repairs, it’s crucial to properly assess the damage to your hardwood floors. This step determines whether you can handle the repair yourself or need professional assistance.
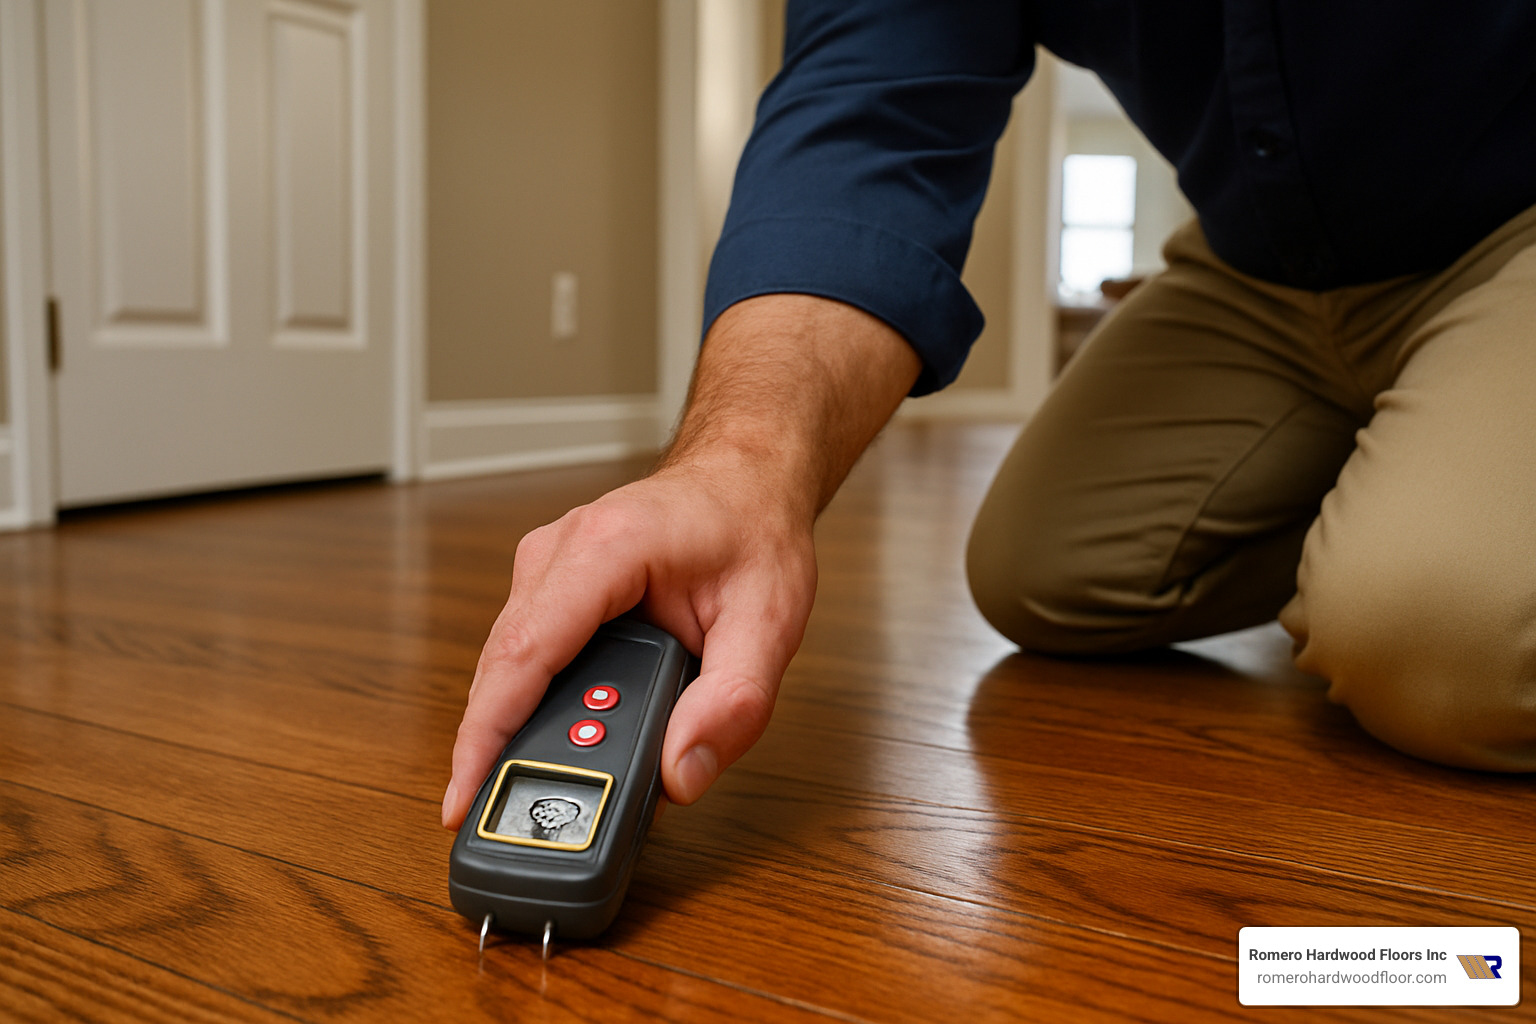
Take a few minutes to carefully examine the damaged area. Get down on your hands and knees (I know, not the most glamorous position!) and look closely for scratches, gouges, dents, water damage signs, gaps between boards, and finish issues like peeling or bubbling.
When it comes to water damage, a moisture meter becomes your best friend. As our head technician often says, “We’re looking for moisture content below 12% before even thinking about repairs. Anything higher means your floor is still throwing a pool party under the surface.”
The type of floor you have makes a huge difference in your repair approach:
Site-finished floors are like the forgiving friend in your life. Since they were sanded and finished after installation, you can often repair sections and blend them more seamlessly with the surrounding floor.
Prefinished floors, with their factory-applied finishes and beveled edges, tend to be a bit more high-maintenance when it comes to repairs. That aluminum oxide finish that keeps your floors looking gorgeous also makes spot repairs trickier to blend.
Here’s a simple test I recommend to my clients: run your fingernail across the damaged area. If your nail catches in the scratch, you’ll likely need filler. If the damage is deeper than 1/8 inch (about the thickness of two quarters), you might be looking at replacing boards instead.
Based on internet data, hardwood floor damage repair typically costs between $2-$20 per square foot, with most projects falling between $478 to $1,624. When you compare this to full replacement costs of $2,480 to $7,028 or more, repairing makes good sense for your wallet when possible.
For more detailed cost information, check our guide on How Much Does Hardwood Floor Repair Cost? and Step-by-Step Hardwood Floor Repair Techniques, or visit HomeAdvisor’s cost guide for additional pricing information.
Determine Floor Type
Knowing exactly what type of floor you’re working with is essential for effective hardwood floor damage repair. Let me walk you through the main types:
Solid Hardwood is the marathon runner of floors. Made from single pieces of wood (typically 3/4 inch thick), these floors can be sanded and refinished up to 10 times over their lifetime. Oak, maple, and walnut are popular choices that have graced homes for generations.
Engineered Hardwood is more like a sprinter – beautiful but with less endurance. It features a thin veneer of real wood over plywood or fiberboard layers. While gorgeous, it can usually only be refinished once or twice before that thin top layer is compromised.
Laminate Flooring is the impersonator of the bunch – not real wood at all, but a photographic layer over fiberboard. These floors cannot be sanded or refinished, and damage typically means replacing the affected boards.
Not sure what you have? Take a peek at the edges of boards in doorways or vents, or remove a floor register to see the cross-section. Solid wood shows consistent grain throughout, while engineered displays distinct layers – like a wood sandwich.
The finish on your floor matters too. Oil-based polyurethane gives that warm amber tone, water-based polyurethane offers a clearer finish, aluminum oxide provides factory-level durability, and natural oils penetrate the wood for a repairable surface.
“The biggest mistake I see homeowners make,” our repair specialist often shares, “is trying to tackle prefinished floors with aluminum oxide coatings using rental equipment. Those finishes are like superhero armor – they need professional-grade equipment to address properly.”
Measure Scope & Budget
Once you know what you’re dealing with, it’s time to crunch some numbers for your hardwood floor damage repair project.
Grab a tape measure and calculate the affected area in square feet:
For that wine spill or dog scratch, measure just the damaged boards plus a couple surrounding ones. For that unfortunate washing machine flood? You’ll need to measure the entire affected room.
Professional hardwood repair typically runs $50-$100 per hour, with most jobs taking between 5-20 hours depending on complexity. If you’re going the DIY route for minor issues, repair kits for scratches and small gouges range from $5-$20 at your local home improvement store.
Let me share a real example from our recent work in Beverly, MA: A client called us panicking about water damage affecting about 20 square feet of their beautiful oak flooring. We replaced 5 damaged boards, sanded the area, and carefully blended the finish with the surrounding floor. Total cost: approximately $650. Had they replaced the entire 200 square foot room? They would have been looking at $4,000+ out of pocket.
For budgeting purposes, consider these average costs based on internet data (not actual Romero Hardwood Floors pricing):
Minor scratch repair might run $1-8 per square foot, while board replacement typically costs $10-25 per square foot. Water damage restoration varies widely from $8-100 per square foot depending on severity, and full room refinishing generally ranges from $3-8 per square foot.
Timing matters! That small water stain you’re ignoring today could turn into a warped, moldy mess by next month. In flooring, as in life, addressing small problems early prevents them from becoming expensive headaches later.
Hardwood Floor Damage Repair 101
Now that you understand the assessment process, let’s dive into the fundamentals of hardwood floor damage repair. Different types of damage require different approaches, tools, and techniques.

The most common types of hardwood floor damage include scratches, gouges, dents, water damage, warping, gaps, and finish failure. Let me walk you through each one.
Scratches are perhaps the most common issue we see in homes across Revere. Surface scratches only affect the finish layer—think of them as “paper cuts” for your floor. Deeper scratches, however, penetrate into the actual wood and require a bit more TLC. The good news? Both are fixable without replacing boards.
Gouges take damage a step further by actually removing wood material. That beautiful oak floor that met the business end of a dropped kitchen knife? That’s a gouge. We’ll need to fill these with wood putty or epoxy that matches your floor’s color and grain pattern.
Dents happen when something heavy compresses the wood fibers without removing material. The surprise gift here is that many dents can actually be raised back up using a bit of moisture and heat—almost like magic!
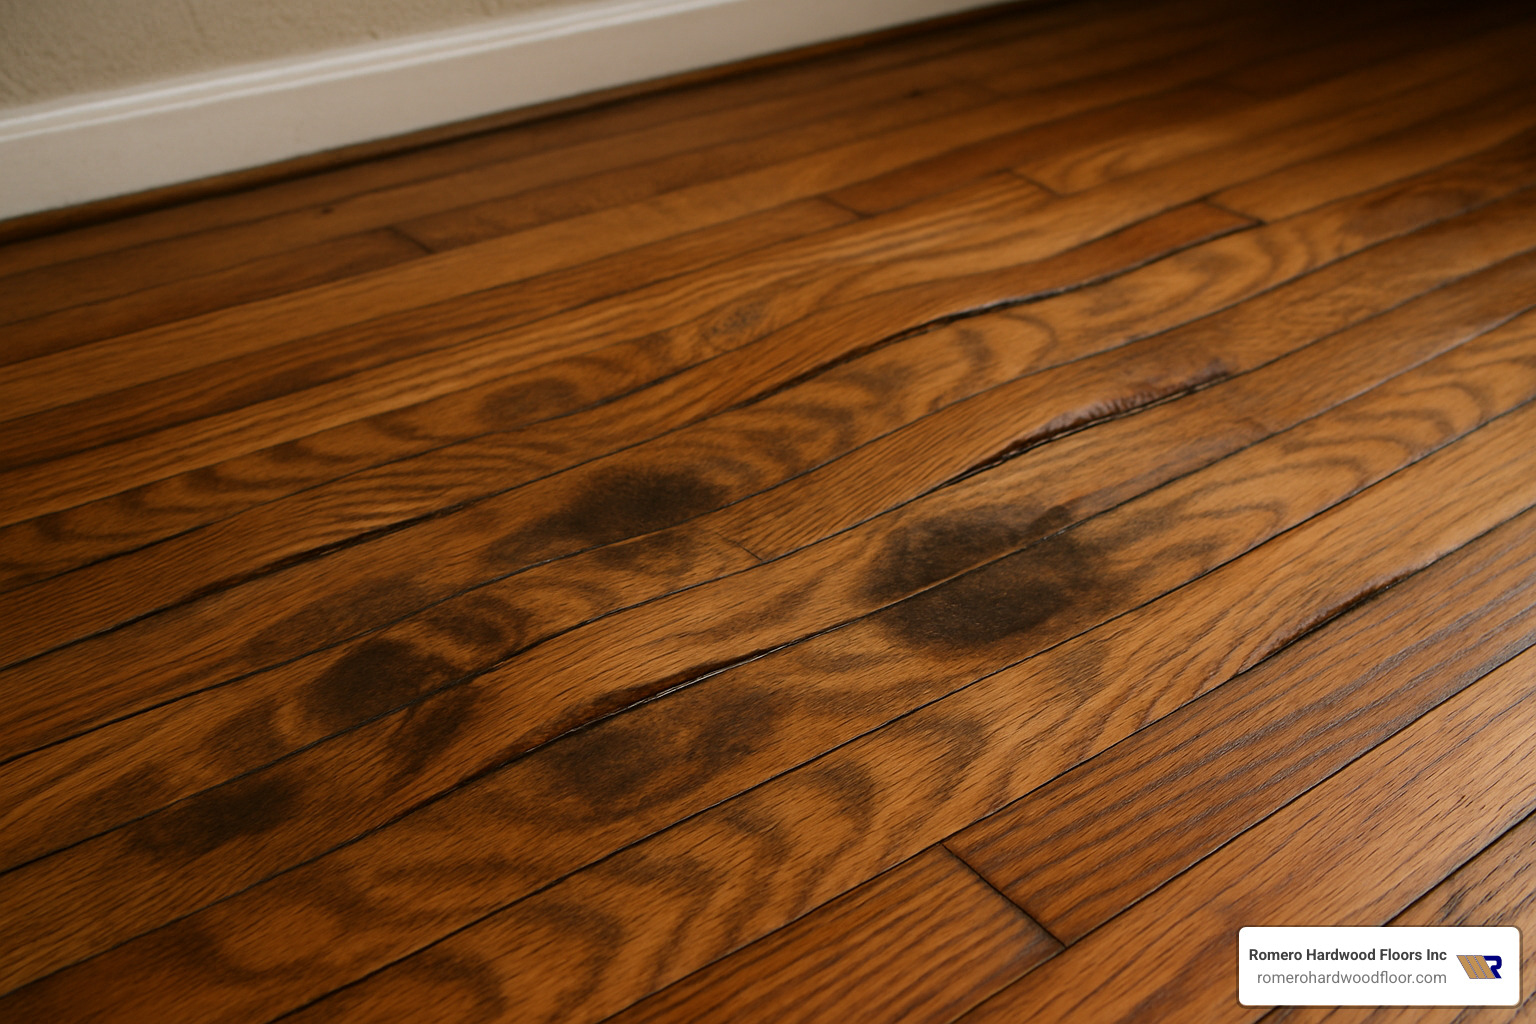
Water damage is the villain in many hardwood horror stories. It can cause staining, cupping (where edges rise higher than centers), or crowning (the opposite, with centers higher than edges). The extent of water damage determines whether we can simply dry and refinish or if we need to replace boards entirely.
Warping occurs when boards bend, twist, or buckle due to moisture changes. I’ve seen minor warping resolve itself once proper humidity is restored, but severe cases will require board replacement to restore your floor’s beauty.
Gaps between boards that exceed normal seasonal movement can be eyesores and dirt traps. Small gaps can be filled, while larger ones might need us to reposition or replace boards.
Finish failure shows up as peeling, bubbling, or worn areas in your floor’s protective coating. This usually calls for screening and recoating, or in more severe cases, complete refinishing.
Every craftsman needs the right tools. For basic hardwood floor damage repair, you’ll want:
– A good vacuum and cleaning supplies (dust is the enemy of a good finish)
– Putty knife and wood filler that matches your floor color
– Sandpaper in various grits (typically 80-220)
– Stain pens or markers for color matching
– Ultra-fine #0000 steel wool for buffing
– Microfiber cloths that won’t leave lint behind
– Protective finish (usually polyurethane)
– Small artist brushes for precise application
For bigger jobs, you might need to add an oscillating multi-tool, pry bar, hammer, drill with spade bits, moisture meter, and maybe a dehumidifier or fans. Don’t worry—most rental centers have these available if you’re going the DIY route.

Hardwood Floor Damage Repair: Quick Assessment Checklist
Before jumping into any repair, take a moment to properly assess what you’re dealing with:
The depth test is simple but effective—run your fingernail across the damage. If your nail catches, the scratch penetrates the finish and likely needs filling. This ten-second test can save you hours of wasted effort using the wrong repair approach.
Try the coin scratch test by gently attempting to scratch the damaged area with a coin. If this makes things worse, your floor’s finish is already compromised and needs attention. I learned this one the hard way early in my career!
For water damage concerns, a moisture reading is essential. Readings should fall below 12% before you begin repairs. I remember a client in Cambridge who insisted on refinishing before proper drying—three weeks later, we were back to fix the new bubbles that formed.
Don’t forget to perform a subfloor check for severe damage. Soft or damaged subfloors must be addressed before any hardwood repairs, or you’re just putting lipstick on a pig, as my grandfather would say.
A quick finish type test with a drop of mineral spirits in an inconspicuous spot can save headaches. If it becomes tacky, you likely have a wax finish. If not, you’re probably dealing with polyurethane.
Always check for proper expansion gaps (typically ¼ inch) around the room’s perimeter. A client in Medford called us about squeaking floors that seemed to need repair, but our assessment revealed the real issue was insufficient expansion gaps causing pressure points. By slightly modifying the baseboards and creating proper gaps, we solved the problem without any floor repair needed.
“Always identify the root cause of damage before attempting repairs,” I tell every client. “Fixing the symptom without addressing the cause means you’ll be making the same repair again soon.”
Pro-Level Hardwood Floor Damage Repair Tips
After years of performing hardwood floor damage repair throughout Massachusetts, I’ve developed some professional techniques that make a significant difference:
Color matching mastery is worth your time to develop. Don’t settle for pre-mixed options when you can blend 2-3 different stains to match aged hardwood perfectly. I always tell my team to write down their formula for future touch-ups. One client in Winthrop had us back three years after a repair just to get our “recipe” for their unique cherry floors.
The feather-sanding technique is what separates amateur repairs from professional ones. When sanding repaired areas, gradually lighten pressure as you move outward from the damage, creating a feathered edge that blends invisibly with the surrounding floor. This simple approach makes repairs virtually undetectable.
Don’t underestimate proper dust control systems. Professional dust containment isn’t just about keeping your home clean—it prevents fine particles from settling in your fresh finish. Use plastic sheeting and tape to isolate repair areas, especially if you’re working in just one section of a larger room.
Your health matters, so use appropriate personal protective equipment. Always wear a respirator mask (N95 or better) when sanding, eye protection throughout the process, knee pads for extended floor work, and gloves when handling chemicals. Your future self will thank you.
Temperature and humidity control can make or break a repair job. Maintain 65-75°F and 35-55% humidity during repairs for optimal results. I’ve seen beautiful repair work ruined by applying finish in high humidity conditions. One particularly humid August day in Boston taught me this lesson the hard way.
Always test in hidden areas like closets or under furniture before applying stains and finishes to visible areas. This five-minute precaution has saved me countless hours of rework over the years.
Take before, during, and after photos of your repair process. This helps track what worked and provides evidence for insurance claims if needed. Plus, there’s something satisfying about seeing the change!
One particularly challenging job in Salem involved matching 80-year-old oak flooring that had developed a distinct patina. We collected sanding dust from an inconspicuous area, mixed it with clear epoxy, and used it to fill deep gouges. The result was an invisible repair that perfectly matched the character of the antique floor—a technique we now use regularly for historic homes.
DIY & Professional Repair Techniques
Now that you understand the fundamentals, let’s explore specific techniques for hardwood floor damage repair, from DIY solutions to professional approaches.

For DIY enthusiasts, several effective techniques can address minor to moderate damage without breaking the bank or requiring specialized tools.
Surface Scratch Buffing works wonders for scratches that haven’t penetrated through the finish. Simply buff the area with #0000 steel wool (yes, that’s four zeros!), then apply a polish or revitalizer specifically designed for hardwood floors. The ultra-fine steel wool gently smooths the surface without creating additional damage.
Have you heard about The Walnut Hack? It sounds strange, but it really works! For light scratches in the wood itself, rub a walnut (the actual nut, not walnut oil) over the scratch. The natural oils fill and darken the scratch. Follow with a microfiber cloth to buff the area.
One homeowner in Revere shared: “I was skeptical about the walnut trick, but it made the scratch nearly invisible on my medium-brown oak floors. I was amazed!”
For deeper scratches and small gouges, Wood-Putty Fill is your friend. Clean the area thoroughly, then apply color-matched wood putty with a plastic putty knife. Once dry, sand lightly with 220-grit sandpaper and apply matching finish. Take your time with color matching—it makes all the difference between a repair that disappears and one that stands out.
Did you know you can actually Steam-Out Dents? For dents that haven’t broken the wood fibers, place a damp cloth over the dent and apply a clothes iron on medium heat for 30-60 seconds. The steam causes the compressed wood fibers to swell back to their original position. It’s like magic watching a dent slowly rise back to level!
When dealing with deeper damage, Epoxy for Gouges provides excellent results. Mix two-part epoxy with stain or wood dust from your floor to match your floor color. Apply to clean, dry gouges, allowing it to slightly overfill. Once cured, sand flush and apply finish. This creates a durable, long-lasting repair.
For more serious damage that exceeds DIY comfort levels, professional techniques include:
Cupping & Crowning Repair requires addressing the moisture source first, then using dehumidifiers to stabilize the floor. Once moisture readings are consistent, the floor is sanded flat and refinished. Patience is key—rushing this process often leads to future problems that could have been avoided.
When boards are beyond repair, Board Removal & Patch becomes necessary. Damaged boards are carefully removed using an oscillating tool or circular saw, then new matching boards are installed and finished to blend with surrounding flooring. This is truly an art form that professionals have refined through years of experience.
The final touch in professional repairs is Touch-Up Finish Application. Professional finishers use specialized techniques to feather new finish into existing finish, making repairs virtually invisible. This often involves blending multiple stain colors and applying finish in thin, carefully controlled layers.
For detailed guides on specific repairs, check out our DIY Guide to Hardwood Floor Scratch Repair and Hardwood Floor Water Damage Repair resources.
Minor Scratches & Scuffs
Minor scratches and scuffs are the most common type of hardwood floor damage, and fortunately, they’re also the easiest to repair. These surface imperfections typically affect only the finish layer rather than the wood itself.
For effective hardwood floor damage repair of minor scratches:
- Clean the area thoroughly: Use a hardwood floor cleaner and microfiber cloth to remove all dirt and debris. Any particles left behind can cause further scratching during repair.
- Buff with #0000 steel wool: Gently rub along the grain of the wood, not across it. This ultra-fine steel wool helps smooth the scratch without damaging the surrounding finish. “The key is gentle pressure,” advises our finishing expert. “Let the steel wool do the work, not your arm strength.”
- Apply a stain marker: For scratches that have penetrated to the wood, use a stain marker that matches your floor color. Test in an inconspicuous area first. Apply the marker to the scratch, let it sit for 30-60 seconds, then wipe away excess with a clean cloth.
- Buff and recoat if necessary: For larger areas with multiple scratches, consider a screen and recoat process. This involves lightly abrading the finish with a buffer and screening pad, then applying a new coat of finish over the entire area.
A client in Melrose called us about scratches caused by their new puppy. We recommended they try the stain marker method first. “I was sure we’d need to refinish,” they told us later, “but the markers made the scratches virtually disappear, saving us hundreds of dollars.”
For scuffs that haven’t penetrated the finish, try this simple trick: rub the area vigorously with a soft cloth. The friction often removes surface scuffs by redistributing the finish.
Remember: addressing scratches promptly prevents them from collecting dirt and becoming more noticeable over time.
Deep Gouges & Dents
Deep gouges and dents require more intensive hardwood floor damage repair techniques, as they affect the wood itself, not just the finish.
For repairing deep gouges:
- Clean the damaged area: Remove all debris and ensure the gouge is completely clean and dry.
- Apply epoxy wood filler: For deep gouges, epoxy fillers provide better durability than standard wood putty. Mix the epoxy according to manufacturer instructions, adding stain or sanding dust from your floor to match the color.
- Apply with precision: Use a plastic putty knife to apply the epoxy, slightly overfilling the gouge. Work quickly as most epoxies set within minutes.
- Allow proper curing time: Follow the manufacturer’s recommendations, typically 24 hours for full hardness.
- Sand carefully: Once cured, use a sanding block with 120-grit sandpaper, followed by 220-grit for a smooth finish. Sand in the direction of the wood grain.
- Custom stain matching: If needed, apply custom-mixed stain to match the surrounding wood. “We often use multiple stain colors to achieve an exact match,” notes our repair specialist. “Take photos of your mixing process for future reference.”
- Apply finish: Once the stain has dried completely, apply the same finish as the rest of your floor, feathering the edges to blend with the surrounding area.
For dents where the wood is compressed but not gouged:
- The steam method: Place a damp cloth over the dent and apply a household iron on medium heat (no steam setting) for about 30 seconds. Check progress and repeat if necessary. The moisture and heat cause the compressed wood fibers to swell back to their original position.
- Water and heat alternative: Place a few drops of water directly in the dent, then heat with a hair dryer on high setting for 2-3 minutes. This can be repeated several times for stubborn dents.
A dramatic example from our work in Winchester involved a client who dropped a cast iron pan on their cherry hardwood, creating a 1/2-inch deep dent. Using a combination of the steam method and epoxy filling, we restored the floor to near-perfect condition without replacing boards.
For more detailed guidance on gouge repair, visit our guide on Hardwood Floor Gouge Repair.
Water Damage & Warping
Water damage is among the most serious threats to hardwood flooring, often resulting in warping, cupping, or buckling. Prompt action is essential for effective hardwood floor damage repair in these cases.
When addressing water damage:
- Remove standing water immediately: Use a wet vacuum to extract as much water as possible. For every hour water sits on hardwood, the damage becomes more severe.
- Deploy fans and dehumidifiers: Position high-velocity fans to create maximum airflow across the floor surface. Add dehumidifiers to remove moisture from the air. “We typically use one dehumidifier per 300 square feet of affected flooring,” explains our water damage specialist.
- Monitor moisture content: Use a moisture meter to track progress. Hardwood should reach 6-9% moisture content (depending on your region) before repairs begin.
- Allow adequate drying time: This is crucial and often takes 1-2 weeks. Rushing repairs on floors that still contain excess moisture leads to future problems.
- Assess damage after drying: Some cupping may resolve naturally as the floor dries. If warping remains after complete drying, more intensive repairs are needed.
For minor cupping that remains after drying:
– Light sanding may be sufficient to level the surface
– Refinishing will then restore the appearance
For severe warping or buckling:
– Affected boards will need replacement
– This requires matching the wood species, cut, and grain pattern
– Professional installation ensures proper integration with existing flooring
A dramatic case from our work in Winthrop involved a dishwasher leak that went unnoticed for 48 hours. The homeowner called us immediately upon finding it, and we implemented emergency drying protocols. Despite the severity, we saved over 80% of the affected flooring through aggressive drying and selective board replacement, saving thousands in replacement costs.
“The key with water damage is speed,” emphasizes our restoration expert. “Every hour counts. We’ve seen floors that could have been saved with immediate action but required complete replacement due to delayed response.”
For comprehensive guidance on water damage situations, see our detailed guide on How to Repair a Water Damaged Hardwood Floor.
Board Replacement Basics
When damage is too severe for surface repairs, individual board replacement becomes necessary. This more advanced hardwood floor damage repair technique can save you from replacing the entire floor.
The basic process for board replacement includes:
- Identify the damaged boards: Mark the specific boards that need replacement. Extend slightly beyond visible damage to ensure all affected wood is removed.
- Cut out the damaged section: Using an oscillating multi-tool, make two parallel cuts down the length of the board to be removed. Set the depth to the thickness of the flooring to avoid damaging the subfloor.
- Remove the center section: After making the cuts, use a chisel to carefully pry out the center strip of the damaged board.
- Extract the edges: With the center removed, use the oscillating tool to cut toward the edges, then carefully pry out the remaining pieces without damaging adjacent boards.
- Prepare the replacement board: Measure the opening precisely and cut a new board to fit. For tongue-and-groove flooring, remove the bottom lip of the groove side to allow insertion.
- Test fit: Dry-fit the new board to ensure proper sizing before applying adhesive.
- Install the new board: Apply construction adhesive to the subfloor, then insert the replacement board. The tongue side goes in first, then the grooveless side is pressed down.
- Secure the board: For traditional installations, face-nail the board with finishing nails, then set the nails below the surface using a nail set.
- Fill nail holes: Use wood putty that matches your floor color to fill the nail holes.
- Sand and finish: Carefully sand the new board to be flush with surrounding flooring, then apply stain (if needed) and finish to match.
A client in East Boston had a section of floor damaged by a heavy furniture drop. We replaced three boards using this method, and after finishing, even the homeowner had difficulty identifying which boards had been replaced.
“The secret to invisible board replacement,” shares our installation expert, “is taking time to match not just the wood species, but the grain pattern and character of the surrounding floor.”
For tongue-and-groove flooring, we sometimes use a specialized “slip tongue” technique: cutting a thin spline that fits into the grooves of adjacent boards, creating a new tongue for the replacement board to connect to.
Preventing Future Damage
An ounce of prevention is worth a pound of hardwood floor damage repair. Implementing these protective measures will extend the life of your hardwood floors and minimize the need for future repairs.
Your beautiful hardwood floors are an investment worth protecting. I’ve seen countless homeowners who could have avoided costly repairs with just a few simple preventive habits.
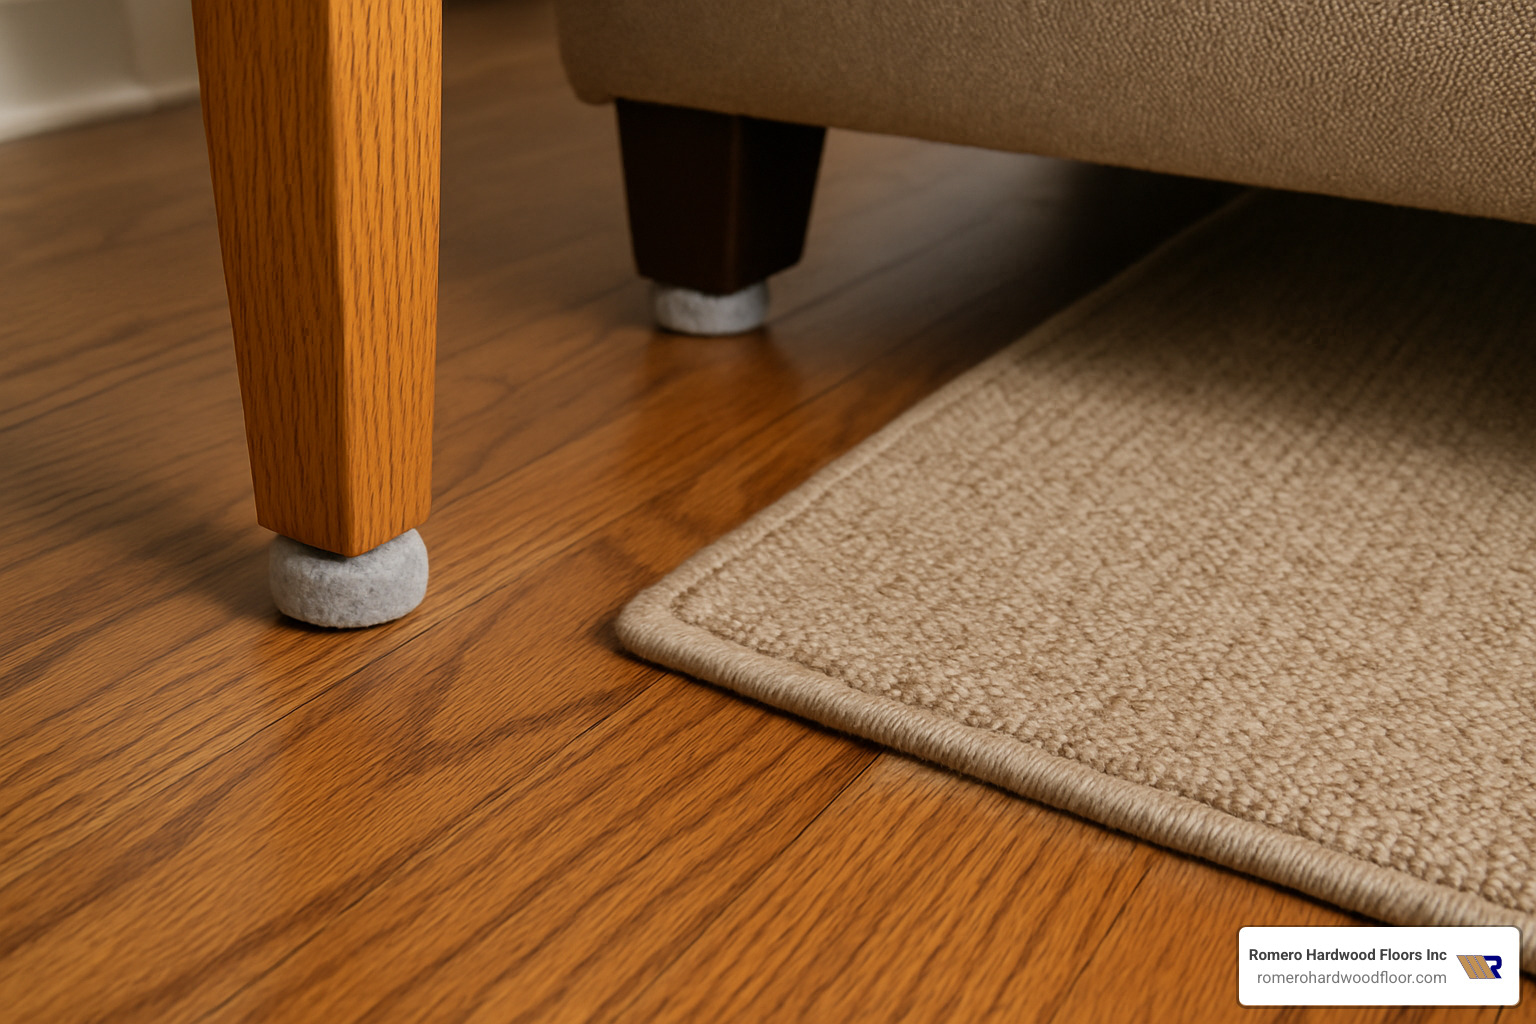
Furniture pads are your floors’ best friends. Those little felt circles might seem insignificant, but they’re mighty protectors against scratches and gouges. “We recommend checking and replacing these pads every 3-6 months,” I tell all my clients. “They wear down faster than most people realize, and once they collect grit, they can actually cause the damage they’re meant to prevent.”
Strategic placement of area rugs can dramatically extend your floor’s life, especially in high-traffic zones like entryways and hallways. Just be sure to use non-slip, non-rubber backing that won’t trap moisture or discolor your wood. I always suggest lifting and vacuuming under these rugs regularly – you’d be surprised how much abrasive dirt collects underneath!
Maintaining proper humidity levels between 35-55% year-round might be the most overlooked aspect of hardwood floor care. Wood naturally expands in humid conditions and contracts when dry, which can lead to everything from minor gaps to serious cupping issues. During Massachusetts winters, when indoor heating systems dry out the air, a simple humidifier can prevent hundreds in potential repair costs. Conversely, our humid summers might call for dehumidifiers in some homes.
One of my favorite client success stories involves a family in Somerville with two Labrador retrievers. They were constantly battling floor scratches until I suggested a bi-weekly pet nail trimming schedule. “It’s like night and day,” they told me six months later. “We haven’t seen a new scratch since we started keeping up with their paws!” A little nail maintenance goes a long way in preserving your hardwood’s beauty.
Regular sweeping and proper cleaning removes the invisible enemies of your hardwood – tiny particles of dirt and grit that act like sandpaper underfoot. Stick to hardwood-specific cleaners and microfiber dust mops. I cringe whenever I see steam mops advertised for hardwood floors – they force moisture into the wood and can cause serious damage over time.
Your choice of footwear matters more than you might think. “High heels can exert over 8,000 pounds per square inch of pressure,” I often explain to surprised homeowners. “That’s enough to dent even the hardest maple or oak floors.” A simple house rule about removing shoes (or at least problematic ones like sports cleats or damaged heels) can significantly reduce damage.
Don’t underestimate the importance of regular sealant maintenance. Even the best finish will wear down over time, especially in busy households. Reapplying sealant every 3-10 years (depending on traffic and wear) creates a sacrificial layer that takes the abuse instead of your actual wood. A professional screening and recoating costs far less than full refinishing and provides excellent protection.
Finally, make a habit of conducting monthly walk-throughs of your home, paying special attention to areas prone to moisture problems – around sinks, dishwashers, refrigerators, and exterior doors. Catching a small water issue before it becomes major warping can save thousands in repairs.
A client in Somerville implemented these preventive measures after we completed hardwood floor damage repair in their living room. Two years later, they reported their floors looked “almost identical to the day you finished the work.” That’s the power of prevention!
For more comprehensive guidance on maintaining your hardwood floors, see our resource on Hardwood Floor Repair and Refinishing.
Frequently Asked Questions about Hardwood Floor Damage Repair
After completing thousands of hardwood floor damage repair projects across Massachusetts over the years, I’ve heard just about every question homeowners have. Let me share the answers to the questions we hear most often:
What are the most common damage types?
You might be surprised to learn that the vast majority of hardwood floor damage falls into just a few categories:
Scratches are by far the most common issue we see. These surface marks typically come from everyday life—your dog’s excited sprint to the door, a chair pulled back at dinner, or even grit tracked in on shoes. Light scratches that only affect the finish layer are usually simple fixes.
Gouges and deep scratches are more serious wounds in your floor. These happen when something sharp or heavy cuts into the wood itself—like that time your refrigerator delivery went wrong or when your child’s science project took a tumble. These require more attention since they’ve broken through the protective finish.
Dents occur when heavy objects compress the wood fibers without breaking them. That cast iron pan that slipped from your hands? Classic dent creator. The good news is that many dents can be steamed out since the wood fibers are compressed but not broken.
Water stains range from those innocent-looking white rings left by a sweaty glass to serious dark discoloration from a leaking dishwasher. I can’t stress enough how important quick action is with water—what starts as a simple white ring can become warped boards if ignored.
“In my experience,” I often tell clients, “about 70% of the damage I repair could have been prevented with some simple protective measures and quick attention to spills.”
When should I repair versus replace?
This is perhaps the most important question, and the answer depends on several key factors:
First, consider the extent of damage. If less than 25% of your floor is affected, repair is almost always more cost-effective. I recently saved a homeowner in Malden over $4,000 by repairing a section damaged by a plumbing leak rather than replacing the entire kitchen floor.
The depth of damage matters tremendously. Surface-level problems can typically be repaired with sanding and refinishing, while structural damage often points toward replacement.
Think about your floor’s age and refinishing history too. Solid hardwood can only be sanded down 4-10 times before becoming too thin. I recently worked with a family in Reading who had a 40-year-old oak floor with water damage. While repair was technically possible, the floor had been refinished multiple times already and was nearing the end of its refinishable life. They opted for partial replacement now with plans for full replacement in a few years.
When structural issues extend to the subfloor or joists, more extensive work becomes necessary. What looks like a simple board repair can reveal bigger problems underneath.
How often should I inspect my hardwood floors?
Developing a regular inspection routine can save you thousands in repair costs over your floor’s lifetime. Here’s what I recommend to my clients:
Do monthly visual walk-throughs of your entire floor. Look for new scratches, dents, or areas where the finish seems to be wearing thin. Pay special attention to high-traffic zones and anywhere near water sources like sinks, dishwashers, and exterior doors.
Perform seasonal humidity checks as Massachusetts weather changes dramatically throughout the year. Use a simple humidity gauge to ensure your home stays in the ideal 35-55% range. This prevents gaps in winter and swelling in summer.
Always do immediate post-incident inspections after any water spill, furniture move, or potential damage event. Catching problems early is crucial—that tiny water spot can become a warped board if left unaddressed.
One of my most diligent clients in Swampscott has hardwood floors that look nearly perfect after 15 years. Their secret? They catch tiny issues before they become major problems through consistent inspections. They’ve never needed anything beyond minor touch-ups because they’re so proactive.
I also suggest scheduling a professional inspection every 3-5 years. My technicians can spot early warning signs that homeowners might miss and recommend preventive maintenance that extends your floor’s life significantly.
Regular attentiveness prevents up to 80% of common hardwood floor problems, saving you considerable money and hassle over your floor’s lifetime.
Conclusion
Hardwood floor damage repair doesn’t have to break the bank or cause sleepless nights. With the right approach, even significant damage can be addressed effectively, preserving both the beauty and value of your investment.
Throughout this guide, we’ve walked through the journey from damage assessment to completed repair, covering everything you need to know to tackle hardwood floor issues with confidence.
Remember these essential steps for successful floor restoration:
First, take time to properly assess the damage. Understand exactly what you’re dealing with—whether it’s surface scratches from your pup’s excited greeting or water damage from that overflowing dishwasher disaster. Knowing your floor type and the extent of damage will guide all your subsequent decisions.
Second, match your repair technique to the specific problem at hand. That minor scratch might need just a quick buff and touch-up, while deeper gouges require filling and careful color matching. Water damage demands immediate action and thorough drying before any repairs begin.
Third, patience truly pays off in hardwood floor damage repair. Rush the process, and you’ll likely find yourself repeating the work sooner than you’d like. Allow proper drying time, take care with finish application, and give stains the time they need to cure fully.
“The most successful repairs are the ones you never notice,” says our senior technician. “Taking that extra hour to perfectly match the color and grain pattern means your guests will never spot where the damage occurred.”
Finally, implement a prevention strategy to protect your newly restored floors. Simple measures like furniture pads, strategic area rugs, and maintaining proper indoor humidity can dramatically extend the life of your hardwood floors and minimize future repair needs.
At Romero Hardwood Floors Inc., we’ve been restoring damaged hardwood floors throughout Revere and surrounding Massachusetts communities since 2006. Our team brings specialized tools, techniques, and experience to every project, ensuring your floors are returned to their original beauty—or better.
Whether you’ve decided to tackle a DIY repair project or realize you need professional assistance for more extensive damage, we’re here to help. Our service area covers the entire North Shore and metro Boston region, including Beverly, Chelsea, Danvers, East Boston, Gloucester, Lynnfield, Malden, Manchester by the Sea, Marblehead, Medford, Melrose, Nahant, Peabody, Reading, Revere, Rockport, Salem, Saugus, Somerville, Stoneham, Swampscott, Wakefield, Winchester, Winthrop, and Woburn.
Your floors tell your home’s story—let us help you keep that story beautiful for decades to come. For expert assistance with your hardwood floor damage repair needs, contact our hardwood floor repair contractors today.
