Hardwood Floor Installation Concrete: 7 Powerful Easy Wins 2025
Why Installing Hardwood Over Concrete Is Now Possible
Hardwood Floor Installation Concrete projects have become increasingly popular as homeowners transform cold concrete slabs into warm, beautiful living spaces. Modern moisture control techniques and improved adhesives now make this a viable option for most concrete subfloors.
Quick Answer for Hardwood Floor Installation Concrete:
- Test concrete moisture (≤4% for solid wood, ≤12% for engineered)
- Flatten and clean the slab (within 1/8″ over 6 feet)
- Install vapor barrier (6 mil polyethylene with ≤0.13 perm rating)
- Choose installation method (glue-down, floating, or plywood subfloor)
- Acclimate wood planks (2-7 days in installation environment)
- Install flooring with proper expansion gaps
- Allow 24-48 hours curing time before walking on floors
The main challenges include moisture management, subfloor preparation, and choosing between engineered versus solid hardwood. Engineered hardwood offers better dimensional stability for concrete installations, while solid wood provides traditional appeal but requires stricter moisture controls.
Grade level matters significantly – above-grade installations are straightforward, on-grade requires moisture barriers, and below-grade installations need engineered products and comprehensive moisture mitigation systems.
I’m Francisco Romero, owner of Romero Hardwood Floors Inc., and over my 15+ years of experience, I’ve successfully completed hundreds of Hardwood Floor Installation Concrete projects throughout the Revere, MA area. My team and I have developed proven techniques that ensure long-lasting results even in challenging below-grade installations.
Hardwood Floor Installation Concrete terms simplified:
- heated hardwood floors on concrete
- floating wood floor over concrete
- gluing solid hardwood floors to concrete
Why Install Hardwood on Concrete? Benefits & Challenges
Hardwood Floor Installation Concrete projects transform cold concrete spaces into warm, inviting living areas throughout Revere, Malden, and Salem. The choice between engineered and solid hardwood isn’t just preference – it’s physics. Engineered hardwood’s cross-grain construction provides dimensional stability that handles humidity changes better than solid wood.
Grade level determines your approach. Above-grade installations are straightforward, on-grade needs moisture barriers, and below-grade requires engineered products with comprehensive moisture mitigation.
Moisture migration from concrete causes up to 90% of hardwood flooring failures. Concrete wicks moisture from the ground, creating humidity levels that can warp floors. Proper preparation prevents these problems entirely.
Adding hardwood increases your floor system’s R-value, providing better insulation than bare concrete. Based on internet data averages, Hardwood Floor Installation Concrete costs typically range from $8-45 per square foot, with basic installations on the lower end and premium installations with extensive subfloor prep reaching the higher range. These are general market averages and not specific to our pricing at Romero Hardwood Floors Inc.
For detailed moisture management techniques, check out this Scientific research on moisture management. You can also explore your Engineered Hardwood Over Concrete options.
Pros & Cons Snapshot
The aesthetics and ROI benefits are undeniable. Hardwood floors dramatically increase home value while creating warm, welcoming atmosphere. You’ll eliminate cold concrete floors and gain comfortable living environment.
Challenges include installation complexity compared to wood subfloors. You’ll need extensive moisture testing, careful preparation, and ongoing humidity monitoring. Initial investment is higher, and you might need door and trim adjustments.
| Installation Method | Cost Range* | Durability | Moisture Resistance | Height Added |
|---|---|---|---|---|
| Glue-Down | $8-25/sq ft | Excellent | Good with barrier | 3/4″ |
| Plywood Subfloor | $12-35/sq ft | Superior | Excellent | 1.5″ |
*Average costs based on internet data, not Romero Hardwood Floors Inc. pricing
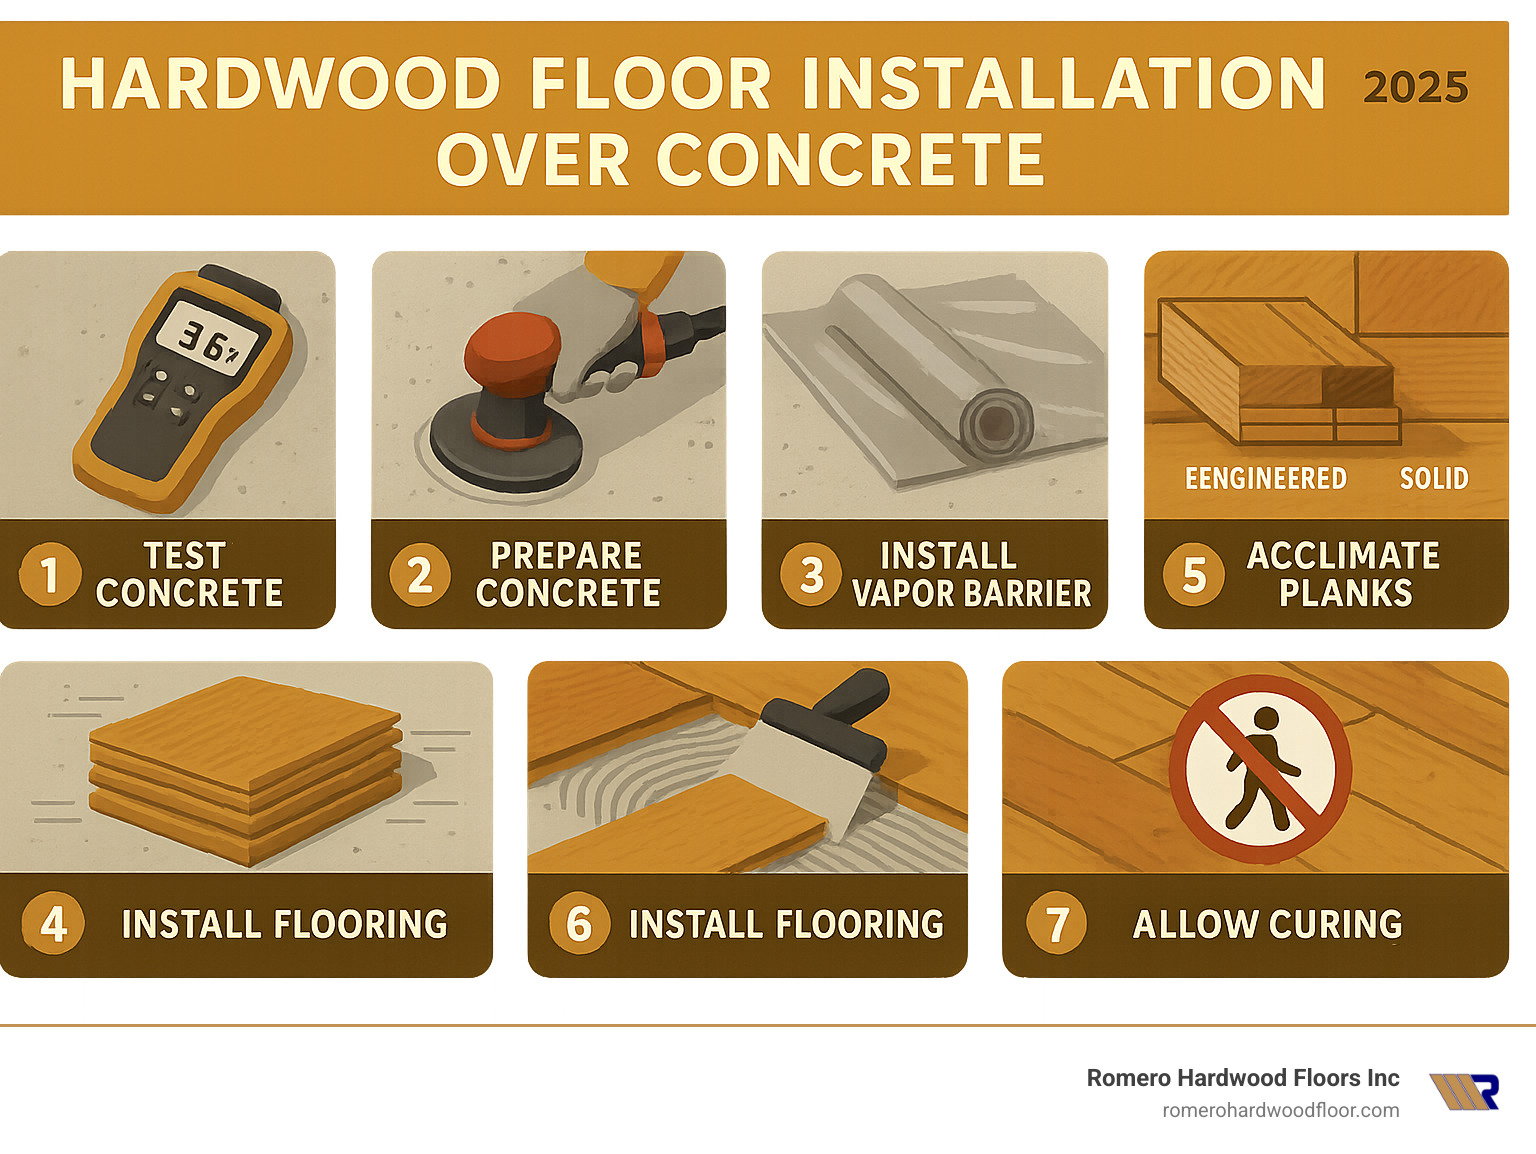
7-Step Hardwood Floor Installation Concrete Process
Installing hardwood over concrete breaks down into seven clear steps following National Wood Flooring Association (NWFA) standards. Essential tools include moisture meters (pin-type and pinless), calcium chloride test kits, long straightedge (6-10 feet), concrete grinder with OSHA-compliant dust collection, self-leveling compound and primer, 6 mil polyethylene sheeting, adhesive with notched trowel, 100-pound roller, and basic measuring tools.
OSHA dust regulations apply to concrete grinding – use proper ventilation and dust collection systems for safety.
Step 1 – Evaluate & Moisture-Test the Slab
Moisture testing is the foundation of successful Hardwood Floor Installation Concrete projects. We perform both relative humidity (RH) tests and calcium chloride tests for comprehensive moisture assessment.
New concrete needs patience. Slabs must cure at least 30 days before testing, but we typically recommend waiting 6-8 weeks for optimal curing. Moisture limits are non-negotiable: solid hardwood requires ≤4% moisture content difference, while engineered hardwood can handle ≤12% moisture content difference.
Test multiple areas across the slab, especially near exterior walls and plumbing penetrations where moisture levels run higher.
For step-by-step moisture testing procedures, check out our detailed guide on Moisture Testing.
Step 2 – Flatten, Repair & Clean
Concrete subfloors must be flat within 1/8″ over a 6-foot radius according to NWFA standards. Use your straightedge to identify high and low spots. High spots get ground down with concrete grinder, while low spots get filled with self-leveling compound after applying primer.
Crack repair is straightforward – fill hairline cracks with flexible concrete crack filler. Remove all paint, sealers, oils, and adhesive residue completely, then vacuum thoroughly.
Step 3 – Install the Vapor Barrier
Use 6 mil polyethylene film with perm rating of 0.13 or less. Overlap seams by 6 inches minimum and seal with contractor-grade tape. Extend barrier up walls by 3 inches with no tears or punctures.
Below-grade installations need extra protection – we often use liquid membrane systems in addition to polyethylene sheeting.
Step 4 – Choose Your Method & Prep Materials
Grade level, moisture conditions, height restrictions, and preferences determine your installation method.
Glue-down method uses urethane-based adhesives for permanent bond with 12 hours cure time. Floating method is ideal for click-lock engineered floors with no adhesive required. Plywood subfloor method creates traditional nail-down surface but adds 1-1.5 inches floor height.
For detailed floating installation information, see our guide on Floating Wood Floor Over Concrete.
Step 5 – Acclimate Hardwood Planks
Acclimation prevents post-installation gaps, warping, and buckling. Duration varies from 2-7 days with consistent temperature between 65-75°F and humidity between 30-55%.
Moisture difference tolerance: 4% for boards less than 3 inches wide, 2% for boards 3 inches or wider. Use sticker-stack technique – remove flooring from boxes, stack with 1×2 stickers between layers, monitor moisture content daily until stabilized.
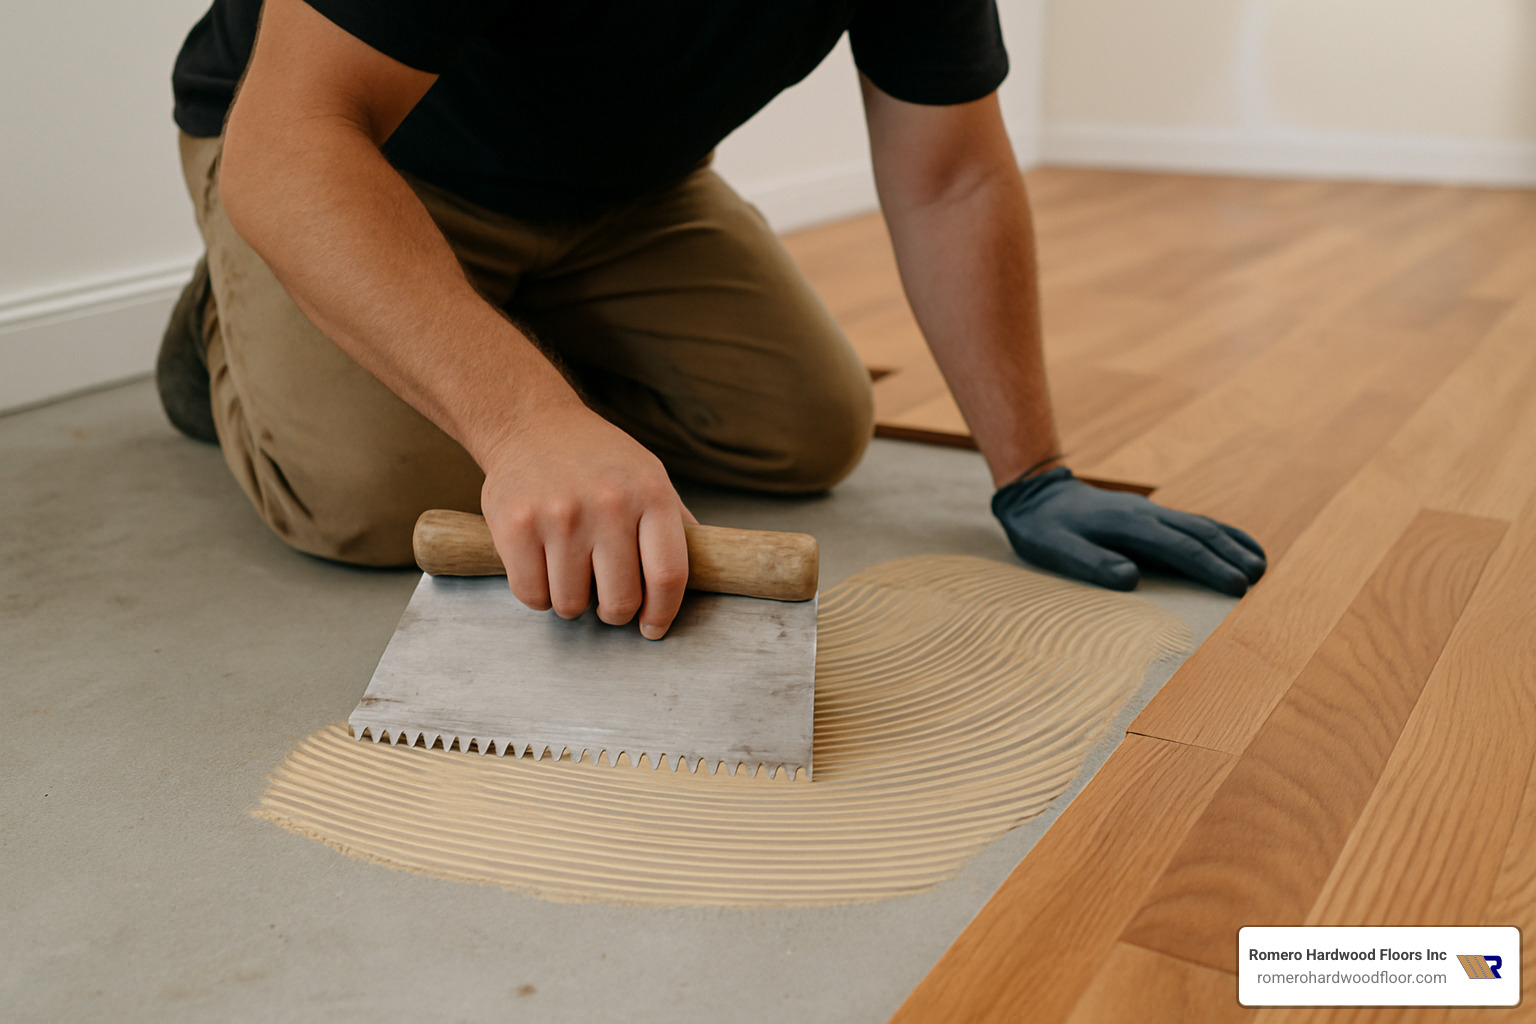
Step 6 – Lay & Secure the Floor
For glue-down installations, spread adhesive at 45-degree angle in sections of 100-150 square feet. Maintain expansion gaps of 3/4 inch at all walls using spacers.
Tongue-and-groove installation requires gentle tapping with tapping block. Stagger end joints by at least 6 inches. Use 100-pound roller within 30 minutes, rolling parallel and perpendicular to planks.
Step 7 – Roll, Cure & First Walk-Through
No foot traffic for 24-48 hours minimum and no heavy furniture for 7 days. Install trim after curing completes. Continue humidity monitoring and maintain 30-55% relative humidity year-round.
Final inspection should verify tight seams, proper expansion gaps, no adhesive squeeze-out, and no loose planks.
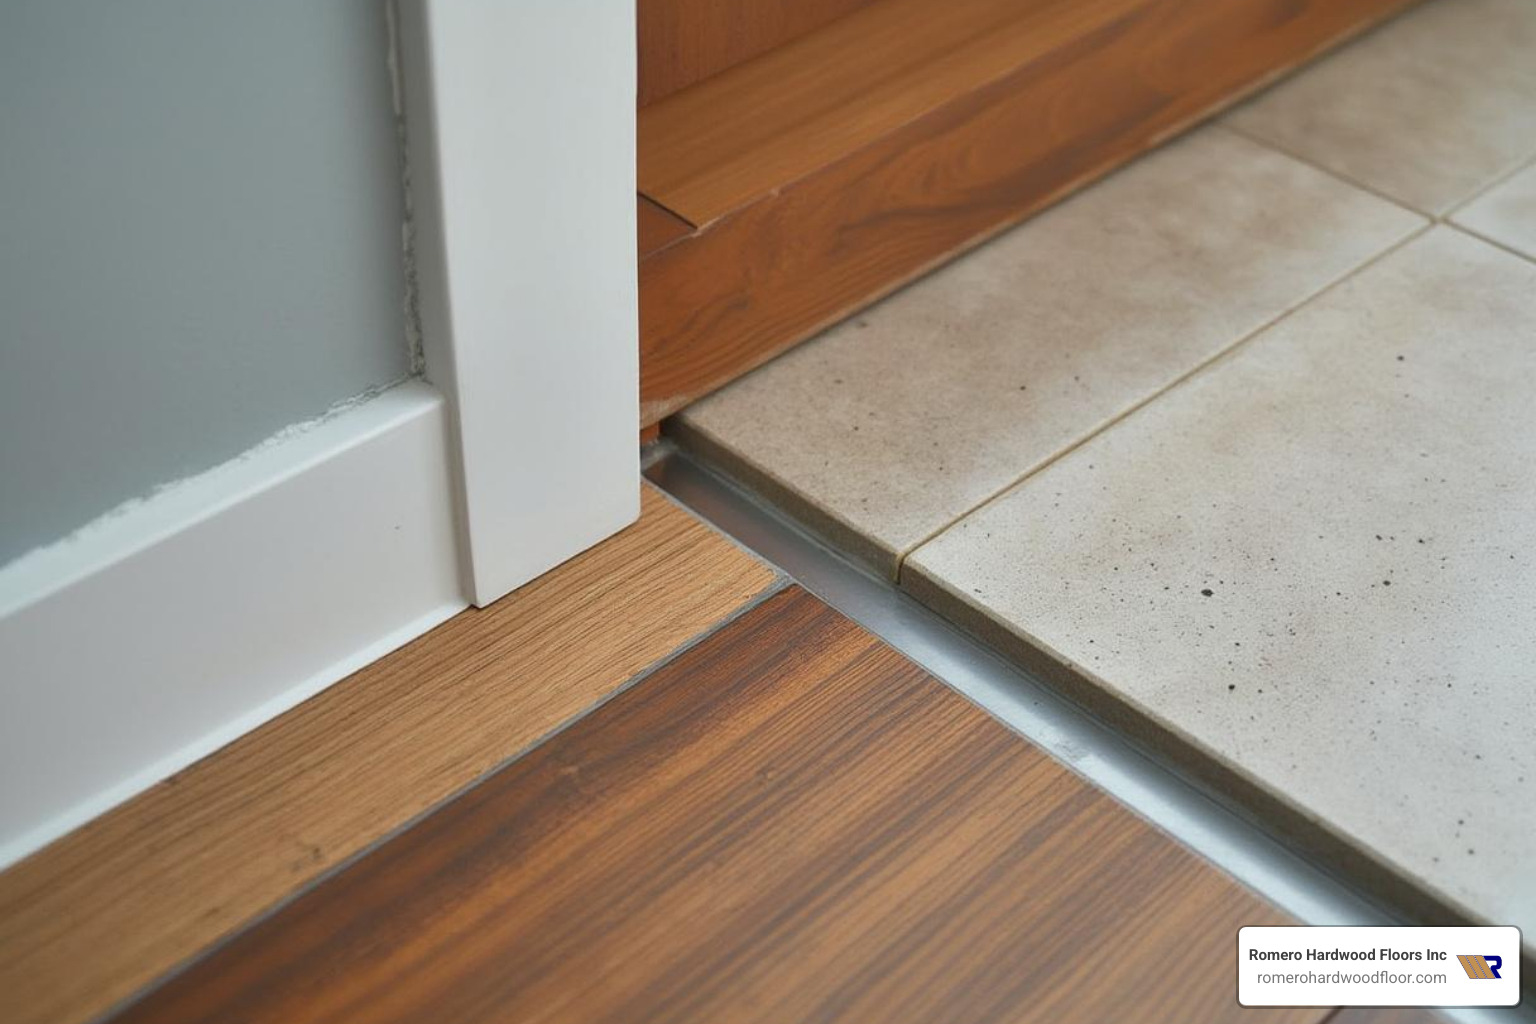
Transitions, Height & Radiant-Heat Tips
Door clearance becomes critical when adding hardwood over concrete. Most doors need 3/4 inch clearance minimum. Plywood subfloor systems add about 1.5 inches to floor height, making door trimming almost inevitable.
Stair modifications can get complex when you raise floor level, affecting bottom step height and staircase rhythm. Building codes require consistent step dimensions for safety.
Height management with plywood subfloors affects appliance clearances, transition strips, and existing baseboards. Plan for these changes before starting installation.
Threshold selection depends on traffic patterns. Metal thresholds handle high-traffic areas better, while wood thresholds provide seamless appearance. Adjustable thresholds help with minor height differences.
Radiant heat systems require radiant-ready engineered hardwood under 5/8 inch thickness for optimal heat transfer. Surface temperature should never exceed 85°F, with gradual 7-10 day ramp-up when starting the system.
Temperature control is critical – gradual changes prevent rapid expansion or contraction that causes gaps or warping.
Maintaining Hardwood Floors on Concrete
Maintaining hardwood floors over concrete requires attention to moisture control. Keep humidity between 30-55% year-round – this prevents most problems before they start.
Daily care includes quick vacuuming with soft brush attachment and immediate spill cleanup. Weekly cleaning uses damp mop with pH-neutral hardwood cleaner – never flood floors with water or use steam cleaners.
Protect your investment with felt pads under furniture, rotated area rugs, and trimmed pet nails. Seasonal changes cause small gaps in winter and slight cupping in summer – this is normal with proper HVAC adjustment.
Professional refinishing every 7-10 years keeps floors looking their best. Address scratches promptly rather than letting them accumulate. Monitor conditions with digital hygrometers to track humidity levels.
For comprehensive maintenance and refinishing services, visit our Floor Sanding & Refinishing page.
Frequently Asked Questions about Hardwood Floor Installation Concrete
Can hardwood floors be installed over a below-grade concrete slab?
Yes, but engineered hardwood is essential for basement installations due to better moisture stability. Below-grade installations require extra moisture control with comprehensive vapor barrier systems, often including liquid membranes.
Moisture testing becomes more critical below grade with extra readings near foundation walls. Professional installation is strongly recommended due to smaller margin for error. Ongoing humidity monitoring helps catch seasonal changes.
How long after installation can I place furniture on the floor?
Give floors at least 24-48 hours before walking and 7 days before heavy furniture. Adhesive-based installations need time to develop full strength.
Recommended timeline: light foot traffic after 24-48 hours, normal activities after 3-5 days, heavy furniture after one week. Use furniture pads immediately when moving items back.
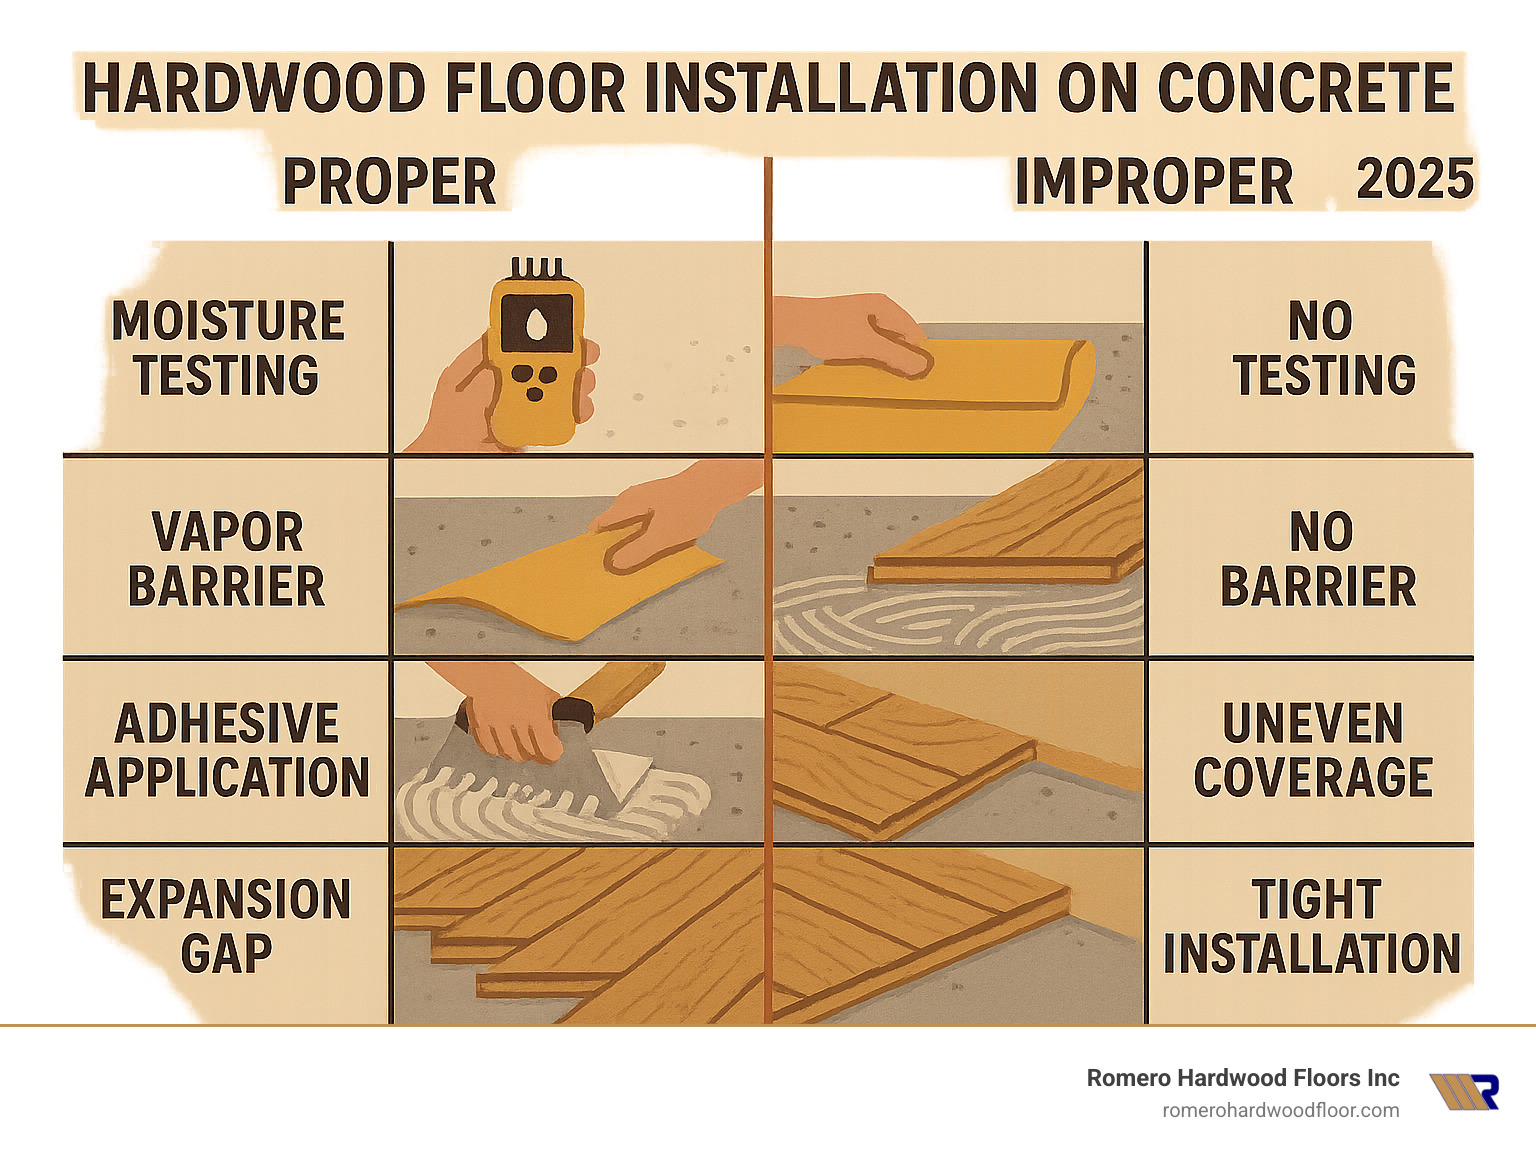
What mistakes cause most failures over concrete?
Inadequate moisture testing causes up to 90% of failures over concrete. Skipping vapor barriers, poor surface preparation, rushing acclimation, ignoring expansion gaps, and inadequate humidity control are other common costly mistakes.
Every step builds on the previous one – skip steps or rush the process, and problems develop later.
Conclusion
Hardwood Floor Installation Concrete transforms cold, utilitarian spaces into warm, beautiful living areas that significantly boost both comfort and property value. While the process requires careful attention to moisture control, surface preparation, and proper installation techniques, the results justify the investment.
The key to success lies in understanding that concrete installations demand more preparation than traditional wood subfloors. Moisture testing, vapor barriers, and proper acclimation aren’t optional steps – they’re essential for long-term success. Skip these steps, and you’ll likely face costly repairs down the road.
At Romero Hardwood Floors Inc., we’ve completed hundreds of successful concrete installations throughout Beverly, Chelsea, Danvers, and surrounding Massachusetts communities since 2006. Our experience has taught us that every moisture test, every vapor barrier detail, and every plank placement must meet or exceed NWFA standards.
The comfort upgrade from cold concrete to warm hardwood flooring creates living spaces your family will enjoy for generations. There’s nothing quite like the feeling of stepping onto real hardwood instead of cold concrete on a winter morning. Combined with proper maintenance and humidity control, your Hardwood Floor Installation Concrete project will improve your home’s value while providing the timeless beauty only real hardwood can deliver.
Whether you’re finishing a basement in Medford, upgrading a slab-on-grade home in Salem, or installing radiant-heated floors in Winchester, professional installation ensures your investment provides decades of beauty and value. The value boost alone often justifies the initial investment, but the daily comfort improvement makes it worthwhile regardless of resale considerations.
Trust the professionals at Romero Hardwood Floors Inc to ensure every moisture test, barrier installation, and plank placement meets NWFA standards. We understand that your home is your biggest investment, and we treat every project with the care and attention it deserves.
Ready to transform your concrete floors? Contact us for a comprehensive evaluation of your project. We’ll test moisture levels, assess your concrete conditions, and recommend the best installation method for your specific situation.
For more information about our complete flooring services, visit our Flooring Installation page to learn how we can help you achieve the hardwood floors of your dreams.
