How to Install Floating Engineered Hardwood Flooring on Concrete: Top Guide 2025
The Essential Guide to Floating Installations
How to install floating engineered hardwood flooring on concrete is a popular DIY project that can transform cold concrete floors into warm, beautiful living spaces. If you’re looking for a quick answer, here’s what you need to know:
Quick Guide: Installing Floating Engineered Hardwood on Concrete
- Test concrete moisture levels (should be less than 4%)
- Clean and level the concrete subfloor
- Acclimate engineered hardwood for 48-72 hours
- Install moisture barrier and underlayment
- Lay first row with 1/4-5/16 inch expansion gap
- Connect subsequent rows, staggering joints by at least 6 inches
- Cut final row to fit, maintaining expansion gap
- Install baseboards and transitions
Engineered hardwood offers significant advantages over solid hardwood when installing on concrete. Its multi-layer construction provides superior stability in environments where moisture and temperature fluctuations are concerns.
Unlike solid hardwood, which can warp and buckle when exposed to concrete’s inherent moisture, engineered hardwood can be installed as a floating floor system that “floats” above the concrete without being permanently attached. This installation method is particularly suitable for DIY enthusiasts as it requires no glue, nails, or professional tools.
“Engineered hardwood is less sensitive to humidity changes compared to traditional wood, making it ideal for installation on concrete at any grade level, including below grade,” notes industry experts.
The floating installation method allows the floor to naturally expand and contract with environmental changes, preventing damage that can occur with fixed installations. This makes it an excellent choice for concrete subfloors, which can transmit moisture upward and cause problems with less suitable flooring materials.
I’m Francisco Romero, owner of Romero Hardwood Floors Inc., and I’ve been installing floating engineered hardwood flooring on concrete for over 15 years, changing countless cold concrete floors into beautiful, warm, and durable spaces for both residential and commercial clients.
Why Choose Floating Engineered Hardwood for Concrete Floors
If you’re looking to upgrade your concrete floors with beautiful, long-lasting hardwood, floating engineered hardwood flooring may just become your new best friend. (Trust me, your cold toes will thank you!)
Concrete subfloors can be tricky for traditional solid hardwood—they’re porous, prone to moisture, and sensitive to temperature swings. Solid hardwood simply doesn’t handle these challenges gracefully. But engineered hardwood is different. With its clever multi-layered design, engineered hardwood flooring combines real hardwood beauty with practical advantages ideal for concrete subfloors.
At Romero Hardwood Floors Inc., we’ve spent over 15 years installing floating engineered hardwood floors on concrete around Revere, MA, and nearby communities. Every installation has transformed chilly, uninviting concrete surfaces into warm, welcoming spaces, perfectly suited for homes and commercial properties alike.
You might wonder, what exactly makes engineered hardwood so special for concrete floors? Let’s take a closer look.
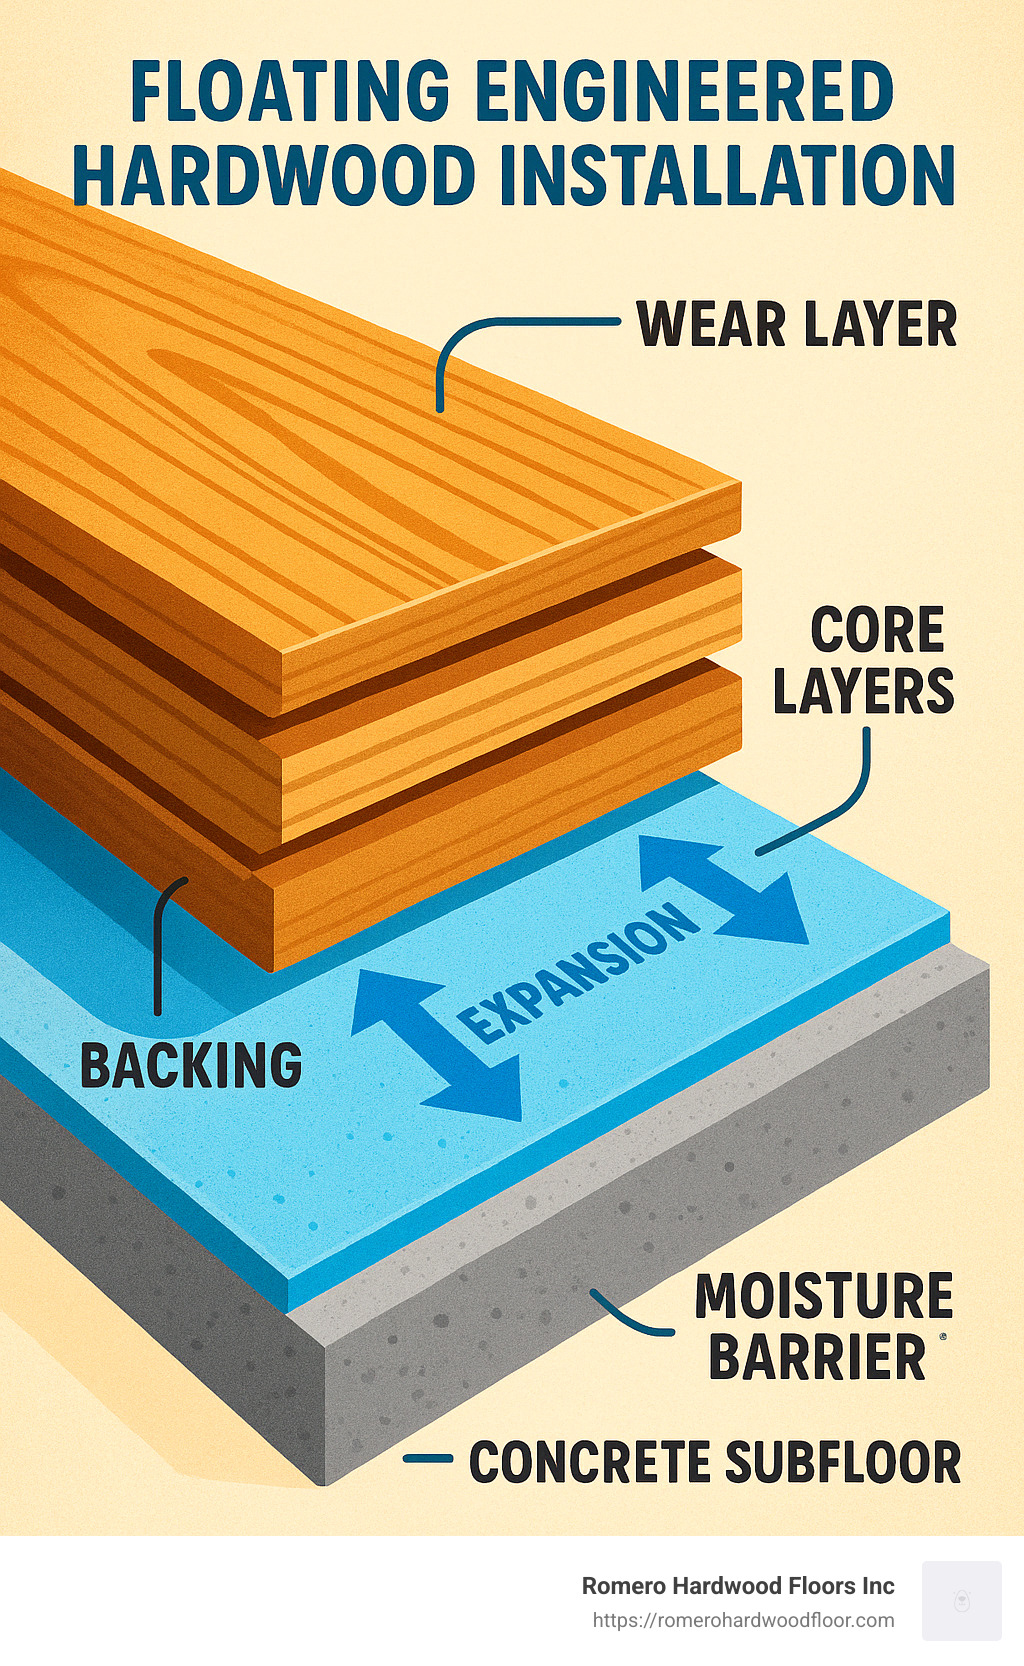
Engineered hardwood is built differently from solid wood. It’s composed of multiple layers of wood veneers stacked together, with the top layer being genuine hardwood. These layers run in different directions, creating remarkable dimensional stability. This stability means engineered hardwood doesn’t expand, contract, or warp like solid hardwood when exposed to moisture and temperature changes—conditions commonly found with concrete.
This unique structure also makes engineered hardwood a smart choice for areas prone to moisture, such as basements or lower floors. While solid hardwood is often off-limits below ground, engineered wood handles below-grade installation like a pro. It’s even compatible with radiant heating systems installed beneath concrete, providing cozy warmth beneath your feet—something that’s a big no-no for most solid wood flooring.
An industry expert puts it best:
“Engineered hardwood is less sensitive to humidity changes compared to traditional wood. It can be installed at any grade level, including below grade, and works beautifully even over radiant heated floors.”
And let’s not forget aesthetics. Engineered hardwood provides more flexibility in plank widths, especially wider planks that would typically bow or twist if made from solid wood. This opens up endless design possibilities, giving your home a luxurious, custom look.
Plus, investing in engineered hardwood flooring isn’t just practical—it’s financially smart. According to the National Association of Realtors, installing new hardwood flooring delivers a whopping 118% return on investment. Now that’s a return worth standing on!
If you’re still on the fence between engineered hardwood and laminate, check out our guide on Engineered Hardwood Versus Laminate for more insights on why engineered hardwood might be the perfect fit for your concrete floors.
Benefits of Engineered Hardwood Over Solid Wood on Concrete
Engineered hardwood offers clear advantages for concrete installations compared to its solid hardwood cousin. Its superior moisture resistance means it won’t warp or buckle from moisture seeping up through your concrete subfloor.
Thanks to its layered construction, engineered hardwood also has excellent dimensional stability, keeping its shape through seasonal temperature or humidity changes. Traditional solid hardwood tends to expand and contract a lot, causing boards to warp, gap, or lift. But engineered hardwood planks stay flat and beautiful year-round.
Because of its improved stability, engineered hardwood can even handle tricky situations like below-grade installations—perfect if you’re dreaming of a stylish basement or lower-level room. And, unlike solid hardwood, engineered hardwood also plays nicely with radiant heating systems, allowing you to enjoy warm, comfortable floors even in chilly New England winters.
If you’d like more details on how engineered hardwood adjusts to indoor conditions, take a peek at our guide on Engineered Wood Floor Acclimation.
Understanding the Floating Installation Method
Now, let’s talk specifically about the floating installation method, and why it’s a favorite for concrete subfloors. Ever wonder why it’s called “floating”? (And no, it doesn’t involve any magic carpets.)
In a floating installation, your engineered hardwood planks aren’t nailed or glued directly onto the concrete. Instead, they connect to each other through an interlocking system—usually a simple click-lock mechanism or tongue-and-groove joints. This connected floor then “floats” above the concrete subfloor, resting comfortably on an underlayment and moisture barrier.
This floating approach offers several attractive perks:
- Because there are no adhesives or nails securing the planks to the concrete, the floor can naturally expand or contract as humidity levels change, significantly reducing risks like buckling or gaps.
- Without needing glue or nails, installation becomes a breeze, making this method ideal for DIY-friendly homeowners or speedy professional installations.
- It accommodates slight imperfections in your concrete, saving you from extensive and costly subfloor repairs before installation.
- If you ever need to remove or replace your flooring (hopefully not anytime soon!), floating floors make removal easy and non-destructive.
The key to success when using this method is allowing a proper expansion gap—typically 1/4 to 5/16 inch—around your room’s perimeter. This space lets your floor breathe and shift slightly without causing issues.
Curious for more details? We share everything you need to know about floating floors in our handy guide on Floating Wood Floor Over Concrete.
At Romero Hardwood Floors Inc., we’ve mastered all things floating engineered hardwood through years of hands-on experience. Whether you’re tackling your own how to install floating engineered hardwood flooring on concrete project or looking for professional installation, we’ve got you—and your concrete floors—covered.
Essential Tools and Materials for Installing Floating Engineered Hardwood on Concrete
Success in how to install floating engineered hardwood flooring on concrete starts with having the right equipment at your fingertips. After 15+ years of installations at Romero Hardwood Floors Inc., I’ve learned that being well-prepared saves time, reduces stress, and leads to better results. Let’s walk through everything you’ll need before you start changing your concrete floor.
Tools Checklist
Picture this: You’re in the middle of laying your beautiful new engineered hardwood, the project is going smoothly, and suddenly you realize you’re missing a crucial tool. Now you’re making an emergency hardware store run with half-finished flooring waiting at home. Not ideal!
To help you avoid this scenario, here’s my comprehensive tool list for your floating floor installation:
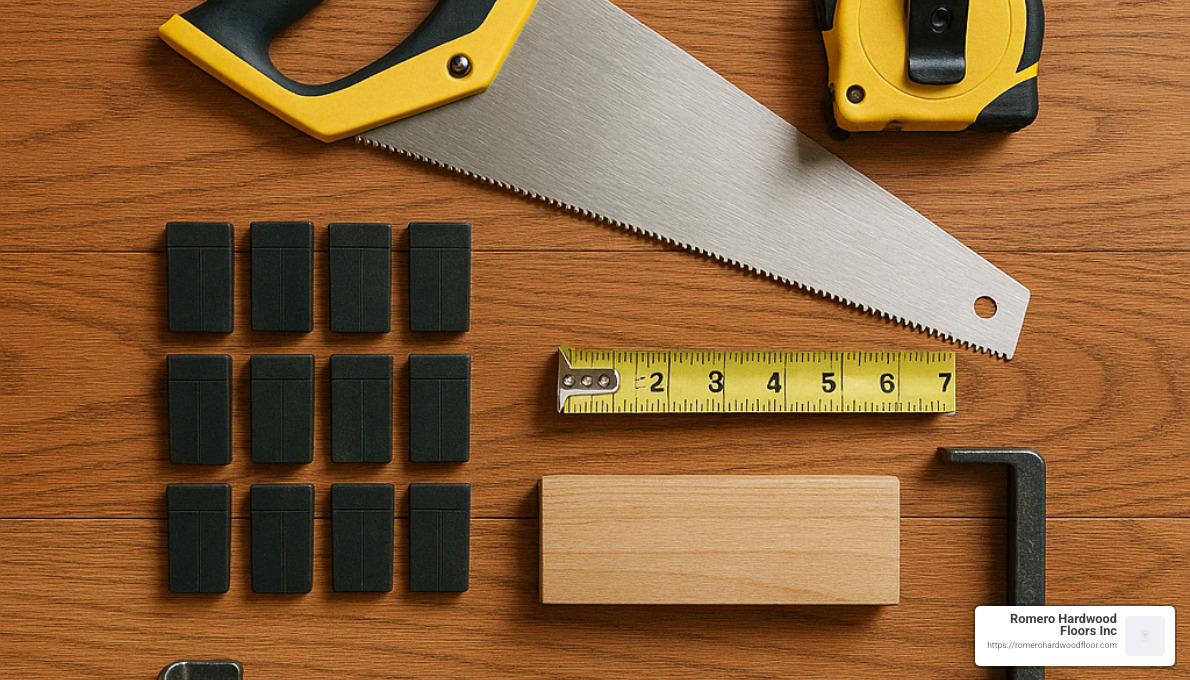
Measuring and Layout Tools
Start with a good 25-foot tape measure (you’ll use this constantly), a chalk line for marking straight references across your concrete, and both a 2-foot and 6-foot level. Don’t forget a carpenter’s square for checking corners and a quality moisture meter—this last one is absolutely non-negotiable when working with concrete subfloors.
Cutting Equipment
You’ll need a circular saw or table saw for straight cuts along planks, a jigsaw for notching around obstacles like pipes or irregular shapes, and ideally a miter saw for perfect angle cuts at transitions. Keep a sharp utility knife and pencil handy for marking cut lines.
Installation Helpers
The right installation tools make all the difference. You’ll need a tapping block that matches your specific flooring’s locking system (don’t substitute this—the wrong tapping block can damage your flooring), a pull bar for tight spaces near walls, a rubber mallet, plastic spacers (1/4 to 5/16 inch) for creating expansion gaps, and a standard hammer for various tasks.
Safety First
Working with engineered hardwood means sawdust, noise, and lots of kneeling. Protect yourself with safety glasses, ear protection during cutting, a dust mask, work gloves, and good quality knee pads. As one of our customers joked after installing his own floor, “My knees aged ten years in two days because I thought knee pads were optional!” Trust me, they’re not.
Subfloor Prep Necessities
Before a single plank goes down, you’ll need to prepare that concrete. Gather a floor scraper, vacuum, broom and dustpan, and potentially concrete patching compound with a trowel if your floor has cracks or divots that need filling.
Materials Needed
Beyond tools, you’ll need quality materials that work specifically with concrete subfloors and floating installations.
Engineered Hardwood Planks
The star of the show! Purchase about 10% more than your measured square footage to account for cuts, waste, and those inevitable mistakes that happen even to pros. Store these in the installation room for 48-72 hours before starting to allow proper acclimation. As we tell our clients at Romero Hardwood Floors, this acclimation period isn’t optional—it’s essential for preventing warping and gapping later.
Moisture Protection
Concrete naturally transfers moisture, which can destroy your beautiful new floor from below if not properly addressed. Invest in a quality 6-mil polyethylene moisture barrier and moisture-resistant tape to seal the seams. Some clients try to save money here, but moisture protection is absolutely not where you want to economize.
Underlayment
A good foam or cork underlayment provides cushioning, sound dampening, and helps smooth minor concrete imperfections. Some products cleverly combine moisture barrier and underlayment in one layer. Either way, this thin layer makes a huge difference in how your floor feels underfoot and how it performs over time.
Finishing Materials
You’ll need transition strips for doorways and where your engineered hardwood meets other flooring types. Don’t forget baseboards and quarter round molding to cover those essential expansion gaps while giving your installation a polished, professional look.
Additional Supplies
If you’re using tongue-and-groove engineered hardwood rather than click-lock, you’ll need wood glue for connecting the planks. And don’t forget cleaning supplies for that satisfying final cleanup after installation.
“Proper acclimation of engineered wood flooring products is vital,” as we always emphasize to our clients at Romero Hardwood Floors Inc. This means creating space to store your flooring materials in the installation room for at least 48-72 hours before beginning. This simple step helps your flooring adjust to the home’s temperature and humidity, preventing problems down the road.
With these tools and materials prepared, you’ll be ready to tackle your floating engineered hardwood flooring on concrete project with confidence. The right preparation truly makes all the difference between a challenging installation and a smooth, enjoyable one that results in flooring you’ll love for years to come.
For more detailed information about proper acclimation techniques, check out our guide on Engineered Wood Floor Acclimation.
Preparing Your Concrete Subfloor for Engineered Hardwood
Preparing your concrete subfloor properly is truly the make-or-break step when it comes to learning how to install floating engineered hardwood flooring on concrete. A well-prepared subfloor ensures a smooth, stable surface that sets your new floor up to look beautiful and perform wonderfully for many years to come.
As flooring expert Kevin Ward wisely says, “Ensure the substrate is flat and dry.” It’s simple advice—but as we’ve learned over our years at Romero Hardwood Floors Inc., these two key points are crucial.
Let’s explore exactly how you can test and manage moisture, level and clean your concrete, and acclimate your engineered hardwood planks to perfection.
Testing and Managing Moisture in Concrete
Concrete’s natural porosity means it tends to transfer moisture from below—which isn’t great news for hardwood. To avoid moisture problems down the road, you’ll want to carefully assess your concrete before installing your floating engineered floor.
First, start with a visual inspection. Keep an eye out for dark, wet-looking patches, mold, mildew, or white powdery residue called efflorescence. These signs indicate excess moisture that needs attention before proceeding.
Next, perform moisture tests to ensure your concrete is safe for hardwood. We recommend using a concrete moisture meter to get a quick initial reading—aim for around 4% moisture content or less. For a more thorough check, consider the calcium chloride test (which should reveal less than 3 pounds of moisture per 1,000 square feet in 24 hours) or a relative humidity test per ASTM F2170 standards (ideally below 75% RH).
Once you’ve determined moisture levels, you’ll typically need a reliable moisture barrier. We usually recommend installing a 6-mil polyethylene moisture barrier, overlapping seams by at least 6-8 inches and sealing them with moisture-resistant tape. Don’t be shy—run the barrier slightly up the walls (around 2-3 inches high); your baseboards will conceal it easily later.
If you’re dealing with a newly poured concrete slab, patience is key: wait at least 60-90 days to ensure the concrete has fully cured before starting your floor installation. For basements or other below-grade rooms, be especially diligent about moisture testing and barriers. It’s better safe than sorry!
(For more insights on flooring value and return on investment, see the latest National Association of Realtors research on flooring value.)
Leveling and Cleaning the Concrete Surface
Next up: ensuring a flat, clean surface to support your gorgeous new floor. Your engineered hardwood will perform best when the subfloor has minimal dips or humps. The industry standard for flatness is a maximum variation of 3/16 inch over a 10-foot span.
To check this, grab your trusty level or a straightedge and carefully scan the entire subfloor surface. Mark any high or low spots clearly. If you find high spots, you’ll want to smooth them down using a rented concrete grinder. This sounds intimidating, but trust us—it’s actually pretty fun (just be sure to wear goggles and a dust mask!).
For areas with dips or unevenness, use a self-leveling compound (for larger areas or deeper dips) or a concrete patching product (for smaller imperfections or cracks). Always follow the manufacturer’s guidelines carefully regarding mixing, application, and drying times.
Once leveled, it’s cleaning time—never underestimate this step! Sweep and vacuum up every last bit of debris, scraping off all traces of paint, adhesive, or sticky substances. Finally, give the surface a good mop with clean water and allow it to dry completely. You’ll be amazed at how satisfying a clean concrete surface can be!
Still unsure? Check out our detailed guide on exactly how to install hardwood floors on concrete for even more tips.
Acclimating Your Engineered Hardwood Flooring
Last—but certainly not least—is acclimating your flooring. Acclimation is just a fancy flooring-world term for letting your engineered hardwood planks adjust slowly to the temperature and humidity of your home’s environment.
Plan to give your flooring at least 48-72 hours to acclimate, although some brands might recommend even longer. Keep the boxes unopened and stacked crosswise in the installation room, away from exterior walls, heating or cooling vents, and direct sunlight. Set your room thermostat between 65°F and 75°F and maintain relative humidity levels between 30% and 55%.
This simple step lets your wood planks adjust gently and evenly, drastically reducing issues like gapping, cupping, or buckling down the line. As experienced installers at Romero Hardwood Floors Inc., we’ve seen just how beneficial proper acclimation is—it’s truly a small step that pays big dividends over the life of your floor. (For even more acclimation tips, see our detailed article about engineered wood floor acclimation.)
Preparing your concrete subfloor might feel like an extra hassle at first—but trust us, it’s worth every minute. When done right, it gives your floating engineered hardwood flooring the perfect foundation, ensuring a beautiful, trouble-free floor that you’ll love for decades!
Step-by-Step Guide: How to Install Floating Engineered Hardwood Flooring on Concrete
You’ve carefully prepared your concrete subfloor, tested moisture, leveled surfaces, and allowed your beautiful engineered hardwood planks to acclimate. Now comes the fun part—actually laying down your new floor. So, brew a fresh cup of coffee (trust me, you’ll appreciate the caffeine boost), put on your knee pads, and let’s walk through exactly how to install floating engineered hardwood flooring on concrete together.
Installing Moisture Barrier and Underlayment
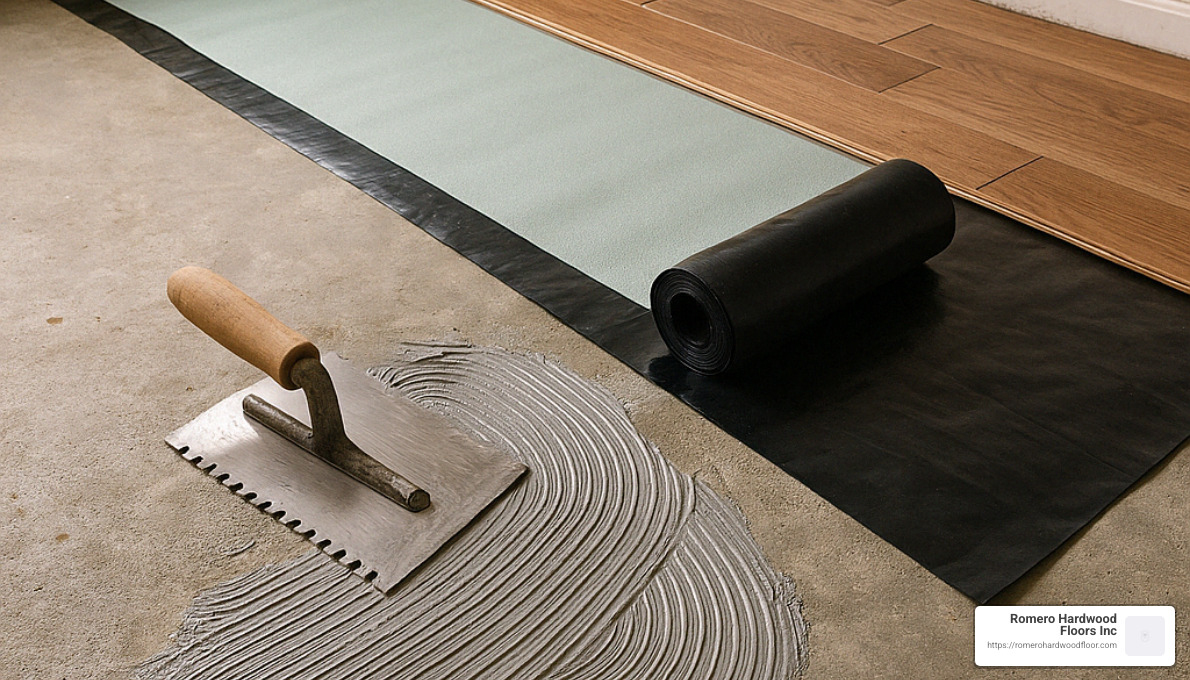
Your first critical step is laying down your protective layers. Begin by rolling out your moisture barrier—ideally a 6-mil polyethylene sheet—across the entire concrete floor. Allow it to extend 2-3 inches up the walls to prevent moisture creeping in at edges. Overlap the seams by at least 6-8 inches and seal them tightly with moisture-resistant tape.
Next, unroll your chosen underlayment perpendicular to the direction you plan to install the flooring. Place the edges snugly together without overlapping, sealing these seams with tape as well. Some DIY-friendly products combine moisture barrier and underlayment into a single sheet, simplifying this step. Be sure to follow the specific manufacturer’s instructions carefully if you’re using a combination product.
Starting Your First Row: Proper Technique for How to Install Floating Engineered Hardwood Flooring on Concrete
The success of your entire flooring project depends largely on getting your first row just right. No pressure, right? Don’t worry—I’ve got your back.
Start along the longest and straightest wall in the room, placing spacers (usually 1/4 to 5/16 inch thick) between the wall and the flooring to create the critical expansion gap. Wood expands and contracts with humidity and heat, and that little gap is your floor’s breathing room.
If your flooring uses a click-lock system, you might need to remove the tongue facing the wall from your first row of planks. If you have tongue-and-groove planks that require glue, apply a thin bead of wood glue to the groove before joining.
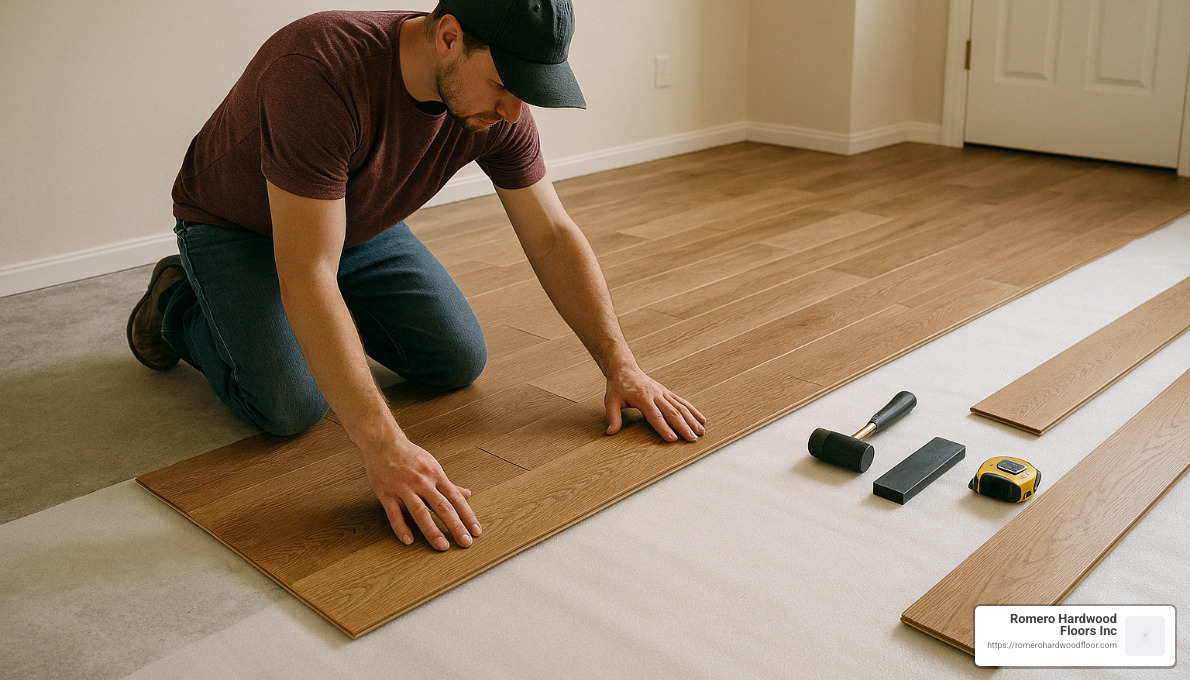
Set the first plank snugly against your spacers in the corner, tongue facing away from the wall. Add the next plank by locking or gently tapping it into place using your tapping block and rubber mallet. Continue this way until you reach the end of the row, cutting the last plank to fit. Make sure you maintain a consistent expansion gap throughout.
Pro tip: Spend extra time making sure your first row is perfectly straight and square to the room—any alignment issues here will become more noticeable as you continue.
Continuing the Installation: Middle Rows and Staggering Patterns
Now you’re in the groove—literally. Moving forward, start each new row with planks cut to different lengths (at least 6 inches offset) to create a strong, visually pleasing staggered pattern. The goal is to avoid noticeable joint patterns, like stair-step or H-shapes, across your floor.
When joining each new plank, angle it gently into the previous row and then press down to secure it. A soft tap with your rubber mallet and tapping block will ensure a tight fit. For glued tongue-and-groove floors, continue applying a small bead of glue along each plank’s groove, wiping any excess immediately.
Every few rows, stand back and visually inspect your work—if anything looks off, it’s easier to correct sooner rather than later. Use your pull bar to get into tight spaces or to tap tricky planks into place near walls.
Completing the Final Row and Installing Transitions
You’re almost there! When you reach the final row, measure carefully from the last installed row to the wall, subtracting your expansion gap. Cut your final planks to width accordingly. If the last row ends up narrower than about 2 inches, you can split the difference by trimming both the final row and the row before it for a balanced look.
Because this last row can be tight, your pull bar will be your new best friend to tap those pieces securely into place.
Now it’s time to tidy up doorways and transitions. At doorways, use a jamb saw or handsaw resting atop a scrap piece of flooring to carefully trim the bottom of door casings so your flooring slides neatly underneath—a simple trick that makes your installation look professionally polished.
Install appropriate transition strips (T-molding, reducers, or thresholds) wherever your new hardwood floor meets another type of flooring or between rooms. Follow manufacturer guidelines for each type of transition strip, and ensure you leave enough space for natural flooring expansion.
With these final touches, give yourself a pat on the back—you’ve successfully learned how to install floating engineered hardwood flooring on concrete.
Next up, we’ll look at installing baseboards, trim, and learning how to maintain your beautiful new floors for many years to come.
Finishing Touches and Post-Installation Care
Congratulations! By following our step-by-step guide on how to install floating engineered hardwood flooring on concrete, you’ve transformed your space into something truly special. Now it’s time for the final touches and some essential tips to keep your floors beautiful for years to come.
Installing Baseboards and Trim
After completing your flooring installation, you’ll notice small gaps around the room’s edges—don’t worry, they’re completely normal! These expansion gaps allow your floating floor to adjust naturally to temperature and humidity changes. Now it’s time to cover them up with some stylish baseboards and trim.
If you removed your original baseboards earlier, carefully reinstall them by attaching them to the wall, not the floor. This lets your engineered hardwood expand freely. If new baseboards are going in, measure twice (or three times—we’ve all learned that one the hard way!) and use accurate miter cuts for clean corners. Attach baseboards securely to the wall with finishing nails, fill any nail holes with wood putty, and touch up with paint for a polished look.
Sometimes the newly installed flooring leaves a visible gap between it and the baseboard. That’s where quarter-round molding or shoe molding comes in handy. Like baseboards, these trims should be attached directly to the baseboard—not the floor—to allow movement.
Don’t forget doorways and transitions! Use appropriate transition strips to seamlessly connect your new engineered hardwood to different flooring types, ensuring smooth transitions underfoot and a professional finish.
Maintaining Your New Engineered Hardwood Floor
Engineered hardwood floors are beautiful, durable, and surprisingly easy to maintain. With just a bit of TLC, your floors will stay gorgeous for decades to come.
After your installation is complete, give your new floors 24 hours to settle before moving furniture back into place. (Think of it as giving your floor a well-deserved rest after all that tapping and sawing!) When placing furniture, lift and place—never drag—to prevent scratches. It’s also a smart idea to attach soft felt pads beneath furniture legs for extra protection.
Regular cleaning is straightforward. Sweep or vacuum (using a hardwood-friendly vacuum attachment) to remove everyday dirt and grit. When needed, use a damp mop along with a cleaner specifically formulated for engineered hardwood. Avoid soaking your floor with water, harsh cleaners, or steam mops, as these could cause damage to your beautiful new flooring.
Because engineered hardwood is sensitive to humidity fluctuations, it’s a good idea to maintain humidity levels between 30% and 55%. You may need a humidifier during dry winters and a dehumidifier during humid summers, especially in basements or lower-level installations.
To protect your floors further, consider placing area rugs in high-traffic zones and entryways. Add mats under chairs—particularly rolling office chairs—and be sure to use casters designed specifically for hardwood. Pet owners, don’t forget to regularly trim your furry friends’ nails to minimize scratches.
And speaking of spills (accidents happen!), clean them up immediately to prevent water damage. Engineered wood is moisture-resistant but not waterproof, so prompt attention prevents issues down the road.
Properly cared-for engineered hardwood floors can look stunning for decades—or even longer. As flooring professionals love to say, “A little TLC goes a long way.” At Romero Hardwood Floors Inc., we’ve seen first-hand how simple maintenance can dramatically extend the life and beauty of engineered hardwood floors.
For more detailed tips on keeping your floor looking its best, check out our helpful guide on Engineered Hardwood Flooring Installation.
Troubleshooting Common Issues When Installing Floating Engineered Hardwood Flooring on Concrete
Even if you’ve carefully followed all the steps on how to install floating engineered hardwood flooring on concrete, sometimes issues can still pop up. Don’t panic—most problems have straightforward fixes. Let’s explore some common challenges you might face and how to solve them effectively.
Addressing Moisture-Related Problems
Moisture can be sneaky, especially when dealing with concrete. It’s the number one challenge that homeowners face with hardwood flooring on concrete subfloors. How do you spot moisture-related trouble? Common signs include boards cupping (edges higher than the center), crowning (middle higher than edges), buckling, warping, discoloration, or even mold growth.
If you notice these signs, act fast. Start by checking your room’s humidity. Ideally, it should stay between 30-55% relative humidity. If it’s too high, a dehumidifier installed in the room or basement can help tremendously.
For minor moisture problems, adjusting your home’s humidity levels might be enough. But if it’s severe—for example, significant cupping or buckling—you might need professional help. Sometimes the only solution is to remove the flooring, add a better moisture barrier, and reinstall the planks. This is frustrating, yes, but it’s far better than letting moisture issues worsen!
Industry experts agree, warning homeowners that “excessive moisture is the surest way to flooring failure.” Concrete loves to pass moisture along, so always ensure you’re proactive about moisture barriers and room humidity control. If you’re uncertain, bring in a trusted flooring professional like Romero Hardwood Floors Inc., who can quickly assess and recommend the best steps forward.
Fixing Installation Mistakes
Mistakes happen—even professionals experience hiccups from time to time. Thankfully, there are simple ways to address common installation errors with your floating engineered hardwood flooring.
Gaps between boards often appear due to seasonal changes in humidity. Small gaps are completely normal and typically close again as humidity levels stabilize. But if larger gaps persist, the problem might be that boards weren’t fully locked into place during installation. Sometimes, simply using a rubber-soled sneaker to gently “kick” the boards closer can work wonders. If the locking mechanism itself is damaged, you might need to replace that particular section.
Clicking or hollow sounds underfoot can be annoying. Usually, these noises mean the subfloor underneath wasn’t perfectly level or the underlayment isn’t providing enough cushion. Minor clicking occasionally settles on its own as the floor adjusts over time. If the sound is significant or persistent, the only lasting fix might be reinstalling portions of the floor after properly leveling the subfloor.
Peaking or tenting boards—where certain sections lift or rise—usually indicates there wasn’t an adequate expansion gap maintained around the room’s perimeter. To check, remove your baseboards or trim and ensure at least a 1/4 inch expansion gap is present. If you don’t see that, you’ll need to trim back the edges of the flooring to create sufficient space. It’s extra work, but crucial for your floor’s long-term health.
Finally, when dealing with damaged planks—such as deep scratches or dents—the floating installation method is your friend. Carefully remove baseboards and planks starting from the nearest wall until you reach and replace the damaged plank. For minor scratches or nicks, a wood-floor touch-up kit can quickly solve the problem without removing any boards.
At Romero Hardwood Floors Inc., we’ve encountered and solved just about every flooring issue imaginable over our 15+ years in business. Our experience tells us that most flooring problems can be avoided by following proper subfloor preparation, moisture management, and careful installation techniques. But if issues do arise, addressing them promptly is key.
Troubleshooting flooring problems early can save you headaches (and money!) down the road. And if you find yourself stuck, we’re always here to help get your floors looking beautiful again.
Frequently Asked Questions about Floating Engineered Hardwood on Concrete
If you’re considering how to install floating engineered hardwood flooring on concrete, you probably have a few questions. You’re not alone! At Romero Hardwood Floors Inc., we hear common questions from homeowners just like you. Let’s walk through some of the most frequently asked questions to help set your mind at ease.
How Long Does It Take to Install Floating Engineered Hardwood Flooring on Concrete?
Installation timelines for floating engineered hardwood flooring on concrete can vary based on several factors. On average, a typical room of about 200-300 square feet will take around 1-2 days to install the flooring itself. However, there’s a bit more to consider to ensure your flooring looks and performs beautifully for years.
You’ll want to factor in additional time for concrete subfloor preparation, which may take another 1-3 days depending on how much leveling or moisture correction is required. Also, engineered hardwood flooring needs to acclimate to your home’s temperature and humidity for about 48-72 hours before installation—that’s another 2-3 days.
Plus, if you’re applying self-leveling compounds or moisture sealers, remember these typically need 24-48 hours to dry properly. All together, from the moment your materials arrive to the moment you can walk on your beautiful new floor, plan on about 5-7 days.
Of course, this timeline can shift depending on your DIY skills. Our experienced team at Romero Hardwood Floors Inc. often completes installations faster because we have the right tools, experience, and know-how to get the job done efficiently. But remember: patience pays off. Rushing steps like acclimation or subfloor prep can create issues down the line, so take your time!
Can I Install Floating Engineered Hardwood in My Basement with a Concrete Floor?
Absolutely! One of the great advantages of engineered hardwood flooring is its ability to be installed below grade—in other words, in basements or rooms partially below ground level. Solid hardwood floors aren’t suitable in these spaces due to moisture risk, but engineered hardwood handles basement moisture beautifully, provided you take the right precautions.
Concrete basement floors typically have higher moisture levels, so carefully preparing your concrete subfloor is crucial. You’ll want to thoroughly test and manage moisture, use proper moisture barriers, and possibly run a permanent dehumidifier to maintain the recommended indoor humidity levels (between 30-55%).
Choose flooring products specifically rated for below-grade installations. Ideally, opt for a slightly thicker engineered plank (at least 3/8 inch thick) with a substantial wear layer, as this provides better insulation and durability in basement conditions.
Basements can go from cold and uninviting to warm, comfortable, and stylishly finished spaces with floating engineered hardwood flooring. At Romero Hardwood Floors Inc., we’ve successfully installed engineered hardwood floors in many basements across Revere, MA, and surrounding areas. It’s all about proper preparation and using the right materials to ensure lasting results.
What Thickness of Engineered Hardwood Is Best for Floating Installation on Concrete?
When deciding how to install floating engineered hardwood flooring on concrete, choosing the right thickness is key to achieving lasting results. Engineered hardwood typically ranges between 3/8 inch to just over 1/2 inch thick. For most floating installations on concrete, we recommend selecting engineered hardwood between 7/16 inch and 1/2 inch thick.
Here’s why: slightly thicker flooring not only feels sturdier underfoot but also provides better insulation against cold concrete. It also tends to offer improved sound absorption, making your room quieter and more comfortable. Of course, thicker flooring usually comes with a thicker wear layer (the topmost layer of real wood), which means increased durability and the opportunity for future refinishing if needed.
Aim for a wear layer of at least 2mm (about 1/12 inch), although 3mm or more is preferable for the best long-term durability. Products with thicker wear layers can be refinished multiple times, extending their lifespan significantly.
Many engineered hardwood products feature convenient click-lock systems—and these products usually have thicknesses specifically designed to optimize the performance of their locking mechanisms. As long as you stay in that recommended range, your flooring should perform beautifully on concrete subfloors.
Choosing the right thickness ultimately comes down to balancing budget, appearance, and durability. Thinner materials can be more budget-friendly and helpful if you’re concerned about overall floor height. However, premium-grade engineered hardwood—with a thicker wear layer and greater overall thickness—often provides a better return on investment over time.
If you have any other questions or need further guidance on your flooring project, reach out to us at Romero Hardwood Floors Inc.—we’re always here to help!
Conclusion
Installing floating engineered hardwood flooring on concrete is far more than just another DIY project—it’s a change that brings warmth, beauty, and lasting value into your home. With careful attention to each step we’ve covered—from moisture management and subfloor prep to acclimation and installation—you can achieve professional-quality results, even if you’re tackling the job yourself.
The process might seem detailed (and yes, maybe a little overwhelming at first!), but trust us: each phase of preparation and installation is crucial. Properly testing and controlling moisture, ensuring your concrete subfloor is clean, flat, and level, and allowing plenty of time for your engineered hardwood to acclimate are essential steps. These will greatly impact the durability and beauty of your new flooring. After all, good preparation doesn’t just lead to a great-looking floor—it helps ensure that your floor continues looking great for decades!
One of the biggest advantages of choosing a floating installation method is how DIY-friendly it truly is. You won’t need glue, nails, or fancy pneumatic tools—just patience, attention to detail, and some basic equipment. Even better, a floating floor naturally moves with temperature and humidity changes, making it a perfect partner for concrete subfloors that can be tricky due to moisture concerns and unevenness.
Of course, if you’re feeling a bit hesitant about installing your floor yourself, remember: you don’t have to go it alone. At Romero Hardwood Floors Inc., we’ve been helping homeowners across Revere, MA, and surrounding communities create beautiful, lasting hardwood floors since 2006. We understand that not everyone has the time or confidence to tackle flooring installation as a DIY project. And that’s perfectly okay! Our experienced team is always ready to step in and give you professional results—with guaranteed punctuality and workmanship—so you can relax and enjoy your new floors worry-free. For more details about our services, visit our Flooring Install page.
Whether you choose the DIY path or trust the experts, upgrading from cold concrete to warm, inviting hardwood flooring is a smart investment. According to recent research by the National Association of Realtors, hardwood floors return an impressive 118% of your investment. That makes floating engineered hardwood not just a beautiful upgrade, but a financially smart choice too.
Changing your concrete floors into stunning hardwood surfaces isn’t just about aesthetics—it’s about enhancing your home’s comfort, market value, and your daily life. With proper installation and regular care, you can look forward to many years of pride, satisfaction, and cozy, comfortable living spaces.
From all of us at Romero Hardwood Floors Inc., happy flooring!
