Laminate Floor Installation Tips: Top 10 Easy Steps 2025
Transform Your Space: Essential Laminate Flooring Installation Tips
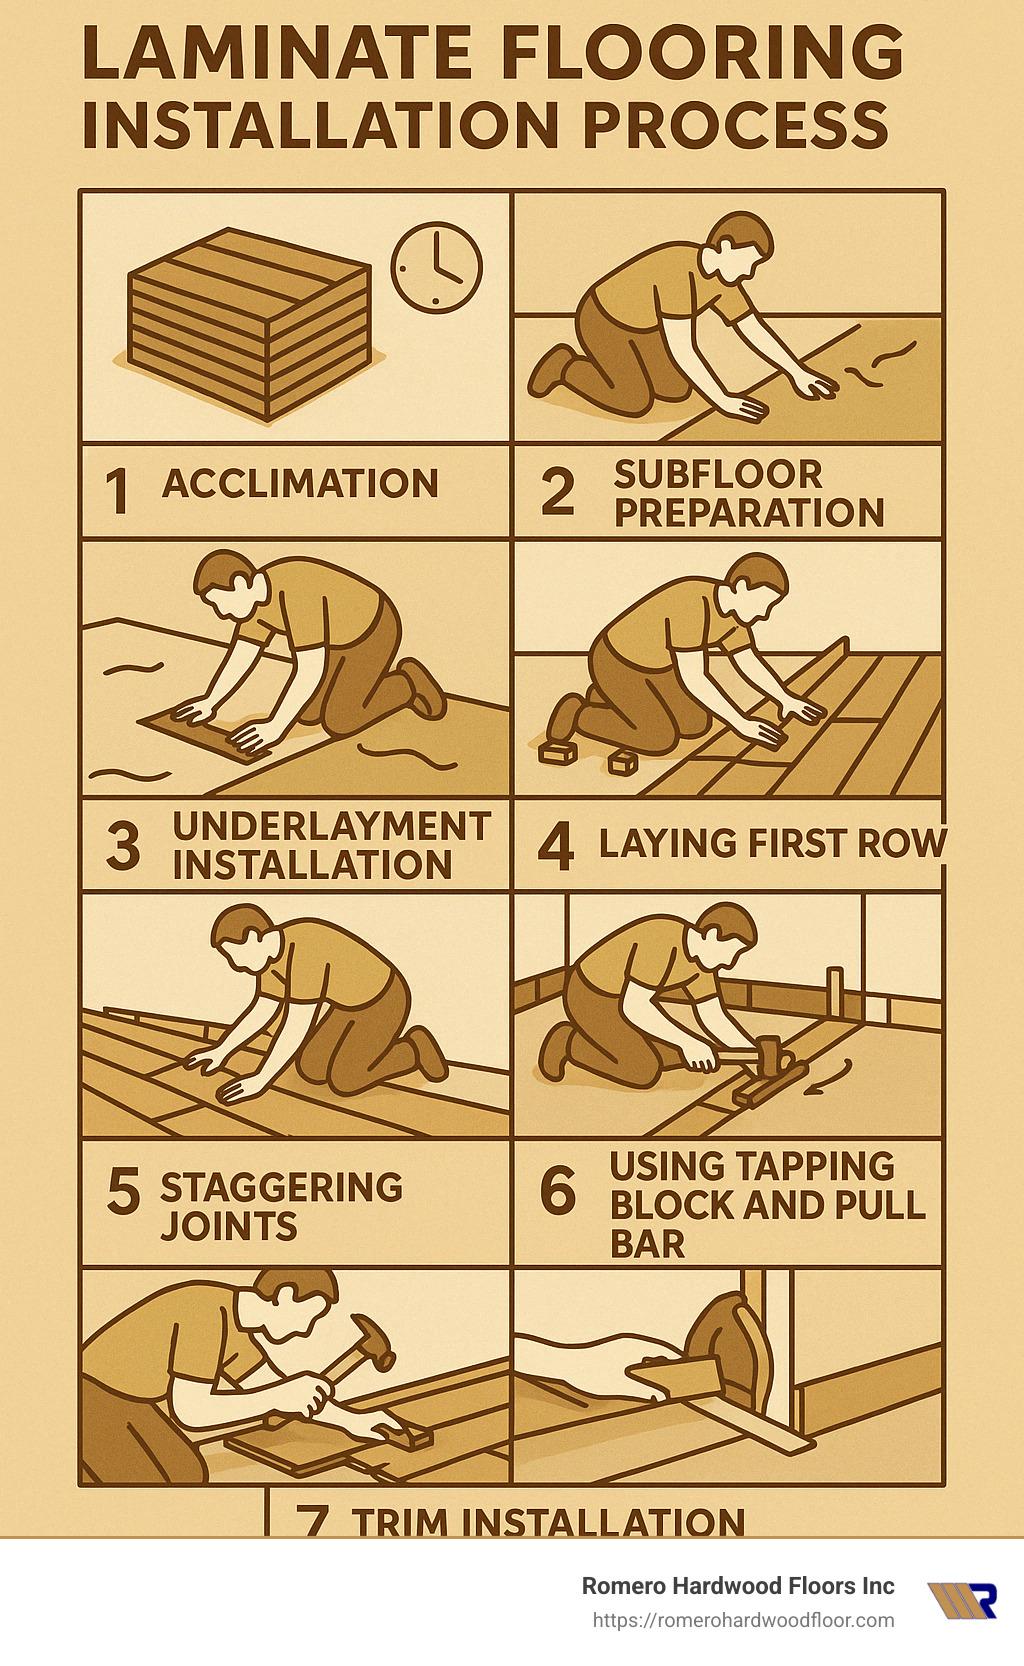
Laminate floor installation tips at a glance:
- Acclimate flooring for at least 48 hours in the installation room
- Prepare subfloor by cleaning, leveling, and ensuring it’s dry
- Install proper underlayment with moisture barrier on concrete
- Maintain 3/8-inch expansion gap around all walls and fixed objects
- Stagger seams by at least 6-12 inches between rows
- Use appropriate tools including spacers, tapping block, and pull bar
- Cut with finished side up when using a jigsaw or handsaw
Installing laminate flooring is one of the most accessible and rewarding DIY home improvement projects you can tackle. With its attractive appearance, durability, and relatively simple installation process, laminate flooring offers an excellent alternative to more expensive hardwood options. However, proper installation techniques are crucial to ensure your new floor looks great and performs well for years to come.
The key to a successful laminate flooring project lies in thorough preparation and following established best practices. From acclimating your materials to maintaining proper expansion gaps, each step plays a vital role in creating a beautiful, long-lasting floor that won’t squeak, buckle, or separate over time.
I’m Francisco Romero, owner of Romero Hardwood Floors Inc., and I’ve helped countless homeowners and property managers implement laminate floor installation tips to achieve professional-quality results over my 15+ years in the flooring industry.
Common Laminate floor installation tips vocab:
– Professional laminate floor installers
– Laminate floor design ideas
– Laminate floor repair specialists
Essential Tools and Materials for Laminate Floor Installation
Getting ready for a laminate flooring project is a bit like preparing for a camping trip – you don’t want to be halfway through and realize you’ve forgotten something essential! Having all your tools and materials organized before you start will make your installation experience much smoother and more enjoyable.

Tools You’ll Need:
Let’s talk about the tools that will become your best friends during this project. Your trusty tape measure will be working overtime as you calculate room dimensions and plan your layout. Keep a pencil handy for marking cut lines – nothing fancy needed here, just something that makes visible marks on your flooring.
When it comes to installation, a good hammer is indispensable, but never use it directly on your laminate! That’s where a tapping block comes in, protecting those delicate edges while you persuade pieces into place. For those tight spots against walls, a pull bar will be your saving grace, allowing you to secure those last rows without damaging the flooring.
Don’t forget about spacers – these little plastic heroes maintain your expansion gaps consistently around the room. And please, protect yourself with proper safety gear: knee pads (your knees will thank you), eye protection, work gloves, and ear protection if you’re using power tools.
Speaking of cutting tools, you have several options. A jigsaw or handsaw works well for intricate cuts around door frames and fixtures. For those long, straight cuts (especially on your first and last rows), a miter saw or table saw will give you clean, precise results. And don’t overlook the humble jamb saw – perfect for undercutting door frames so your flooring can slide neatly underneath.
Materials Required:
Now for the materials that will transform your space. Obviously, you’ll need your laminate flooring – and here’s a pro tip: order about 10% extra to account for mistakes, waste, and those tricky cuts. Trust me, it’s better than running short and finding the store is out of your exact color!
Underlayment is non-negotiable for a proper installation. Choose foam, cork, or felt options based on your specific subfloor conditions and noise concerns. If you’re installing over concrete, a vapor barrier is absolutely essential to prevent moisture from ruining your beautiful new floor.
Don’t forget about the finishing touches. Transition strips create smooth pathways between your laminate and other flooring types. Quarter round or baseboards will neatly cover those necessary expansion gaps around the perimeter. In bathrooms or kitchens, silicone sealant provides crucial waterproofing, while foam backer rod fills larger expansion gaps before you apply trim.
As the old carpentry wisdom goes, “Measure twice, cut once.” This simple advice can save you from wasting expensive materials and spare you the frustration of starting over. Taking your time with measurements and preparation will pay dividends in the quality of your finished floor.
With these laminate floor installation tips and a complete toolkit, you’ll be well-equipped to tackle your flooring project with confidence. And remember, if gathering all these supplies feels overwhelming, the professional team at Romero Hardwood Floors Inc is always here to help with expert installation services.
Preparing Your Subfloor for Laminate Flooring
You know what they say about building a house on sand—it won’t last long! The same principle applies to laminate floor installation tips when it comes to your subfloor. In my 15+ years at Romero Hardwood Floors, I’ve seen beautiful laminate installations fail simply because someone rushed through this critical prep work.
Cleaning the Subfloor
First things first—we need to get down to bare subfloor. Grab your pry bar and carefully remove baseboards and trim. Pro tip: place a small piece of wood between your pry bar and wall to prevent damage to your drywall.
Next comes the fun part (or not-so-fun, depending on your perspective): removing old flooring. If you’re dealing with carpet, start at a corner and pull it up, then remove all padding, staples, and those pesky tack strips. For vinyl, a utility knife works wonders to score it before scraping away. Hardwood requires a bit more muscle—set your circular saw to the exact thickness of the boards and make relief cuts before prying them up. And tile? Channel your inner demolition expert with a hammer and chisel before scraping the surface clean.
Once you’ve cleared away the old materials, grab your broom and vacuum. A truly clean subfloor means no dust bunnies, debris, or even tiny particles that could create bumps under your new laminate. Think of it as creating a clean canvas for your masterpiece!
Leveling the Subfloor
Now comes the critical part that many DIYers rush through. Your laminate needs a flat, level surface to perform its best. While the industry standard allows for some variation (up to 3/16 inch over 10 feet), flatter is always better for a professional-looking result.
For high spots on wood subfloors, break out the sander or plane them down. Those low spots? Fill them with a self-leveling compound that will seek out and fill the depressions. If you’re working with wood, secure any loose or squeaky boards with screws (not nails) and sand down uneven joints. Concrete subfloors might need patching compound for cracks and low areas.
I always tell my clients: “Spend the extra hour leveling now, or spend years noticing every little dip and peak in your new floor.” It really is that important!
Want to see proper floor leveling in action? Check out this helpful video: How to Level a Floor.
Moisture Testing
If there’s one enemy that keeps me up at night when thinking about laminate floor installation tips, it’s moisture. Water and laminate simply don’t mix—period.
For concrete subfloors, use a moisture meter for accurate readings, or try the simple plastic sheet test: tape down a 2′ x 2′ piece of clear plastic to the floor and check for condensation after 24 hours. If you find moisture, you’ve got an issue to address before proceeding.
Wood subfloors should register below 12% on a wood moisture meter. Higher readings spell trouble down the road.
If you find moisture problems, don’t panic! Solutions might include repairing leaks, applying concrete sealer, improving ventilation, or installing a quality vapor barrier. The extra time spent addressing moisture issues now will save you from warped, buckled flooring later.
Proper subfloor prep isn’t just about today’s installation—it’s about how your floors will look and perform for years to come. If you’re feeling overwhelmed by this critical step, consider reaching out to professionals like us at Romero Hardwood Floors Inc. for Laminate Flooring Installation Services to ensure your project starts on solid ground!
Acclimating Your Laminate Flooring for Optimal Results
One of the most frequently overlooked yet critical laminate floor installation tips is proper acclimation. This step allows the flooring material to adjust to the temperature and humidity conditions of the installation environment.

Why Acclimation Matters
Laminate flooring is made from wood-derived materials that naturally expand and contract with changes in temperature and humidity. By allowing the flooring to adjust to your home’s conditions before installation, you significantly reduce the risk of future problems like buckling, gapping, or warping.
“Nearly all installation failures we’ve seen at Romero Hardwood Floors Inc. could have been prevented with proper acclimation,” I often tell our clients in Revere, MA and surrounding communities.
Proper Acclimation Process
Think of acclimation as letting your flooring “get comfortable” in its new home before settling in permanently. Start by maintaining your room temperature between 65-75°F (18-24°C) for at least 48 hours before you even bring the flooring home. This temperature should remain consistent throughout the installation process and for several days afterward.
Your home’s humidity also plays a crucial role. Keep relative humidity between 45-65% during this period. If you live in an extremely dry or humid climate, you might need to use a humidifier or dehumidifier to maintain these levels.
When you bring your laminate flooring home, don’t just stack the boxes against the wall and forget about them. Instead, place the unopened boxes flat in the center of the room where they’ll be installed. Cross-stack them like you would a campfire, which allows air to circulate around all sides of the packaging.
Most manufacturers recommend a minimum 48-hour acclimation period, but I’ve found that 72 hours often produces better results, especially in basements or when installing over concrete subfloors. These environments tend to be cooler and hold more moisture, so giving your flooring extra time to adjust pays dividends later.
Testing for Proper Acclimation
How do you know when your flooring is properly acclimated? If you have a moisture meter, you can check that the moisture content of the laminate is within 2-4% of the subfloor’s moisture content. Otherwise, follow the manufacturer’s recommended acclimation time, which is typically 48 hours minimum.
“Acclimate laminate planks to the room’s climate for at least 48 hours to adapt to temperature and humidity, which can significantly reduce expansion or contraction issues,” advises one flooring expert.
Rushing through acclimation might seem like a time-saver, but it’s actually setting yourself up for frustration down the road. Those 48-72 hours of patience can prevent years of headaches with your new floor. At Romero Hardwood Floors, we’ve seen too many DIY projects fail simply because this crucial step was rushed or skipped entirely. Give your flooring time to adjust to its new home, and it will reward you with years of beautiful, trouble-free performance.
Choosing the Right Underlayment for Laminate Flooring
That thin layer that goes between your subfloor and those beautiful laminate planks? It’s not just filler—it’s the secret MVP of your flooring project! As someone who’s installed countless floors throughout Revere and beyond, I can tell you that underlayment makes all the difference between a floor that looks great for a few months and one that performs beautifully for years.
Functions of Underlayment
Think of underlayment as your floor’s silent protector. It smooths out those minor imperfections in your subfloor that you might not even notice with your eyes but would definitely feel underfoot. It adds a cushioning effect that makes walking more comfortable—something your knees will thank you for! It also reduces that hollow “clacking” sound that can make laminate floors sound cheap, while providing thermal insulation that keeps your floors warmer in winter. Perhaps most importantly, the right underlayment protects against moisture that could otherwise destroy your beautiful new floor.
Types of Underlayment
When clients ask me about underlayment options, I typically break it down into four main types:
Standard Foam Underlayment is your basic, budget-friendly option. It’s thin (usually 2-3mm) and provides minimal cushioning and sound absorption. I recommend this only if you’re working with a perfectly level subfloor and budget is your primary concern.
Combination Foam + Vapor Barrier includes a plastic moisture barrier along with the foam cushioning. This is my go-to recommendation for basement installations or any concrete subfloor. The integrated vapor barrier is crucial for preventing moisture damage from below.
Cork Underlayment is a natural material that excels at sound absorption. It’s slightly pricier, but the sound-dampening properties make it perfect if you’re installing in an upstairs room or apartment building. Plus, it offers excellent thermal insulation and comfort underfoot.
Felt Underlayment is the premium choice for serious sound reduction. It’s denser than foam (typically 3-6mm thick) and provides superior thermal properties. I often recommend this for high-end installations where quietness is a priority.
Choosing the Right Underlayment for Your Project
If you’re installing over a concrete subfloor, there’s no negotiation here—you must use a vapor barrier or a combination underlayment with an integrated one. Concrete continuously releases moisture that will damage your laminate over time. A minimum 6-mil polyethylene vapor barrier is essential protection.
For wood subfloors, you can focus more on sound dampening and cushioning properties. A vapor barrier typically isn’t necessary unless you’re installing over a crawl space, which can release moisture upward.
“I skipped the underlayment to save money and regretted it within months,” one of my clients once told me. Don’t make the same mistake! The right underlayment might add a small cost upfront, but it will extend the life of your laminate floor by years while making it more comfortable to live with every day.
The best laminate floor installation tips I can offer is to never skimp on underlayment quality. It’s like buying a luxury car but putting the cheapest possible tires on it—you’re undermining the entire investment!
Laminate Floor Installation Tips: Step-by-Step Process
Now that you’ve prepared your subfloor and acclimated your materials, it’s time for the main event—installing your laminate flooring. Let me walk you through the process with some proven laminate floor installation tips that will help you achieve professional results.

Planning Your Layout
Before laying a single plank, take some time to plan your approach. I typically recommend running planks parallel to the longest wall or main light source in the room. This creates a visually pleasing effect and minimizes the appearance of seams, making your room look larger and more cohesive.
Next, measure the width of your room and divide by the width of a plank. This simple calculation helps you avoid ending up with a tiny sliver of flooring on your final row. If your calculations show that the last row would be less than 2-3 inches wide, you should trim the first row accordingly to balance the look.
Don’t forget to mix planks from different boxes as you work. I can’t tell you how many DIY jobs I’ve seen where all the identical patterns ended up clustered together, creating an obviously artificial look. Blending planks from multiple boxes ensures natural variation that mimics the random patterns of real wood.
Installing the First Row
Your first row sets the tone for the entire installation. Start by removing the tongue on the wall-facing edge of these planks using a utility knife or saw. This allows you to place the cut edge flush against the wall while maintaining the groove needed for connecting to the next row.
Place spacers along your starting wall about every 12 inches. These little plastic pieces are your best friends during installation—they maintain that crucial 3/8-inch expansion gap that prevents buckling later on.
Begin in a corner, positioning your first plank with the cut edge facing the wall. As you connect subsequent planks in the first row, insert each short end at a slight angle (about 20-30 degrees) and press down until you hear that satisfying click. The click-lock system of modern laminate is quite forgiving for beginners, making this a perfect DIY project.
For the last plank in your row, you’ll likely need to cut it to fit. Remember to account for the expansion gap when measuring, and always double-check your measurements before cutting. As my grandfather used to say, “Measure twice, cut once!”
Installing Subsequent Rows
For your second row, start with a cut plank to create that all-important staggered pattern. Make sure this piece is at least 8 inches long to maintain structural integrity. When connecting this row to the first, you’ll use a slightly different technique: angle and click the long edge first, then connect the short ends.
Insert the tongue of your new plank into the groove of the first row at a 20-30 degree angle, then lower while maintaining pressure. For the short ends, position the next plank at an angle against the previous one, slide until the ends meet, then press down to lock in place. If the seams aren’t closing completely, a gentle tap with a tapping block and hammer will snug everything up without damaging the locking mechanism.
As you continue this pattern, complete each row fully before moving to the next. For tight spaces near walls, a pull bar becomes invaluable for clicking in those final pieces where your fingers can’t reach.
“Most modern laminate flooring uses a tongue-and-groove, click-lock design,” which is why even first-time installers can achieve beautiful results with a bit of patience and attention to detail.
Cutting Laminate Flooring: Laminate Floor Installation Tips to Avoid Splintering
Clean cuts make all the difference in a professional-looking installation. When making straight cuts with a power saw, remember this simple rule: decorative side down for table saws or miter saws, but decorative side up when using a jigsaw or handsaw. This orientation prevents splintering on the visible surface of your flooring.
To further prevent splintering, apply masking tape along your cut line before sawing. This little trick has saved countless planks from damage on our job sites at Romero Hardwood Floors Inc. Also, scoring the cut line with a utility knife before sawing can make a huge difference in cut quality.
For those tricky curved cuts around doorways or pipes, I recommend making a paper template first. This extra step saves you from potentially ruining expensive flooring materials. When cutting around pipes, drill holes at the corners of your cutouts to prevent cracking, then connect the holes with your jigsaw.
Staggering Laminate Flooring for Stability and Natural Look
Proper staggering isn’t just about looks—it significantly impacts how your floor handles foot traffic over time. Always stagger end joints by at least 6-12 inches between adjacent rows. This prevents those unsightly “H” patterns where four corners meet at one spot, which can become weak points in your flooring.
Avoid using pieces shorter than 8 inches at the ends of rows. These tiny pieces are more likely to come loose over time. Instead, adjust your starting piece length to ensure all end pieces meet this minimum size requirement.
For the most natural-looking floor, vary your stagger distances rather than creating a repeating pattern. Those obvious “stair-step” patterns are a dead giveaway of amateur installation. Using leftover cut pieces to start new rows not only reduces waste but also helps create that random, natural appearance that mimics real hardwood.
For more detailed guidance on these laying techniques, check out How to Lay Laminate Flooring: 13 Steps.
Ensuring Proper Expansion Gaps Around the Room
In my 15+ years of installing flooring, I’ve seen more laminate floor failures from improper expansion gaps than from any other cause. These 3/8-inch spaces around the perimeter of your room aren’t optional—they’re absolutely essential for the long-term performance of your floor.
Laminate flooring, like all wood-based products, naturally expands and contracts with seasonal humidity changes. Without proper expansion gaps, this movement has nowhere to go, resulting in buckling, warping, or even complete failure of your locking system.
Be diligent about maintaining these gaps around all walls and fixed objects—including pipes, heating vents, door frames, cabinets, and transitions to other flooring types. Those plastic spacers should remain in place until your entire floor is installed, and you should periodically check gap width throughout the installation process.
“Expansion gaps are critical due to temperature and humidity fluctuations that affect flooring dimensions,” and this is especially true in areas like Revere, MA, where we experience significant seasonal changes. Trust me, the few minutes you spend ensuring proper gaps now will save you from costly repairs down the road.
Handling Door Jambs and Other Obstructions
Doorways, pipes, and other obstacles can make even experienced DIYers nervous during laminate installation. But don’t worry—with a few simple techniques, you can create those clean, professional transitions that make all the difference in your finished floor.

Undercutting Door Jambs
Remember the first time I tried installing laminate without undercutting door jambs? Let’s just say those awkward cuts around the doorframe didn’t exactly scream “professional installation.” Trust me on this one—taking a few minutes to undercut your door jambs will save hours of frustration and give you much cleaner results.
Start by creating a height guide using a scrap piece of laminate with underlayment beneath it. Place this sample against the door jamb—this shows exactly how high you’ll need to cut. This simple step prevents cutting too high or too low, which can lead to gaps or binding.
For the actual cutting, an oscillating multi-tool or jamb saw is your best friend. These tools let you make a clean, controlled horizontal cut while keeping the blade flat against your sample. Once you’ve made your cut, gently remove the waste piece and test the fit by sliding your laminate sample underneath. It should slip right under with just enough clearance—not too tight, not too loose.
“Trimming door jambs before laying the flooring simplifies the process by allowing the flooring to slide neatly under the doors for a cleaner finish,” notes a professional installer. I’ve found this approach eliminates those awkward cuts and creates transitions so seamless you might forget they’re there.
Fitting Around Pipes and Other Fixed Objects
Pipes, HVAC vents, and built-in cabinetry can seem like installation roadblocks, but they’re actually opportunities to showcase your attention to detail. The key is careful measurement and preparation before making any cuts.
When dealing with pipes, measure the position from multiple reference points—both from the wall and from your last installed row. Always add your 3/8-inch expansion gap to these measurements. For round pipes, drill a hole slightly larger than the pipe diameter (remember that expansion gap!). Then, cut from the edge of the plank to the hole, install both pieces around the pipe, and no one will ever know the plank was cut.
For irregular shapes or complex transitions, I’ve found that making a quick template from cardboard saves countless headaches. At Romero Hardwood Floors Inc., we often use this approach when fitting laminate around stone fireplaces or custom built-ins. Simply trace the shape onto cardboard, test the fit, make adjustments, and then transfer that template to your laminate plank.
When cutting these complex shapes, drill starter holes at corners before using your jigsaw—this prevents cracking and gives you cleaner cuts. Take your time here; these detail areas are often the most visible parts of your installation.
One of my favorite laminate floor installation tips for uneven walls or unusual shapes comes from years of experience: “Using a discarded offcut to trace the contour of an uneven wall before cutting the laminate board to fit perfectly.” This simple technique ensures a precise fit even along the most irregular surfaces.
Even around obstacles, maintaining that critical expansion gap remains essential. In bathrooms especially, where pipes are common, I’ve seen too many DIYers fit planks snugly around toilet flanges or sink pipes, only to face buckling issues months later when seasonal humidity changes cause expansion.
With these techniques in your toolbox, those challenging obstacles can become showcases of your installation skills rather than eyesores that distract from your beautiful new floor.
Common Mistakes to Avoid During Laminate Floor Installation
After installing hundreds of laminate floors throughout Revere and beyond, I’ve seen just about every mistake homeowners can make. Trust me when I say that a little knowledge beforehand can save you from some serious headaches later!
Not Properly Acclimating the Flooring
The excitement of a new flooring project often tempts homeowners to rip open those boxes and start installing right away. Big mistake! Laminate flooring needs time to adjust to your home’s environment before installation.
When you skip acclimation, your beautiful new floor might start buckling, gapping, or peaking within days or weeks. I’ve seen floors that looked perfect on installation day develop unsightly ridges by the end of the week simply because the homeowner skipped this crucial step.
Always give your laminate 48 hours to acclimate in the actual room where it will be installed. Keep your home at normal living temperature and humidity during this time. Your patience will be rewarded with a stable, long-lasting floor.
Skipping or Using Improper Underlayment
“It’s just a thin foam layer—how important can it really be?” Very important, as it turns out! Underlayment isn’t an optional extra—it’s essential for your floor’s performance and longevity.
Without proper underlayment, your laminate floor will be noisier, colder, and more susceptible to moisture damage. Each type of subfloor requires specific underlayment considerations, especially concrete, which absolutely requires a vapor barrier to prevent moisture migration.
At Romero Hardwood Floors Inc., we’ve been called to replace many prematurely failed floors where the homeowner tried to save a few dollars by skipping underlayment. Trust me—this isn’t where you want to cut corners!
Inadequate Expansion Gaps
This might be the number one installation mistake I see. Laminate flooring is designed to “float” over your subfloor, expanding and contracting with changes in temperature and humidity. Without proper expansion gaps, your floor has nowhere to go when it expands.
The result? Buckling, warping, and edge damage that can ruin your beautiful new floor. Always maintain a consistent 3/8-inch gap around all walls and fixed objects. Those little plastic spacers included with your flooring aren’t optional decorations—they’re critical installation tools!
Improper Staggering of Seams
A properly staggered laminate floor not only looks more natural but is also structurally stronger. When seams line up too closely between rows (creating what we call “H-joints”), you create weak points in your floor.
I’ve seen floors where every row started with a full board, creating a ladder-like pattern of seams that not only looked artificial but also compromised the floor’s stability. Aim for at least 6-12 inches of stagger between seams in adjacent rows, and mix up your starting lengths for a more natural appearance.
Not Following Manufacturer Instructions
Every laminate product has its own specific installation requirements. While the general principles remain similar, the details can vary significantly between brands and product lines.
“Before you begin, read the manufacturer’s instructions,” advises the Lowe’s Editorial Team—and they couldn’t be more right. Those instruction sheets aren’t just packing material; they contain crucial information about your specific flooring.
Ignoring manufacturer guidelines can void your warranty and lead to installation failures. I’ve seen beautiful premium laminate ruined because someone assumed they knew better than the manufacturer’s instructions.
Installing Over an Unsuitable Subfloor
Your laminate floor is only as good as what’s underneath it. Installing over a subfloor that’s uneven, wet, or structurally unsound is a recipe for disaster.
I once visited a home where the owner had installed laminate directly over old carpet padding. Within weeks, the locking system began failing as the floor flexed with every step. The entire installation had to be redone, costing twice as much as doing it right the first time.
Take the time to properly prepare your subfloor. Fix squeaks, address moisture issues, and ensure the surface is clean and level before you lay a single plank.
Using Improper Cutting Techniques
Those clean, precise cuts you see in professional installations don’t happen by accident. Proper cutting techniques make a huge difference in the final appearance of your floor.
Using the wrong blade or cutting without proper support leads to chipped, splintered edges that create gaps and an unprofessional appearance. Invest in a fine-tooth blade designed for laminate, and always support the plank properly during cutting.
For best results, use masking tape along your cut line to reduce splintering—a simple trick we use regularly at Romero Hardwood Floors Inc. that makes a world of difference in the finished product.
As one flooring expert notes, “Laminate flooring requires a strong subfloor, and carpeting does not provide that surface.” This highlights why proper preparation and following established best practices is so important for a successful installation.
Post-Installation Tips: Maintenance and Cleaning
You’ve put in the hard work and your beautiful new laminate floor is installed – congratulations! Now comes the equally important part: keeping it looking gorgeous for years to come. Proper maintenance isn’t just about aesthetics; it’s about protecting your investment and extending the life of your flooring.
Initial Cleaning and Care
After completing your installation, give your new floor 24 hours to fully settle before moving furniture back into the room. This brief waiting period allows any adhesives to cure properly and gives the floor time to adjust to its final position.
Remember those spacers that were so important during installation? Now’s the time to remove them all. With spacers gone, you can install baseboards or quarter round molding to cover those essential expansion gaps while creating a polished, finished look.
Before you consider the job complete, give your new floor a thorough cleaning to remove any installation dust or debris. A vacuum with a soft brush attachment works wonderfully for this initial clean, followed by a very light damp-mopping with a manufacturer-approved cleaner. This first cleaning sets the stage for your ongoing maintenance routine.
Routine Cleaning
Daily sweeping or vacuuming with a soft brush attachment is your first line of defense against scratches. Dirt and grit act like sandpaper when walked on, gradually wearing down your floor’s protective finish. Make this quick clean part of your daily routine, and you’ll significantly extend your floor’s lifespan.
When it comes to cleaning products, be selective and cautious. Use only cleaners specifically designed for laminate flooring – these products are formulated to clean effectively without damaging the protective wear layer. Avoid oil soaps, waxes, polish, or steam cleaners, as these can leave residue or cause moisture damage.
Perhaps the most important maintenance rule is moisture control. Laminate may look like real wood, but it doesn’t handle water the same way. Never wet mop or flood your laminate floor with water. Instead, use a barely damp microfiber mop and dry the floor immediately if any spills occur. As we often tell our clients at Romero Hardwood Floors Inc., “If your mop is dripping, it’s too wet for laminate!”
Protecting Your Laminate Floor
Think of your laminate floor as needing three layers of protection: furniture protection, entrance protection, and environmental controls.
For furniture protection, felt pads under furniture legs are absolutely essential. These inexpensive little items prevent scratches when furniture shifts slightly during normal use. When rearranging your room, always lift furniture rather than dragging it, no matter how light the piece may be. For office chairs or other rolling furniture, protective mats are a must-have to prevent wheel damage.
At entrances to your home, doormats serve as your floor’s first line of defense. They trap dirt, moisture, and debris before it can reach your beautiful laminate. Consider implementing a “no shoes” policy, especially for high heels which can cause dents and punctures. If you have pets, keeping their nails trimmed will prevent accidental scratching during their excited moments.
Environmental factors play a surprisingly important role in laminate floor health. Maintain indoor humidity between 45-65% to prevent expansion and contraction that can damage the locking system. During dry winter months, a humidifier can prevent gaps from forming, while a dehumidifier in summer months prevents excess moisture absorption. Direct sunlight can fade and damage laminate over time, so use blinds or curtains during the brightest parts of the day.
“Laminate flooring is only water resistant, not waterproof, so be mindful of where you use it, avoiding areas with excessive water,” cautions a flooring specialist. At Romero Hardwood Floors Inc., we advise our clients in Revere, MA and surrounding areas to be particularly vigilant about moisture control in kitchens and bathrooms with laminate floors.
Addressing Gaps and Warping After Installation
Even with perfect installation, sometimes issues arise as your home goes through seasonal changes. Knowing how to address these problems can save you significant expense and frustration.
For small gaps (less than 1/8 inch), color-matched vinyl putty or laminate filler can work wonders. Apply according to the product instructions, making sure to wipe away excess before it dries. The result is a nearly invisible repair that maintains your floor’s seamless appearance.
Larger gaps often indicate a humidity issue in your home. Low humidity, especially during winter heating season, can cause laminate planks to shrink slightly. Consider using a humidifier during dry seasons to maintain optimal conditions. In more severe cases, reinstalling sections might be necessary – though this is rare with proper maintenance.
If you notice buckling or warping, your first step should be to identify and eliminate any moisture sources. Check for leaks under appliances, plumbing fixtures, or exterior doors. Ensure your expansion gaps haven’t been blocked by furniture or rugs pressed tightly against walls. Sometimes removing baseboards temporarily can release pressure if expansion space has become inadequate.
“Gaps between boards are likely to be caused by not lifting them to a high enough angle when clicking into place. If this is the case, disassemble and re-click the board at a higher angle,” advises a flooring expert. This simple adjustment can often resolve connection issues before they become permanent problems.
With these laminate floor installation tips for maintenance and care, your new floor will continue to improve your home’s beauty and value for many years to come. The small effort of proper maintenance pays big dividends in the long run!
Laminate Floor Installation Tips: Frequently Asked Questions
Can a Beginner Install Laminate Flooring?
Absolutely! If you’ve been dreaming of a DIY home improvement project that delivers impressive results without requiring professional-level skills, laminate flooring installation might be perfect for you.
Modern laminate flooring with its ingenious click-lock system has revolutionized the DIY flooring world. These systems allow pieces to snap together like a puzzle, making it accessible to homeowners with basic tools and a willingness to learn. I’ve seen countless first-timers achieve beautiful results after a bit of practice.
Follow manufacturer instructions to the letter—they’re your best friend during this process. Trust me, I’ve seen what happens when folks think they know better than the instructions! Take your time with preparation steps like acclimation and subfloor leveling, as rushing these crucial stages is where most DIY projects go sideways.
Make sure you have the right tools before starting. Nothing kills momentum faster than having to run to the hardware store mid-installation. And perhaps most importantly, be patient with yourself as you learn. Your first few rows might take longer than expected, but you’ll pick up speed as you go.
“Laminate flooring installation is generally less expensive than installing hardwood or porcelain tile,” making it a fantastic option if you’re renovating on a budget. At Romero Hardwood Floors Inc., we often suggest that our Revere clients who want to try DIY installation start with a guest bedroom or small office before tackling larger, more visible spaces like your living room.
Laminate Floor Installation Tips: Do You Need Underlay?
In a word: yes! Skipping underlayment is like building a house without a foundation—technically possible but asking for trouble down the road.
Even when your laminate comes with attached padding (those spongy backing layers), additional underlayment provides crucial benefits that can dramatically extend the life of your beautiful new floors. Think of underlayment as a small investment that pays dividends in comfort and longevity.
First and foremost, proper underlayment provides moisture protection—absolutely essential when installing over concrete, which can slowly release moisture that destroys laminate from below. It also delivers impressive sound dampening properties, reducing that hollow clicking sound that can make laminate floors feel cheap in multi-story homes.
Beyond that, quality underlayment helps smooth minor subfloor imperfections that might otherwise create pressure points, provides thermal insulation for warmer feet in winter, and significantly extends your floor’s lifespan by reducing stress on those click-lock joints.
“Do yourself a favor and begin by removing the baseboards and any existing flooring before proceeding with anything else,” advises a flooring professional I’ve worked with for years. This extra step creates the space needed for proper underlayment installation.
The only scenario where you might possibly skip additional underlayment is when installing over an existing laminate or vinyl floor that’s perfectly flat, clean, and dry—and your new laminate already has an attached pad. Even then, I’d still recommend a vapor barrier over concrete for peace of mind.
How Much Does It Cost to Install Laminate Flooring?
When clients ask me about laminate flooring costs, I always explain that it’s a bit like asking “how much does a car cost?”—the range is wide depending on what you’re looking for. Based on industry averages (not Romero Hardwood Floors’ specific pricing), here’s what you might expect:
For materials, economy laminate typically runs $1-2 per square foot—perfect for rental properties or tight budgets. Mid-range laminate at $2-4 per square foot offers better visuals and durability, while premium laminate at $3-7 per square foot provides stunning realism and improved water resistance. Don’t forget to budget for underlayment ($0.30-$1 per square foot), vapor barriers ($0.15-$0.40 per square foot), and transition pieces ($1-5 per linear foot).
If you’re hiring professionals, installation costs vary significantly based on your location and project complexity. Basic installation might range from $2-8 per square foot, while complex installations involving stairs or intricate patterns can run $3-15 per square foot. Removing existing flooring adds another $1-4 per square foot, and significant subfloor preparation might add $2-6 per square foot to your total.
For perspective, a 1,000 square foot project might cost anywhere from $1,500-4,000 for DIY with basic materials, $5,000-13,000 for professional installation with mid-range materials, or $8,000-25,000 for premium installation with high-end materials.
“The cost ranges from $5,000 to $13,000 depending on the type of laminate, labor costs, underlayment, subfloor preparation, and additional services such as removal of old flooring,” according to industry sources.
Your final cost will be influenced by room complexity (more doorways and odd angles mean more cuts), subfloor condition (more prep equals higher cost), your region’s labor rates, and material quality. When you’re budgeting, I always recommend adding a 10-15% buffer for unexpected surprises—they have a way of showing up in every flooring project!
Note: These are average costs based on internet data and not actual costs for Romero Hardwood Floors Inc.
Conclusion
After all the measuring, cutting, clicking, and tapping, there’s nothing quite like stepping back and admiring your newly installed laminate floor. The change can be truly remarkable – from an outdated, worn surface to a fresh, modern space that feels entirely new. By following these laminate floor installation tips, you’ve given your home a beautiful upgrade that will serve you well for years to come.
Throughout this guide, we’ve covered the journey from preparation to finishing touches. The success of your laminate flooring project doesn’t happen by accident – it comes from attention to those critical details that make all the difference:
Proper preparation sets the foundation for everything that follows. Those 48 hours of acclimation might seem tedious when you’re eager to start, but they’re absolutely essential for preventing future headaches. Your subfloor preparation might not be visible in the finished product, but it silently supports every step you’ll take on that floor for years to come.
Following manufacturer guidelines isn’t just about maintaining warranty coverage – it’s about leveraging the expertise of companies that have engineered these products specifically for success in your home. Each laminate product has its own unique requirements and installation nuances.
Those expansion gaps might seem like wasted space now, but they’re actually your insurance policy against buckling and warping as seasons change. Your floor needs room to breathe and adjust to changing conditions.
Quality underlayment is never a place to cut corners. Think of it as the unsung hero of your installation – quietly providing moisture protection, sound dampening, and comfort underfoot day after day.
Taking your time during installation pays dividends in both appearance and performance. Those extra minutes spent ensuring tight seams and proper staggering translate to years of added durability and beauty.
At Romero Hardwood Floors Inc., we’ve been changing homes throughout Revere, MA and surrounding communities since 2006. We’ve seen how these principles directly impact both short-term satisfaction and long-term performance. The care taken during installation is directly reflected in how your floor looks and functions five, ten, or fifteen years down the road.
Whether you’ve tackled this project yourself or called in professionals, understanding these laminate floor installation tips empowers you to make informed decisions about your home. You now have the knowledge to maintain your beautiful new floor properly and recognize quality installation when you see it.
For homeowners in Beverly, Chelsea, Danvers, East Boston, Gloucester, Lynnfield, Malden, Manchester by the Sea, Marblehead, Medford, Melrose, Nahant, Peabody, Reading, Revere, Rockport, Salem, Saugus, Somerville, Stoneham, Swampscott, Wakefield, Winchester, Winthrop, Woburn, and surrounding Massachusetts communities – we’re here to help with your next flooring project. Our experienced team brings craftsmanship and attention to detail to every installation.
More info about Laminate Flooring Installation Services
