Affordable Laminate Flooring Installation: 5 Easy Steps
Why Laminate Flooring Is a Budget-Friendly Choice
Affordable laminate flooring installation combines elegance with practicality for homeowners seeking to update their spaces without breaking the bank. If you’re looking for a quick answer about laminate flooring costs:
| Cost Component | Average Price Range |
|---|---|
| Materials | $1 to $4 per square foot |
| Professional Labor | $2 to $8 per square foot |
| DIY Installation | Save 30-50% on total project cost |
| Total Project (1000 sq ft) | $3,000 to $12,000 |
Laminate flooring has become increasingly popular among homeowners looking for the aesthetic appeal of hardwood without the hefty price tag. This durable, versatile option mimics the look of natural materials while offering significant cost advantages and easier installation.
For many budget-conscious homeowners, laminate flooring presents the perfect balance of affordability and style. With technological advancements in manufacturing, today’s laminate options can convincingly replicate the look of expensive hardwood, stone, or tile at a fraction of the cost.
What makes laminate particularly attractive for those watching their budget is not just the lower material costs, but also the potential for DIY installation. With most modern laminate products featuring a floating floor design with click-and-lock installation systems, many homeowners can tackle this project themselves, eliminating labor costs entirely.
I’m Francisco Romero, owner of Romero Hardwood Floors Inc., and with over 15 years of experience in the flooring industry, I’ve guided countless clients through affordable laminate flooring installation projects that transformed their spaces while respecting their budgets.
Important Affordable laminate flooring installation terms:
– Laminate floor installation tips
– Professional laminate floor installers
– Laminate floor repair specialists
For more general information about laminate flooring types and manufacturing processes, you can visit the North American Laminate Flooring Association website.
Understanding the Benefits of Laminate Flooring
Have you ever walked into a home with gorgeous wood floors and thought, “I wish I could afford that”? Well, I have good news! Laminate flooring offers the beauty you crave at a price that won’t empty your wallet. Let me walk you through why so many of my clients at Romero Hardwood Floors fall in love with this practical yet stylish option.
Durability That Stands the Test of Time
Life happens – kids spill juice, dogs scratch with their nails, furniture gets dragged across the floor. That’s why I love recommending laminate to busy families. Modern laminate flooring is like the superhero of flooring options, with its multiple protective layers including a tough high-density fiberboard core and a wear-resistant top layer.
With proper care, quality laminate can be your faithful companion for 10 to 25 years. Many of my clients are genuinely shocked when I show them laminate floors we installed years ago that still look fantastic.
“Laminate flooring combines beauty, sophistication, and practicality in one simple solution,” is something our installation team at Romero Hardwood Floors often tells hesitant customers. “Many of our clients are surprised by how well it holds up, even in homes with active children and pets.”
When shopping for laminate, pay attention to the Abrasion Class (AC) rating. For most homes, I recommend products rated AC3 to AC5 – the higher the number, the better it resists scratches, fading, and daily wear and tear.
Affordability Without Compromise
Let’s talk dollars and cents – after all, that’s often what brings people to consider affordable laminate flooring installation in the first place. Check out how laminate compares to other popular flooring options:
| Flooring Type | Material Cost (per sq ft) | Installation Cost (per sq ft) | Total Average Cost (per sq ft) |
|---|---|---|---|
| Laminate | $1 – $4 | $2 – $8 | $3 – $12 |
| Hardwood | $6 – $12 | $3 – $10 | $9 – $22 |
| Vinyl | $2 – $7 | $2 – $5 | $4 – $12 |
| Tile | $5 – $10 | $4 – $12 | $9 – $22 |
| Carpet | $2 – $7 | $2 – $6 | $4 – $13 |
Note: These are average costs based on internet data and not actual costs for Romero Hardwood Floors.
The numbers speak for themselves. For a typical 1,000 square foot home, choosing laminate instead of hardwood could keep $6,000 to $10,000 in your pocket! That’s a family vacation, a home theater setup, or a healthy addition to your savings account.
Easy Maintenance for Busy Households
I’ll be honest – I’m not a fan of high-maintenance flooring, and I bet you aren’t either. One of the joys of laminate is how little fuss it requires. No refinishing. No special cleaners. No complicated care routines.
For most laminate floors, regular sweeping or vacuuming (with the beater bar turned off) and an occasional once-over with a slightly damp mop is all you need. This makes laminate particularly perfect for busy families with young children, pet owners who deal with muddy paws and accidents, time-strapped professionals who’d rather not spend weekends maintaining floors, and property owners looking for durable, low-maintenance options for their rentals.
Versatility in Design Options
“But does it actually look good?” This is a question I hear all the time, and I love seeing people’s faces when I show them modern laminate samples. Today’s options are truly impressive, with realistic wood grains, authentic-looking stone patterns, and textures you can actually feel.
Whether your style is rustic farmhouse, sleek contemporary, or classic traditional, there’s a laminate that matches your vision. From wide-plank oak looks to weathered barn wood styles, from marble-inspired elegance to industrial concrete aesthetics – the design possibilities have expanded dramatically in recent years.
Environmental Considerations
While laminate isn’t perfect from an environmental standpoint (few flooring options are), it does offer some green advantages worth considering. Modern laminate uses less hardwood than solid wood flooring, which helps conserve forest resources. Many manufacturers now incorporate recycled wood fibers into their products, and the longevity of laminate means you won’t be replacing it as frequently as some other options.
For health-conscious homeowners, I’m happy to point out that many manufacturers now offer low-VOC (volatile organic compound) laminate options, which contribute to better indoor air quality. Just ask, and I can help guide you toward these more eco-friendly choices.
At Romero Hardwood Floors, we’ve seen affordable laminate flooring installation transform homes across Revere and beyond. It’s not just about saving money – it’s about creating beautiful, practical spaces that stand up to real life while looking fantastic year after year.
Affordable Laminate Flooring Installation: A Step-by-Step Guide
Rolling up your sleeves and tackling affordable laminate flooring installation yourself can be incredibly rewarding—both for your home and your wallet. The math speaks for itself: DIY installation typically saves $2 to $8 per square foot compared to hiring professionals. On a 500-square-foot project, that’s up to $4,000 staying in your pocket!
As I often tell my clients at Romero Hardwood Floors Inc., “Today’s click-and-lock laminate systems were practically designed with DIYers in mind. With a little patience and the right guidance, your floors can look like they were professionally installed—because they were… by you!”
Let’s walk through how to transform your space with beautiful new laminate flooring without breaking the bank.
Preparing Your Space for an Affordable Laminate Flooring Installation
The secret to a successful laminate installation isn’t just in the installation itself—it’s in the preparation. Cutting corners here often leads to costly fixes later.
First, take a good look at your subfloor. Whether it’s concrete, plywood, or an existing floor, it needs to be clean as a whistle, bone dry, and level within 3/16 inch over a 10-foot span. Think of your subfloor as the foundation of your new floor—any imperfections below will eventually show up above.
For concrete floors, moisture is the enemy. I’ve seen beautiful laminate installations ruined by moisture seeping up from concrete. A simple moisture test kit from your local hardware store can save you significant heartache down the road.
If you’re working with existing floors, you’ve got options. Laminate can often go right over vinyl, tile, or hardwood, saving you the dusty, time-consuming demolition work. However, carpet (including that old padding and those pokey tack strips) always needs to come out first.
Acclimation is crucial but often overlooked. Those boxes of beautiful new laminate need to spend 48-72 hours in the room where they’ll be installed. This isn’t just manufacturer fussiness—wood-based products naturally expand and contract with temperature and humidity changes. Proper acclimation prevents buckling and gapping after installation. Simply stack the boxes flat in the room while maintaining normal living conditions.
Don’t forget about expansion gaps! Laminate flooring needs room to breathe—about 1/4 to 3/8 inch between the flooring and walls or fixed objects. These gaps will be hidden by baseboards later, so no worries about appearance. I’ve seen too many DIY projects go sideways because someone wanted that “perfect fit” against the wall, only to have the floor buckle during the first humid summer.
Underlayment might seem like an optional expense, but it’s actually essential unless your laminate comes with it attached. This thin foam layer provides moisture protection (especially important over concrete), reduces noise (your downstairs neighbors will thank you), adds comfort underfoot, and smooths out minor subfloor imperfections. At just $0.20 to $0.50 per square foot, it’s money well spent.
Essential Tools and Materials
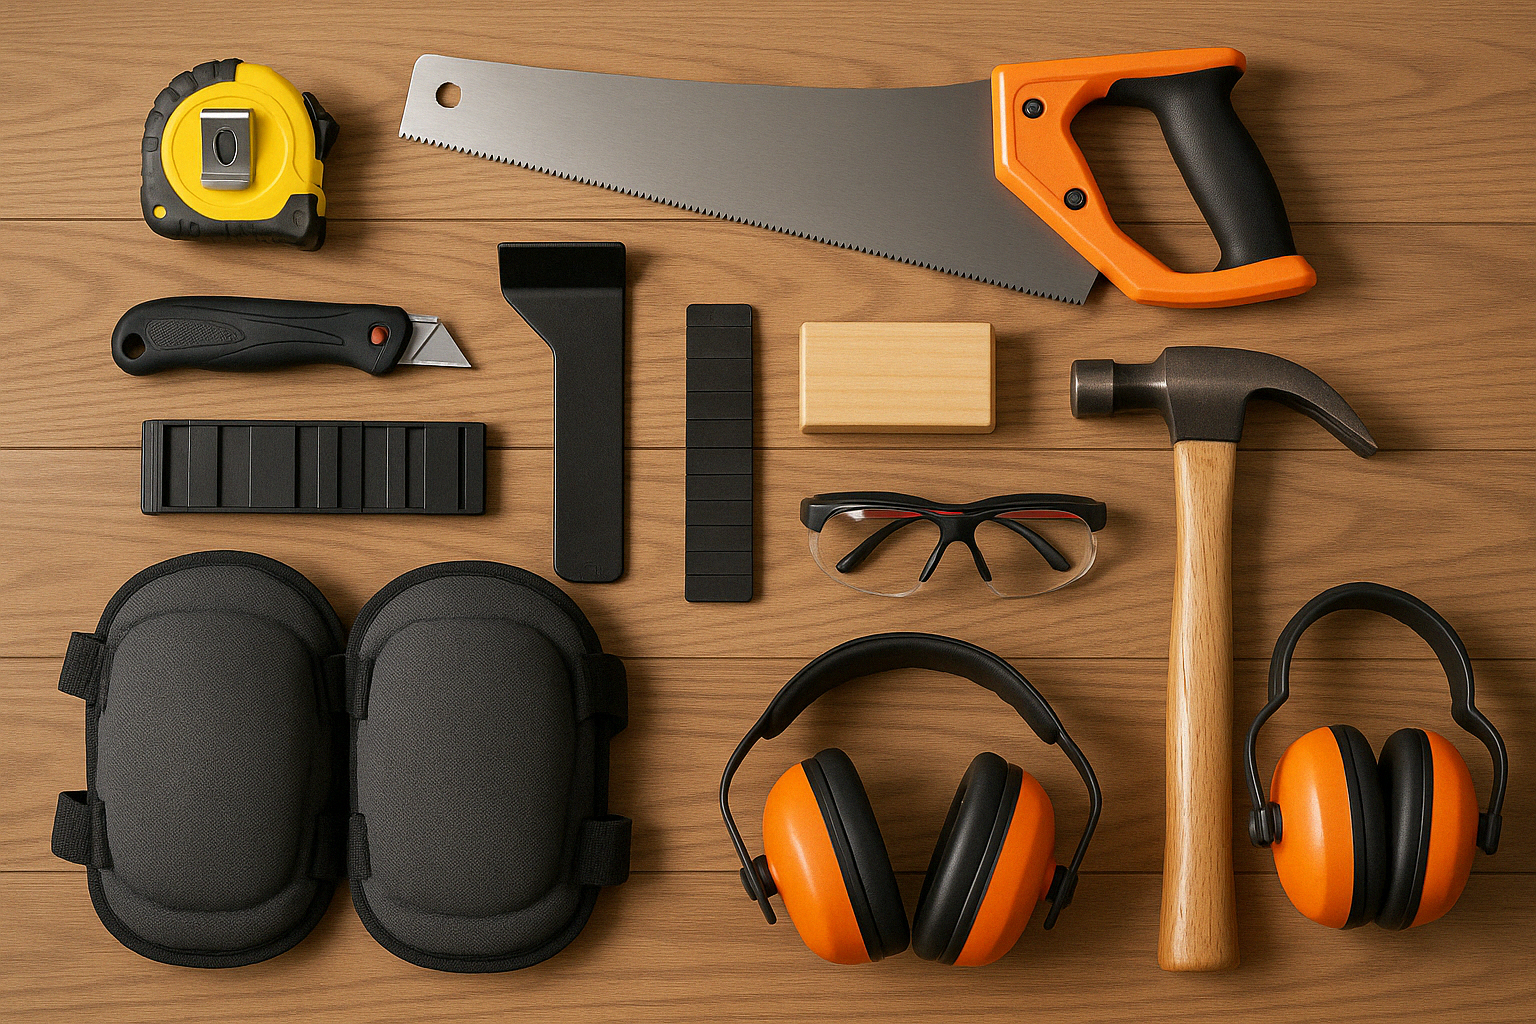
Having the right tools ready before you start will make your affordable laminate flooring installation go much more smoothly. Nothing halts progress like realizing you’re missing a critical tool halfway through the project!
For a basic installation, you’ll need a tape measure, pencil, chalk line, utility knife, saw (jigsaw, circular saw, or ideally a miter saw), pull bar, tapping block, spacers, hammer, and knee pads. Don’t forget safety equipment like glasses and ear protection when cutting.
Here’s a money-saving tip: for specialized tools like a miter saw that you might not use again soon, consider renting rather than buying. Most home improvement stores offer daily tool rentals at reasonable rates. Why spend $200 on a saw you’ll use for one weekend when you can rent one for $30?
For materials, you’ll need your laminate flooring (purchase about 10% extra to account for cuts and waste), underlayment (unless attached to your flooring), moisture barrier for concrete subfloors, transition strips for doorways, and baseboards or quarter round molding to cover those expansion gaps.
“When budgeting for your project, don’t forget these accessories,” I always remind my clients at Romero Hardwood Floors. “While the flooring is your biggest expense, these additional materials typically add about $0.50 to $1.50 per square foot to your project cost—but they’re absolutely essential for a professional-looking finish.”
Step-by-Step Guide to Affordable Laminate Flooring Installation
Now for the fun part—actually installing your new floor! With preparation complete and tools gathered, it’s time to transform your space.
For detailed installation instructions with helpful diagrams, you can also check out this DIY Network guide to installing laminate flooring.
1. Installing Underlayment
Start in one corner and roll out your underlayment along the longest wall. Use your utility knife to trim it to fit the room’s dimensions. For the next section, butt it against the first (don’t overlap) and seal the seam with vapor tape. Continue until your entire floor is covered.
This step creates a smooth, consistent base for your laminate. As we say at Romero Hardwood Floors, “The quality of what’s underneath determines the quality of what’s on top.”
2. Planning Your Layout
Before laying a single plank, take time to plan. Laminate typically looks best running parallel to the longest wall or in the same direction as your main light source. Plan for at least a 12-inch stagger between end joints in adjacent rows—this provides structural stability and looks much more natural than aligned seams.
I also recommend calculating the width of your first and last rows before starting. Ideally, they should be approximately the same width, and neither should be less than 2 inches wide. If your calculations show a very narrow last row, save yourself future headaches by cutting the first row narrower to compensate.
3. Installing the First Row
For the first row, you’ll need to remove the tongue (the protruding part of the click-lock system) on the side facing the wall. Place spacers between the wall and where your first row will go to maintain that crucial expansion gap.
Place your first plank in the corner with the trimmed side facing the wall. For the second plank, insert its end at an angle into the first, then fold down to lock them together. Continue adding planks until you reach the end of the row, then measure and cut the final piece (remembering that expansion gap at the end).
4. Installing Subsequent Rows
If the cut piece from the previous row is at least 12 inches long, use it to start the next row. This creates that attractive staggered pattern. Insert the long side of the plank at a 30-degree angle into the previous row, then fold down to lock it in place.
Use your tapping block and hammer to ensure the planks are fully connected, but be gentle—damaged locking mechanisms can compromise your entire floor. Continue this pattern, connecting both long and short sides of each plank.
I recommend checking alignment every few rows. Step back and make sure your rows remain straight and parallel to the wall. Small deviations can compound quickly, and it’s much easier to make minor adjustments early than major fixes later.
5. Cutting Around Obstacles
Doorways, cabinets, and other obstacles require special attention. For complex cuts, I find creating a paper template first saves a lot of wasted material. Carefully measure and mark your plank, then use the appropriate tools—a jigsaw works well for curved cuts, while a miter saw is best for straight cuts.
For door casings, use a handsaw to undercut the jamb so your flooring can slide underneath for a clean, professional look. And remember to maintain those expansion gaps around all fixed objects!
6. Installing the Final Row
The last row usually needs to be cut lengthwise to fit. Measure carefully and cut your planks, accounting for the expansion gap. Since there won’t be room to angle the last row, use your pull bar to click the pieces into place.
7. Finishing Touches
Install transition strips at doorways or where your laminate meets other flooring types. Replace baseboards or install quarter round molding to cover those expansion gaps while still allowing for floor movement. If you removed baseboards during installation, a little caulk where they meet the walls creates a seamless look.
Finally, give your beautiful new floor a thorough cleaning according to the manufacturer’s recommendations.
“The beauty of laminate’s click-lock system,” as we often tell our clients at Romero Hardwood Floors, “is that there’s a rhythm to it. The first few planks might take some time, but once you get the hang of it, you’ll find yourself moving quickly. Most homeowners can complete a standard room in a weekend, even as first-time installers.”
With these steps, you’re well on your way to enjoying beautiful new floors that will have friends asking which professional company you hired—a secret you can keep or share as you bask in the pride of a job well done!
Cost-Saving Tips for Installing Laminate Flooring
When it comes to affordable laminate flooring installation, there’s good news – you can create a beautiful space without emptying your wallet. At Romero Hardwood Floors, we’ve helped countless homeowners maximize their budgets while still achieving stunning results. Let me share some of our best money-saving strategies that don’t cut corners on quality.
Strategic Shopping for Materials
Finding the right materials at the right price makes a significant difference in your overall project cost. Think of shopping for flooring like buying a new appliance – timing and strategy matter!
Bulk Purchasing
One of the simplest ways to save money is buying in larger quantities. When you purchase more laminate flooring at once, suppliers often reward you with better pricing. I’ve seen customers save 10-15% just by increasing their order size.
If you’re planning to install flooring in multiple rooms, consider doing the entire project at once rather than room by room. Not only will you likely qualify for volume discounts, but you’ll also ensure consistent coloring and pattern matching throughout your home.
Some of our more creative clients at Romero Hardwood Floors have even partnered with neighbors or family members who are also planning flooring projects. By combining orders, everyone benefits from bulk pricing while maintaining their individual design choices.
Seasonal Discounts and Sales
Just like buying winter coats in summer, timing your flooring purchase can lead to substantial savings. The flooring industry has predictable sales cycles that savvy homeowners can leverage:
January tends to be an excellent time to buy, as retailers clear out inventory after the holiday season. I’ve seen discounts reach 30% during these clearance events. The ends of quarters (March, June, September, and December) often feature special promotions as retailers work to meet sales targets.
Don’t overlook major holiday weekends like Memorial Day, Labor Day, and Black Friday. These traditional shopping holidays typically include significant flooring discounts that can make a real difference in your budget.
Sample Before You Commit
Before making any final decisions, always request samples of your preferred laminate options. This small step serves double duty – you’ll confirm the flooring looks good in your actual space under your lighting conditions, and you’ll have physical samples to compare pricing between different retailers.
Most suppliers charge a nominal fee for samples (typically $5-10 each), but many will credit this amount back if you ultimately purchase from them. It’s a small investment that can prevent expensive mistakes and help you find the best deal.
DIY vs. Professional Installation: Making the Right Choice
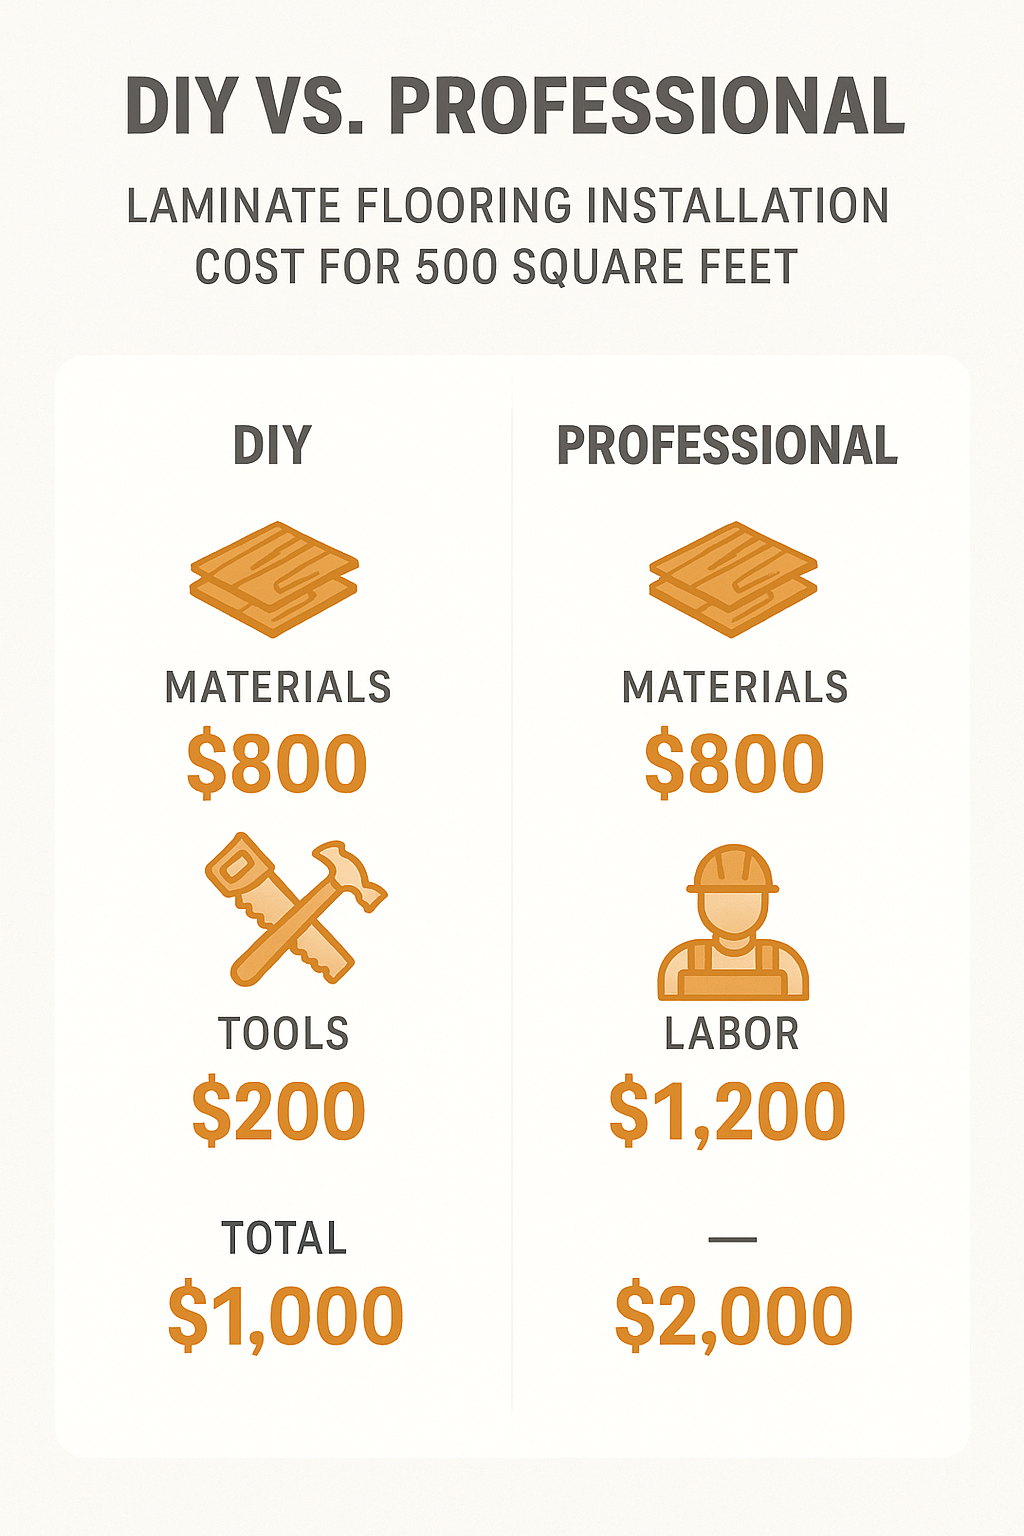
The labor portion of flooring installation typically costs between $2 and $8 per square foot. For a modest 500-square-foot area, handling the installation yourself could save $1,000 to $4,000 – a significant chunk of your budget.
“DIY installation can save a significant amount on labor costs, with floating floors that click and lock into place.” This is especially true with modern laminate systems designed with homeowners in mind.
However, DIY isn’t the right choice for everyone. Consider these factors when deciding:
DIY makes the most sense when you have basic tool skills, are working with straightforward rectangular rooms, have time to dedicate to the project, and your subfloor is in relatively good condition.
Professional installation might be worth the investment when dealing with complex layouts (think rooms with islands or unusual angles), subfloor issues that require extensive prep work, tight timelines, or if you have physical limitations that make kneeling and lifting difficult.
At Romero Hardwood Floors, we’ve rescued more than a few DIY projects that hit unexpected challenges. If you’re on the fence, remember we offer both full installation services and consultation options for DIYers who want professional guidance at key points in their project.
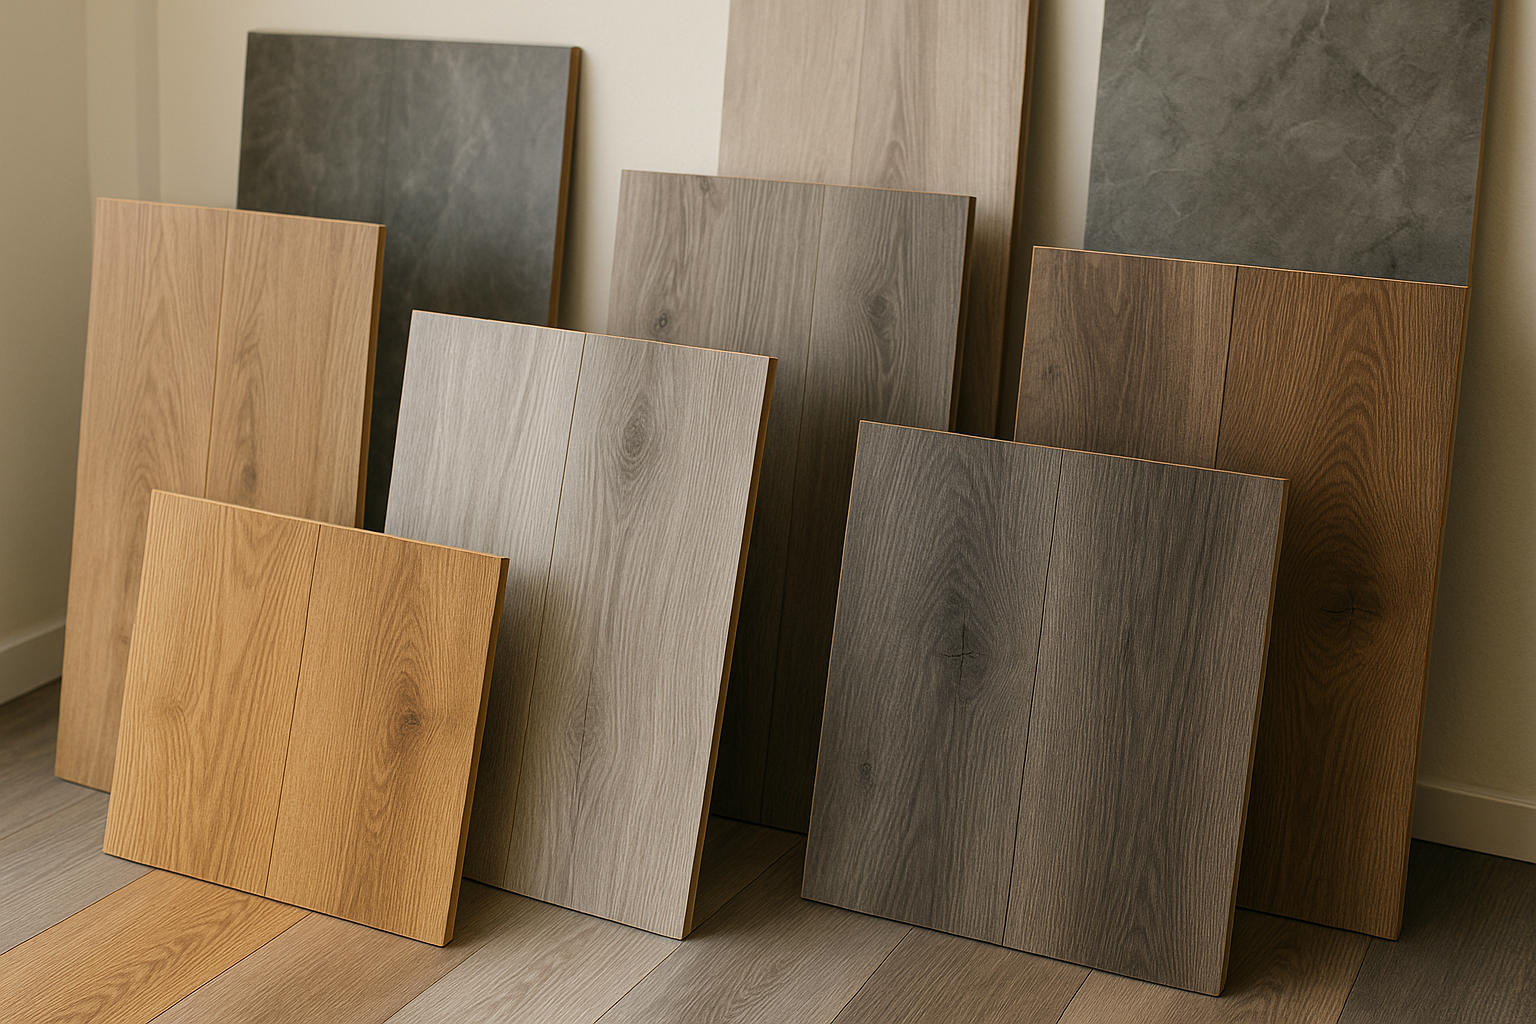
Smart Material Choices
Being strategic about which laminate you choose can significantly impact your bottom line without sacrificing quality.
Thickness Considerations
Laminate thickness ranges from 6mm to 12mm, with prices that correspond to these differences. Thinner options (6-7mm) typically cost between $0.69-$0.99 per square foot and work well in bedrooms or other low-traffic areas. Mid-range options (8-9mm) run about $1.19-$1.99 per square foot and handle moderate traffic admirably. Premium thick laminates (10-12mm) cost $2.29-$5.99 per square foot and offer superior durability and sound insulation for high-traffic areas.
You don’t need to choose the same thickness throughout your home. Many of our clients use premium laminate in their entryways and living rooms while selecting more budget-friendly options for bedrooms and less-used spaces. This targeted approach maximizes both performance and savings.
Consider Closeouts and Discontinued Lines
Flooring retailers regularly update their inventory, creating opportunities for savvy shoppers. When manufacturers discontinue certain patterns or lines, retailers often discount these products by 40-60% to make room for new inventory.
These closeout deals offer exceptional value since the product quality is identical to current offerings – only the pattern is being phased out. The key is purchasing enough extra material (typically 15-20% more than your measured area) to account for both installation waste and potential future repairs, as finding matching replacements later may be impossible.

I recently helped a customer save over $1,200 on their 800-square-foot project by selecting a discontinued premium laminate line. The flooring was gorgeous, durable, and came with the same warranty as current products – the only difference was the significant discount.
By combining these strategic approaches – smart shopping, making the right installation choice for your situation, and selecting materials wisely – you can achieve a beautiful laminate floor while keeping your project firmly within budget. At Romero Hardwood Floors, we’re always happy to help you steer these options to find the perfect balance between cost and quality for your affordable laminate flooring installation.
Cost-Saving Tips for Installing Laminate Flooring
When it comes to affordable laminate flooring installation, there’s good news – you can create a beautiful space without emptying your wallet. At Romero Hardwood Floors, we’ve helped countless homeowners maximize their budgets while still achieving stunning results. Let me share some of our best money-saving strategies that don’t cut corners on quality.
Strategic Shopping for Materials
Finding the right materials at the right price makes a significant difference in your overall project cost. Think of shopping for flooring like buying a new appliance – timing and strategy matter!
Bulk Purchasing
One of the simplest ways to save money is buying in larger quantities. When you purchase more laminate flooring at once, suppliers often reward you with better pricing. I’ve seen customers save 10-15% just by increasing their order size.
If you’re planning to install flooring in multiple rooms, consider doing the entire project at once rather than room by room. Not only will you likely qualify for volume discounts, but you’ll also ensure consistent coloring and pattern matching throughout your home.
Some of our more creative clients at Romero Hardwood Floors have even partnered with neighbors or family members who are also planning flooring projects. By combining orders, everyone benefits from bulk pricing while maintaining their individual design choices.
Seasonal Discounts and Sales
Just like buying winter coats in summer, timing your flooring purchase can lead to substantial savings. The flooring industry has predictable sales cycles that savvy homeowners can leverage:
January tends to be an excellent time to buy, as retailers clear out inventory after the holiday season. I’ve seen discounts reach 30% during these clearance events. The ends of quarters (March, June, September, and December) often feature special promotions as retailers work to meet sales targets.
Don’t overlook major holiday weekends like Memorial Day, Labor Day, and Black Friday. These traditional shopping holidays typically include significant flooring discounts that can make a real difference in your budget.
For more tips on finding the best deals on flooring materials, check out this helpful Consumer Reports guide on how to save money on flooring.
Sample Before You Commit
Before making any final decisions, always request samples of your preferred laminate options. This small step serves double duty – you’ll confirm the flooring looks good in your actual space under your lighting conditions, and you’ll have physical samples to compare pricing between different retailers.
Most suppliers charge a nominal fee for samples (typically $5-10 each), but many will credit this amount back if you ultimately purchase from them. It’s a small investment that can prevent expensive mistakes and help you find the best deal.
DIY vs. Professional Installation: Making the Right Choice
The labor portion of flooring installation typically costs between $2 and $8 per square foot. For a modest 500-square-foot area, handling the installation yourself could save $1,000 to $4,000 – a significant chunk of your budget.
“DIY installation can save a significant amount on labor costs, with floating floors that click and lock into place.” This is especially true with modern laminate systems designed with homeowners in mind.
However, DIY isn’t the right choice for everyone. Consider these factors when deciding:
DIY makes the most sense when you have basic tool skills, are working with straightforward rectangular rooms, have time to dedicate to the project, and your subfloor is in relatively good condition.
Professional installation might be worth the investment when dealing with complex layouts (think rooms with islands or unusual angles), subfloor issues that require extensive prep work, tight timelines, or if you have physical limitations that make kneeling and lifting difficult.
At Romero Hardwood Floors, we’ve rescued more than a few DIY projects that hit unexpected challenges. If you’re on the fence, remember we offer both full installation services and consultation options for DIYers who want professional guidance at key points in their project.
Smart Material Choices
Being strategic about which laminate you choose can significantly impact your bottom line without sacrificing quality.
Thickness Considerations
Laminate thickness ranges from 6mm to 12mm, with prices that correspond to these differences. Thinner options (6-7mm) typically cost between $0.69-$0.99 per square foot and work well in bedrooms or other low-traffic areas. Mid-range options (8-9mm) run about $1.19-$1.99 per square foot and handle moderate traffic admirably. Premium thick laminates (10-12mm) cost $2.29-$5.99 per square foot and offer superior durability and sound insulation for high-traffic areas.
You don’t need to choose the same thickness throughout your home. Many of our clients use premium laminate in their entryways and living rooms while selecting more budget-friendly options for bedrooms and less-used spaces. This targeted approach maximizes both performance and savings.
Consider Closeouts and Discontinued Lines
Flooring retailers regularly update their inventory, creating opportunities for savvy shoppers. When manufacturers discontinue certain patterns or lines, retailers often discount these products by 40-60% to make room for new inventory.
These closeout deals offer exceptional value since the product quality is identical to current offerings – only the pattern is being phased out. The key is purchasing enough extra material (typically 15-20% more than your measured area) to account for both installation waste and potential future repairs, as finding matching replacements later may be impossible.
I recently helped a customer save over $1,200 on their 800-square-foot project by selecting a discontinued premium laminate line. The flooring was gorgeous, durable, and came with the same warranty as current products – the only difference was the significant discount.
By combining these strategic approaches – smart shopping, making the right installation choice for your situation, and selecting materials wisely – you can achieve a beautiful laminate floor while keeping your project firmly within budget. At Romero Hardwood Floors, we’re always happy to help you steer these options to find the perfect balance between cost and quality for your affordable laminate flooring installation.
Frequently Asked Questions about Affordable Laminate Flooring Installation
Let’s tackle some of the most common questions I hear from homeowners considering affordable laminate flooring installation. After helping hundreds of customers through this process at Romero Hardwood Floors, I’ve found these answers can help you make informed decisions about your flooring project.
What is the average cost for labor to install laminate flooring?
When budgeting for your laminate project, labor costs typically range from $2 to $8 per square foot. This wide range exists because several factors influence the final price:
Labor costs tend to be higher in metropolitan areas like Boston compared to rural locations. The complexity of your space matters too—a simple rectangular room will cost less than a space with islands, multiple doorways, or intricate cuts around built-ins.
“I always tell customers to consider what’s happening beneath their floors,” I often share during consultations. “If your subfloor needs significant leveling or repair, this can add to your labor costs considerably.”
Removing existing flooring is another consideration that many homeowners overlook. If we need to tear out old carpet, tile, or hardwood, you’ll typically pay an additional $1 to $2 per square foot for removal and disposal.
For a standard 250-square-foot living room with minimal preparation needed, professional installation might cost between $500 and $2,000. At Romero Hardwood Floors, we provide detailed quotes that break down all labor components so you know exactly what you’re paying for—no surprises on installation day.
Can I install laminate flooring myself to save money?
Absolutely! DIY installation is one of the most effective ways to reduce your project costs. With modern click-lock systems, laminate is one of the most DIY-friendly flooring options available.
Many of our customers successfully install their own laminate flooring, especially in straightforward rooms. You can save that entire $2 to $8 per square foot in labor costs—which adds up quickly in larger spaces.
Before grabbing your tools, though, consider whether DIY installation aligns with your skills and situation. Time investment can be substantial for first-timers. What might take our professional team a day could require an entire weekend for someone new to flooring installation. Tool requirements matter too—if you don’t already own a miter saw, jigsaw, and other specialized tools, the rental or purchase costs will eat into your savings.
“If you’re on the fence about DIY installation, start small,” I always suggest. “A guest bedroom or home office makes a perfect practice space before tackling your main living areas.”
For homeowners who want a middle ground, we offer consultation services where we can provide advice on preparation, material selection, and installation techniques without handling the entire project. It’s a great way to gain confidence while still saving on labor costs.
How does laminate flooring compare to other flooring options in terms of cost and durability?
Laminate flooring occupies a sweet spot in the flooring world—offering impressive durability at a price point that’s accessible for most homeowners. Let me break down how it compares to other popular options:
When comparing with hardwood flooring, laminate typically costs 50-75% less for materials and installation. While hardwood can last generations with proper refinishing, quality laminate can provide 10-25 years of service at a significantly lower price point. For busy households with children and pets, laminate’s superior scratch resistance can actually make it more practical than natural wood.
Against vinyl flooring, laminate generally offers a more realistic wood appearance and a more rigid, substantial feel underfoot. Vinyl wins for moisture resistance, making it better for bathrooms and basements, while laminate excels in living spaces and bedrooms where its realistic wood appearance shines.
Compared to tile, laminate is much warmer underfoot and significantly easier to install, especially for DIYers. While tile may last longer (30+ years versus 10-25 for laminate), the installation costs are typically much higher, often $4 to $12 per square foot for professional tile setting.
Carpet offers similar initial pricing to laminate but typically needs replacement much sooner (5-15 years) and requires more frequent cleaning and maintenance.
“What impresses me about today’s laminate products is how they’ve improved in moisture resistance,” I often tell customers touring our showroom. “While standard laminate handles occasional spills well if promptly cleaned, the newer waterproof laminate options provide even better protection for busy households.”
For most homes with normal wear and tear, quality laminate flooring will look great for 15-20 years with minimal maintenance requirements—a compelling value proposition compared to more expensive alternatives.
How soon can I walk on newly installed laminate flooring?
One of the biggest advantages of affordable laminate flooring installation is the immediate usability. Unlike hardwood that needs finishing or tile that requires grout curing time, you can walk on your new laminate floor right away.
That said, I recommend a bit of caution during the first few days. Light foot traffic is fine immediately, but wait about 24 hours before moving furniture back onto the floor. For heavy pieces like entertainment centers or pianos, give it 48 hours and use furniture pads to prevent damage to your new floors.
Hold off on placing area rugs for about 72 hours. This allows the floor to fully settle and adjust to your home’s temperature and humidity conditions.
“The quick completion time is why many of our clients choose laminate for busy households,” I explain to customers. “You can literally have us install new floors in your living room in the morning and host dinner guests that same evening.”
What maintenance is required for laminate flooring?
Low maintenance is one of laminate’s strongest selling points, and it contributes significantly to the overall value proposition of affordable laminate flooring installation.
Daily care is simple—just sweep or vacuum with a soft brush attachment to remove the grit and debris that can scratch your floors over time. For deeper cleaning, a barely damp microfiber mop with a manufacturer-approved cleaner is all you need. This should be done weekly in high-traffic areas and monthly in less-used spaces.
Avoid common cleaning mistakes that can damage laminate. Steam cleaners, wet mops, and harsh chemicals are all no-nos that can void your warranty and damage your floors. Similarly, avoid oil-based polishes or cleaners that leave behind residue.
“Prevention is the best maintenance strategy,” I remind our customers. Use felt pads under furniture legs, place mats at entrances to catch dirt before it reaches your floors, and trim pet nails regularly to prevent scratches.
The beauty of laminate is that, unlike hardwood, it never needs sanding, refinishing, or waxing. This makes it not only affordable to install but economical to maintain throughout its lifetime.
Can laminate flooring be installed in bathrooms and kitchens?
This is perhaps the most common question I receive about laminate flooring. The answer has evolved significantly in recent years as manufacturing technology has improved.
Traditional laminate flooring isn’t ideal for high-moisture environments due to its wood-based core, which can swell when exposed to prolonged moisture. However, kitchens generally work fine with standard laminate as long as you’re diligent about wiping up spills promptly and placing mats near sinks and dishwashers.
For bathrooms, I strongly recommend choosing products specifically labeled as waterproof laminate—not just water-resistant. These specialized products feature improved core materials and improved sealing systems that prevent moisture penetration. While they typically cost $1-$2 more per square foot than standard laminate, the peace of mind is well worth the investment.
“Installation technique is just as important as product selection in moisture-prone areas,” I emphasize to customers considering bathroom installation. Our professional installers take extra precautions in these spaces, including:
- Careful sealing around toilets, tubs, and other fixtures
- Using silicone caulk at the perimeter
- Installing toilets on top of the flooring rather than cutting around them
- Ensuring proper expansion gaps are maintained
With the right product and proper installation, today’s advanced laminate options can perform beautifully even in challenging spaces like bathrooms and kitchens.
Conclusion
Affordable laminate flooring installation truly stands as one of today’s best home improvement values. When you combine the reasonable material costs with the option for DIY installation, you can achieve that high-end look you’ve been dreaming of without emptying your wallet.
Throughout this guide, we’ve explored the many benefits that make laminate flooring such a popular choice among homeowners. The cost-effectiveness is undeniable—with materials ranging from $1-$4 per square foot and the potential to save significantly through DIY installation, you’re getting exceptional bang for your buck. The durability factor can’t be overlooked either, as quality laminate can withstand the challenges of busy households for 10-25 years while requiring minimal maintenance.
The versatility of today’s laminate options might be what surprises most homeowners. Gone are the days of obviously fake-looking floors—modern manufacturing techniques create stunning replicas of hardwood, stone, and tile that can complement virtually any design vision you have. And let’s not forget the DIY-friendly installation systems that make this flooring accessible even to those with basic skills and tools. That satisfying “click” as pieces lock together is music to the ears of budget-conscious homeowners everywhere!
“We’ve seen clients transform entire homes with laminate flooring, room by room, as their budgets allow,” shares Francisco Romero, owner of Romero Hardwood Floors Inc. “The results are often so impressive that visitors can’t tell the difference between their laminate and real hardwood.”
We’ve also shared practical advice for making the most of your budget—from timing your purchases during major sales events to buying in bulk when possible. Choosing the appropriate thickness based on how each room is used can help you allocate your budget wisely. The decision between DIY and professional installation deserves careful consideration, weighing the potential savings against your comfort level and time constraints. And never underestimate the importance of proper subfloor preparation, which can prevent costly issues down the road.
At Romero Hardwood Floors Inc., we’ve guided countless Massachusetts homeowners through successful laminate flooring changes. Whether you decide to tackle the project yourself or prefer our professional installation services, we’re committed to helping you achieve beautiful results that respect your budget constraints.
While the upfront savings compared to hardwood or tile are significant, we always advise choosing quality products and proper installation techniques. The lowest-priced option isn’t always the most economical long-term investment—a slightly higher quality laminate that lasts 20 years proves far more valuable than a budget option requiring replacement after 5 years.
“We believe everyone deserves beautiful floors,” says Francisco Romero. “Laminate makes that possible for virtually any budget level, and we take pride in helping our clients make smart decisions that balance immediate costs with long-term satisfaction.”
Ready to transform your space with affordable laminate flooring installation? Contact Romero Hardwood Floors Inc. today for a free consultation. We proudly serve communities throughout Massachusetts, including Beverly, Chelsea, Danvers, East Boston, Gloucester, and beyond. Our friendly team is ready to help you explore options, provide accurate cost estimates, and ensure your flooring project becomes a source of pride for years to come.
More info about Laminate Flooring Installation