Installing Floating Engineered Hardwood Floors on Concrete Slab: 10 Powerful Reasons in 2025
Transform Your Concrete Slab with Floating Engineered Hardwood
Installing floating engineered hardwood floors on concrete slab transforms cold, uninviting spaces into warm, beautiful rooms your family will love. The process is straightforward, though attention to detail matters tremendously for long-lasting results.
Here’s what the installation journey looks like: First, you’ll need to test your concrete for moisture (aiming for levels at or below 12% moisture content). Then thoroughly clean and level your concrete surface, ensuring it’s within 1/8″ of level over any 8-10 foot span. Next comes the crucial moisture barrier – a 6-mil polyethylene sheet that prevents vapor from migrating up into your beautiful new floor. After rolling out and carefully taping your underlayment seams, you’ll need to let your flooring acclimate to your home’s conditions for 48-72 hours. When installing, maintain a 5/16″ expansion gap around the perimeter, stagger end joints by at least 6 inches, and finally add trim and transitions (always attached to walls, never to the flooring itself).
I’ve seen the magic that happens when homeowners replace their cold, gray concrete with the rich, natural warmth of wood. Unlike traditional solid hardwood, engineered hardwood floors are specifically designed to perform beautifully over concrete. Their multi-layer construction provides exceptional dimensional stability, making them resistant to the moisture and temperature fluctuations that would wreak havoc on solid wood planks.
The beauty of the floating installation method is in its simplicity. Rather than being permanently attached to the subfloor with nails or glue, the planks connect to each other through either tongue-and-groove connections (sometimes with a thin bead of glue) or modern click-lock systems. This creates a unified surface that “floats” above the concrete, allowing natural expansion and contraction without stress or buckling.
As a bonus, floating floors are perfect for DIY enthusiasts since they don’t require specialized tools like flooring nailers or messy adhesives. And if you ever need to make changes down the road, floating floors can be disassembled and reinstalled elsewhere – something impossible with traditional installation methods.
I’m Francisco Romero, owner of Romero Hardwood Floors Inc., and after installing countless floating engineered hardwood floors on concrete slabs throughout Massachusetts over the past 15+ years, I’ve seen how this flooring solution transforms basements and concrete-slab living areas into gorgeous, comfortable spaces that families enjoy for years to come.

If you’re exploring concrete flooring solutions, you might also find these related topics helpful:
– gluing solid hardwood floors to concrete
– heated hardwood floors on concrete
– installing hardwood floors on concrete slab
The change from cold concrete to beautiful wood flooring isn’t just about aesthetics – it’s about creating a home that feels welcoming underfoot. With proper installation, your floating engineered hardwood floor will provide decades of beauty and comfort, even in spaces where traditional hardwood wouldn’t be suitable.
What Is a Floating Engineered Hardwood Floor?
Picture this: a beautiful wood floor that simply rests on your concrete slab without being permanently attached to it. That’s the essence of a floating engineered hardwood floor. Unlike traditional installation methods, these floors connect to each other through interlocking edges, creating a unified surface that “floats” above your concrete subfloor.
Engineered hardwood is a clever sandwich of materials – a genuine hardwood veneer on top (giving you that authentic wood look and feel) bonded to several layers of high-quality plywood or high-density fiberboard underneath. This smart construction creates remarkable stability, allowing your floor to adapt to Massachusetts’ seasonal changes without the dramatic expanding and shrinking that solid hardwood experiences.
“I always tell my clients that engineered hardwood isn’t waterproof, but it’s definitely more forgiving with moisture than solid wood,” says Francisco Romero, owner of Romero Hardwood Floors. “That’s why it’s my go-to recommendation for concrete slab installations, where moisture is always something we need to plan for.”
When installing floating engineered hardwood floors on concrete slab, you’ll typically encounter one of two connection systems:
- Tongue-and-groove: These planks feature a protruding “tongue” on one edge that fits into a corresponding “groove” on the next plank. During installation, we apply wood glue to the groove before sliding the tongue in, creating a secure bond between planks.
- Click-lock: This more modern system features specially designed edges that snap together without glue, creating a tight mechanical connection that’s particularly DIY-friendly.
Want to understand if engineered is right for your home? Check out our detailed comparison of Engineered vs Solid Hardwood to help make your decision.
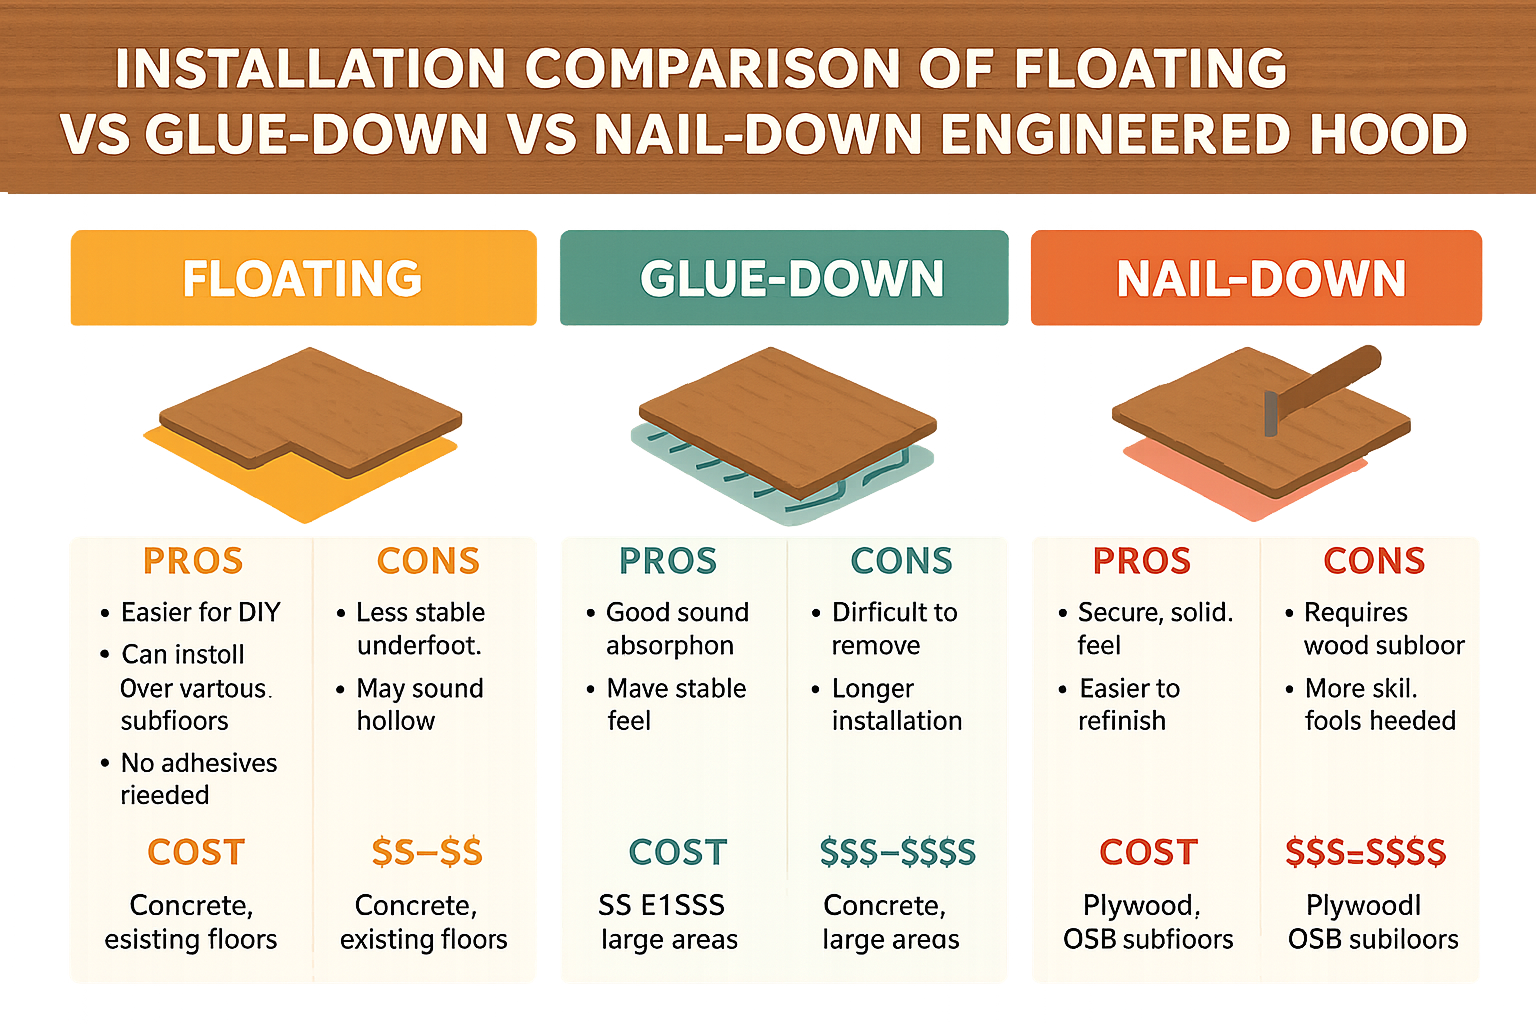
How Floating Differs from Glue-Down & Nail-Down
When considering installing floating engineered hardwood floors on concrete slab, the differences between installation methods become important for both practical and aesthetic reasons.
Installation Speed: Floating floors are the sprinters of hardwood installation. Without the need to apply adhesive or drive fasteners, we can typically complete a standard room in 8-10 hours, compared to the 1-2 days needed for other methods. This means less disruption to your daily life and faster enjoyment of your new floors.
Removability: One huge advantage I’ve seen benefit many homeowners is the non-permanent nature of floating floors. If you ever need to access the subfloor or decide to change your flooring down the road, floating floors can be disassembled without damaging your concrete.
I remember helping a family in Revere after their basement experienced minor flooding. Because they had a floating engineered floor, we were able to remove the affected planks, thoroughly dry everything, and reinstall the same flooring—something that would have been impossible with a glue-down installation.
Sound Characteristics: Let’s be honest—floating floors do have a slightly more hollow sound underfoot compared to glue-down installations. The underlayment helps minimize this, but there is a subtle acoustic difference that some homeowners notice. If you’re particularly sensitive to sound, this is something to consider.
Subfloor Impact: Unlike nail-down methods that require a wooden subfloor, or glue-down installations that permanently bond to concrete, floating floors leave minimal impact on your concrete slab. This makes them ideal for rental properties or spaces where you might want future flexibility.
Why Choose Floating Floors on a Concrete Slab?
Concrete slabs can be tricky when it comes to flooring options. If you’ve ever walked barefoot on concrete, you know it’s cold, hard, and not exactly cozy. Traditional solid hardwood typically needs a wooden subfloor for nailing, which raises your floor height and complicates the whole project. This is where floating engineered hardwood truly shines as an neat solution.
Below-Grade Friendly: One of the biggest advantages of engineered hardwood is that it can go where solid hardwood fears to tread—below grade in basements. Thanks to its layered construction, it stands up to the moisture and humidity challenges that would warp solid hardwood in these environments.
Moisture Tolerance: Concrete slabs are notorious for emitting moisture vapor, which can spell disaster for many flooring types. The multi-layer construction of engineered hardwood gives it remarkable dimensional stability when humidity fluctuates. It won’t expand and contract dramatically like solid wood would.
“We installed floating engineered hardwood in a Revere basement that had minor seasonal moisture issues,” shares Francisco Romero. “Three years later, it still looks perfect while maintaining that genuine hardwood warmth you just can’t get with vinyl or laminate.”
Radiant Heat Compatible: Love the idea of warm floors in winter? Many engineered hardwood products work beautifully over radiant heating systems embedded in concrete slabs. Your feet will thank you! For specific considerations about this cozy option, check out our guide to Heated Hardwood Floors on Concrete.
Minimal Tools Required: If you’re considering the DIY route, you’ll appreciate that floating installation requires fewer specialized tools than nail-down or glue-down methods. No need for pneumatic nailers or trowels—just some basic tools will get you going.
Slab Flatness Flexibility: While you’ll still need a relatively flat surface (within 3/16″ over 10 feet), floating floors can sometimes bridge minor imperfections better than glue-down installations, which show every bump and dip. This gives you a bit more forgiveness if your slab isn’t perfectly level.
Perfect for Basement Remodels: Throughout our Massachusetts service area, we’ve transformed countless chilly basement concrete floors into beautiful, inviting living spaces. “The before-and-after difference is night and day,” our installation team often remarks. “Clients can’t believe it’s the same space once we’ve finished installing floating engineered hardwood floors on concrete slab.”
Advantages & Drawbacks
Before you commit to this flooring solution, it’s worth weighing the pros and cons:
Advantages:
– Quick Installation: Most average-sized rooms can be completely transformed in a single day, letting you enjoy your new floor sooner.
– Cost-Effective: You’ll save on adhesives and specialized installation tools, keeping your budget happier.
– DIY-Friendly: With proper preparation and a little patience, this is one of the more accessible hardwood installation methods if you’re handy.
– Easy Repairs: If a plank gets damaged (think dropped cast iron pan or puppy accidents), individual pieces can be replaced without tearing up the whole floor.
– No Permanent Modification: Your concrete slab remains intact, which is ideal if you’re renting or might want different flooring in the future.
Drawbacks:
– Hollow Sound Risk: Floating floors might sound slightly hollow underfoot compared to glued-down installations. Quality underlayment helps minimize this effect, but it’s something to be aware of.
– Height Buildup: The combined thickness of underlayment and flooring may require trimming doors or transitioning to other flooring types.
– Expansion Concerns: Wood naturally expands and contracts with seasonal changes, so proper expansion gaps are critical, and larger rooms may need T-moldings to prevent buckling.
– Moisture Sensitivity: While engineered hardwood handles moisture better than solid wood, it’s not waterproof. Proper moisture testing and vapor barriers remain essential steps.
“Preparation is everything,” says our senior installer at Romero Hardwood Floors. “In our experience, most floating floor failures happen because someone rushed through or skipped the moisture testing and acclimation steps. Take your time with prep work, and your floor will reward you for years to come.”
Tools & Materials Checklist
Gathering the right tools and materials before installing floating engineered hardwood floors on concrete slab will save you countless headaches and trips to the hardware store. Think of this as your project shopping list to ensure smooth sailing from start to finish.
When our Romero teams prepare for a floating floor installation, we always start with safety equipment. Knee pads will be your best friends during this project, trust me! Your knees will thank you after hours of floor work. Don’t forget safety glasses to protect your eyes from sawdust and debris.
For measuring and layout, you’ll need a reliable tape measure, chalk line, and carpenter’s square to ensure your installation stays straight and true. A 4-foot level is perfect for checking both your concrete slab and your progress as you install.

The cutting tools are where many DIYers get tripped up. While a miter saw gives the cleanest cuts for your engineered planks, a circular saw can work too if that’s what you have available. Don’t forget a jigsaw for those tricky cuts around doorjambs and other obstacles. A sharp utility knife will be essential for cutting underlayment and vapor barrier materials.
For the actual installation process, you’ll need 5/16″ spacers to maintain your crucial expansion gap, a tapping block to protect board edges while securing them, a pull bar for those tight spots near walls, and a rubber mallet for gentle persuasion without damaging your beautiful new floors. A 100-pound roller might sound intimidating, but it’s essential for properly pressing down your underlayment.
Perhaps the most important tool isn’t one that cuts or hammers – it’s your moisture meter. This device is absolutely non-negotiable for testing both your concrete slab and your engineered wood planks. Skip this step, and you might as well plan for a flooring replacement much sooner than you’d like!
As for materials, start with your star player: engineered hardwood flooring. Always purchase about 10% extra to account for cuts, waste, and the occasional damaged board. Your 6-mil polyethylene sheeting serves as your vapor barrier – your first line of defense against concrete moisture.
Choose your underlayment carefully based on your specific needs – foam provides basic cushioning, cork offers superior sound absorption, and combination products might include built-in vapor barriers. Learn more about your options at our guide to Hardwood Floor Underlayment Types.
Don’t forget duct tape or underlayment tape for sealing vapor barrier seams. If you’re installing tongue-and-groove flooring, you’ll need wood glue specifically formulated for floating floors (click-lock systems typically don’t require adhesive unless specified by the manufacturer).
Finally, prepare for the finishing touches with transition moldings for doorways and baseboards and quarter round to cover your expansion gaps while giving your new floor that polished, professional look.
“Having everything ready before you start is the difference between a one-day project and a weekend-long headache,” says our installation manager. “I’ve seen too many DIYers waste hours running back to the store for something they forgot.”
Preparing the Concrete Slab for Success
When installing floating engineered hardwood floors on concrete slab, preparation truly makes the difference between a stunning, long-lasting floor and one plagued with problems. Think of your concrete slab as the foundation of your investment—it deserves careful attention.
Start with a thorough cleaning of your concrete surface. This isn’t just a quick sweep—remove all dust, debris, and contaminants by sweeping, vacuuming with a shop vac, and scraping away any paint splatters or adhesive residue. Finish with a mild cleaner mopping, giving the surface plenty of time to dry completely.
“I’ve seen homeowners rush through prep work only to deal with squeaky, uneven floors later,” says Francisco Romero. “Taking time now saves headaches later.”
Next, check your slab for flatness. Your concrete should be level within 1/8 inch over 8-10 feet—about the thickness of a quarter. Use a long level or straight edge to spot any problematic areas. For high spots, you’ll need to grind them down with a concrete grinder (rentable at most home improvement stores). Low spots require filling with a self-leveling compound that will create the flat surface your floating floor needs.
Don’t ignore cracks or damage in your concrete. Small cracks should be filled with an appropriate concrete patching compound, while larger structural issues might require professional assessment before proceeding. For new concrete slabs, patience is key—they need at least 60 days of curing time before installation.
For more comprehensive guidance on preparing concrete for hardwood installation, check out our detailed guide on Installing Hardwood Floors on Concrete Slab.
Moisture Testing & Mitigation
Moisture is the silent destroyer of hardwood floors on concrete. Even decades-old slabs can emit significant moisture vapor that will damage your beautiful new floors if not properly addressed.
Professional moisture testing provides the most reliable results:
The gold standard is Relative Humidity (RH) Testing following ASTM F2170 standards. This involves drilling small holes in your concrete and inserting probes to measure moisture levels inside the slab. For most engineered hardwood installations, readings should be below 75% RH.
Another approach is the Calcium Chloride Test, which measures the moisture vapor emission rate over 72 hours. Results should generally be below 3 pounds per 1,000 square feet per 24 hours for a successful installation.
If you’re tackling this as a DIY project, you can perform a simple plastic sheet test. Tape a 2’×2′ piece of clear plastic sheeting to the concrete and seal all edges. After 24 hours, check for condensation or darkening of the concrete, which indicates concerning moisture levels.
“At Romero Hardwood Floors, we’ve unfortunately seen too many beautiful floors ruined within months because someone skipped proper moisture testing,” shares our installation team. “The $50-100 investment in proper testing saves thousands in potential damage.”
Based on your moisture test results, you’ll need to choose the appropriate moisture protection:
For concrete with acceptable moisture levels, a standard 6-mil polyethylene vapor barrier provides sufficient protection when properly installed with overlapping seams taped securely.
If your readings are borderline, consider specialized underlayments with improved moisture protection capabilities that offer additional peace of mind.
For concrete with high moisture levels, don’t proceed without addressing the issue. Professional moisture mitigation systems (often epoxy-based) create an effective barrier between your concrete and new flooring.
To better understand concrete moisture and its impact on flooring, review this Scientific research on concrete moisture for deeper insights into this critical aspect of your installation.
Acclimating Engineered Hardwood Planks
If there’s one step DIYers are tempted to skip when installing floating engineered hardwood floors on concrete slab, it’s proper acclimation. But this crucial process can mean the difference between a beautiful, long-lasting floor and a disaster waiting to happen.
“Skipping acclimation is like asking for trouble,” explains our senior installer. “Wood is hygroscopic—it absorbs and releases moisture based on environmental conditions. Without proper acclimation, your beautiful new floor could develop gaps, buckling, or cupping within weeks.”
Think of acclimation as letting your wood “get comfortable” in its new home before it settles in permanently. Even engineered products with their improved stability need this adjustment period.
When we install floors throughout Massachusetts, we always allow 48-72 hours for the wood to reach equilibrium with your home’s environment. This means keeping your home at normal living conditions—between 60-80°F with relative humidity between 35-55%—before, during, and after installation.
Don’t just leave the flooring in sealed boxes, though! Open those packages and cross-stack them in the actual installation room. This allows air to circulate around each board, speeding up the acclimation process. Some manufacturers even recommend “sticker stacking,” where you place small wood strips between layers of flooring for maximum air exposure.
Throughout acclimation, we regularly check moisture content using a quality wood moisture meter. We’re looking for the wood to stabilize within the manufacturer’s recommended range (typically 6-9%) and be within 2-4% of any wood substructures in your home. Keep a log of these readings—they can be important for warranty purposes if issues arise later.
For basement installations on concrete, acclimation is even more critical. These spaces often have higher humidity levels and temperature fluctuations than above-grade rooms. We sometimes recommend extending acclimation to a full week in these environments.
The small investment of time during acclimation pays enormous dividends in floor performance. A properly acclimated floor is less likely to develop gaps between boards in winter or experience crowning during humid summer months.
For more detailed information about this crucial process, check out our comprehensive guide on Engineered Wood Floor Acclimation.

Step-by-Step Guide to Installing Floating Engineered Hardwood Floors on Concrete Slab
With your concrete properly prepared and your flooring well-acclimated, it’s time to roll up your sleeves and begin the actual installation. I’ve guided countless Massachusetts homeowners through this process, and with some patience and attention to detail, you’ll soon be enjoying your beautiful new floor.
1. Install Vapor Barrier
Start by rolling out your 6-mil polyethylene sheeting across the entire concrete surface. This critical moisture barrier prevents vapor from migrating up through the concrete and into your new flooring. Overlap the seams by 6-8 inches (more is better than less!) and run the barrier 2-3 inches up the wall. Secure all seams with waterproof tape to create a continuous moisture shield.
“I can’t emphasize enough how important this step is,” our installation manager often tells clients. “I’ve seen beautiful floors ruined because someone tried to save a few dollars by skipping the vapor barrier.”
2. Install Underlayment
Next, roll out your underlayment perpendicular to the direction your flooring will run. Unlike the vapor barrier, most underlayments should butt together without overlapping (though always check your specific product’s instructions). Tape all seams securely and trim any excess at the walls. The underlayment provides cushioning, sound absorption, and additional moisture protection for your installing floating engineered hardwood floors on concrete slab project.
3. Plan Your Layout
Before cutting a single board, take time to measure and plan. Typically, boards look best running parallel to the longest wall, but consider factors like light sources and room flow. Ensure your last row will be at least 2 inches wide—if calculations show it will be narrower, adjust by ripping down your first row instead. Also plan for staggered end joints to create that natural, professional-looking hardwood pattern.
4. Install the First Row
This is perhaps the most critical row of your entire installation! Place 5/16″ spacers against all walls to create your expansion gap—this space allows the floor to expand and contract with seasonal changes without buckling.
For tongue-and-groove systems, apply a thin bead of wood glue to the groove side. For click-lock systems, simply engage the locking mechanism according to your manufacturer’s instructions. Make absolutely certain this first row is perfectly straight, as any deviation will compound throughout your installation.
5. Install Subsequent Rows
As you continue across the room, maintain at least a 6-inch stagger between end joints in adjacent rows. This creates structural integrity and the classic hardwood floor appearance. For tongue-and-groove systems, apply glue to each groove, insert the tongue, and gently tap with a tapping block to secure. For click-lock systems, angle the new board into the previous row at about 30 degrees, then press down to engage the locking mechanism.
“Never hammer directly on the boards,” I always caution my DIY clients. “Always use a proper tapping block to protect those delicate edges.”
6. Cut Boards as Needed
Measure carefully for each cut, remembering to account for the expansion gap. Mark your cutting line on the finish side of the board, and use a miter saw for straight cuts or a jigsaw for notches and curves. Safety first—always wear eye protection when cutting, and consider ear protection as well.
7. Install the Final Row
Measure the remaining gap, subtracting the 5/16″ expansion space. Rip your final row of boards to the required width, then use a pull bar to engage them with the previous row. This specialized tool allows you to tap the board into place without damaging the wall.
8. Remove Spacers
Once all flooring is installed, remove all the spacers. Your expansion gap will later be covered by baseboards and trim, giving your floor a finished look while still allowing for necessary movement.
For an even more detailed walkthrough with specific techniques, visit our comprehensive tutorial on How to Install Floating Engineered Hardwood Flooring on Concrete.
Handling Obstacles, Doors & Radiant Heat
Door Casings and Jambs
Those pesky door frames require special attention. Use a jamb saw or handsaw to undercut door casings, using a scrap piece of flooring (plus underlayment) as your height guide. This allows your new flooring to slide neatly underneath for a seamless transition. Remember to maintain that crucial expansion gap around door frames too.
Transitions Between Rooms
Where your new floor meets another room or flooring type, you’ll need transition moldings. A critical detail: these should be attached to the subfloor or wall—never to the floating floor itself. This allows your floor to move independently beneath the transition pieces.
“One of the most common DIY mistakes we correct is transition moldings screwed through the floating floor,” notes our senior installer. “This defeats the entire purpose of a floating installation!”
Obstacles and Fixtures
For pipes, vents, or other permanent fixtures, careful measurement is key. Mark their location precisely on the plank, then drill holes slightly larger than the obstacle to accommodate expansion. Create a V-shaped cut from the hole to the edge of the board, install around the obstacle, then glue the cut piece back in place for a clean finish.
Radiant Heat Considerations
If you’re installing floating engineered hardwood floors on concrete slab with embedded radiant heat:
Turn off the heating system 24 hours before installation and keep it off during installation and for 48 hours after. When restarting, increase temperature gradually—no more than 5°F per day—and never allow the surface temperature to exceed 85°F. Always use an underlayment specifically rated for radiant heat applications.
“Different manufacturers have different guidelines for radiant heat,” I remind clients. “Some products have special requirements, and others aren’t suitable at all. Always check your specific flooring’s warranty and installation guide.”
Managing Expansion Gaps, Transitions & Trim
When installing floating engineered hardwood floors on concrete slab, one of the most critical aspects is properly managing expansion gaps and transitions. These seemingly small details can make the difference between a floor that lasts for decades and one that fails within months.
Your beautiful new floor needs room to breathe. Wood, even engineered hardwood, naturally expands and contracts with seasonal changes in temperature and humidity. Without proper accommodation for this movement, your floor could buckle, warp, or develop unsightly gaps.
“I can’t tell you how many DIY disasters I’ve had to fix because homeowners skipped the expansion gap,” says our lead installer at Romero. “One customer in Revere installed their floor tight against the walls, and by summer, it had buckled so badly you could trip over the humps!”
Expansion Gaps: Always maintain a consistent gap around the entire perimeter of your floor equal to the thickness of your flooring material – typically 5/16″ to 1/2″. Those little plastic spacers in your installation kit aren’t optional extras; they’re essential tools that ensure consistent gaps. Once installation is complete, remove all spacers, but never fill these gaps with caulk or other materials that would prevent natural movement.
T-Moldings for Larger Spaces: In Massachusetts homes with open floor plans or rooms larger than 30-40 feet in any direction, you’ll need to install T-moldings to create expansion breaks. These should always be fastened to the subfloor or wall – never to the floating floor itself. This is particularly important in modern open-concept designs where flooring might run continuously through multiple spaces.
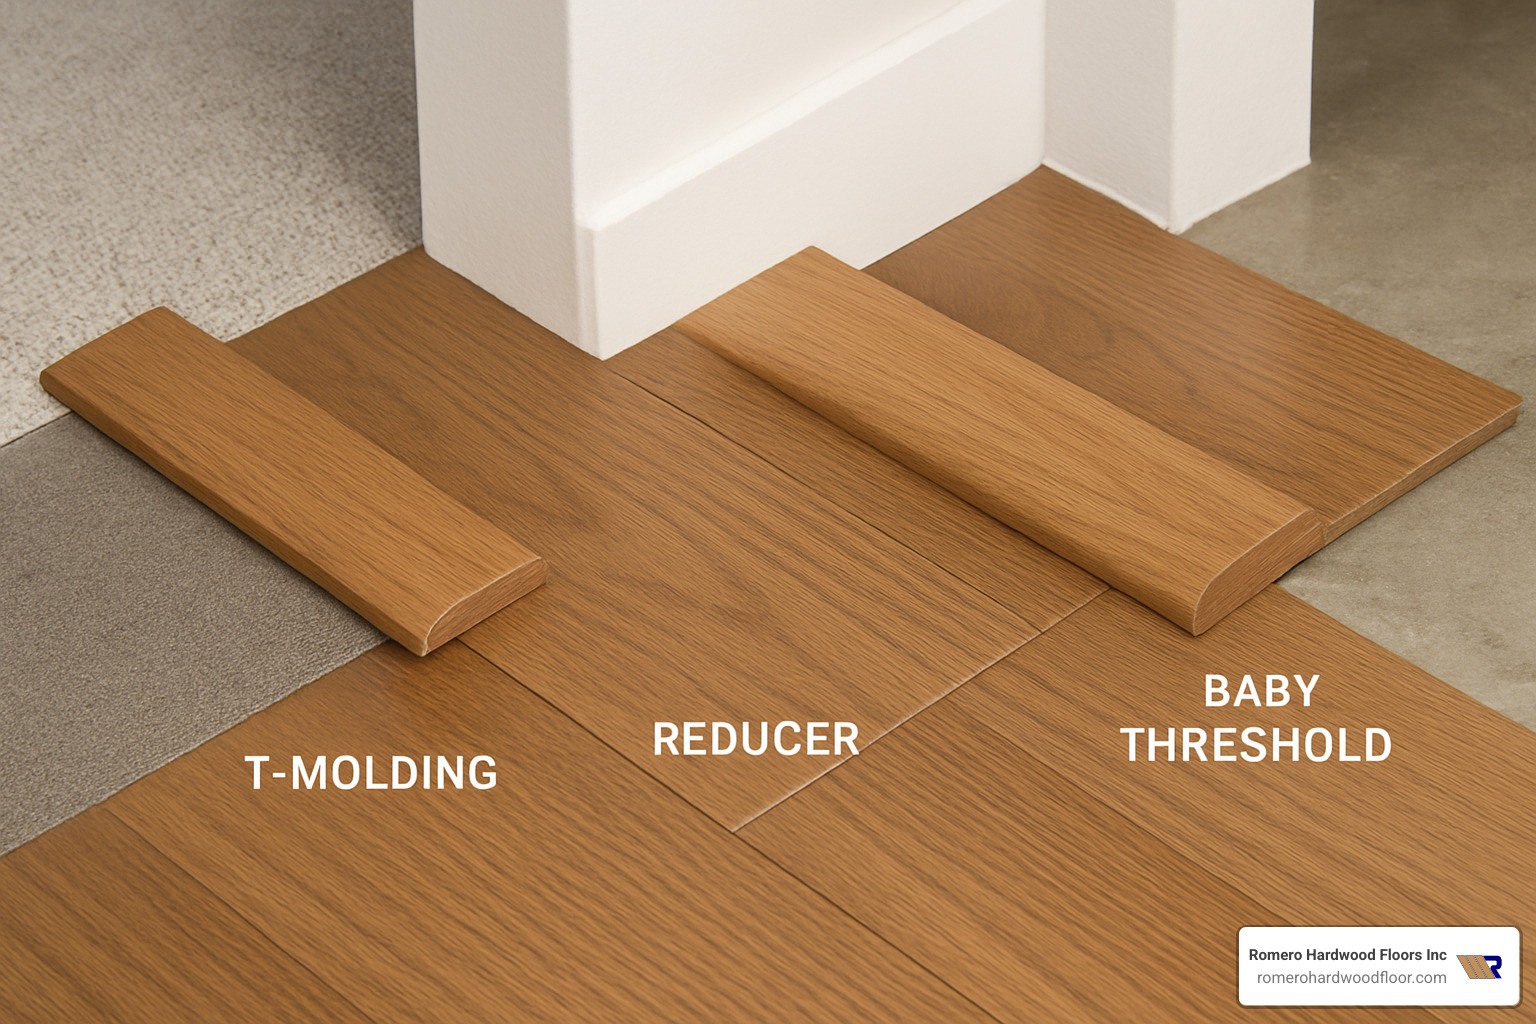
Transition Moldings: Different transitions serve specific purposes in your installation. T-moldings join floors of equal height, while reducers help transition to lower floor coverings like vinyl or low-pile carpet. Stair nosing provides a finished edge and safety at steps, and baby thresholds work perfectly at sliding doors or transitions to carpet.
Baseboards and Trim: After your floating floor installation is complete, install baseboards to cover those expansion gaps while still allowing floor movement. The golden rule here: attach baseboards to the wall, never to the floor itself. If you’ve kept existing baseboards, quarter-round molding can neatly cover the expansion gap. The goal is to hide the gap while still allowing the floor to move freely beneath.
For areas prone to occasional water exposure, like entryways or near exterior doors, a small bead of silicone can seal the expansion gap while still allowing some movement. This should be limited to small areas where water intrusion is most likely, not applied throughout the installation.
“Proper trim work is what gives your floor that professionally finished look,” our installation team often tells clients. “It’s the difference between a floor that looks DIY and one that looks like it was installed by professionals.”
Cost, Time & Common Mistakes
Let’s talk about what you can expect to invest – both financially and time-wise – when installing floating engineered hardwood floors on concrete slab. Understanding these factors upfront helps avoid unwelcome surprises down the road.
When it comes to costs, floating engineered hardwood installation is generally more budget-friendly than traditional nail-down or glue-down methods. Based on internet averages (not Romero Hardwood Floors Inc. pricing):
DIY Installation: Typically runs $8 to $18 per square foot for materials only, depending on the quality of flooring you select.
Professional Installation: Expect to pay $12 to $30+ per square foot for materials and labor combined, with premium services and high-end materials pushing toward the upper end of that range.
The engineered hardwood itself represents the biggest variable in your budget. “Some homeowners are surprised by the price range,” our estimator often notes. “Basic engineered products start around $3 per square foot, while premium options with exotic wood veneers and thicker wear layers can easily reach $13 or more per square foot.”
Other factors that influence your final cost include subfloor preparation (especially if significant leveling is needed), underlayment quality, and the trim pieces required to finish the job properly. Investing in quality materials upfront typically saves money in the long run by extending the life of your floor.
Time-wise, a typical 250-square-foot room takes about 8-10 hours for the actual installation once all prep work is complete. However, don’t forget to account for:
Acclimation period: 48-72 hours of mandatory waiting while your flooring adjusts to your home’s environment
Subfloor preparation: Could add 1-2 additional days if your concrete needs significant leveling or moisture mitigation
The floating installation method is significantly faster than nail-down or glue-down approaches, which is why many homeowners choose this option when time is a consideration.
Over the years, our team has witnessed the same mistakes happening repeatedly with DIY floating floor installations. Here are the most common pitfalls to avoid:
Skipping moisture testing is perhaps the most costly mistake. Concrete continuously releases moisture vapor, and without proper testing and barriers, that moisture will destroy your new floor from underneath.
Rushing acclimation often leads to gaps or buckling after installation as the wood adjusts to your home’s environment after the fact rather than before.
Creating insufficient expansion gaps around the perimeter causes buckling when the floor naturally expands. Remember: wood moves!
“I once visited a home where the owners had installed beautiful engineered planks with barely any expansion gap,” recalls our lead installer. “Six months later, the floor had buckled so severely in places that it looked like speed bumps. All that money and effort wasted because of a 1/4-inch miscalculation.”
Other common errors include choosing improper underlayment (undermining sound absorption and moisture protection), creating poor staggering patterns (weakening the floor structure), installing under fixed cabinetry (preventing proper expansion), and attaching trim directly to the floating floor instead of the wall.
Perhaps most importantly, always follow your specific product’s manufacturer guidelines. Each engineered product has unique requirements, and following them protects both your investment and your warranty coverage.
Maintenance, Repairs & Long-Term Performance
Your beautiful new floating engineered hardwood floor isn’t just a one-time investment—it’s a living part of your home that requires proper care to maintain its beauty and functionality. With the right maintenance approach, your floor can remain stunning for many years to come.
Daily maintenance is refreshingly simple. Sweep or vacuum regularly with a soft brush attachment to prevent dirt and grit from scratching your floor’s surface. Water is the enemy of wood flooring—wipe up spills immediately to prevent damage to both the surface and the connections between planks.
“I always tell my clients to think of their engineered hardwood like fine furniture,” says our maintenance specialist at Romero Hardwood Floors. “Use only manufacturer-recommended cleaning products, and never, ever wet mop or steam clean these floors. That’s a quick ticket to damage!”
Taking preventative measures saves headaches later. Place felt pads under furniture legs to prevent scratches when pieces are moved. Position high-quality mats at exterior doors to catch dirt and moisture before they reach your beautiful floors. Perhaps most importantly, maintain indoor relative humidity between 30-50% to prevent excessive expansion and contraction.
“Living in Massachusetts, we face some serious seasonal challenges,” our team often reminds clients. “During our dry winters, a humidifier can prevent excessive shrinkage and gapping. In humid summers, you might need a dehumidifier to prevent swelling. Maintaining consistent conditions is your floor’s best friend.”
When damage happens (and eventually, it probably will), repairs are manageable. One significant advantage of installing floating engineered hardwood floors on concrete slab is the ability to replace individual damaged boards without tearing up the entire floor. The process involves carefully cutting down the center of the damaged plank, removing it in pieces, preparing a replacement board by modifying its edges, and installing it with wood glue. This repair technique allows you to address isolated damage without a complete refinishing.
Understanding your floor’s long-term performance expectations helps set realistic maintenance goals. Engineered hardwood with a wear layer of 3mm or thicker can typically be refinished 1-3 times throughout its lifespan, extending its beauty for years beyond what thinner products might offer. Natural wood will gradually change color with exposure to light—this patina is part of wood’s natural aging process and often improves its character.
High-traffic areas like hallways and kitchen entry points will naturally show wear faster than less-used spaces. Consider occasional rotation of area rugs to ensure more even aging of the floor’s surface.
Some seasonal movement is entirely normal. During dry winter months, you might notice small gaps appearing between planks. When humidity rises in summer, the floor may feel slightly tighter. These changes are normal as long as they’re not extreme. The expansion gaps you carefully maintained during installation are now doing their job, allowing this natural movement without damage.
“The beauty of wood is that it’s a natural material that responds to its environment,” our installation expert explains. “A floor that shows absolutely no seasonal changes might look perfect, but it’s actually fighting against its nature—and that fight eventually leads to bigger problems.”
For more detailed information about caring for your new floor, check out our comprehensive guide on Engineered Hardwood Flooring.
Frequently Asked Questions about Installing Floating Engineered Hardwood Floors on Concrete Slab
How do I test and fix high moisture in my concrete?
Moisture testing isn’t just a recommendation—it’s absolutely essential before installing floating engineered hardwood floors on concrete slab. Skipping this step is like building a house without checking the foundation!
The gold standard for testing is the Relative Humidity (RH) method following ASTM F2170 standards. This involves drilling small holes in your concrete, inserting probes, and waiting 72 hours to get accurate readings of the internal moisture. Most engineered flooring manufacturers want to see RH levels between 75-85% before giving you the green light for installation.
Some homeowners also use the Calcium Chloride test (ASTM F1869), which measures the moisture vapor emission rate from your concrete surface. For this test, you’ll want results below 3 pounds per 1,000 square feet per 24 hours.
“Here in Massachusetts, we see big seasonal swings in concrete moisture levels,” explains our testing specialist. “Testing during summer’s humidity gives you the worst-case scenario, which is exactly what you want to plan for.”
If your testing reveals high moisture levels, don’t panic! For minor issues, a quality 6-mil polyethylene vapor barrier might be all you need. More serious moisture problems might require a professional mitigation system—essentially a moisture-blocking membrane applied to the concrete. New concrete needs at least 60 days to cure before testing, and sometimes improving external drainage around your foundation can help reduce moisture problems at the source.
Can I install floating engineered hardwood in a below-grade basement?
Yes, you absolutely can enjoy beautiful hardwood in your basement! Floating engineered hardwood is actually an ideal choice for below-grade installations, but success depends on proper preparation.
Moisture control becomes even more critical in basement installations. Your testing should be thorough, and vapor barriers are non-negotiable. Make sure to select engineered products specifically rated for below-grade use—not all engineered hardwood is created equal when it comes to basement applications.
“We’ve transformed countless cold, dreary basements throughout Revere and Beverly into warm, inviting living spaces,” shares our project manager. “The before-and-after difference is incredible, but it always comes down to proper preparation and moisture management.”
If your basement has any history of flooding, you might want to consider truly waterproof alternatives like luxury vinyl plank. For typical basements, installing a dehumidifier to maintain 30-50% relative humidity year-round will help protect your investment. And don’t forget that basements often have very different conditions than your main living areas, making proper acclimation absolutely essential before installation begins.
What type of underlayment doubles as a vapor barrier?
When it comes to underlayment that pulls double-duty as moisture protection, you’ve got several excellent options that save you both time and money.
The most popular choice is what we call 2-in-1 underlayment, which combines cushioning (usually foam or cork) with an attached vapor barrier film on one side. These products are convenient one-step solutions that streamline your installation process.
For even more benefits, consider 3-in-1 underlayment products. These include cushioning, moisture protection, AND sound reduction properties—perfect if you’re in a condo with noise restrictions or installing in an upstairs room where footfall noise might be an issue downstairs.
Many of our customers also love cork underlayment with integrated vapor barriers. The natural cork provides excellent thermal insulation (keeping your floors warmer) while also absorbing sound beautifully. It’s a slightly premium option, but the comfort underfoot is noticeable.
“The quality of your underlayment directly impacts how your floor feels and sounds,” our product specialist often reminds customers. “This isn’t a place to cut corners if you want a floor that feels solid and quiet underfoot.”
When selecting any underlayment, verify it meets your flooring manufacturer’s specifications (this protects your warranty). Look for at least 2mm thickness for adequate cushioning, a compression rating between 20-30% for durability, and a moisture barrier with a perm rating under 1.0 for proper protection. If sound reduction is important in your space, also check the STC and IIC ratings—higher numbers mean better sound insulation.
Conclusion
Installing floating engineered hardwood floors on concrete slab transforms cold, uninviting spaces into warm, beautiful living areas that add real value and comfort to your home. After helping countless Massachusetts homeowners make this change, I’ve seen how floating installations strike that perfect balance between beauty, practicality, and longevity.
Let’s take a moment to recap the journey we’ve covered:
First, proper preparation makes all the difference. Your concrete needs to be clean, level, and—most critically—tested for moisture. Skipping this step is like building a house without checking the foundation—a recipe for disappointment.
Next comes the protective layer system—your vapor barrier and quality underlayment that shield your beautiful new floor from the concrete’s natural moisture. Think of this as your floor’s insurance policy.
The acclimation period might test your patience, but those 48-72 hours allow your engineered hardwood to adjust to its new environment. This isn’t just manufacturer advice—it’s wisdom gained from seeing what happens when this step gets rushed.
During installation, those expansion gaps might seem unnecessarily wide, but they’re your floor’s breathing room. I’ve seen too many DIYers minimize these gaps only to face buckling floors when summer humidity arrives.
Finishing touches matter too—proper transitions and trim complete the installation while allowing for that crucial seasonal movement. Attach these to your walls, not your floating floor!
Finally, good maintenance habits protect your investment. Simple practices like felt pads under furniture legs, controlling indoor humidity, and using manufacturer-approved cleaners can extend your floor’s beauty for years.
At Romero Hardwood Floors Inc., we’ve been helping homeowners throughout Massachusetts achieve stunning hardwood floors over concrete for more than 15 years. Our experienced team has faced and solved virtually every concrete slab challenge you might encounter.
If you’re in Beverly, Chelsea, Danvers, East Boston, or anywhere in our Massachusetts service area, we’d love to help with your project—whether you need professional installation or just some personalized guidance for your DIY endeavor.
For more information about our services or to schedule a consultation, visit our page on flooring installation services. At Romero Hardwood Floors Inc., we’re committed to enhancing Massachusetts homes one beautiful plank at a time—changing concrete foundations into warm, inviting spaces you’ll love living on.
