Best Way to Install Engineered Hardwood Flooring on Concrete Slab: 7 Powerful Proven Steps for 2025
Transform Your Concrete Slab with Engineered Hardwood
If you’re searching for the best way to install engineered hardwood flooring on concrete slab, here’s the quick answer:
| Installation Method | Best For | Why It’s Recommended |
|---|---|---|
| Glue-down | Most situations | Most stable, best sound absorption, works with radiant heat |
| Floating | DIY projects, temporary installations | Easier installation, no adhesive mess |
| Nail-down | Not recommended for concrete | Requires wood subfloor |
The best way to install engineered hardwood flooring on concrete slab is the glue-down method, which provides superior stability, sound dampening, and long-term performance. While floating installations are easier for DIYers, the direct adhesive bond between wood and concrete creates a more solid feel underfoot and prevents movement or squeaking over time.
Changing a cold, unwelcoming concrete space into a warm, inviting area is one of the most rewarding home improvements you can make. Engineered hardwood offers the perfect solution, combining the beauty of real wood with the practical stability needed for concrete foundations.
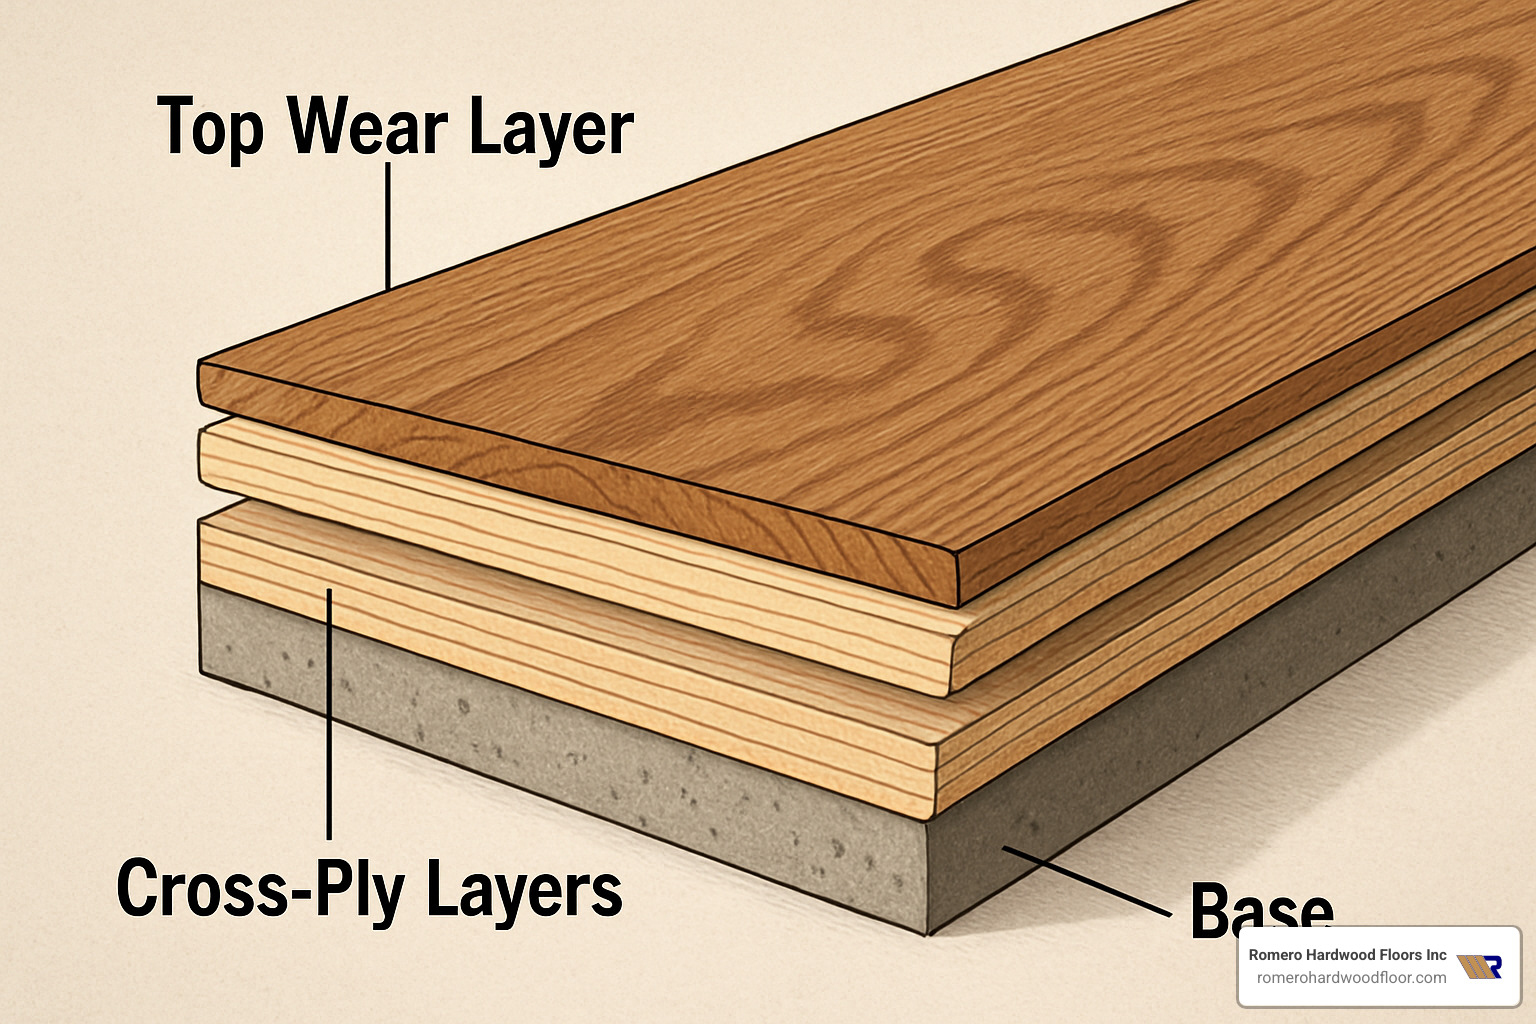
Unlike solid hardwood, engineered products feature a multi-layer construction that resists the moisture and temperature fluctuations common to concrete slabs. This makes them ideal for basements, ground floors, and any area where traditional hardwood might warp or buckle.
I’m Francisco Romero, owner of Romero Hardwood Floors Inc. with over 15 years of experience determining the best way to install engineered hardwood flooring on concrete slab for hundreds of homes in the Revere, MA area. My team and I have perfected techniques that ensure lasting beauty and performance when installing engineered hardwood over concrete foundations.
Similar topics to best way to install engineered hardwood flooring on concrete slab:
– gluing solid hardwood floors to concrete
– heated hardwood floors on concrete
– hardwood floor on a slab
Why Gluing Is the Best Way to Install Engineered Hardwood Flooring on Concrete Slab
There’s something magical about changing a cold concrete slab into a warm, inviting space with beautiful hardwood floors. After installing hundreds of engineered hardwood floors throughout Massachusetts, I’ve seen why the glue-down method consistently delivers the best results.
“When we glue down engineered hardwood, we’re not just installing a floor—we’re creating a relationship between the wood and concrete that will last for decades,” says our lead installer at Romero Hardwood. This permanent bond simply outperforms other installation methods in nearly every way.
Let me share why glue-down is truly the best way to install engineered hardwood flooring on concrete slab:
The dimensional stability you get with a glue-down installation is best. That adhesive creates a rock-solid connection that prevents the boards from shifting, cupping, or developing gaps over time. This is especially important in our New England climate where seasonal changes can be dramatic.
For basement renovations and other below-grade spaces, engineered hardwood glued to concrete (with proper moisture mitigation) performs beautifully where solid hardwood would fail miserably. I’ve seen countless basement changes where homeowners are thrilled to replace cold tile or carpet with the warmth of real wood.
The sound quality of a glued-down floor is noticeably better too. When you walk on a floating floor, you might hear hollow echoes or subtle movement. A properly glued floor feels and sounds solid underfoot—more like walking on traditional hardwood.
From a resale perspective, real estate agents consistently tell us that glued-down engineered hardwood floors add significant value to homes. Buyers recognize and appreciate the quality difference compared to floating installations.
While the installation process requires more skill, once you’ve mastered the technique, a glue-down installation can actually be completed more efficiently than methods requiring additional underlayment steps.
According to scientific research on moisture control, proper adhesive systems can even provide additional moisture protection for your flooring, creating a more resilient installation.
Core Benefits Over Solid Hardwood on Slabs
Engineered hardwood offers distinct advantages over solid hardwood when installed on concrete:
The multi-layer plywood construction is the secret to engineered hardwood’s success on concrete. These cross-layered plies provide exceptional stability against moisture and temperature fluctuations that would quickly damage solid hardwood.
Today’s premium engineered products feature wear layers up to 6mm thick—comparable to many solid hardwoods—allowing for multiple refinishing opportunities over their lifetime. This gives you the best of both worlds: the stability of engineered with the longevity of solid.
I love when clients call us years after an installation to share how their engineered floors remain dimensionally stable through all seasons. One Marblehead homeowner told me, “After dealing with solid hardwood that cupped every humid summer, our engineered floors have been absolutely perfect for three years straight. Best decision we ever made.”
Cost & Lifespan Snapshot
When planning your concrete floor change, here’s what you can typically expect for budgeting:
Material costs for quality engineered hardwood generally range from $3 to $13 per square foot. The variation depends on wood species, wear layer thickness, and overall construction quality.
For professional installation, the average labor costs range from $3 to $10 per square foot based on internet research and not actual costs for Romero Hardwood Floors Inc. More complex installations with intricate patterns or challenging conditions can run between $15 to $30 per square foot.
The lifespan of your engineered hardwood floor will primarily depend on the thickness of its wear layer and how well you maintain it. With proper care, these floors can last anywhere from 20 to 80 years—a remarkable investment in your home’s comfort and value.
Speaking of value, hardwood flooring consistently ranks among the top home improvements for return on investment. The National Association of Realtors reports that hardwood floors can return up to 106% of their cost when you sell your home.
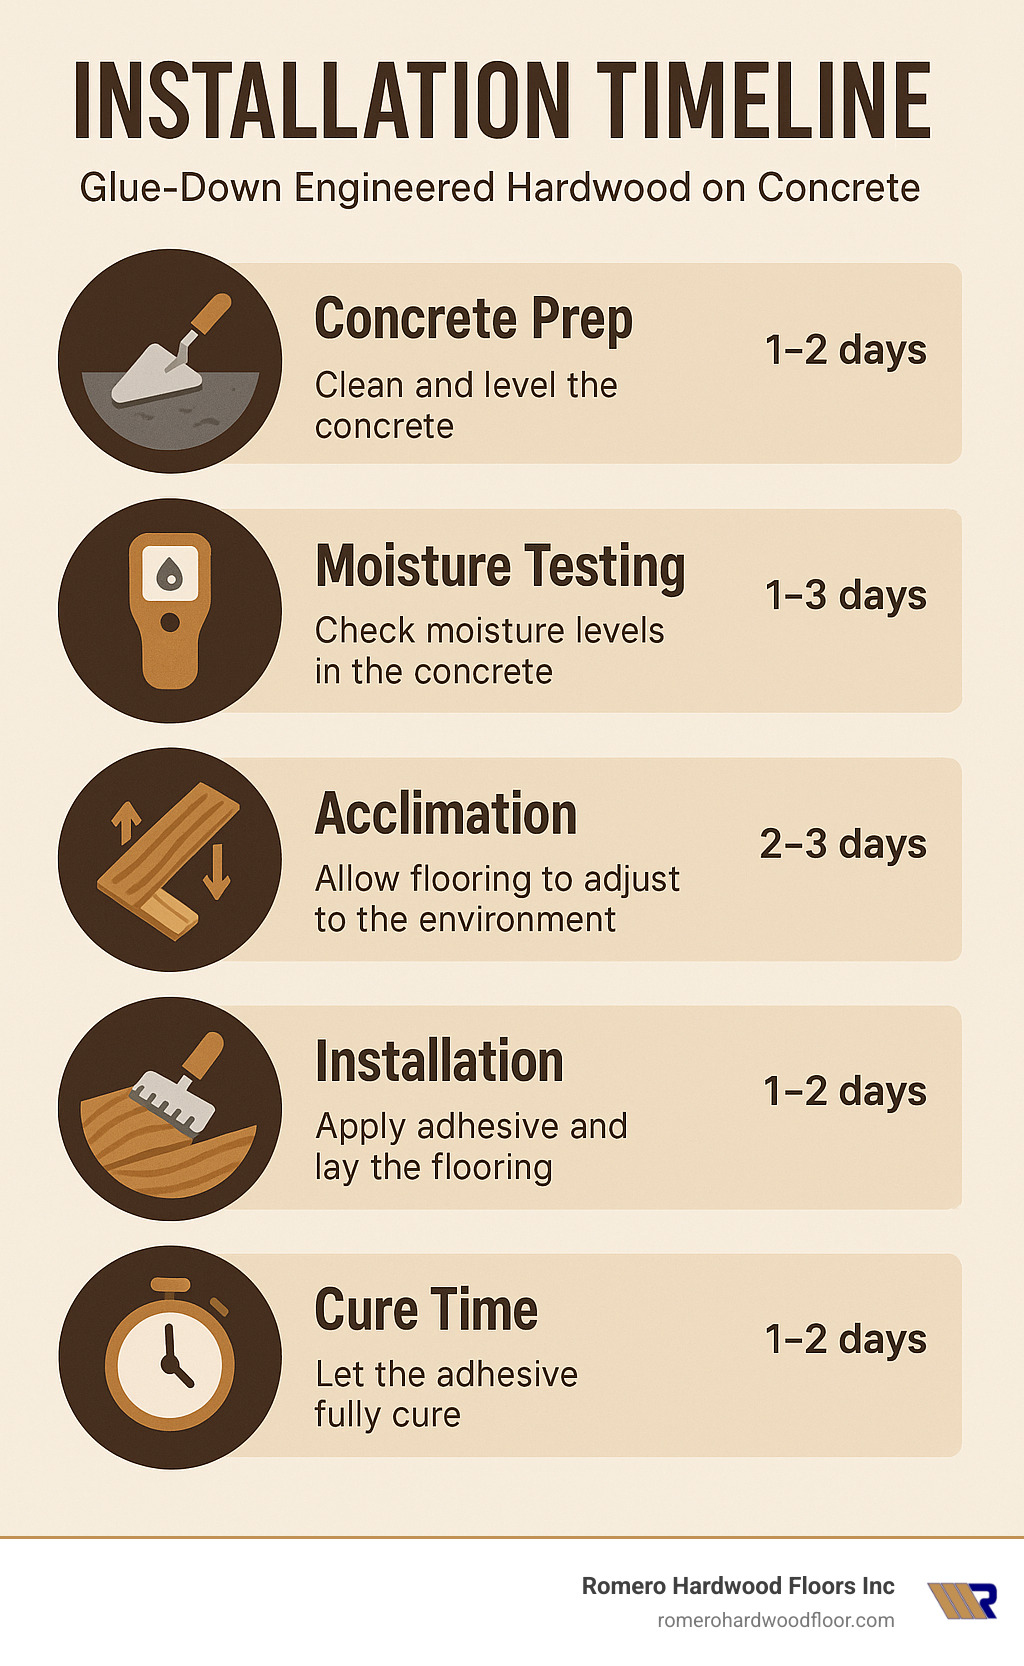
Pre-Game: Assessing and Preparing the Concrete Subfloor
The best way to install engineered hardwood flooring on concrete slab starts long before you open a single box of flooring. Think of concrete prep as the foundation of your foundation—skip it, and you’re asking for trouble.
“I’ve seen gorgeous, high-end engineered floors fail within months because someone cut corners on concrete prep,” says our lead installer at Romero. “It’s like putting designer clothes on without showering first—eventually, everyone notices the problem.”
Your concrete needs to be flatter than you might think—industry standards require flatness within 1/8″ over any 10-foot span. We check this with a long straightedge, carefully scanning the entire floor to find those subtle high and low spots that your eye might miss.
For those pesky high spots, we break out the concrete grinder. It’s dusty, noisy work (even with our dust collection systems), but absolutely necessary. When we find low areas, we fill them with self-leveling compound specifically designed for wood floor installations. This creates the perfect “tabletop” surface your engineered hardwood needs.
Cracks aren’t just unsightly—they can be warning signs of bigger issues. We repair them with epoxy fillers that strengthen the concrete while providing a smooth, continuous surface. A thorough cleaning follows all this work—sweeping, vacuuming, and mopping to remove every speck of dust before the concrete dries completely.
During a recent project in East Boston, we finded a 3/8″ variation across just 6 feet of concrete—a recipe for disaster with hardwood. After grinding and leveling, our client was amazed: “I can’t believe how solid and quiet my new floor feels—it’s nothing like my neighbor’s floating floor that sounds like a percussion instrument when you walk on it!”
Moisture Testing & Mitigation—The Non-Negotiable Step
If I could tattoo one piece of advice on every DIYer’s arm, it would be this: “Test your concrete for moisture!” Concrete slabs—even decades-old ones—can silently pump moisture vapor upward that will destroy your beautiful wood floor from underneath.
There are three main testing approaches:
ASTM F2170 Relative Humidity Testing involves drilling small holes in your concrete and inserting probes that measure internal moisture. This is our preferred method because it tells us what’s happening inside the slab, not just on the surface. Readings below 75% RH generally give us the green light for installation.
Calcium Chloride Testing (ASTM F1869) measures the moisture vapor emission rate from the concrete surface. Results are expressed in pounds of moisture per 1,000 square feet per 24 hours, with 3 pounds typically being the maximum acceptable level.
For DIYers, the Plastic Sheet Method provides a basic indicator—tape an 18″×18″ piece of clear plastic to the concrete for 24 hours and check for condensation underneath. It’s not scientific, but it can reveal obvious moisture issues.
Based on test results, we select the appropriate moisture solution:
Moisture-barrier adhesives can handle moderate moisture levels without additional steps. For more serious cases, epoxy moisture control systems create an impermeable barrier between your concrete and the adhesive. In extreme situations, we might recommend sheet membranes as an additional protective layer.
A Somerville basement renovation taught us this lesson dramatically. Our testing revealed 85% RH levels—far above the acceptable threshold. We applied a premium epoxy moisture control system before installation, and three years later, the engineered oak flooring remains flawless despite the challenging below-grade environment.
Why Moisture Testing Is the Best Way to Install Engineered Hardwood Flooring on Concrete Slab
The best way to install engineered hardwood flooring on concrete slab always includes proper moisture evaluation because the stakes are simply too high. Even new slabs can emit more than 15 pounds of moisture vapor per 1,000 square feet daily—enough to warp and destroy your investment within months.
Most manufacturers won’t honor warranties on moisture-related failures, making proper testing and mitigation your only protection. The relatively small cost of moisture mitigation seems like a bargain compared to replacing an entire failed floor.
For borderline situations, “no-test” adhesives provide additional peace of mind, while modern mitigation systems can handle even extreme moisture conditions. As we tell our clients: “Moisture testing isn’t an extra—it’s essential insurance for your investment.”

Acclimation Done Right
Proper acclimation is another non-negotiable step in the best way to install engineered hardwood flooring on concrete slab. Wood is naturally hygroscopic—it absorbs and releases moisture based on its environment. Acclimation allows your flooring to adjust to your home’s conditions before installation, preventing surprises later.
The process starts with your home itself. Maintain normal living conditions—between 60-80°F and 30-50% relative humidity—for at least 5 days before acclimation begins. This creates the stable environment your wood needs.
We cross-stack unopened cartons in the center of the room, away from exterior walls, direct sunlight, and HVAC vents that might create “micro-climates.” The wood needs to experience consistent conditions throughout.
While some manufacturers might suggest shorter periods, we recommend a minimum 48-72 hour acclimation period. After this initial phase, we open the ends of the cartons to allow air circulation without fully unpacking the boards. This controlled approach prevents damage while maximizing air exposure.
Before installation, we verify the wood has reached equilibrium moisture content using a wood moisture meter—the scientific way to know your floor is truly ready.
A Winchester client shared this eye-opening experience: “Another contractor told us we could install the flooring the same day it arrived. Romero insisted on a three-day acclimation period. When I saw how much the boards had adjusted during that time, I understood why this step was so important.”
For more detailed information about preparing your concrete surface, check out our comprehensive guide on concrete prep for engineered hardwood.
Tool Kit & Material Checklist
Getting ready for the best way to install engineered hardwood flooring on concrete slab means having the right tools at your fingertips. Think of it as preparing for a special meal – you wouldn’t want to start cooking only to realize you’re missing key ingredients!
“I’ve seen too many DIYers make three trips to the hardware store mid-installation,” laughs Francisco, our lead installer. “Nothing kills your momentum faster than realizing you don’t have the right trowel when you’ve got adhesive ready to go.”
Your installation command center should include a properly sized notched trowel (this is critical – the adhesive manufacturer specifies this for a reason), a substantial 100-150 lb roller for ensuring proper bonding, and reliable moisture testing equipment to verify your concrete is ready. You’ll also need a long straightedge (at least 10 feet) for checking floor flatness, plus the usual suspects: chalk line, tape measure, jamb saw, and cutting tools like a miter or table saw.
Don’t forget the smaller but equally important items: utility knife, rubber mallet, tapping block, pull bar, and spacers. And for your comfort and safety, knee pads, safety glasses, and a dust mask are absolute must-haves during installation day.
On the materials front, you’ll need your beautiful engineered hardwood flooring (we recommend purchasing 5-10% extra for waste and future repairs), quality adhesive (more on this below), any necessary moisture mitigation system, and finishing touches like transition strips and color-matched wood putty.
Choosing the right adhesive deserves special attention when determining the best way to install engineered hardwood flooring on concrete slab. Urethane adhesives offer excellent sound reduction and good moisture protection, making them suitable for most installations. Modified silane options provide superior moisture protection and flexibility, perfect for areas with higher humidity concerns. Basic acrylic adhesives are more budget-friendly but should only be used in consistently dry spaces, while specialized moisture-barrier adhesives include built-in protection for those “just to be safe” scenarios.
“I always tell clients that skimping on adhesive is like buying a luxury car and filling it with the cheapest gas,” says our installation manager. “The right adhesive is what keeps your beautiful floor beautiful for decades.”
When selecting underlayment for floating installations (though remember, glue-down is our recommended method for concrete), look for products specifically designed for concrete applications with built-in moisture barriers. Premium underlayments will provide better sound absorption and comfort underfoot, though they won’t match the solid feel of a proper glue-down installation.
For our North Shore clients from Salem to Winthrop, we’ve found that investing in premium installation materials pays dividends in longevity and performance. One Swampscott client told us, “The floor you installed five years ago still looks brand new, while my neighbor’s DIY project is already showing gaps and movement.”
Ready to get your concrete floor change started? Learn more about concrete preparation or check out the scientific research on adhesive shear strength for a deeper dive into why proper adhesive selection matters so much.
Step-by-Step: Floating vs Glue-Down Methods (Spoiler: Glue Wins)
Let’s talk about the battle of installation methods. When figuring out the best way to install engineered hardwood flooring on concrete slab, homeowners often find themselves torn between floating and glue-down approaches. I’ve seen this dilemma play out hundreds of times in homes across Massachusetts.
“Think of floating floors like a houseguest and glue-down floors like family,” I often tell my clients. “One’s just visiting; the other’s there for the long haul.”
Floating installations have their place in the world. The planks connect to each other rather than the subfloor, creating what’s essentially a wood island that sits atop your concrete. These systems typically use click-lock mechanisms or tongue-and-groove connections with a foam or cork underlayment beneath. The entire floor moves as a single unit, which makes for a faster, cleaner installation process. And yes, you can potentially take it with you when you move!
Glue-down installations, however, create a permanent bond between your beautiful new flooring and the concrete subfloor. This results in that solid, substantial feel underfoot that most homeowners prefer. There’s no hollow sound when you walk, minimal movement, and significantly less noise. For homes with temperature fluctuations or radiant heat systems, glue-down installations provide superior stability.
A client in Revere recently shared: “Our previous home had a floating engineered floor that always felt slightly… temporary. It clicked when we walked on it and just didn’t have that solid hardwood feel. The glue-down floor you installed feels like it’s actually part of the house.”
After installing hundreds of engineered hardwood floors throughout Massachusetts, our experience confirms that glue-down is truly the best way to install engineered hardwood flooring on concrete slab for most situations.
How to Float an Engineered Hardwood Floor on Concrete
If floating installation makes sense for your specific situation, here’s our tried-and-true process:
Start by installing a 6-mil polyethylene vapor barrier over your prepared concrete, overlapping seams by 6 inches and securing with tape. Next, roll out your foam or cork underlayment perpendicular to the planned direction of your flooring, butting edges together and taping seams.
Determine your starting wall (usually the longest) and establish a perfectly straight line parallel to it. Place spacers against the wall to create that critical 1/4″ expansion gap, then install your first row with the groove facing the wall.
For click-lock systems, you’ll angle each new board into the previous row, then press down to lock it in place. If you’re using tongue-and-groove, apply a thin bead of wood glue to the groove before connecting boards.
Maintain a staggered pattern with end joints at least 6 inches apart between rows for structural integrity. When you reach the final row, cut boards to fit (remembering that expansion gap!) and use a pull bar to lock everything in place.
Finish by installing appropriate transition strips at doorways and baseboards or quarter round to cover those expansion gaps.
While floating floors can work well, I’ve noticed they’re more likely to develop movement issues over time, especially in larger rooms or areas with significant temperature swings.
How to Glue Engineered Hardwood to Concrete Like a Pro
Now for what we consider the best way to install engineered hardwood flooring on concrete slab – the glue-down method that creates floors that feel and perform like traditional hardwood.
Begin with one final check of your subfloor – it must be clean, dry, flat, and properly prepared with any necessary moisture mitigation. Next, plan your layout by snapping a chalk line parallel to your starting wall. This line should be positioned the width of several boards plus that crucial 1/4″ expansion gap from the wall.
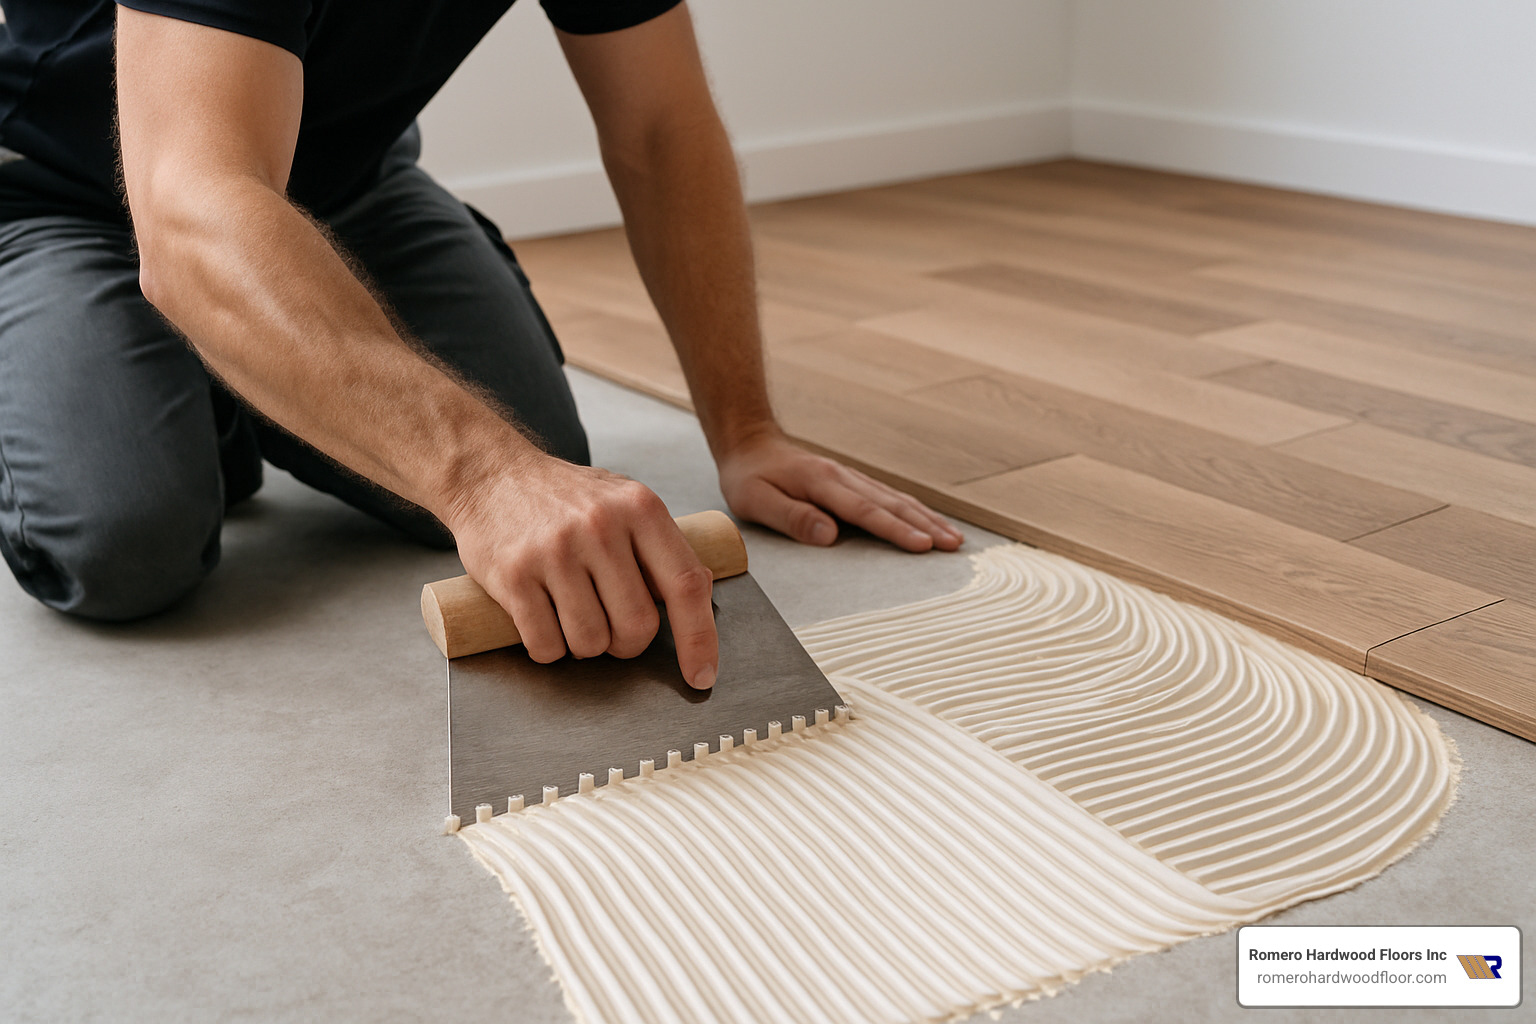
Using a manufacturer-recommended notched trowel, spread adhesive at a 45° angle in a small, manageable section about 2-3 feet wide. The proper trowel angle ensures you create optimal adhesive ridges for maximum bonding. We prefer Bostik Pro-Cure for most installations due to its excellent bonding properties and moderate working time.
Place your first board along the chalk line with the tongue facing away from the wall, pressing firmly into the adhesive. Continue the first row, applying wood glue to the end joints if recommended by your flooring manufacturer.
Here’s a pro tip: periodically lift a board to verify at least 90% adhesive transfer from the concrete to the board’s back. If you’re not seeing good transfer, adjust your trowel angle or pressure.
As you continue spreading adhesive and laying boards, maintain proper expansion gaps and staggered end joints. Use a tapping block and mallet to ensure tight seams between boards, and immediately clean up any adhesive that gets on the surface using the manufacturer’s recommended cleaner.
After installing a large section (or the entire floor for smaller rooms), use a 100-150 lb roller to ensure complete adhesive contact. Roll in both directions for best results. For the last row, cut boards to fit, maintaining the expansion gap, and use a pull bar to draw them tight.
“One trick we’ve developed over years of installations,” I like to share with clients, “is using small dots of hot glue every 8-10 inches to temporarily tack boards in place while the adhesive sets. This prevents boards from sliding and maintains perfect alignment without leaving a trace once removed.”
Allow proper curing time – restrict foot traffic for at least 24 hours and avoid heavy furniture placement for 48-72 hours. This patience pays off with decades of beautiful performance.
In a recent Medford installation, my client was concerned about a click-lock engineered hardwood product they had purchased, wondering if it could be glued down instead of floated. We confirmed with the manufacturer that their product was suitable for glue-down installation, which resulted in a much more stable floor than the floating method would have provided.
Smart Details: Expansion Gaps, Transitions & Obstacles
Mastering the best way to install engineered hardwood flooring on concrete slab means paying attention to crucial details that ensure long-term performance. These seemingly small considerations can make the difference between a floor that lasts for decades and one that develops problems within months.
Expansion Gaps: Always maintain a 1/4″ gap between the flooring and all vertical surfaces (walls, cabinets, pipes, etc.). While engineered hardwood is more dimensionally stable than solid wood, it still needs room to adjust to environmental changes.
“I once saw a DIY installation where the homeowner installed the flooring tight to the walls,” recalls our project manager. “Within six months, the floor had buckled in multiple places because it had nowhere to expand during humid weather.”
Transitions: Proper transitions between different flooring materials or at doorways are critical:
- T-Moldings: Used between rooms or in doorways where the flooring continues into the next space.
- Reducers: Create a smooth transition from engineered hardwood to lower-height flooring like vinyl or carpet.
- Thresholds: Used at exterior doors or transitions to stone/tile.
- Stair Nosing: Essential for a safe and attractive transition at stair edges.
Handling Obstacles:
- Door Jambs: Rather than cutting the flooring to fit around door jambs, we undercut the jambs using a jamb saw. This allows the flooring to slide underneath for a cleaner look and proper expansion space.
- Pipes and Vents: For pipes, measure and mark the location on the board, then drill a hole 1/2″ larger than the pipe diameter to allow for movement. For floor vents, carefully measure and cut with a jigsaw, again allowing slight clearance for expansion.
- Irregular Walls: Use a scribe tool to trace the wall contour onto the boards that will run along uneven walls, then cut along the traced line for a perfect fit while maintaining the expansion gap.
In a historic Salem home renovation, we encountered numerous obstacles including radiator pipes, uneven walls, and built-in cabinetry. By carefully templating each unique cut and maintaining proper expansion gaps throughout, we created a seamless installation that accommodated the home’s character while ensuring the floor’s long-term stability.
Avoiding the Three Negative R’s: Common Mistakes & How to Dodge Them
When it comes to the best way to install engineered hardwood flooring on concrete slab, we’ve seen it all at Romero Hardwood. Over our years serving homes from Revere to Winchester, we’ve developed what we playfully call the “Three Negative R’s” philosophy: Repair, Revise, and Redo – the costly consequences that come from cutting corners during installation.
“The most expensive floor is the one you have to install twice,” I often tell my clients with a smile that masks the seriousness of this truth. Let me walk you through the pitfalls we’ve seen homeowners and even some contractors fall into.
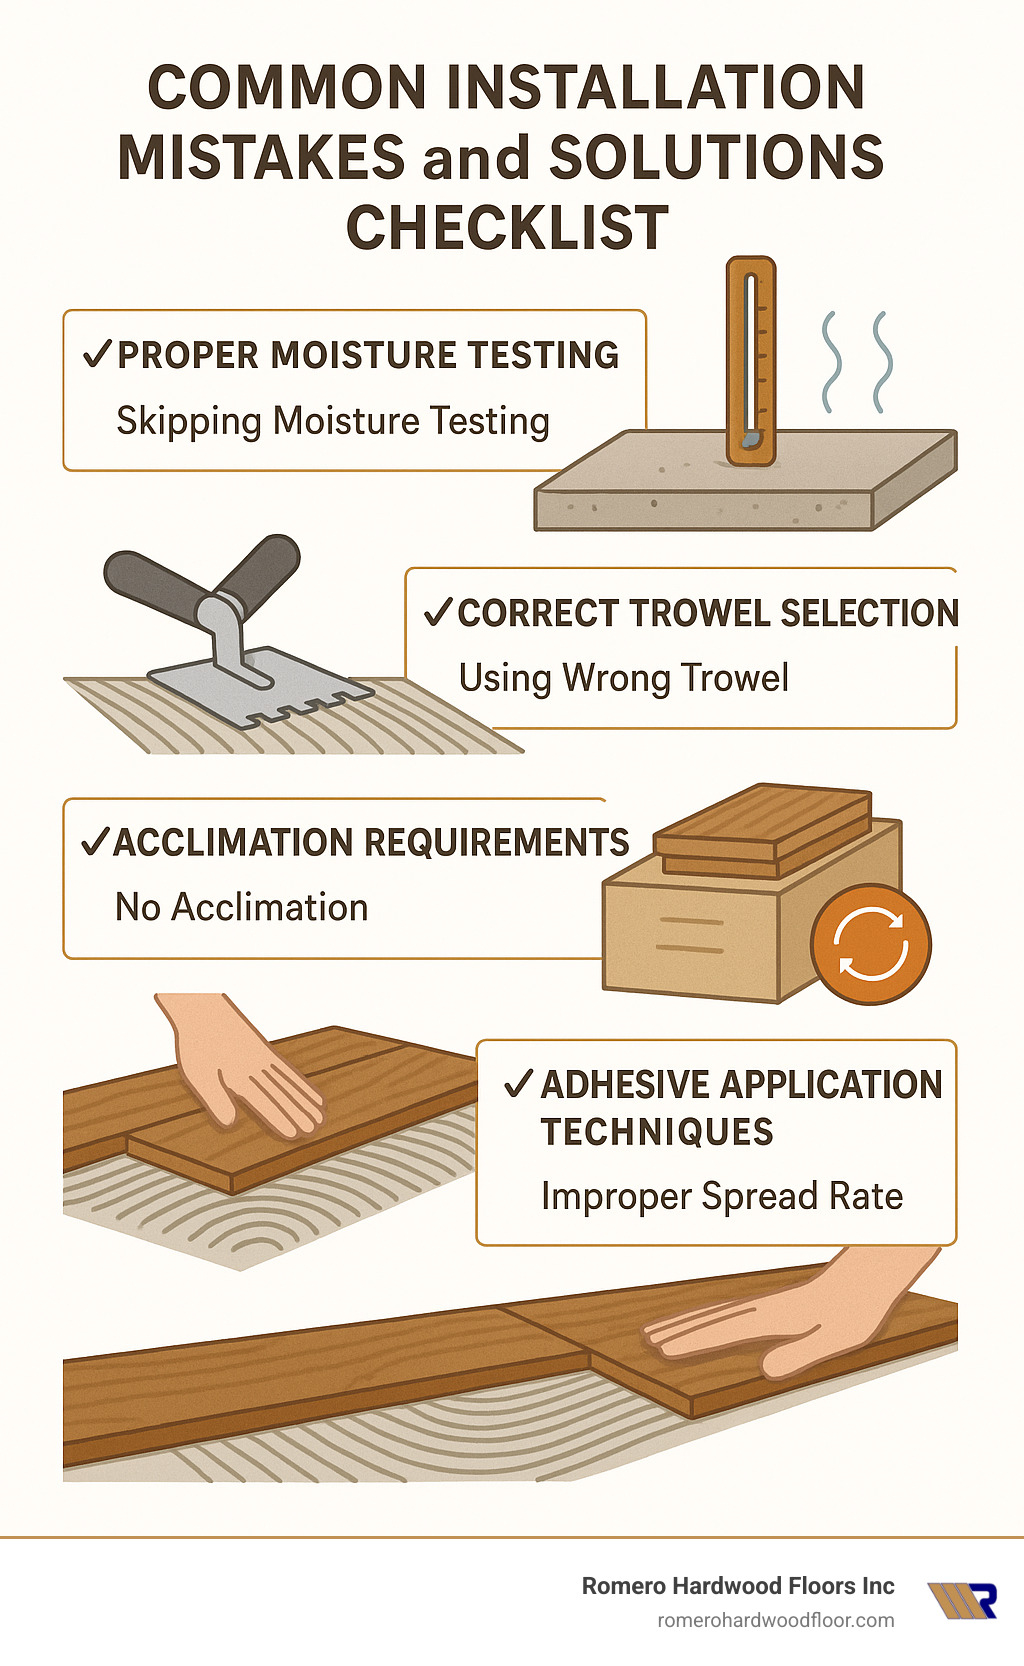
Skipping moisture testing might be the most heartbreaking mistake we encounter. Just last month, we met with a Medford family whose beautiful engineered maple floor had begun to cup and warp after only eight months. The previous installer had assured them their 15-year-old basement slab was “plenty dry.” Our testing revealed moisture readings nearly double the acceptable limits. Always test your concrete properly – it’s like checking for a fever before deciding if you’re healthy enough to run a marathon.
Using the wrong trowel size seems minor until you realize it’s like trying to frost a cake with a paint roller. Each adhesive manufacturer specifies exact notch patterns and sizes for a reason. Too small, and you won’t get enough adhesive for proper bonding; too large, and you waste product while potentially creating height variations. We keep a dedicated trowel for each adhesive system we use and replace them when they show wear.
Walking on floors too soon is temptingly easy to do. After all the work of installation, it’s natural to want to enjoy your new floor immediately. But as a client in Salem learned when her holiday dinner guests left footprint impressions in her new floor, adhesives need proper curing time. Think of it like baking – opening the oven too soon ruins the cake!
Inadequate acclimation remains a persistent problem, especially in our New England climate where seasonal changes are dramatic. Your engineered hardwood needs time to adjust to your home’s unique environment before installation. We had a customer in Wakefield who insisted on immediate installation of flooring that had been delivered that morning. We gently explained that rushing acclimation would be like asking someone to run a marathon immediately after stepping off a plane from a different climate.
Allowing adhesive to skin over happens when installers try to work too large an area at once. The adhesive begins to dry and form a skin before the wood makes contact, dramatically reducing bond strength. We work in manageable 2-3 foot sections, ensuring every board makes perfect contact with fresh adhesive.
One of our Woburn clients shared this cautionary tale: “My brother-in-law convinced me he could install my engineered hardwood to save money. Six months later, boards were popping up everywhere. When Romero came to fix it, they found he’d spread adhesive across the entire room before starting to lay boards. By the time he reached the far side, the adhesive had already dried.”
Ignoring subfloor flatness is like building a house on a hillside without leveling the foundation. Every bump and dip in your concrete will eventually telegraph through your beautiful hardwood. We’re meticulous about grinding down high spots and filling low areas to achieve that critical 1/8″ in 10′ flatness.
Improper board patterns might seem like an aesthetic concern, but staggering end joints is actually structural. Short pieces at row ends or “stair-step” patterns create weak points that can lead to separation and damage. We ensure end joints are staggered by at least 6 inches between rows and avoid pieces shorter than 6 inches at row ends.
The good news? All these mistakes are completely avoidable with proper planning and execution. When we install engineered hardwood at Romero Hardwood Floors, we follow a detailed checklist that eliminates these common pitfalls, ensuring your floor will stand the test of time.
As one satisfied Beverly customer told us, “The attention to detail during installation was impressive – from moisture testing to the final cleaning. Five years later, our engineered oak floor still looks brand new, even with two kids and a dog!”
Post-Installation & Long-Term Care
The journey to enjoying your beautiful engineered hardwood floor doesn’t end with installation. In fact, what you do after the last board is secured can determine how your floor performs for decades to come. At Romero Hardwood Floors, we’ve seen how proper care transforms a great installation into a lifetime investment.
Those first 48 hours are critical. After determining the best way to install engineered hardwood flooring on concrete slab and completing the work, patience becomes your greatest virtue. Light foot traffic should be avoided for at least 24 hours, giving the adhesive time to form its initial bond. For furniture and normal household activities, wait a full 48 hours. Heavy pieces like refrigerators or pianos? Give it the full 72 hours to ensure nothing disrupts the curing process.
“I always tell my clients that the hardest part isn’t installing the floor—it’s waiting to enjoy it,” jokes Francisco, our lead installer. “But those who wait are rewarded with floors that stay beautiful for decades.”
Your first cleaning should be gentle and minimal. Simply vacuum without using a beater bar or sweep with a soft-bristled broom to remove any installation debris. Once the adhesive has fully cured (typically 72 hours), you can lightly damp-mop with a manufacturer-approved hardwood cleaner. Remember—damp doesn’t mean wet! Your mop should leave barely any moisture behind.
Felt pads are your floor’s best friends. Before returning furniture to the room, apply quality felt pads to all legs and contact points. For heavier pieces, consider wide, soft rubber casters or protective cups that distribute weight more evenly. This simple step prevents scratches and dents that can permanently damage even the most durable engineered hardwood.
Long-term care focuses on three key principles: cleaning, climate control, and protection.
For cleaning, develop a weekly routine of sweeping or vacuuming to remove abrasive particles that can scratch your floor over time. When deeper cleaning is needed, stick with products specifically formulated for engineered hardwood—all-purpose cleaners often contain chemicals that dull finishes or damage wood.
Climate control might sound technical, but it’s simply about keeping your home comfortable for both you and your floors. Engineered hardwood performs best in environments with 30-50% relative humidity and temperatures between 65-75°F. During winter months when heating systems dry the air, consider using a humidifier. In humid summers, air conditioning or dehumidifiers help maintain optimal conditions.
“A client in Salem installed a smart thermostat that monitors humidity as well as temperature,” shares our service manager. “Her floors have remained flawless for over seven years, even through New England’s seasonal extremes.”
Protection comes in many forms—strategically placed mats at exterior doors capture dirt and moisture before they reach your floors. Area rugs in high-traffic zones provide additional protection, though be sure to use rugs with breathable backing rather than rubber or vinyl that can trap moisture. And of course, the most important protection is promptly wiping up any spills before they can seep into seams or damage the finish.
What about refinishing? This is where engineered hardwood differs most from solid hardwood. While solid floors can typically be refinished many times, engineered products have a limited wear layer. Most premium engineered floors with wear layers of 3mm or thicker can be professionally refinished 1-3 times. More budget-friendly options with thinner wear layers may only support screen-and-recoat processes rather than full sanding.
A Revere family we worked with has maintained their engineered maple floors for over a decade with just one light refinishing. Their secret? Consistent care and addressing small issues before they become big problems. As the homeowner told us, “It’s like maintaining your car—regular oil changes cost less than a new engine!”
By following these care guidelines, your engineered hardwood floor can remain a beautiful, valuable part of your home for generations. For specific care questions about your floor, our maintenance experts are always happy to provide personalized advice.
Radiant Heat & Other Special Cases
There’s something magical about stepping onto a warm wood floor on a frosty winter morning. If you’re considering radiant heat with your concrete slab, you’ll be happy to know that the best way to install engineered hardwood flooring on concrete slab with heating systems just requires some extra care and planning.
“Radiant heat and engineered hardwood can be best friends or worst enemies—it all comes down to the installation,” says our senior installer who’s completed dozens of heated floor projects throughout Massachusetts.
Your radiant heating system needs proper preparation before we can install your beautiful new floors. We always ensure the system has been running for at least two weeks prior to installation. This crucial step drives out any lingering moisture that could cause problems later on.
When installation day arrives, we’ll turn off your heating system completely 24 hours beforehand. This gives the concrete a chance to cool to a consistent temperature. After we’ve completed the installation, we’ll help you implement a gentle warm-up schedule—increasing the temperature by no more than 5°F each day until you reach your desired comfort level.
One absolute rule we never break: keep the surface temperature below 85°F. Anything hotter can damage even the best engineered hardwood. We recommend installing temperature sensors in the floor to prevent accidental overheating that could void your warranty and harm your investment.
The adhesive we use matters tremendously in heated floor installations. We select special formulations designed to maintain flexibility through the heating and cooling cycles your floor will experience. These premium adhesives cost a bit more but provide invaluable insurance against future problems.
Not all wood species handle heat equally well. In our experience installing heated floors throughout Revere and surrounding communities, we’ve found that traditional domestic species like oak, maple and ash perform excellently with radiant heat. Some exotic hardwoods with extreme density might be more temperamental—we’ll guide you toward the best choices for your specific situation.
A client in Winchester shared: “I was worried about installing wood over my heated concrete floor, but three winters later, my engineered white oak still looks perfect. The floor heats evenly and there’s no gapping between boards like I had with my old solid hardwood floors.”
Beyond Radiant Heat: Other Special Considerations
Expansive, open-concept spaces present their own challenges. For rooms exceeding 30 feet in any direction, we might recommend incorporating subtle expansion joints within your floor layout. These barely noticeable breaks allow the wood to move naturally without buckling or warping in response to temperature and humidity changes.
Sunrooms and spaces with abundant natural light require special attention too. The best way to install engineered hardwood flooring on concrete slab in these sun-drenched areas includes selecting UV-resistant finishes and discussing window treatment options. That gorgeous sunshine can cause localized drying and potential gapping if left unmanaged.
For homes with split levels or multiple concrete elevations, we approach each section as its own installation. Proper transitions between these areas not only look beautiful but also allow each section to move independently as environmental conditions change.
“We installed engineered hardwood throughout a three-level Marblehead home with concrete subfloors,” recalls Francisco, our founder. “By treating each level as its own unique installation with proper transitions, the floors have remained stable through four New England seasons with no callbacks.”
Whether you’re dealing with radiant heat, unusual layouts, or other special circumstances, our team at Romero Hardwood Floors has likely encountered and solved similar challenges in our years of service to Massachusetts homeowners. The key is planning ahead and adapting the installation method to your specific conditions.
Want to learn more about heated floors? Check out our detailed guide on heated hardwood floors on concrete for additional information specific to your project.
Frequently Asked Questions About Engineered Hardwood on Concrete
What expansion gap is required?
When installing engineered hardwood on concrete, that little space around the edges isn’t just an installation detail—it’s absolutely essential for your floor’s long-term health.
For most installations, you’ll want to maintain a 1/4″ expansion gap around the entire perimeter of the room and around any fixed objects like kitchen islands or built-in cabinets. This small but mighty gap allows your beautiful new floor to breathe, expanding and contracting naturally as the seasons change and humidity levels fluctuate.
During installation, we use plastic spacers to keep this gap consistent—they’re simple but incredibly important tools that prevent you from accidentally snugging boards too tight against the wall while you work. Once everything’s installed, your baseboards or quarter round molding will cover these gaps completely, giving you a clean, finished look.
“I remember a client who insisted we install the floor tight to the walls because he didn’t want any gaps,” recalls Francisco from our team. “Six months later, we were back replacing buckled sections after the summer humidity caused the wood to expand with nowhere to go.”
For larger spaces—particularly rooms exceeding 30 feet in any direction—you might need additional expansion space. Always check your specific manufacturer’s guidelines, as some products have unique requirements based on their construction.
Can I install engineered hardwood in my basement?
Yes! This is actually one of the scenarios where engineered hardwood truly shines compared to solid hardwood. Thanks to its dimensional stability and cross-layered construction, engineered hardwood can absolutely work in basement spaces when installed properly.
Basements present unique challenges since they’re below-grade spaces where traditional solid hardwood would be a recipe for disaster. The key to success lies in proper preparation and moisture management:
Thorough moisture testing isn’t just recommended—it’s non-negotiable in basement installations. Even basements that have been “dry for years” can surprise you with moisture test results. We’ve seen countless situations where homeowners skipped this step only to face problems months later.
Moisture mitigation systems are typically necessary in basement installations. The investment in proper moisture control pays dividends by protecting your beautiful new floor for decades.
Maintaining proper humidity through dehumidification during damp months helps keep your floor in optimal condition. Aim for that sweet spot between 30-50% relative humidity.
Choosing the right product makes a difference too—opt for engineered hardwood with thicker wear layers and more stable construction for best results in variable basement conditions.
One of our Revere clients shared her experience: “After watching two laminate floors warp and buckle in our basement, we were hesitant to try wood again. But the engineered hardwood Romero installed, with proper moisture barriers, has performed beautifully for over five years now—even through some pretty humid summers.”
How soon can I walk on my new glue-down floor?
I know it’s tempting to move furniture back and start enjoying your beautiful new floor immediately, but patience truly pays off when it comes to glue-down installations on concrete.
For light foot traffic (think: carefully walking across the room in clean socks), you’ll need to wait at least 24 hours after installation. The adhesive needs this initial time to establish its bond.
Normal household traffic should wait until the 48-hour mark. This gives the adhesive enough time to cure to a point where it can handle regular daily movement.
When it comes to placing furniture back in the room, give your new floor 48-72 hours. And for heavy furniture or appliances like refrigerators or pianos, a full 72-hour wait is best.
“One of the hardest parts of our job is convincing excited homeowners to stay off their beautiful new floors,” laughs our lead installer. “But those who follow our curing timeline guidelines never regret it.”
Rushing this process might seem harmless, but it can cause boards to shift or bond improperly while the adhesive is still setting, potentially creating permanent issues that no amount of maintenance can fix later.
If you absolutely must access the room sooner (we understand that life happens!), we recommend placing pieces of plywood over the installation to distribute your weight and prevent direct pressure on individual boards. This simple step can prevent headaches down the road.
The best way to install engineered hardwood flooring on concrete slab includes giving your adhesive the proper time to cure—your patience will be rewarded with decades of beautiful, problem-free flooring.
Conclusion
When it comes to the best way to install engineered hardwood flooring on concrete slab, I’ve seen how a properly executed glue-down installation truly transforms spaces. After hundreds of installations across Massachusetts homes, I can confidently say this method delivers superior performance, longevity, and homeowner satisfaction. Yes, it requires careful preparation and attention to detail, but trust me—the results are absolutely worth the investment.
Think of your flooring installation as building a relationship with your home. Like any good relationship, it needs a solid foundation, proper care, and attention to thrive. Here’s what I’ve learned matters most:
Proper preparation isn’t just important—it’s essential. Your concrete must be clean, flat, dry, and properly tested for moisture before the first board ever touches the floor. Skipping this step is like building that beautiful dream home on a shaky foundation.
I still remember a client in Salem who called us after their DIY installation started showing problems just months after completion. “I wish I’d known how important the prep work was,” they told me. “I was so focused on the beautiful wood that I rushed through getting the concrete ready.”
Moisture control is absolutely critical. In my 15+ years installing floors, moisture problems are the number one cause of floor failures. Always conduct appropriate testing and implement the right mitigation measures. This single step can be the difference between a floor that lasts for decades and one that fails within months.
The quality of your materials really does matter. Choose premium engineered hardwood with an appropriate wear layer and an adhesive specifically formulated for concrete subfloors. While budget considerations are real, this is truly an area where investing in quality pays dividends for decades.
Don’t rush the acclimation process. Allow sufficient time for the wood to adjust to your home’s environment. Your engineered hardwood needs to “get comfortable” in its new home before installation begins.
The small details make the biggest difference. Proper expansion gaps, well-planned transitions, and careful management around obstacles ensure long-term performance. These seemingly minor considerations are often what separate professional installations from problematic ones.
And finally, how you care for your floor after installation preserves its beauty for years to come. Follow manufacturer guidelines for cleaning and maintenance to maximize the life of your floor. A little care goes a remarkably long way.
At Romero Hardwood Floors Inc., we’ve been changing cold concrete slabs into beautiful, warm living spaces throughout Revere and surrounding Massachusetts communities since 2006. Our commitment to quality installation and customer satisfaction has built our reputation as the region’s trusted hardwood flooring experts.
Whether you’re finishing a basement, updating your kitchen, or building a new home, engineered hardwood offers the perfect combination of natural beauty, practical durability, and long-term performance for concrete slab foundations. When installed using our proven glue-down method, you’ll enjoy a floor that not only looks stunning today but performs flawlessly for decades to come.
Ready to transform your concrete slab with beautiful engineered hardwood flooring? Contact Romero Hardwood Floors Inc. today for a consultation and estimate. Our team of installation experts serves communities throughout Massachusetts, including Beverly, Chelsea, Danvers, East Boston, Gloucester, and beyond.
