Fixing Scratches on Fake Wood: 7 Powerful Solutions 2025
The Reality of Scratched Laminate: What You Need to Know
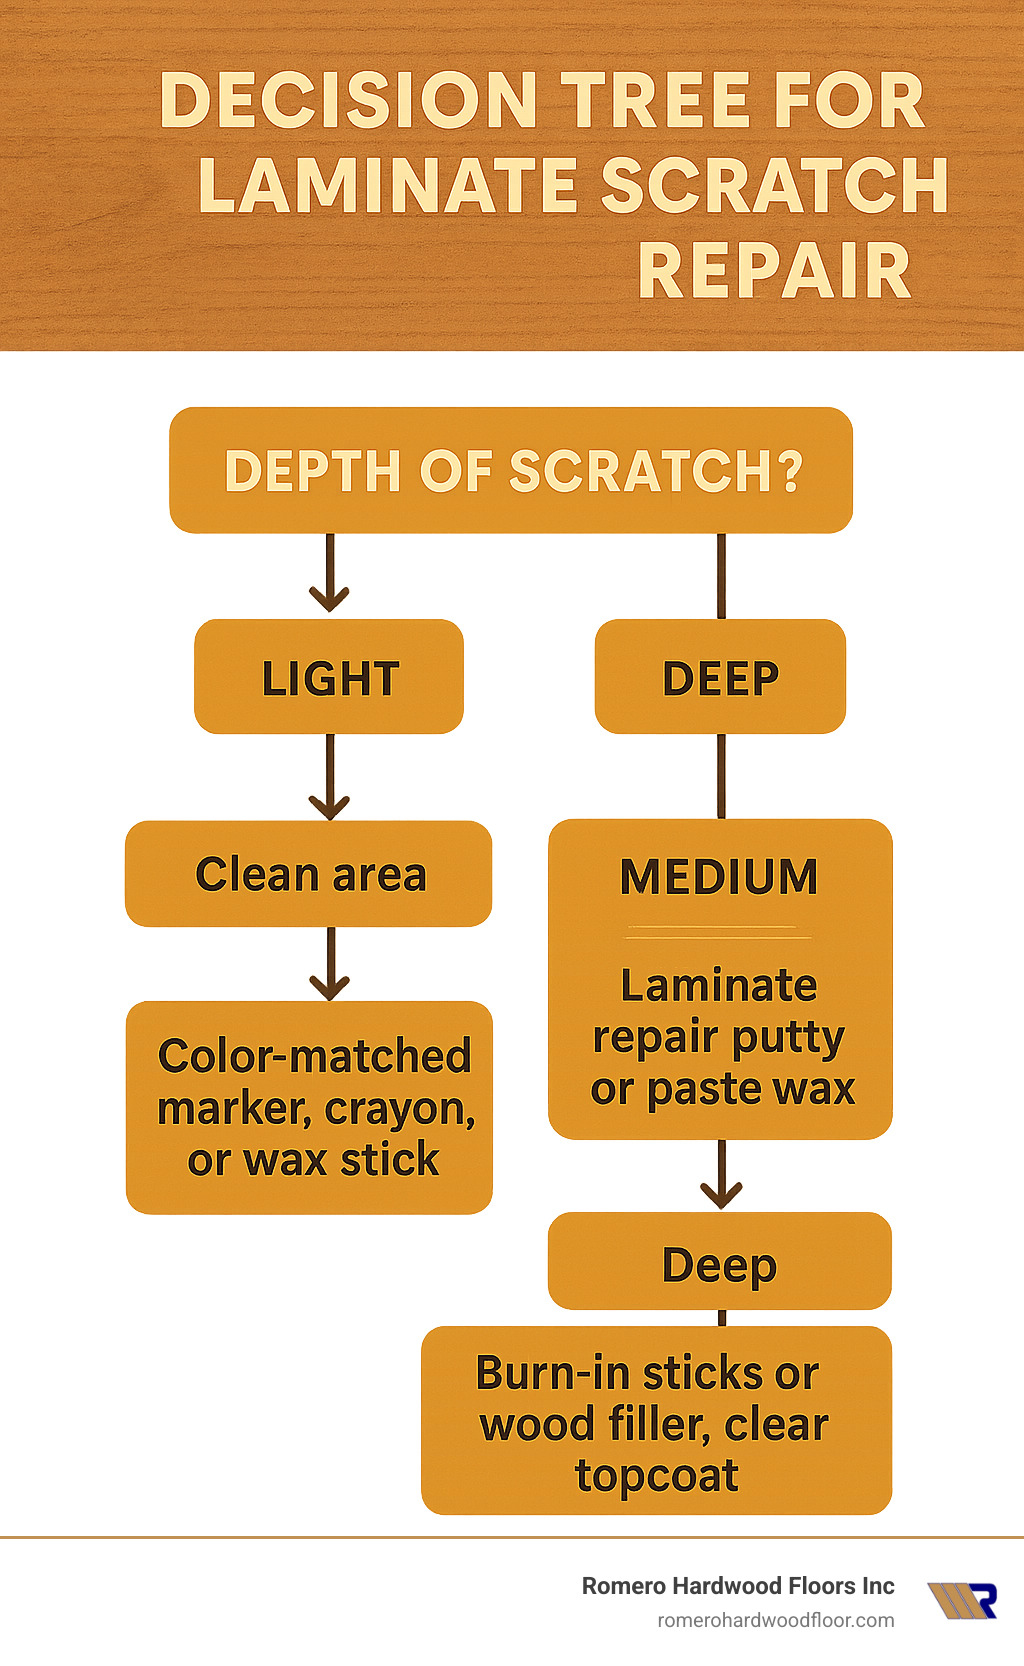
Fixing scratches on fake wood is possible with these simple methods:
- Light scratches: Clean the area and use a color-matched marker, crayon, or wax stick
- Medium scratches: Apply laminate repair putty or paste wax in matching color
- Deep scratches: Use burn-in sticks or wood filler, then add a clear topcoat
- Severe damage: Consider professional repair or plank replacement
That beautiful laminate floor you installed promised durability and scratch resistance, but the reality often falls short. Fixing scratches on fake wood floors is something most homeowners face eventually, whether from pet claws, furniture moves, or everyday traffic. Unlike real hardwood that can be sanded down multiple times, laminate flooring has only a thin protective layer covering the printed image layer. Once scratched, that damage reveals the wood fiber core beneath.
The good news? You don’t need to replace your entire floor. With the right techniques and materials, most scratches can be repaired in about 30 minutes with basic DIY skills.
I’m Francisco Romero, owner of Romero Hardwood Floors Inc., and with over 15 years of experience in floor installation and restoration, I’ve helped countless homeowners with fixing scratches on fake wood surfaces to restore their floors’ appearance without costly replacements.
Fixing scratches on fake wood terminology:
– fixing dents in wood
– fixing floorboard squeaks
– hardwood floor lifting repair
Why This Guide Matters
Many homeowners buy laminate flooring believing the “scratch-resistant” marketing claims, only to find that while more durable than some alternatives, laminate isn’t invincible. At Romero Hardwood Floors Inc., we’ve seen the frustration when customers realize their floors aren’t as impervious to damage as they hoped.
This guide matters because:
- DIY repair can save you hundreds compared to professional services
- Most scratches can be fixed without replacing entire planks
- Proper repair techniques extend your floor’s lifespan
- Knowing your options helps you make informed decisions about when to call professionals
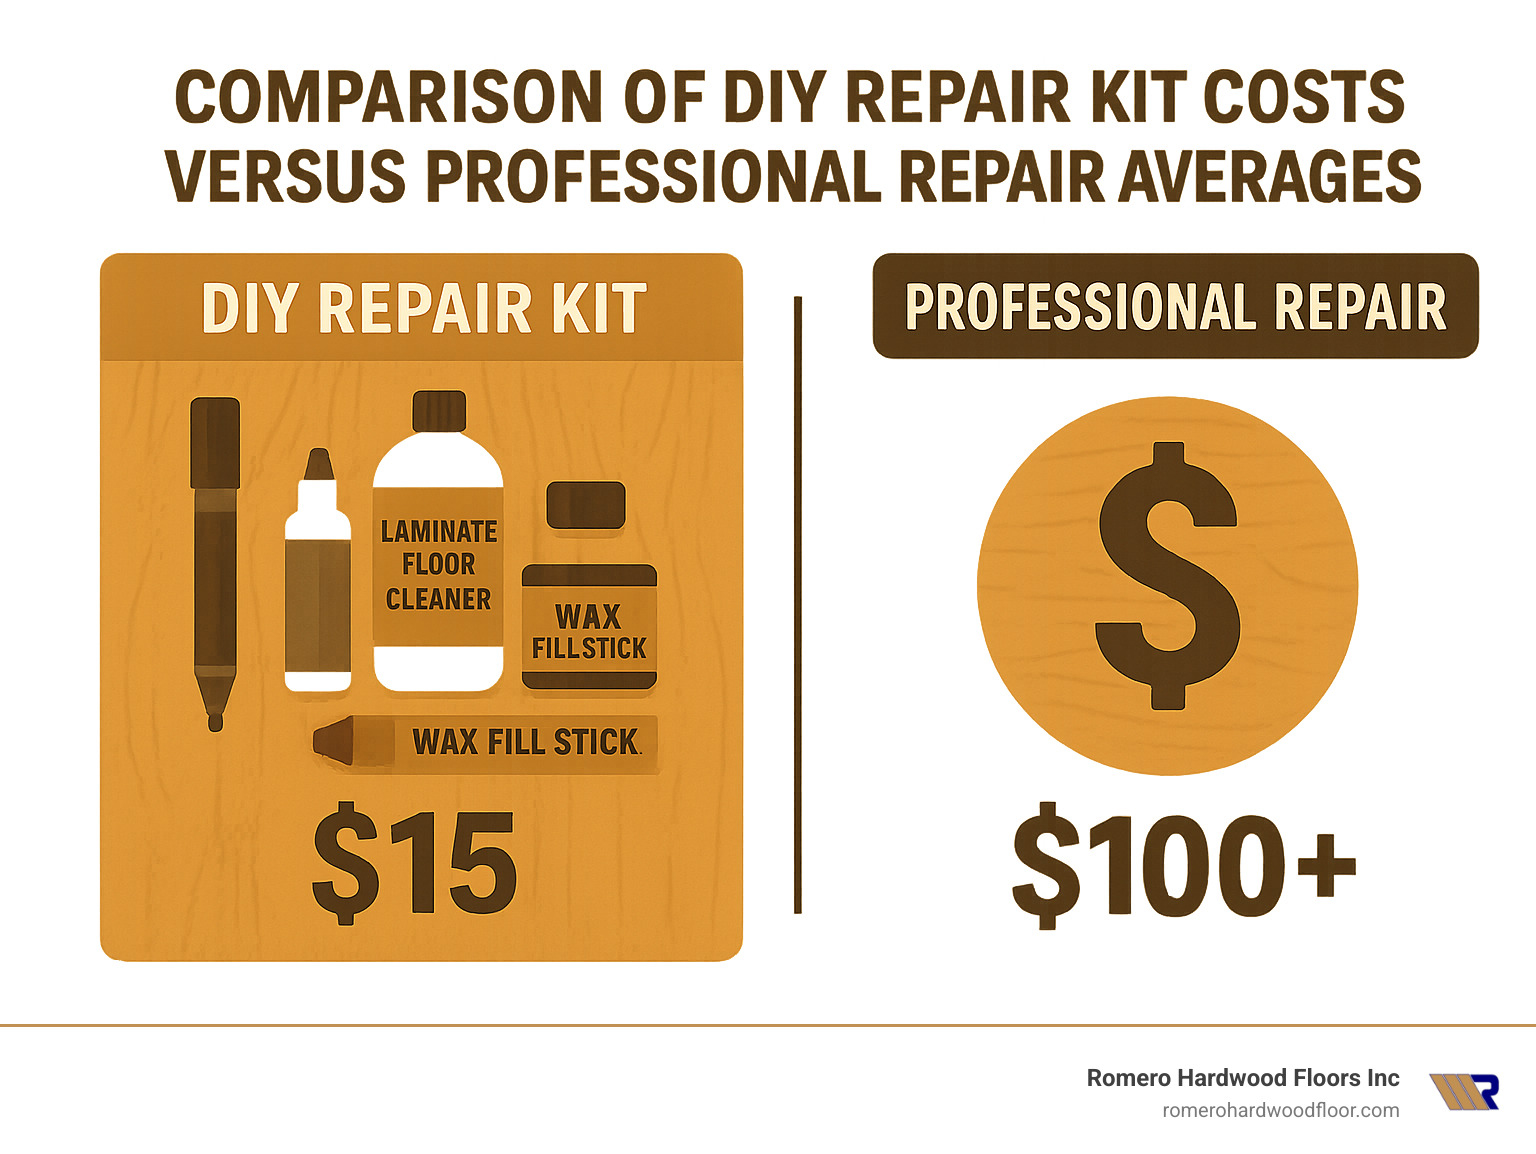
With the average cost of professional laminate floor scratch repair ranging from $100 to $300 (and plank replacement potentially costing $300 to $900 or more), learning these DIY techniques could save you significant money over your floor’s lifetime.
What Exactly Is “Fake Wood”? Understanding Laminate Flooring
Ever wondered what’s actually under your feet when you walk on a laminate floor? Despite its convincing wood appearance, what we often call “fake wood” isn’t wood at all!

Laminate flooring is actually a clever sandwich of synthetic materials designed to mimic the beauty of hardwood while offering some practical advantages. At Romero Hardwood Floors Inc., we like to help our customers understand exactly what they’re walking on.
Your laminate floor consists of four distinct layers working together:
The top wear layer is your floor’s bodyguard – a transparent coating of aluminum oxide or melamine resin between 0.1mm and 0.6mm thick. This thin but mighty layer is what stands between your floor and the outside world, providing protection against everyday scratches, spills, and sun fading.
Just beneath that sits the design layer – essentially a high-resolution photograph of wood. This paper-thin layer is what creates the illusion of oak, maple, cherry, or whatever wood species your laminate is imitating. When you’re fixing scratches on fake wood, protecting this image layer is crucial since once damaged, it can’t be restored like real wood.
The bulk of your floor’s structure comes from the core layer, typically made from high-density fiberboard (HDF) or medium-density fiberboard (MDF). This sturdy middle provides stability and some resistance to dents and impacts.
Finally, the backing layer works as your floor’s foundation, providing structural support while helping to block moisture from seeping up from your subfloor. This moisture resistance is one advantage laminate has over some natural wood options.
Most modern laminate floors feature ingenious “click-lock” or “tongue-and-groove” edges that snap together without glue. This floating installation method is part of what makes laminate so popular for DIY projects – no need for messy adhesives or specialized tools.
When shopping for laminate, you’ll encounter AC ratings (Abrasion Class) ranging from AC1 to AC5. Think of this as your floor’s toughness score:
AC1-AC2: Perfect for bedrooms and other low-traffic areas
AC3: The sweet spot for most homes – suitable for all residential areas and light commercial use
AC4-AC5: Commercial-grade durability for high-traffic spaces
At Romero Hardwood Floors Inc., we typically recommend at least AC3 rating for households with kids, pets, or busy lifestyles. The slightly higher cost pays off in better scratch resistance and longer lifespan before you’ll need to worry about fixing scratches on fake wood surfaces.
Understanding these layers helps explain why laminate scratches differently than real wood – and why the repair techniques we’ll cover in this guide are so important for preserving your floor’s appearance.
Why Laminate Scratches Faster Than Hardwood
Ever wonder why your “scratch-resistant” laminate floor seems to pick up marks so easily? You’re not imagining things. Despite what those glossy brochures promised, laminate floors often show scratches more readily than real hardwood. Let me explain why this happens.
The protective wear layer on laminate flooring typically uses aluminum oxide or melamine coatings that are indeed tough—but they’re also incredibly thin. We’re talking less than a millimeter in most cases! Once something manages to breach this microscopic armor, you’re immediately into the photo layer or core material. There’s simply no margin for error.
This is fundamentally different from real hardwood floors. When I install hardwood for clients at Romero Hardwood Floors Inc., I explain that solid wood provides several millimeters of actual wood that can be sanded and refinished multiple times over decades. With laminate, once that wear layer is compromised, that’s it—game over for that spot.
Fixing scratches on fake wood requires understanding this key limitation. There’s no “sanding it out” option like with real wood.
I’ve also noticed that while laminate’s wear layer is quite hard, it lacks the natural flexibility of wood. Real hardwood can sometimes absorb minor impacts that would leave a permanent mark on laminate. Think of it like the difference between something brittle and something with a bit of give.
Pet owners, take note! Those adorable claws create concentrated pressure points that can exceed even the best wear layer’s resistance. The same goes for high heels and furniture legs—especially when dragged across the surface. This is why felt pads under furniture are absolutely essential for laminate floors.
Perhaps most sneaky of all is what I call the “hidden grit effect.” That tiny bit of sand tracked in on shoes acts like sandpaper when walked on, gradually wearing down the protective layer over time. This is particularly noticeable in high-traffic areas like entryways.
Scientific research on surface abrasion confirms what I’ve seen in practice. According to studies cited on Hunker, laminate flooring with a typical AC3 rating (recommended for residential use) can withstand about 2,000-4,000 rotations in abrasion testing before showing visible wear. That sounds impressive in a lab, but in real homes with kids, pets, and the occasional dropped pot, those limits can be reached faster than you might expect.
Understanding these limitations doesn’t mean laminate is a bad choice—it just means having realistic expectations and knowing how to address scratches when they inevitably appear. And with the right techniques for fixing scratches on fake wood, you can keep your floors looking great for years to come.
Types of Laminate Floor Scratches & How to Assess Them
Let’s face it—not all scratches on your laminate floor tell the same story. Before you grab your repair supplies, you’ll need to play detective and figure out exactly what kind of damage you’re dealing with.
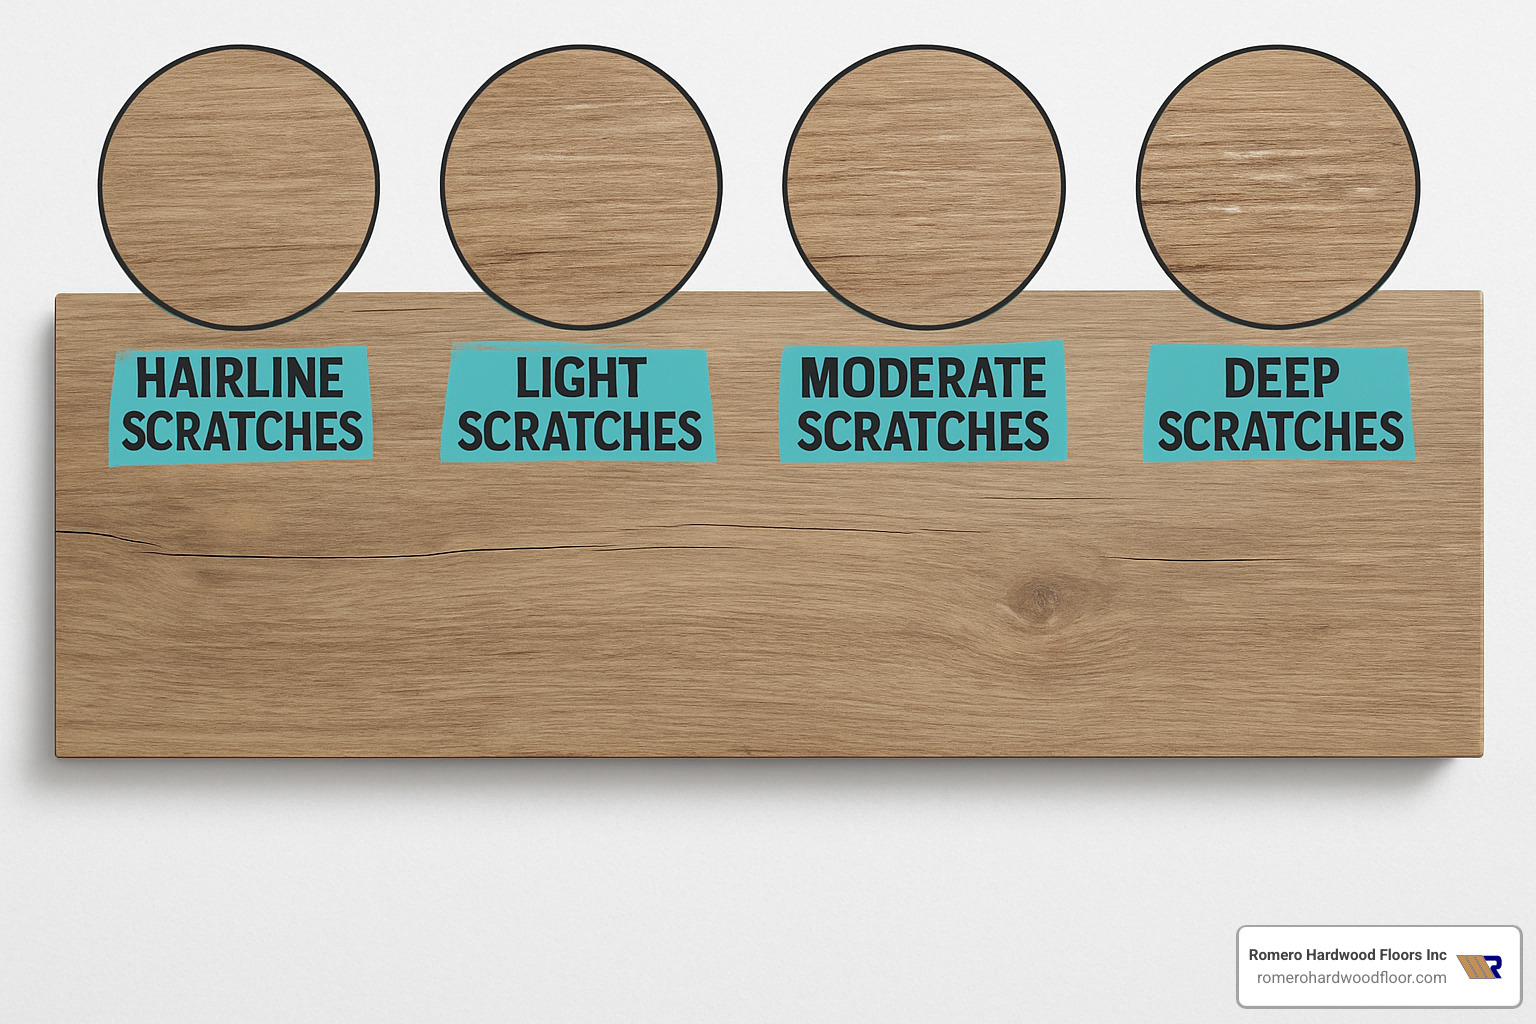
Hairline Scratches
Those sneaky little lines that seem to disappear when you look directly at them? Those are hairline scratches. They’re like the ninjas of floor damage—barely visible except when light hits them just right. Your fingernail glides smoothly over them, and they typically appear as fine white lines that haven’t broken through the wear layer. These are the easiest to fix, thankfully!
Light Scratches
A step up from hairline scratches, these pesky marks are visible without squinting or special lighting tricks. When you run your fingernail across, you might feel a slight catch, but they haven’t gone deep enough to expose the design layer underneath. Think of these as surface wounds that look worse than they actually are.
Deep Scratches
Now we’re getting into more serious territory. Fixing scratches on fake wood gets trickier when they’ve penetrated through the protective wear layer. Your fingernail definitely catches when you run it across, and you might notice a color change where the printed image layer has been damaged. These scratches often reveal the lighter-colored core material beneath—a clear sign you’ll need more than a simple touch-up.
Gouges
Ouch! Gouges are the result of something heavy dropping or sharp objects being dragged across your floor. They’ve dug into the core layer and may have even removed material. These wounds run deep and require more intensive repair methods. We see these most often under dining chairs or where furniture has been dragged.
Chipped Edges
These typically occur along the perimeter of planks, especially near walls or transitions. The click-lock edges have taken a hit, potentially causing planks to separate slightly. These can be particularly tricky because they affect how planks connect to each other.
How to Assess Your Scratches:
The Lighting Test is your first step. Check your floor under different lighting conditions—natural daylight streaming through windows, overhead lights, and my personal favorite, holding a flashlight at a low angle across the surface. You’d be amazed how many “invisible” scratches suddenly appear when light hits them from the side!
Next, try the Fingernail Rule. Simply run your fingernail perpendicular across the scratch. This simple test tells you volumes about the damage depth. If your nail catches, you’ve got more than surface damage to deal with.
For potentially deeper scratches, the Water Test can be revealing. Place a tiny drop of water on the scratch—if it soaks in or the area darkens, water has reached the absorbent core layer. Just be sure to wipe it dry immediately after checking!
Don’t forget to note your floor’s Gloss Level too. High-gloss floors not only show scratches more readily (sorry, shiny floor lovers!), but they also require more careful blending during repairs to avoid obvious patch jobs.
At Romero Hardwood Floors Inc., we’ve learned through thousands of floor inspections that proper assessment is the foundation of successful repairs. Taking a few minutes to really understand your scratches now will save you hours of frustration and potentially wasted materials later. Most homeowners can easily learn to distinguish between these scratch types with a little practice—and your floor will thank you for the precise treatment it deserves.
Toolkit: Supplies You’ll Need Before Fixing Scratches on Fake Wood
Before rolling up your sleeves to tackle those annoying scratches, let’s make sure you’ve got everything you need. Having the right supplies on hand makes fixing scratches on fake wood much less stressful and more successful.
Think of this as preparing for a small art project – because that’s essentially what you’re doing! You’re touching up and restoring the appearance of your floor’s surface with precision and care.
For Light Scratches:
I’ve found that most homeowners already have some of these basics around the house. For those subtle scratches that catch the light but aren’t deep, you’ll need color-matched touch-up markers or pens (usually $5-$10 at home improvement stores). Grab some non-abrasive laminate floor cleaner, a few microfiber cloths (never paper towels – they can scratch!), and some isopropyl alcohol (91% works best) to prep the surface. A clear coat pen can be helpful for restoring the sheen after your repair.
For Medium Scratches:
When your finger can feel the scratch but it hasn’t gone all the way through the wear layer, you’ll need wax sticks or crayons in matching colors ($5-$15 for a set). A plastic putty knife or even an old credit card works well for smoothing fillers. Color-matched floor putty ($5-$10) gives better results than wax for slightly deeper scratches. Keep soft cloths handy for buffing and some painter’s tape to protect the surrounding flooring from accidental smudges.
For Deep Scratches and Gouges:
The big guns! For serious damage, invest in a laminate repair kit with multiple colors ($15-$40) so you can custom-blend to match your floor exactly. Burn-in sticks with a heating tool ($20-$25) are fantastic for deeper repairs, melting into the gouge and creating a durable fix. Wood filler in the appropriate color, extremely fine-grit sandpaper (220 grit or higher), and clear floor polish to seal your repair will round out your arsenal.
General Supplies:
Don’t forget the basics: a vacuum cleaner with a soft brush attachment, a soft-bristled broom for removing debris, and good lighting (a portable work light is ideal for seeing all those tiny scratches). Rubber gloves will keep your hands clean, and if you can find a color chart from your flooring manufacturer, it’s golden for matching colors. Taking before-and-after photos with your smartphone helps track your progress and document successful techniques.
At Romero Hardwood Floors Inc., we’ve learned that investing in a comprehensive repair kit makes sense if you have a large area of flooring or multiple scratches to address. These kits typically include several color options, allowing you to blend the perfect match for your specific floor tone. For smaller areas or one-time fixes, individual markers or wax sticks may be all you need.
Pro tip: Always keep a few extra planks from your original installation for color matching or potential replacement down the road. No extras? Take a clear photo of your floor in natural light to help match colors when shopping for repair supplies. This simple step can save you multiple trips to the store!
Fixing Scratches on Fake Wood — Light & Hairline Marks
Those tiny scratches catching the light on your laminate floor can be frustrating, but don’t worry! Fixing scratches on fake wood when they’re still light or hairline marks is surprisingly simple and can prevent them from turning into bigger problems down the road.
Before you grab that repair marker, take a moment to properly prepare the area. I always tell my customers that preparation is half the battle. Start by thoroughly cleaning the scratch and surrounding area—any trapped dirt will make your repair job more noticeable than the original scratch! Make sure everything is completely dry before proceeding, and always test your repair products in a hidden spot first, like under a couch or refrigerator.
When I visit homes with minor laminate damage, I’m often asked if these small scratches really need attention. The answer is absolutely yes—those small marks can catch more dirt and eventually worsen if left untreated.
Step-by-Step for Light Scratches
First, vacuum the area with a soft brush attachment, then follow up with a dry microfiber cloth to capture any remaining dust particles. Even tiny specs can ruin your repair job.
Next, dampen a clean microfiber cloth with isopropyl alcohol and gently wipe the scratch. This removes invisible residues from cleaners or natural oils that might prevent your repair material from sticking properly. Let it dry completely—usually just a minute or two.
Now comes the important part: applying your color-matched marker. Follow the direction of the wood grain pattern printed on your laminate. I always recommend starting lighter than you think you need—you can always apply more, but removing too much color is nearly impossible. Use thin, gentle strokes rather than heavy pressure. Good lighting is crucial here so you can accurately match colors.
Immediately after applying the marker, wipe away any excess with a clean, dry cloth. Don’t let the ink pool or dry outside the scratch lines. For extra protection and to match the surrounding sheen, apply a clear coat pen after the color has fully dried.
Finally, be patient! Allow your repair to cure for at least 24 hours before subjecting it to heavy foot traffic or cleaning. Rushing this step can undo all your hard work.
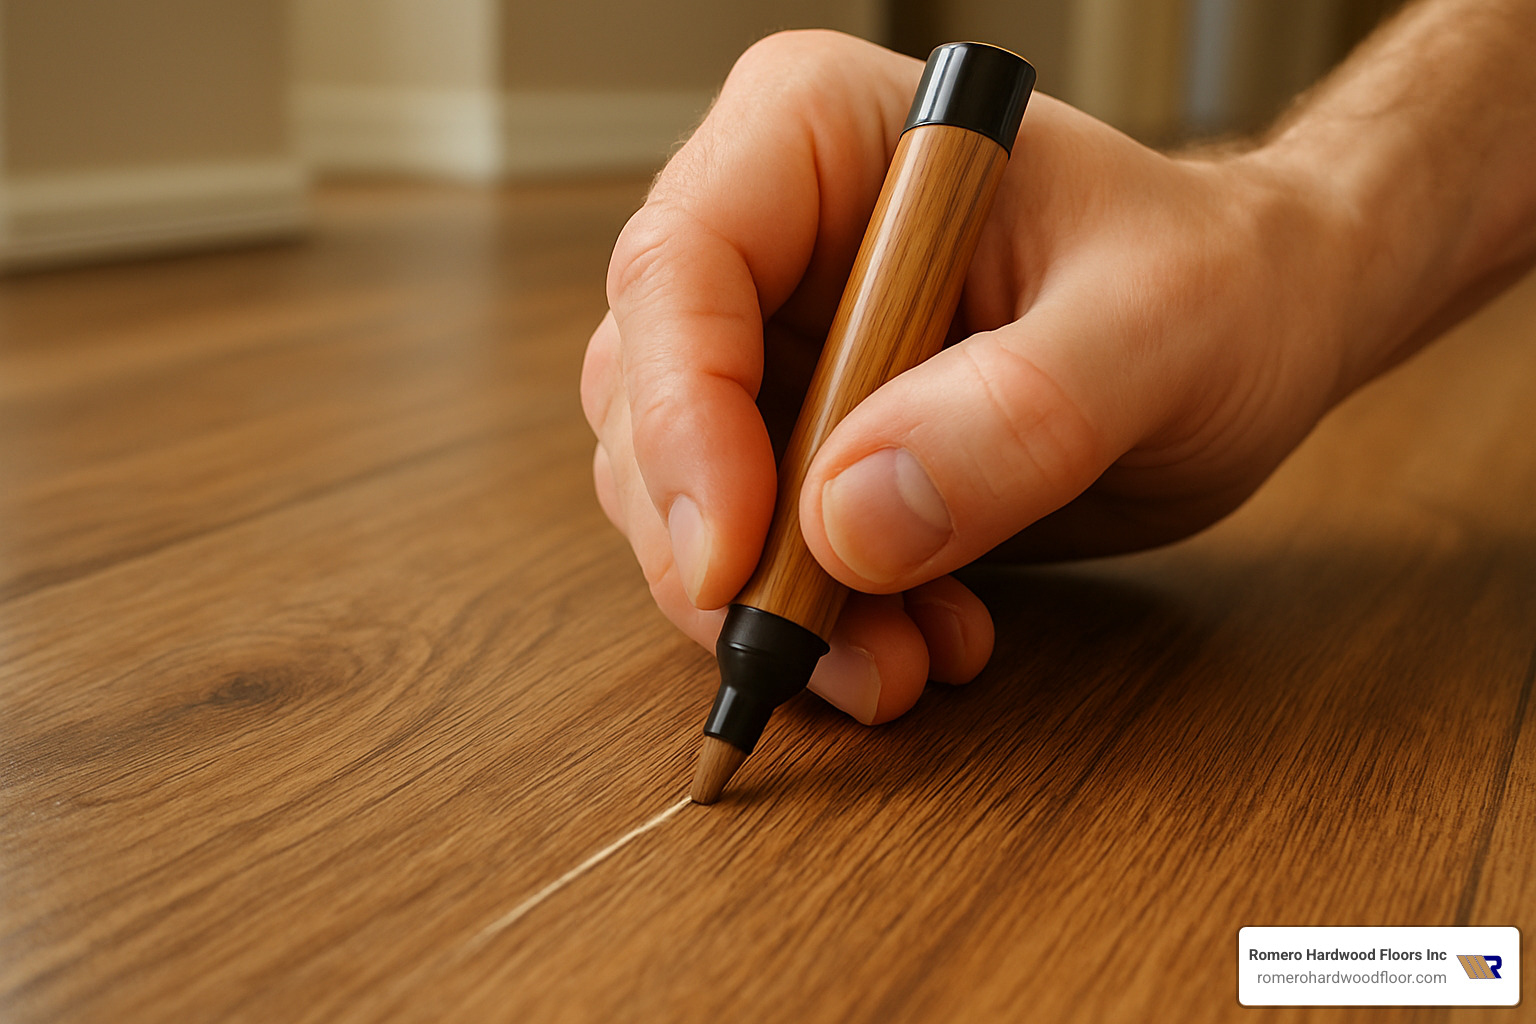
Pro tip from Romero Hardwood Floors Inc.: For the most natural-looking repair, use short, feathered strokes that mimic the wood grain pattern of your laminate. Think of yourself as an artist touching up a painting, not filling in a coloring book. This approach blends the repair more seamlessly with the surrounding floor.
Special Care for High-Gloss & Dark Finishes
High-gloss and dark laminate floors can be particularly tricky when it comes to scratch repair. These surfaces show imperfections more readily, so your technique needs some adjustment.
For those gleaming high-gloss finishes, sheen matching is just as important as color matching. After applying your colored marker, use a specialized high-gloss clear coat pen to restore that showroom shine. Buff very gently with a microfiber cloth using light circular motions to blend the edges of your repair. Be careful not to over-buff, as this can create dull spots that stand out even more than the original scratch.
Dark finishes present their own challenges, as scratches often appear as stark white lines against your rich espresso or walnut tones. I’ve found the dual-shade approach works best here: apply a base color that matches the main dark tone, then add subtle wood grain details with slightly lighter or darker shades to mimic the natural variation in real wood. For very dark floors, a permanent marker can work in a pinch, though specialized repair products will give superior results.
Working in excellent lighting is absolutely essential with dark floors—what looks perfect under a dim lamp might look completely off in natural daylight. Take your time and build up the color gradually.
In my years of experience at Romero Hardwood Floors Inc., I’ve seen many homeowners successfully tackle these small repairs themselves. With a little patience and attention to detail, you can make those annoying little scratches practically disappear!
Fixing Scratches on Fake Wood — Deep Cuts & Gouges
When you’re dealing with deeper damage, fixing scratches on fake wood requires a different approach than those surface-level marks. These aren’t your everyday scuffs—we’re talking about scratches that have broken through the wear layer and exposed the printed design or even the core material underneath.
Filling & Texturing a Gouge
I’ve seen many homeowners panic when they find a deep gouge in their laminate floor. Don’t worry—with some patience and the right materials, you can make that eyesore nearly invisible.
First, thoroughly clean the damaged area. Use your vacuum with the soft brush attachment to remove every speck of debris from inside the gouge. Any tiny particles left behind will ruin your repair job before it even starts.
Next comes the color-matching challenge. This is where having a repair kit with multiple colors really pays off. Mix your filler colors on a piece of cardboard until you get a close match to your floor tone. I always recommend testing your blend on a hidden spot first—maybe in a closet or under furniture. It’s easier to mix more of the same color than to match a color twice!
When applying your filler, choose the right technique for your repair product:
For wax fillers, heat the stick according to the package and carefully drip melted wax into the gouge. For putty, press it firmly into the damage with a plastic putty knife (never use metal—it can cause more scratches!). For burn-in sticks, the heating tool melts the material right into the gouge.
Always overfill slightly above the surface—about 1/16 inch is perfect. Almost all fillers shrink a bit as they dry or cool, and you’d rather have too much than too little.
Here’s where the artistry comes in. While your filler is still soft, recreate the wood grain texture using a wood grain tool or even an old comb. Pay attention to the direction and pattern of the surrounding wood grain. For floors with complex patterns, I’ve seen customers use a fine artist’s brush to add realistic detail—it’s impressive what a steady hand can accomplish!
Once your filler has set (but before it fully hardens), hold a plastic scraper at a 45-degree angle and gently scrape away the excess. Always work in the direction of the wood grain to avoid creating new marks. After that, a light buff with a soft pad will help blend the repair with the surrounding floor.
Finish with a clear coat sealer if your repair kit includes one. This final touch helps match the sheen and protects all your hard work.
Pro tip from Romero Hardwood Floors Inc.: For really deep gouges, build up your repair in thin layers rather than trying to fill it all at once. Your patience will be rewarded with a much more natural-looking result.
When to Replace a Damaged Plank
Sometimes, despite our best efforts, a repair just won’t cut it. How do you know when it’s time to replace the entire plank? Consider these factors:
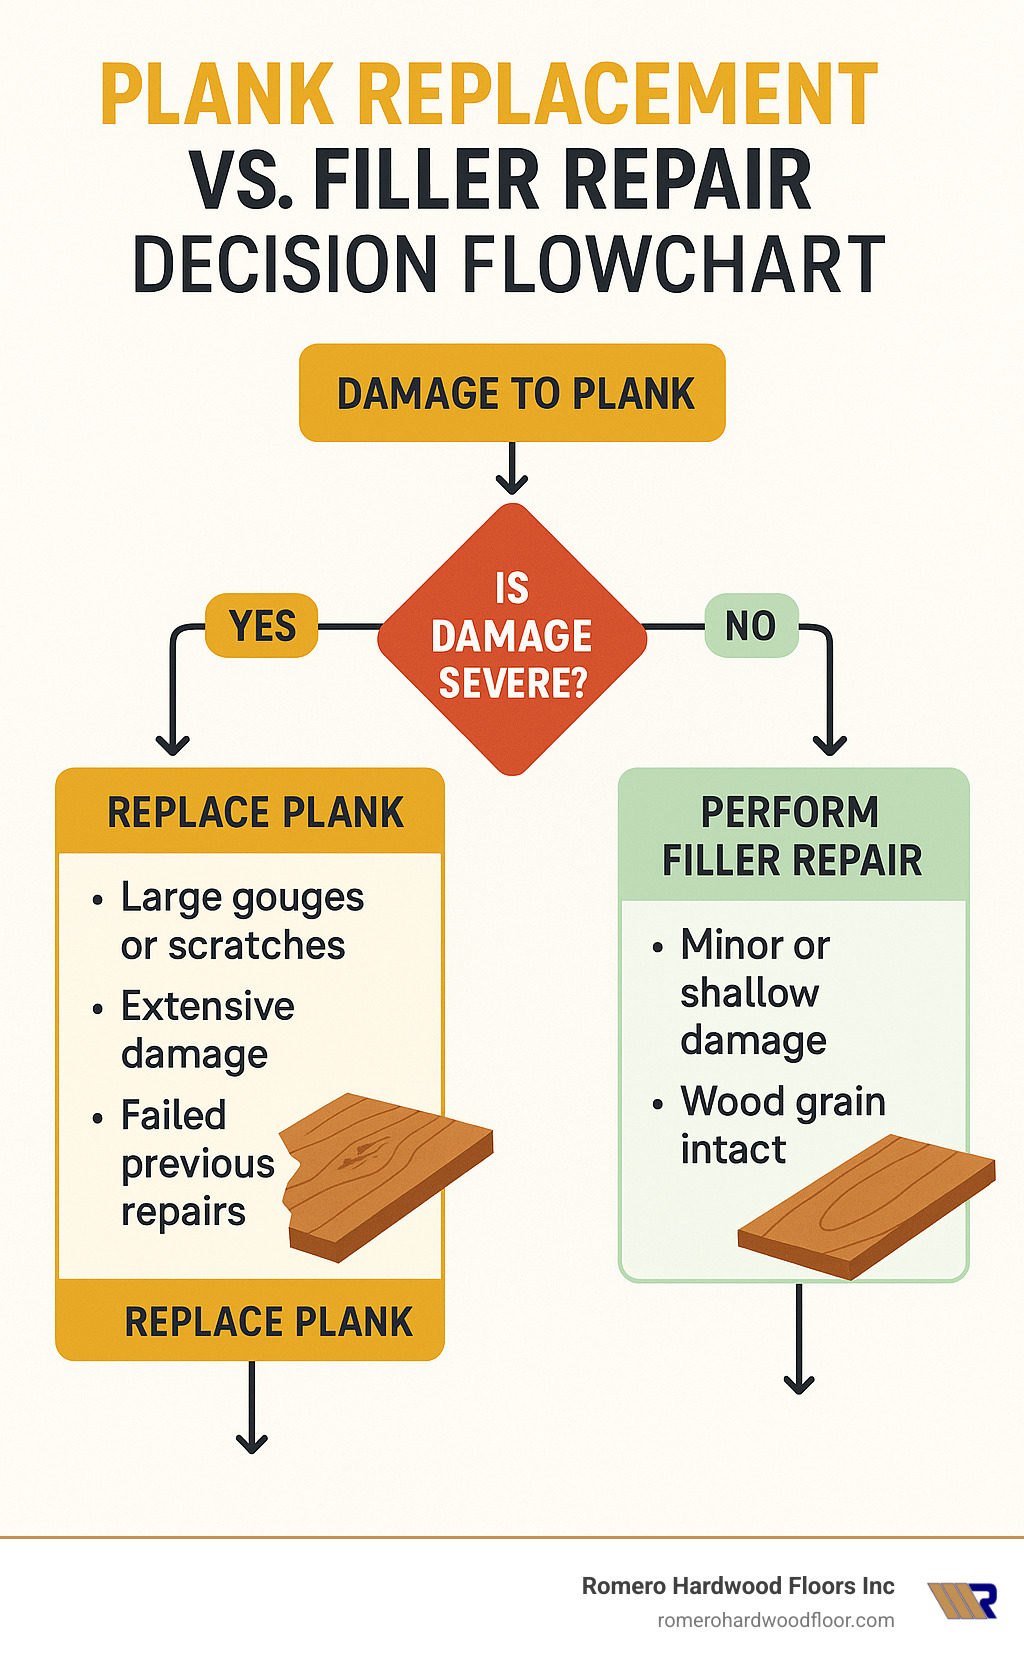
Replace the plank when the damage covers more than a quarter of its surface, you’re dealing with multiple deep gouges on one plank, the core layer is severely damaged or crumbling, previous repairs haven’t held up, or the click-lock edge is compromised.
If you decide on replacement, you have two paths forward:
The DIY approach requires removing baseboards, carefully disassembling the floor until you reach the damaged plank, installing the new one, and putting everything back together. It’s doable for handy homeowners, but I won’t sugar-coat it—this job requires patience and the right tools.
For most folks, professional replacement makes more sense. At Romero Hardwood Floors Inc., we use specialized tools to replace single planks without tearing up large sections of your floor. Our technicians can typically complete the job in under an hour with minimal disruption to your home.
When replacing planks, matching is crucial. This is why I always tell customers to keep a few spare planks from their original installation—those batch codes matter! If you don’t have spares, we’ll help you find the closest match possible.
New planks need to acclimate in your home for 48-72 hours before installation. And even with perfect matching, new planks may look slightly different until they age and develop the same patina as your existing floor. This is completely normal—give it a few months, and you’ll barely notice the difference.
Color Matching Like a Pro
One of the trickiest parts of fixing scratches on fake wood is getting the color just right. Even a slightly mismatched repair can draw more attention than the original scratch! At Romero Hardwood Floors Inc., we’ve refined our color matching techniques over years of experience, and I’m happy to share our professional secrets with you.
Manufacturer Resources
Your first stop should be the company that made your flooring. Many manufacturers have thought ahead and created touch-up solutions specifically for their products. Dig out your original purchase paperwork and look for the model number, batch code, or color name – this information is gold when it comes to finding the right match.
“I always tell my customers to keep their flooring information in a home maintenance folder,” says Francisco Romero. “It’s like having the recipe for your exact floor color.”
Some manufacturers will even send you a custom-matched repair kit if you mail them a small sample of your flooring. This service can save hours of frustration trying to mix colors yourself.
Custom Mixing Techniques
If you can’t get a manufacturer-matched product, don’t worry – you can still create a perfect match with a multi-color repair kit. Here’s our tried-and-true approach:
Always start with a base color that’s lighter than your target – you can darken a mixture, but lightening it is nearly impossible. Mix small amounts on a piece of aluminum foil or a plastic lid, adding tiny amounts of darker shades until you get close.
The secret that separates professionals from amateurs? We test our mixtures on an inconspicuous spot first – like inside a closet or under a piece of furniture that rarely moves. This gives you a chance to see how the color looks when it’s actually on your floor, not just on your mixing surface.
“Write down your mixing formula,” advises Francisco. “I can’t tell you how many times I’ve created the perfect match, then couldn’t remember the exact proportions when I needed to make more!”
Matching Both Color and Finish
Even perfect color matching can look obvious if the sheen is wrong. Laminate floors come in matte (flat), satin (slight shine), and high-gloss (very shiny) finishes. Your repair needs to match both the color AND the shine level of your floor.
High-gloss floors are particularly challenging because any variation in shine becomes immediately noticeable when light hits it. Most quality repair kits include clear topcoats in different sheen levels that you can apply after your color repair has dried.
For extra-fussy matches, try this professional trick: Mix a tiny bit of clear nail polish with your topcoat to fine-tune the exact level of shine.
Testing Methodology
Professional floor technicians never judge a color match immediately after application. Colors can shift as they dry, and what looks perfect when wet might be too dark or light once fully cured.
Test your match in different lighting conditions – morning sunlight, afternoon indirect light, and under your evening lamps. You’d be surprised how different a repair can look as lighting changes throughout the day.
Take photos of your test spots so you can compare them objectively. Our eyes adjust to colors over time, making it hard to remember exactly how something looked an hour ago.
Pro tip from Romero Hardwood Floors Inc.: For the absolute best color match, snip a tiny sample from an area no one will ever see – perhaps under a radiator cover or behind a permanently installed appliance. Bring this sample with you when shopping for repair products. This physical sample is far more reliable than trying to match from memory or even photos.
With a little patience and these professional techniques, you’ll be fixing scratches on fake wood so seamlessly that even you might forget where they were!
Prevention & Maintenance Tips
At Romero Hardwood Floors Inc., we’ve seen that preventing scratches saves homeowners a lot of headaches down the road. After all, even the best repair techniques can’t perfectly restore your floor to its original condition. Let’s talk about how to keep those scratches from happening in the first place.
Your furniture is often the biggest culprit when it comes to floor scratches. Invest in quality felt pads for all furniture legs and make a habit of checking them every few months – they wear down faster than you might think! For heavier pieces, soft rubber or silicone cups work better than plastic or metal glides. And please, when you’re rearranging the living room, get a helper and lift furniture rather than dragging it across your beautiful floors.
Your home’s entryways are your first line of defense. Place quality mats at every exterior door to catch the invisible enemies – dirt, sand, and tiny grit particles that act like sandpaper under shoes. For maximum protection, use both outdoor and indoor mats, creating a two-stage cleaning zone. Many of our clients have found that a simple “shoes-off” policy dramatically extends their floor’s life.
For the pet parents among us, those adorable claws can be laminate’s worst enemy. Regular nail trimming for your furry friends is essential. Consider placing runner rugs in hallways or areas where your pets like to sprint and play. And don’t forget to put waterproof mats under food and water bowls – it’s not just scratches you need to worry about, but moisture damage too.
Your cleaning routine makes a huge difference in floor longevity. Vacuum regularly with a soft brush attachment (never use beater bars on laminate!), and opt for microfiber mops instead of traditional string mops that can push abrasive particles into the surface. When spills happen, clean them immediately to prevent liquid from seeping into seams and damaging the core layer. Always follow your manufacturer’s recommendations for cleaning products – many common household cleaners can damage laminate’s protective layer over time.
Finally, make regular inspection a habit, especially in high-traffic areas where wear shows up first. Check monthly for early signs of scratches and address them promptly before they worsen. Don’t forget to occasionally peek under area rugs to ensure no moisture is trapped underneath, and pay special attention to edge damage in kitchens and bathrooms where moisture exposure is more common.
By implementing these preventive measures consistently, you’ll significantly extend your laminate floor’s lifespan and maintain that fresh, just-installed look for years to come. At Romero Hardwood Floors Inc., we believe that a little prevention truly is worth a pound of repair when it comes to fixing scratches on fake wood floors.
What to Avoid During Cleaning or Repair
When fixing scratches on fake wood, knowing what to avoid can save you from turning a small issue into a major problem. Over my years at Romero Hardwood Floors Inc., I’ve seen well-intentioned homeowners accidentally damage their floors by using the wrong products or techniques.
Harmful Chemicals
Your laminate floor’s protective wear layer is surprisingly delicate when it comes to harsh chemicals. Never use acetone or nail polish remover on your laminate—these solvents can actually dissolve the protective coating and permanently damage the design layer beneath. I once had a customer who tried to remove a nail polish spill with remover, only to find they’d created a cloudy, dull spot that was far more noticeable than the original stain.
Similarly, products designed for real wood often spell trouble for laminate. Oil soaps leave behind a residue that attracts dirt and can make your floor look hazy. Many homeowners reach for vinegar solutions thinking they’re making an eco-friendly choice, but the acidity gradually dulls your floor’s finish over time. And bleach? It might disinfect, but it can also fade your floor’s photographic layer, leaving discolored patches that can’t be fixed.
Damaging Tools
Your tool choice matters tremendously when working with laminate. Steel wool is an absolute no-go—even the finest grades will create micro-scratches that catch light and make your floor look dull. I remember a client who used steel wool to “buff out” a scratch, only to create a hazy area three times larger than the original damage.
Abrasive scrub brushes might seem necessary for tough stains, but they’re actually creating thousands of tiny scratches that accumulate over time. If you absolutely must use sandpaper for a deep gouge repair, never go coarser than 220 grit, and use it sparingly with minimal pressure. And unless you’re professionally trained, stay away from rotary buffers—they can quickly burn through the wear layer if held in one spot for even a few seconds too long.
Moisture Mistakes
Laminate’s greatest enemy is excessive moisture. Steam mops are particularly dangerous despite being marketed for all hard floors—the steam can penetrate the seams between planks and cause swelling in the fiberboard core. Once that core swells, there’s no fixing it.
Wet mopping with a soaking mop can cause similar damage as water seeps into the joints. When applying repair products, use them sparingly—a little goes a long way, and excess liquid can damage surrounding areas. Also avoid wax-based polishes that might seem like they’re adding protection but actually make floors dangerously slippery and attract dirt that leads to more scratches.
Repair Errors
Some products designed for real wood have no place in laminate repair. Wood hardeners can damage the synthetic materials in laminate, while excessive sanding quickly removes the thin design layer. Wood fillers that require sanding are generally too aggressive for laminate’s delicate surface.
Another common mistake is mixing oil-based and water-based products in the same repair job. These can react poorly with each other, creating discoloration or preventing proper adhesion. I’ve seen repairs fail simply because incompatible products were layered on top of each other.
Pro tip from Romero Hardwood Floors Inc.: When you’re unsure about a cleaning or repair product, don’t experiment on visible areas. Test it on a spare plank (this is why we always recommend keeping a few extras from your installation) or try it in a closet corner. Give it a full 24 hours to show any potential adverse reactions before using it on noticeable scratches.
With laminate floors, gentle treatment is always better than aggressive approaches. The thin wear layer that protects your floor can’t be restored once damaged, so treating it with care during both cleaning and repairs will extend your floor’s life significantly.
DIY vs Professional Repair: Average Costs & When to Call In Help
Deciding whether to handle fixing scratches on fake wood yourself or bring in experts like our team at Romero Hardwood Floors Inc. ultimately comes down to the severity of damage, your comfort with DIY projects, and your budget. Let’s break down what you can expect to spend either way.
When tackling repairs yourself, your wallet will thank you. Basic touch-up markers and pens typically run just $5-$15, while wax stick repair kits range from $10-$25. If you’re dealing with more significant damage, comprehensive laminate repair kits cost about $20-$40, and burn-in stick kits with heating tools will set you back $30-$60. For most homeowners, the total DIY expense falls somewhere between $5-$40 – significantly less than professional services.
Professional repairs, while pricier, offer expertise and guaranteed results. Note: These are average costs based on internet data and not actual costs for Romero Hardwood Floors Inc. For light scratch repair, expect to pay around $75-$225, while deep scratch or gouge repair typically runs $100-$300. If you need a single plank replaced, costs range widely from $100-$900 depending on your flooring type and accessibility. For multiple plank replacements, you’re looking at $300-$2,700 or more.
When DIY Makes Sense
DIY repairs are perfectly reasonable when you’re dealing with minor, surface-level scratches in a small, contained area. If you have some basic handyman skills, a bit of patience, and ideally some leftover flooring material from your original installation, you can likely achieve good results. Just be prepared to experiment in hidden areas first to perfect your technique before tackling visible scratches.
When to Call Professionals
Sometimes calling in the pros just makes more sense. If your floor has extensive damage in highly visible areas, or deep gouges have compromised its structural integrity, professional intervention will save you headaches. Water damage accompanying scratches, color-matching challenges with older floors, or the need to replace multiple planks (especially in complex layouts) all signal it’s time for expert help. And if you’ve already attempted DIY repairs without satisfactory results, professionals can often salvage the situation.
At Romero Hardwood Floors Inc., we’re happy to provide professional assessments to help you make the most cost-effective decision. What might appear to be major damage sometimes has a simple fix, while seemingly minor scratches could indicate underlying issues requiring professional attention.
Pro tip: If you’re planning to sell your home soon, investing in professional repairs often pays off by preventing potential buyers from using floor damage as leverage to negotiate a lower price. For a quick assessment from local professionals, you can Find Local Pros in your area.
The bottom line? For minor scratches in low-visibility areas, DIY approaches offer tremendous value. For everything else, professional repairs provide peace of mind and typically superior, longer-lasting results.
Frequently Asked Questions About Fixing Scratches on Fake Wood
Will coconut oil hide laminate scratches?
I’ve had many customers ask about using coconut oil after reading about it online, but I always have to burst this bubble. While coconut oil might temporarily mask very light scratches by filling them and changing how light reflects, it creates more problems than it solves.
Think about it – you’re essentially greasing your floor! This leaves a slippery residue that not only creates a safety hazard but also acts like a dust and dirt magnet. Even worse, that oily film can interfere with proper repairs if you decide to fix the scratches correctly later on.
At Romero Hardwood Floors Inc., we always recommend using products specifically designed for laminate repair. These won’t compromise your safety or make future restoration more difficult. Your floors (and anyone walking on them) will thank you!
Can I sand laminate like real hardwood?
No, you absolutely cannot sand laminate flooring like real hardwood. This is probably the most important distinction between these flooring types, and a mistake I’ve seen lead to completely ruined floors.
Here’s the reality: that beautiful wood appearance on your laminate is actually just a photograph covered by an extremely thin protective layer (often less than 1mm thick). Once you start sanding, you’ll quickly remove this protective layer and damage the photo layer beneath. And unlike real hardwood, there’s no solid wood underneath to expose—just fiberboard core material that will look nothing like wood once revealed.
Even the gentlest buffing with ultra-fine sandpaper can permanently damage your laminate’s appearance. If someone suggests sanding your laminate floor, they might be confusing it with engineered hardwood, which does have a real wood veneer that can sometimes handle light sanding.
How long do touch-up repairs last?
This is a bit like asking how long a car repair will last—it really depends on several factors. At Romero Hardwood Floors Inc., we’ve found repair longevity varies based on:
The quality of materials you use makes a huge difference. Professional-grade products typically outlast budget options by months or even years. The depth of the original damage matters too—surface repairs generally last longer than deep gouge fixes because they don’t have to withstand as much structural stress.
Location plays a crucial role too. A repair in your rarely-used guest room might look perfect for years, while the same repair in your busy hallway might show wear within months. And of course, how well the repair matches your floor’s original finish affects how noticeable any wear becomes.
Based on our experience, well-executed repairs using quality materials typically last:
– Light scratch repairs: 1-3 years in normal traffic areas
– Medium scratch repairs: 6 months to 2 years depending on location
– Deep gouge repairs: Often 6 months to 1 year before showing signs of wear
Want to extend the life of your repairs? Use furniture protectors, place area rugs in high-traffic zones, and clean with laminate-specific products that won’t degrade the repair materials.
Can I use a hairdryer to fix bubbling laminate?
Bubbling or lifting in laminate usually indicates a moisture problem, not scratches. While I’ve occasionally used a hairdryer on low heat to help with minor edge lifting, it’s rarely a permanent solution for water-damaged laminate.
If your floor has both bubbling and scratches, you need to address them in the right order. First, find and fix whatever moisture source caused the bubbling—maybe a leaky appliance or spill that wasn’t fully dried. Then allow the floor to completely dry (which might take several days) before attempting to repair any scratches using the methods we’ve discussed.
Be honest with yourself about the extent of the damage. Significant bubbling usually means water has penetrated deep into the core layer, which often requires replacing the affected planks rather than attempting surface repairs. Fixing scratches on fake wood won’t help if the underlying structure is compromised.
Do I need to reapply a protective coating after repairs?
For most minor scratch repairs using markers or wax sticks, you can skip the extra protective coating. The repair materials themselves provide adequate protection for the damaged area.
However, if you’ve done deeper repairs that required filling material, a clear protective coat can be worthwhile. Some repair kits include a specialized sealer designed specifically for this purpose. Just make sure whatever you use is explicitly labeled as safe for laminate floors.
The key is applying any clear coat very sparingly. A heavy application can create a visible “patch” effect where the repaired area looks different from the surrounding floor—sometimes more noticeable than the original scratch!
At Romero Hardwood Floors Inc., we sometimes use professional-grade clear coats that precisely match your floor’s original sheen, but these specialty products aren’t typically available to consumers. For DIY repairs, less is definitely more when it comes to protective topcoats.
Conclusion
Fixing scratches on fake wood flooring is a skill that can save you hundreds of dollars and extend the life of your floors. Throughout this guide, we’ve walked through everything from understanding what laminate flooring actually is to mastering professional-level repair techniques.
The good news? With some patience and the right approach, you can restore your floors to their former glory without breaking the bank.
Remember these key points as you tackle your floor repairs:
First, proper assessment makes all the difference. Take time to really examine those scratches—are they just surface marks that catch the light, or have they penetrated into the core? Your repair strategy depends entirely on getting this right.
Second, match your repair method to the damage. Those light surface scratches might need nothing more than a color-matched marker, while deeper gouges require fillers and more advanced techniques. Don’t overcomplicate simple fixes or underestimate serious damage.
Third, color matching isn’t just about picking a similar shade. Take the time to blend colors properly, test in inconspicuous areas, and check your work under different lighting conditions. The difference between an obvious repair and an invisible one often comes down to this careful attention to detail.
Fourth, prevention truly is better than cure. Once you’ve restored your floors, protect your investment with furniture pads, entryway mats, and regular cleaning with laminate-specific products. Your future self will thank you!
Finally, know when to call in the experts. At Romero Hardwood Floors Inc., we’ve seen many floors that could have been saved with simpler solutions had homeowners reached out earlier. Sometimes professional help is the most cost-effective solution, especially for valuable floors or extensive damage.
Fixing scratches on fake wood is ultimately about more than aesthetics—it’s about preserving your home’s value and enjoying beautiful floors for years to come. With the knowledge from this guide and a bit of practice, you can keep your laminate looking fresh despite life’s occasional scratches and scuffs.
For those challenges beyond DIY repair, or if you’d like a professional assessment of your flooring needs, our team at Romero Hardwood Floors Inc. is here to help. With over 15 years serving homeowners throughout Eastern Massachusetts, we bring expertise and care to every flooring project, large or small.
After all, your floors are the foundation of your home’s beauty—they deserve the best care possible, whether from your own hands or ours.
