Engineered Flooring for Kitchens: 7 Powerful Pros in 2025
Why Kitchen Flooring Decisions Make or Break Your Home’s Heart
Engineered flooring for kitchens has become the go-to solution for homeowners who want real wood beauty without the moisture headaches. Here’s what you need to know:
Quick Answer: Is Engineered Flooring Right for Your Kitchen?
– ✅ YES if: You want real wood looks, need moisture resistance, have humidity swings, want underfloor heating compatibility
– ❌ MAYBE NOT if: You expect 100% waterproof performance, plan frequent refinishing, have extremely tight budgets
– 💰 Cost: $4-15/sq ft materials + $3-12/sq ft installation (internet averages)
– 🔧 Best for: High-traffic kitchens, open floor plans, homes with pets/kids
It’s been said that “the kitchen is the heart of the home” – and your flooring choice affects everything from daily comfort to long-term home value. Unlike solid hardwood that warps with kitchen moisture, engineered floors use cross-ply construction that stays stable when humidity swings from cooking steam to winter dryness.
I’m Francisco Romero, owner of Romero Hardwood Floors Inc., and I’ve been installing engineered flooring for kitchens since 2006 across the greater Boston area. Over 15 years of kitchen installations have taught me exactly when engineered floors shine – and when they don’t.

Engineered flooring for kitchens glossary:
– engineered wood floor cleaning
– engineered wood with underfloor heating
– engineered wood floor adhesive
Engineered Flooring for Kitchens: Construction & Performance
Think of engineered flooring for kitchens as the smart cousin of solid hardwood – it looks just as beautiful but handles kitchen life way better. After installing floors in hundreds of kitchens across Beverly, Chelsea, Danvers, and the North Shore since 2006, I can tell you the difference is remarkable.
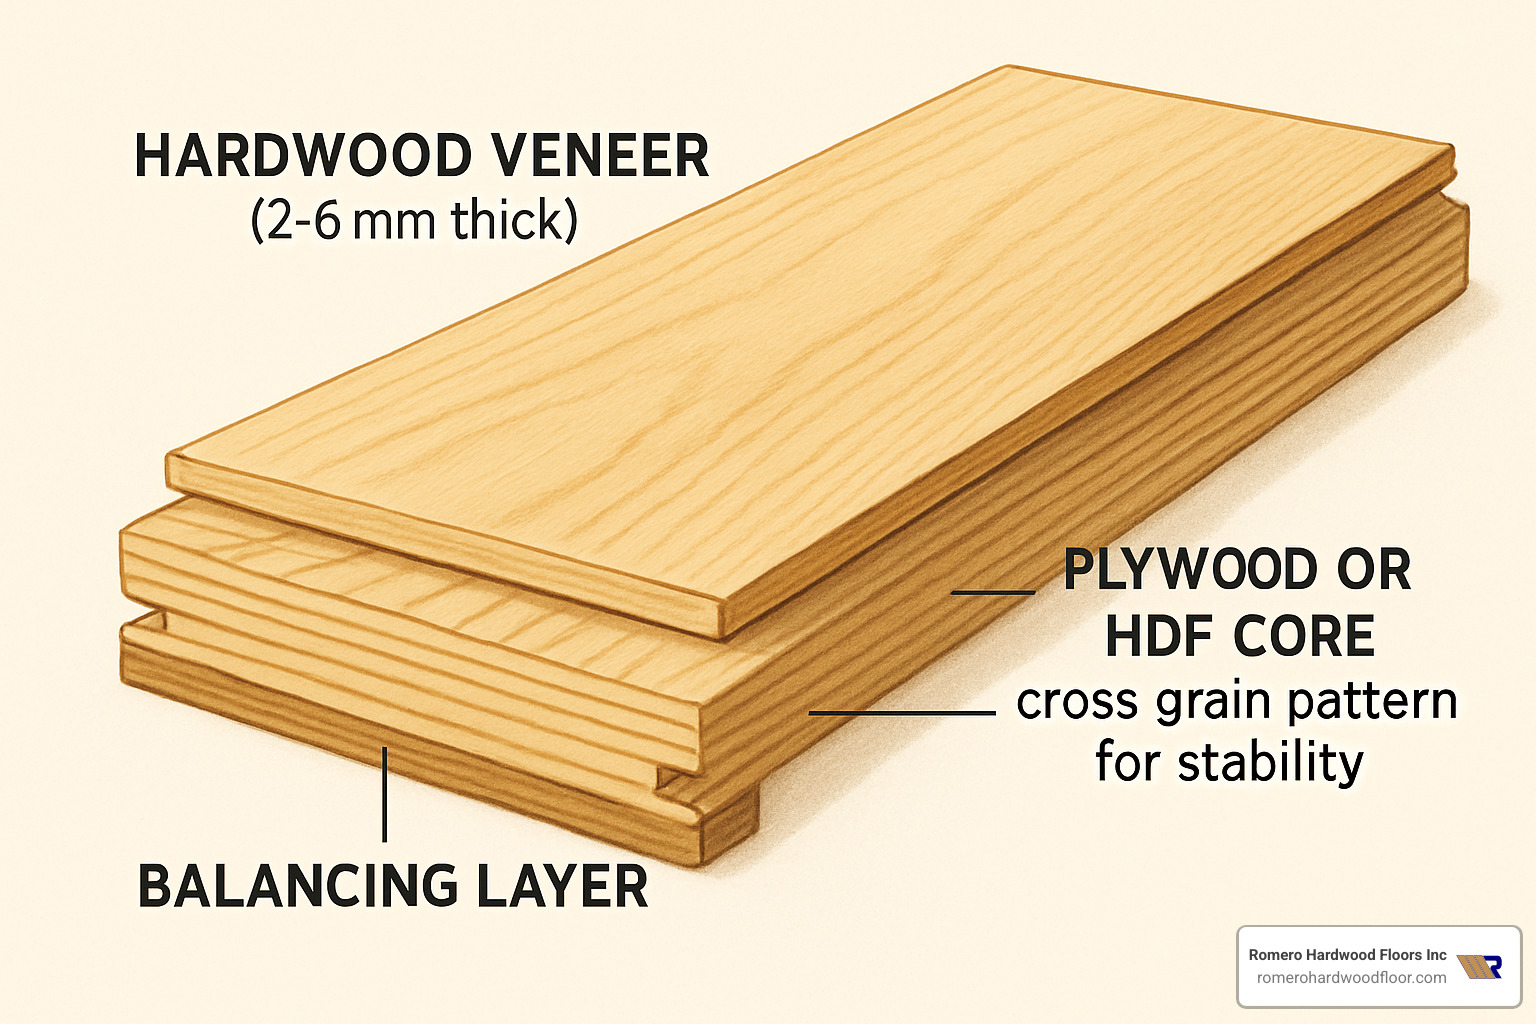
Here’s what makes engineered floors so kitchen-friendly: instead of one thick piece of wood that moves with every humidity change, you get a clever layered sandwich. The top layer is real hardwood veneer (usually 2-6mm thick) sitting on a plywood or HDF core. Each layer runs perpendicular to the next – this cross-ply construction keeps your floor flat when cooking steam sends humidity soaring.
I’ve seen solid hardwood floors in kitchens that look like rolling hills after a few years – warped, cupped, and gapped. Meanwhile, the engineered floors we installed a decade ago in busy family kitchens still look fantastic. The dimensional stability is remarkable – engineered floors move less than 1/16″ over a 20-foot span, while solid wood can shift up to 1/2″.
The wear layer thickness makes a huge difference for kitchen performance. Kitchens need at least 3-4mm to handle dropped pots, chair scrapes, and daily foot traffic. This thicker wear layer also means you can refinish the floor if needed down the road.
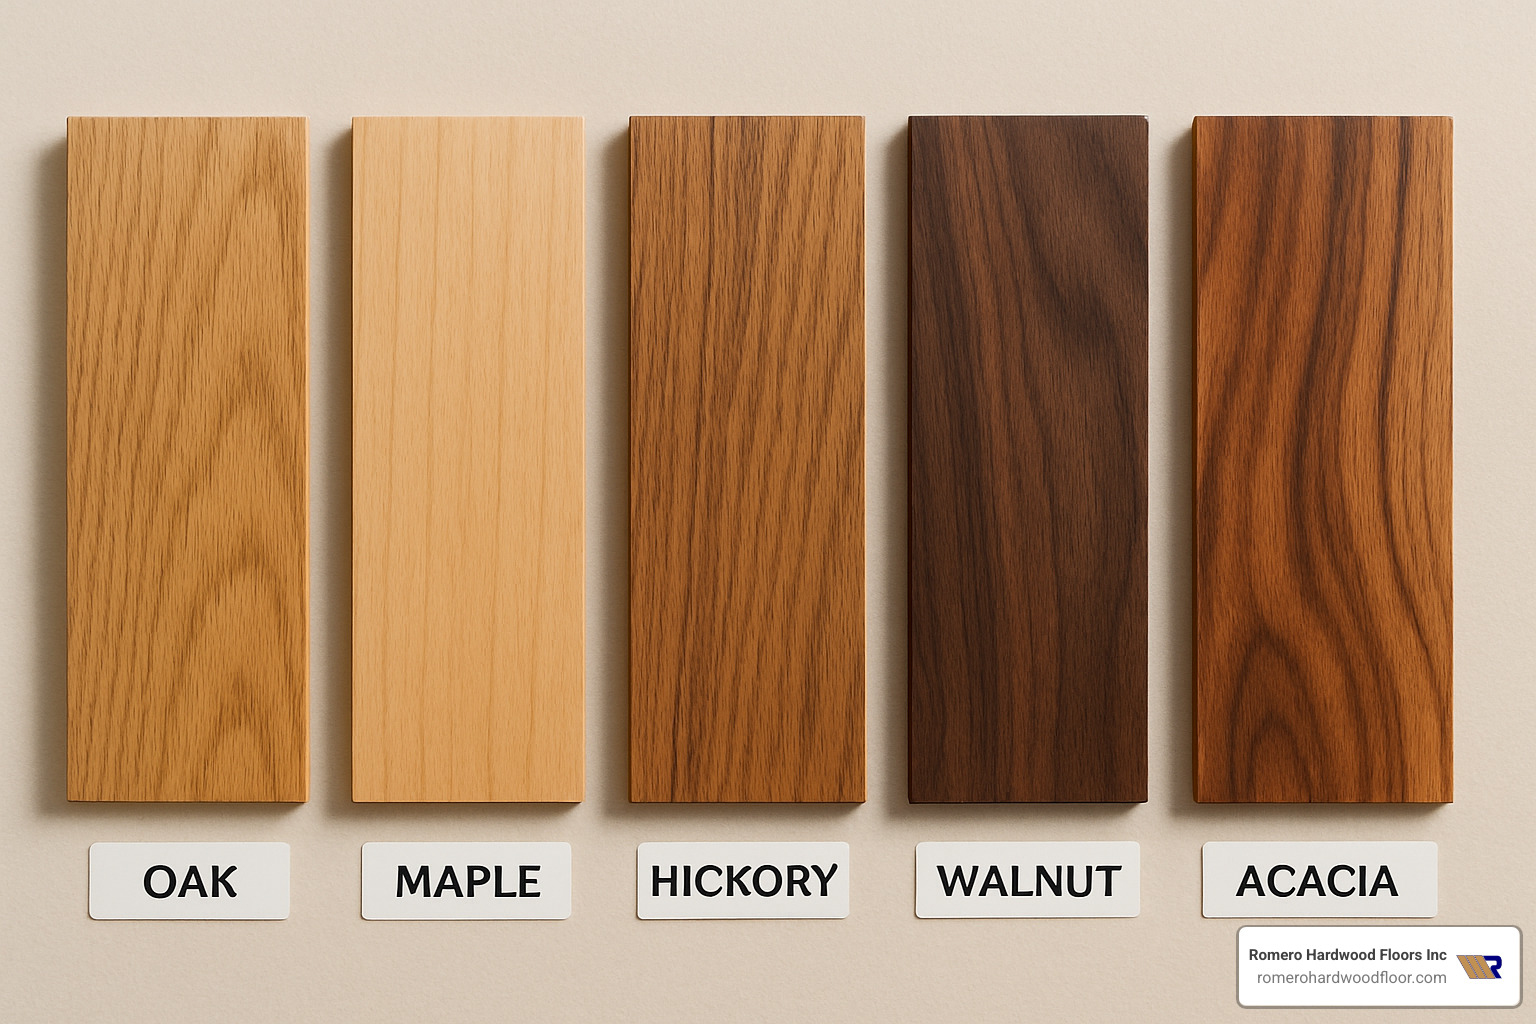
When choosing species, Janka hardness ratings tell the whole story. Hickory tops the charts at 1820, making it nearly bulletproof for busy kitchens. Maple comes in at 1450, and white oak at 1360 – all excellent choices that resist dents and scratches from kitchen chaos.
One bonus that surprises many homeowners: engineered floors work beautifully with underfloor heating. The stable construction handles temperature changes without the expansion drama that makes solid hardwood installers nervous. For more details about engineered flooring benefits, check out our guide on engineered hardwood flooring.
Layers & Materials Explained
Peek inside a quality engineered board and you’ll find 8-12 layers working together like a well-organized team. The plywood core layers run cross-grain for maximum stability, while HDF (high-density fiberboard) adds strength and moisture resistance. A balancing layer on the bottom prevents cupping and warping.
The adhesive systems have come a long way too – modern boards use formaldehyde-free or low-VOC options that won’t off-gas nasty chemicals into your kitchen air. This multi-layer approach isn’t just engineering showing off – it’s the reason engineered flooring for kitchens can handle spills, steam, and the daily chaos of family life without missing a beat.
Why Construction Matters in Kitchens
Kitchens are basically moisture obstacle courses for flooring. You’ve got steam billowing from pasta water, splashes from washing dishes, and temperature swings from ovens heating up the space. Solid hardwood sees all this and starts expanding, contracting, and generally misbehaving.
The cross-ply construction tackles these challenges head-on. Humidity swings that would make solid wood boards cup and gap barely register with engineered floors. Spill resistance comes from tight seams and quality finishes that give you time to clean up accidents before damage sets in.
We’ve installed engineered floors in Revere and Malden kitchens that still look perfect after 10+ years of family life – kids, pets, cooking disasters, and all. The reduced warping compared to solid wood isn’t just noticeable, it’s dramatic.
Smart Choice or Slippery Slope? Pros, Cons & Comparisons
After fifteen years of installing engineered flooring for kitchens across the North Shore, I’ve learned to give homeowners the straight truth. No sugar-coating, no sales pitch – just real-world experience from hundreds of kitchen installations.
Here’s the reality: engineered floors can be a brilliant choice for kitchens, but they’re not magic. They solve some problems while creating others, and understanding this balance is crucial for making the right decision for your home.
The durability factor is where things get interesting. Quality engineered floors with thick wear layers handle kitchen life remarkably well. I’ve walked through 15-year-old installations in busy family kitchens that still look fantastic. But I’ve also seen cheap engineered floors fail spectacularly after just three years of normal use.
Moisture resistance is engineered flooring’s biggest selling point for kitchens – and its most misunderstood feature. Yes, the cross-ply construction makes these floors far more stable than solid hardwood when humidity swings from cooking steam. But “water-resistant” doesn’t mean waterproof, despite what some marketing materials claim.
The scratch and dent risk is real but manageable. Harder species like hickory and maple hold up better to dropped pots and chair scrapes. However, once you damage the wear layer, your refinishing options become limited quickly.
Refinishing limits are perhaps the biggest trade-off. Where solid hardwood can be sanded and refinished 8-10 times over decades, engineered floors typically offer 1-3 refinishing cycles maximum, depending on wear layer thickness.
When we look at cost comparisons, engineered flooring sits in an interesting middle ground. Based on internet averages, you’re looking at $4-15 per square foot for materials and $3-12 per square foot for installation. Compare that to solid hardwood at $6-20 per square foot plus $4-15 for installation, or luxury vinyl at $2-8 per square foot plus $2-8 for installation.
For current research on waterproof engineered options, check out this latest research on waterproof engineered wood.
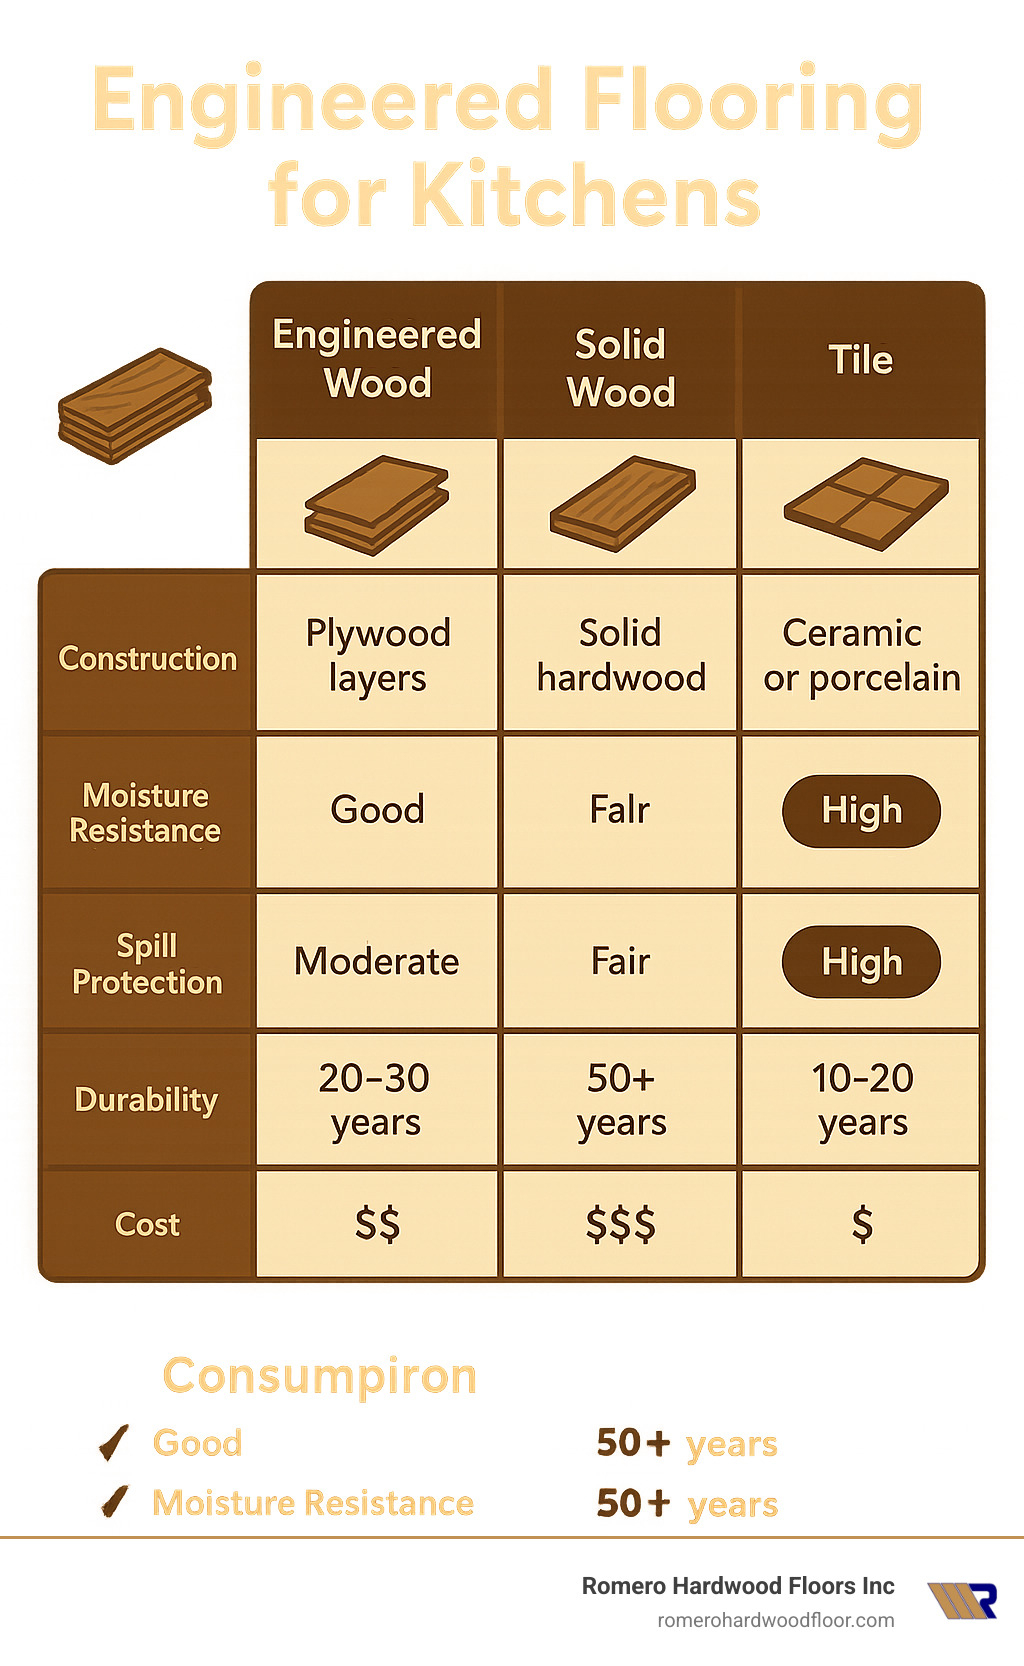
How do engineered floors stack up against other kitchen flooring options? Tile offers superior water resistance but can be cold, hard on feet, and challenging to keep grout clean. Laminate costs less but lacks the authentic wood feel and can’t be refinished. Vinyl handles moisture well but doesn’t add the same home value as real wood.
Advantages at a Glance
The seamless look factor can’t be overstated. When we install engineered floors that flow from kitchen into dining and living areas, the visual impact is stunning. No awkward transition strips breaking up your open floor plan – just beautiful, continuous wood grain throughout.
Home value benefits are significant and measurable. Real wood floors, including quality engineered options, can boost your home’s sale price. This value increase often justifies the higher upfront cost compared to synthetic alternatives.
Underfloor heating compatibility sets engineered floors apart from solid hardwood. The stable core construction handles temperature changes beautifully, making them perfect for radiant heating systems that would cause solid wood to gap and warp.
Potential Drawbacks
Let’s be honest about the waterproof myth. Even floors marketed as “waterproof” have limits – typically 24-36 hours before standing water causes damage. I’ve seen homeowners surprised when their “waterproof” engineered floor suffered damage from a weekend plumbing leak.
Dent potential varies dramatically by species and quality. While harder woods like hickory resist damage well, softer species or thin wear layers can show dents from normal kitchen activities. Dropped cast iron pans and furniture legs without felt pads are common culprits.
Quality variability in the engineered flooring market is enormous. The difference between premium products with thick wear layers and quality adhesives versus budget options with paper-thin veneers is night and day. Unfortunately, this difference isn’t always obvious until after installation.
Buying & Budgeting Guide: Species, Wear Layer, Finish, Cost, Installation & Maintenance
Picking the right engineered flooring for kitchens is like choosing a car – you need to match the performance specs to how you’ll actually use it. After nearly two decades of kitchen installations, I’ve learned that the prettiest floor sample means nothing if the technical details don’t match your family’s lifestyle.
Let’s start with wood species, because this choice affects everything from durability to your daily cleaning routine. Oak remains our most popular recommendation for good reason. With its Janka hardness rating of 1360 (for white oak), it strikes the perfect balance between durability and workability. The tight grain structure naturally resists moisture penetration – crucial when you’re dealing with pasta water spills and dishwasher steam.
Maple steps up the hardness game at 1450 Janka rating, offering superior resistance to dents from dropped pots and pans. Its smooth, consistent grain makes cleanup a breeze, and the naturally light color helps brighten darker kitchens.
For families who really put their floors through the wringer, hickory is the heavyweight champion at 1820 Janka rating. Yes, it costs more, but when you’ve got kids playing floor hockey in the kitchen and dogs racing around corners, that extra hardness pays dividends.
Walnut brings rich, chocolate tones that can actually make minor wear disappear into the natural color variation. While it’s softer than oak or maple, quality walnut engineered floors handle kitchen duty beautifully when properly maintained.
The wear layer thickness is where many homeowners make expensive mistakes. Think of it as the “meat” of your floor – once it’s gone, you’re down to the plywood core. Anything under 2mm is basically throwaway flooring for kitchens. You can’t refinish it, and it won’t handle normal kitchen traffic for more than a few years.
The sweet spot for most kitchens is 4mm or thicker wear layers. This gives you multiple refinishing cycles over the floor’s lifetime, making it a true long-term investment.
When it comes to costs, the range is all over the map. Budget engineered flooring for kitchens starts around $4-6 per square foot, while premium options can hit $15-25 per square foot or more. Installation adds another $3-12 per square foot depending on the method and complexity. These are average costs based on internet data and not actual costs for Romero Hardwood Floors Inc.
For detailed guidance on kitchen-specific choices, check out our best engineered wood flooring for kitchen guide. Our engineered hardwood flooring installation cost breakdown covers all the pricing factors you need to consider.
Wear Layer & Refinishing
Here’s the reality about refinishing engineered floors: the wear layer thickness determines your floor’s entire future. With a 2mm wear layer, you get one refinishing cycle – maybe. That’s it. Once you sand through that thin veneer, you’re looking at replacement, not repair.
A 2-4mm wear layer opens up two refinishing cycles typically, which extends your floor’s life significantly. But the real sweet spot is 4mm or thicker, where we’ve successfully refinished floors three or four times over 25+ years.
Finish Choices for Busy Kitchens
The finish on your engineered flooring for kitchens is your first line of defense against spills, scratches, and daily wear. Aluminum oxide finishes are the workhorses – they create an incredibly hard, scratch-resistant surface that laughs at chair legs and pet claws.
Polyurethane finishes offer excellent moisture resistance with solid durability. They come in various sheen levels, from matte to high gloss. UV-cured finishes take durability to the next level and resist fading from sunlight streaming through kitchen windows.
Sheen level matters more than most people realize. Matte finishes (10-25% gloss) hide scratches beautifully and create a contemporary look. Satin finishes (25-35% gloss) balance durability with appearance – our most popular choice for kitchens.
Budgeting & Value
Smart budgeting for engineered flooring for kitchens means thinking beyond the initial price tag. Quality engineered floors deliver value through their 20-30 year lifespan, multiple refinishing opportunities, and significant home value boost – up to 2.5% increase in sale price according to real estate professionals.
The warranty landscape tells the quality story. Structural warranties typically run 25-50 years for quality products, while finish warranties range from 10-25 years. Installation warranties vary from 1-5 years – another reason to choose experienced installers who stand behind their work.
Installation & Maintenance Guide
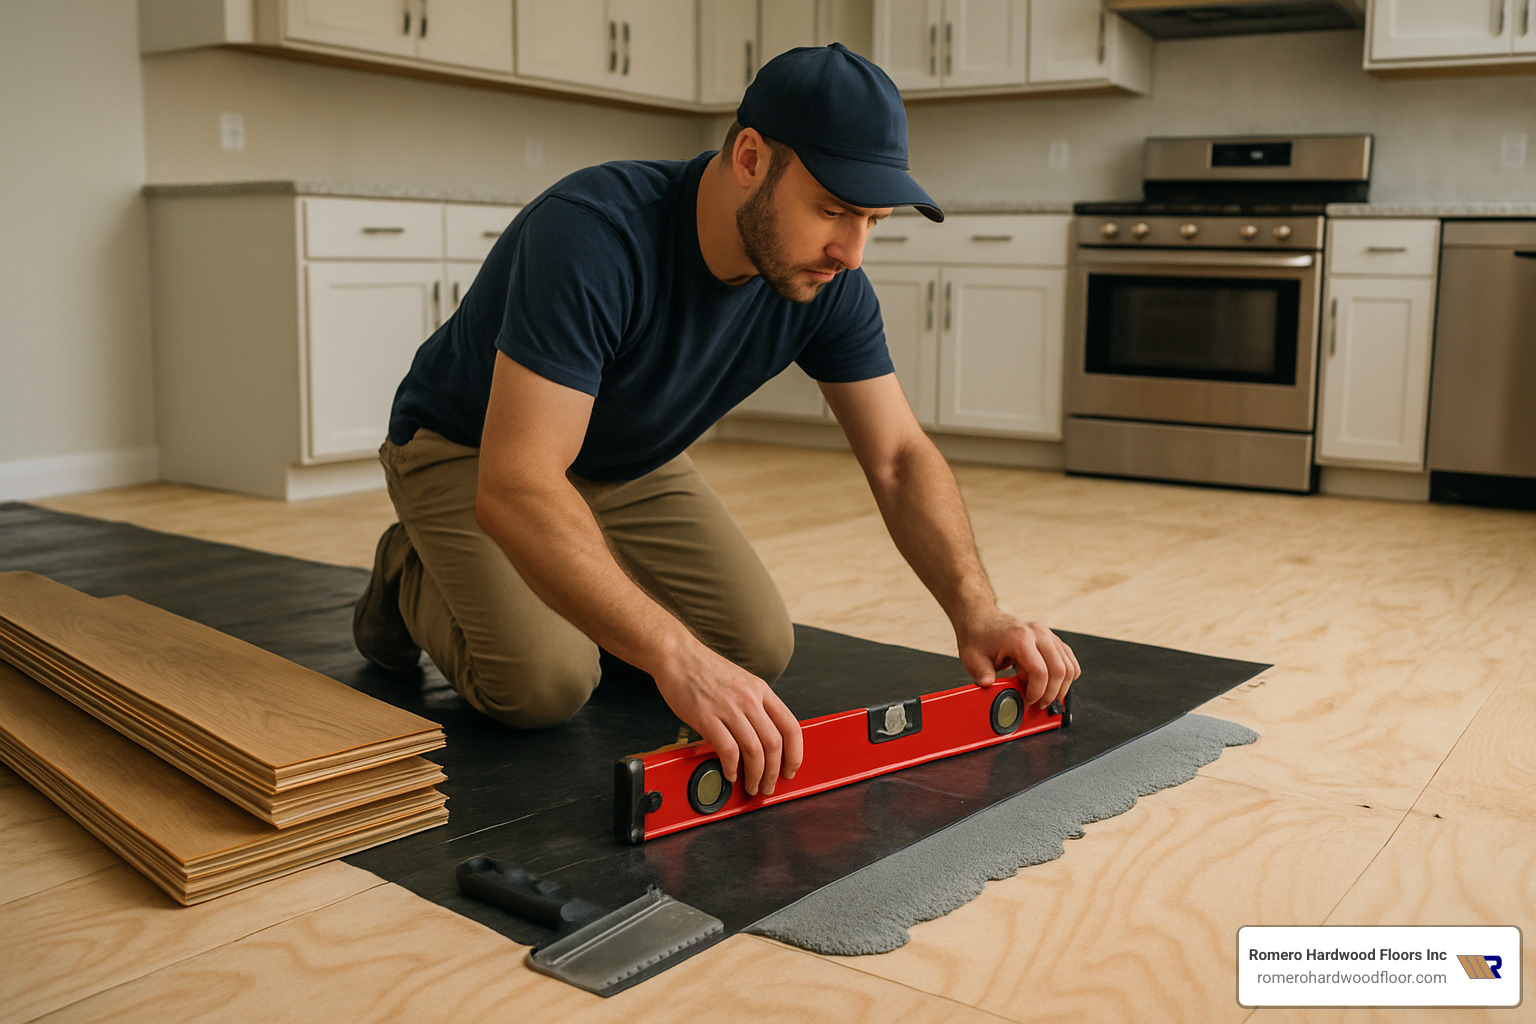
Getting engineered flooring for kitchens installed properly is like baking a perfect cake – skip the prep work, and even the best ingredients won’t save you. After 15+ years of kitchen installations across the North Shore, I’ve learned that the difference between floors that last decades and those that fail within years often comes down to what happens before the first board goes down.
Your subfloor is the foundation of everything. Kitchen subfloors need to be level within 3/16″ over 10 feet – any more variation and you’re asking for trouble. High spots create pressure points that cause premature wear, while low spots leave boards unsupported and prone to flexing.
Moisture management becomes even more critical in kitchens. Even though engineered floors handle humidity better than solid wood, they’re not invincible. We test every subfloor’s moisture content and install appropriate barriers based on what we find.
The acclimation process might seem like an unnecessary delay, but it’s insurance against future problems. We deliver materials 48-72 hours before installation and let them adjust to your kitchen’s specific temperature and humidity conditions.
Installation methods each have their place in kitchen applications. Click-lock floating systems work beautifully for DIY enthusiasts and over concrete subfloors. Glue-down installation provides the most solid feel underfoot with excellent sound control – perfect for busy family kitchens where stability matters most. Nail-down methods offer traditional stability over wood subfloors but require more installation expertise.
For concrete subfloor installations, our detailed guide on floating engineered hardwood flooring on concrete covers the specific techniques that ensure long-term success.
Daily maintenance for engineered flooring for kitchens is refreshingly simple. Sweep or vacuum daily to remove the grit and debris that act like sandpaper on your finish. Wipe spills immediately – this single habit prevents 90% of water damage we see in service calls. Use entrance mats to catch dirt before it reaches your floors.
Weekly cleaning involves a light damp mop with hardwood floor cleaner – never soaking wet. Check for loose boards or finish wear while you clean.
High-Traffic Survival Tips
Kitchen floors take a beating, but a few smart strategies can dramatically extend their lifespan. Felt pads under all furniture legs prevent the scratches and dents that make floors look worn before their time. Replace these pads every 6-12 months since worn pads can actually cause more damage than no pads at all.
Pet owners need extra vigilance. Keep pet nails trimmed to prevent scratches, and clean up accidents immediately to prevent staining or odor absorption. Area rugs in pet feeding areas can save your floors from daily water bowl splashes.
Kitchen-specific protection makes a huge difference. Use rugs near sinks and stoves where spills happen most often. Install proper ventilation to control the humidity from cooking steam. Rotate area rugs periodically to prevent uneven wear patterns that create obvious traffic lanes.
Frequently Asked Questions about Engineered Flooring for Kitchens
Let’s tackle the questions we hear most often from homeowners considering engineered flooring for kitchens. After nearly two decades of installations across the Boston area, these are the real concerns that keep people up at night when making this investment.
Does engineered flooring for kitchens handle water spills?
Here’s the honest truth: engineered flooring for kitchens handles water spills significantly better than solid hardwood, but calling it “waterproof” is marketing spin that gets homeowners in trouble.
The reality is much more practical. Quality engineered floors with proper finishes can absolutely handle your everyday kitchen life – spilled coffee, splashed dishwater, even that time the kids knocked over a full water glass. The cross-ply construction and water-resistant coatings give you precious time to grab a towel and clean up.
We’ve seen engineered floors survive some impressive accidents. One client in Chelsea had their dishwasher leak overnight, creating a small flood. Because they caught it within 12 hours and had quality flooring with aluminum oxide finish, there was zero damage.
But here’s where expectations need to align with reality: standing water will eventually win. Even floors marketed as “waterproof” typically offer 36-hour protection claims at best before moisture penetrates the core layers.
Water-resistant coatings like lacquer and polyurethane create that crucial barrier between spills and your floor. These finishes buy you the time you need for prompt cleanup – which really means minutes, not hours.
How many times can engineered flooring for kitchens be refinished?
This question reveals a common misconception about engineered floors. The refinishing potential depends entirely on wear-layer thickness, and frankly, most homeowners never refinish their floors anyway.
Here’s the breakdown we give every client: floors with 2mm wear layers get one light refinishing cycle if you’re lucky. Many can’t be refinished at all because the veneer is too thin to sand safely.
2-4mm wear layers handle twice the refinishing cycles – typically two full sand-and-refinish jobs over their lifetime. This covers most mid-range engineered floors and represents the sweet spot for kitchen applications.
4mm+ wear layers offer multiple refinishing cycles – often 3-4 times over 25-30 years. These premium floors cost more upfront but deliver the best long-term value for busy family kitchens.
But here’s what we’ve learned from hundreds of installations: most homeowners never refinish their engineered floors. With proper maintenance and quality finishes, these floors look great for two decades without refinishing.
What installation method is best for my kitchen?
The “best” installation method depends on your specific situation, and there’s no one-size-fits-all answer. After installing engineered floors in hundreds of kitchens, we’ve learned that the right choice depends on your subfloor, budget, and how you use your kitchen.
Click-lock floating installation works beautifully for DIY enthusiasts and concrete subfloors. The boards literally click together and float over underlayment, allowing for natural expansion and contraction.
Glue-down installation delivers the most solid feel and superior sound control – crucial if you have family or neighbors below your kitchen. We recommend this method for busy family kitchens where stability matters most.
Nail-down installation represents the traditional approach that’s worked for generations. It provides excellent stability over wood subfloors and creates that solid, permanent feel homeowners love.
For most kitchen installations, we lean toward glue-down methods when budget allows. The superior stability and sound dampening make daily life more pleasant, especially in open floor plans where kitchen noise carries throughout the home.
Conclusion
After 15+ years installing engineered flooring for kitchens throughout the greater Boston area, I’ve watched this flooring option evolve from a compromise choice to the smart choice for most kitchen projects.
When we first started installing engineered floors in 2006, homeowners saw them as “fake wood” – a budget alternative to solid hardwood. Today, our clients choose engineered flooring for kitchens not because they have to, but because it makes sense. The technology has improved dramatically, and homeowners have learned that sometimes the engineered solution actually outperforms the “natural” one.
The reality check: Your kitchen isn’t a museum showcase. It’s a working space where life happens – cooking disasters, pet accidents, holiday entertaining chaos, and daily family traffic. Engineered floors are built for this reality while still delivering the warmth and beauty that only real wood can provide.
We’ve installed these floors in everything from tiny North End condos to sprawling Winchester colonials. The consistent feedback? Homeowners love the peace of mind. No more worrying about every spill or humidity swing from cooking. The floors just perform, day after day, year after year.
But let’s be honest – engineered floors aren’t perfect. They won’t handle a burst pipe like ceramic tile would. They can’t be refinished endlessly like solid hardwood. And cheap versions will disappoint you faster than you can say “buyer’s remorse.”
The secret is understanding what you’re buying and why. When clients ask us about engineered flooring for kitchens, we don’t just talk about products – we talk about lifestyles. The right engineered floor choice depends on your real life, not marketing brochures.
At Romero Hardwood Floors Inc., we’ve perfected our consultation-to-completion process over hundreds of kitchen installations across Beverly, Chelsea, Danvers, Gloucester, Lynnfield, Malden, Marblehead, Medford, Melrose, Peabody, Reading, Revere, Salem, Saugus, Somerville, Stoneham, Swampscott, Wakefield, Winchester, Winthrop, and Woburn. Our reputation for competitive pricing and guaranteed workmanship means you get both value and peace of mind.
Here’s what we’ve learned works: Choose engineered floors with thick wear layers, invest in quality finishes, and don’t skip professional installation. The upfront investment pays back through decades of worry-free performance and increased home value.
The bottom line: Engineered flooring for kitchens represents the sweet spot where beauty meets practicality. It’s real wood that’s engineered to handle real life. For most homeowners, it’s simply the smartest flooring choice for their kitchen.
Ready to see what engineered floors can do for your kitchen? We bring the same punctuality and craftsmanship to every project, whether it’s a simple refresh or a complete kitchen change. For specialized installations, our engineered hardwood over concrete guide shows how we handle even challenging subfloor conditions.
Your kitchen deserves flooring that works as hard as you do. Let’s make it happen together.
