Hardwood floor transition strips: 10 Best Stunning Picks 2025
Why Hardwood Floor Transition Strips Matter for Every Home
Hardwood floor transition strips are essential profiles that bridge the gap between different flooring materials, create smooth height transitions, and cover expansion gaps around the perimeter of floating floors. They serve both safety and aesthetic purposes by preventing tripping hazards while providing a finished, professional look to your flooring project.
Quick Answer for Buyers:
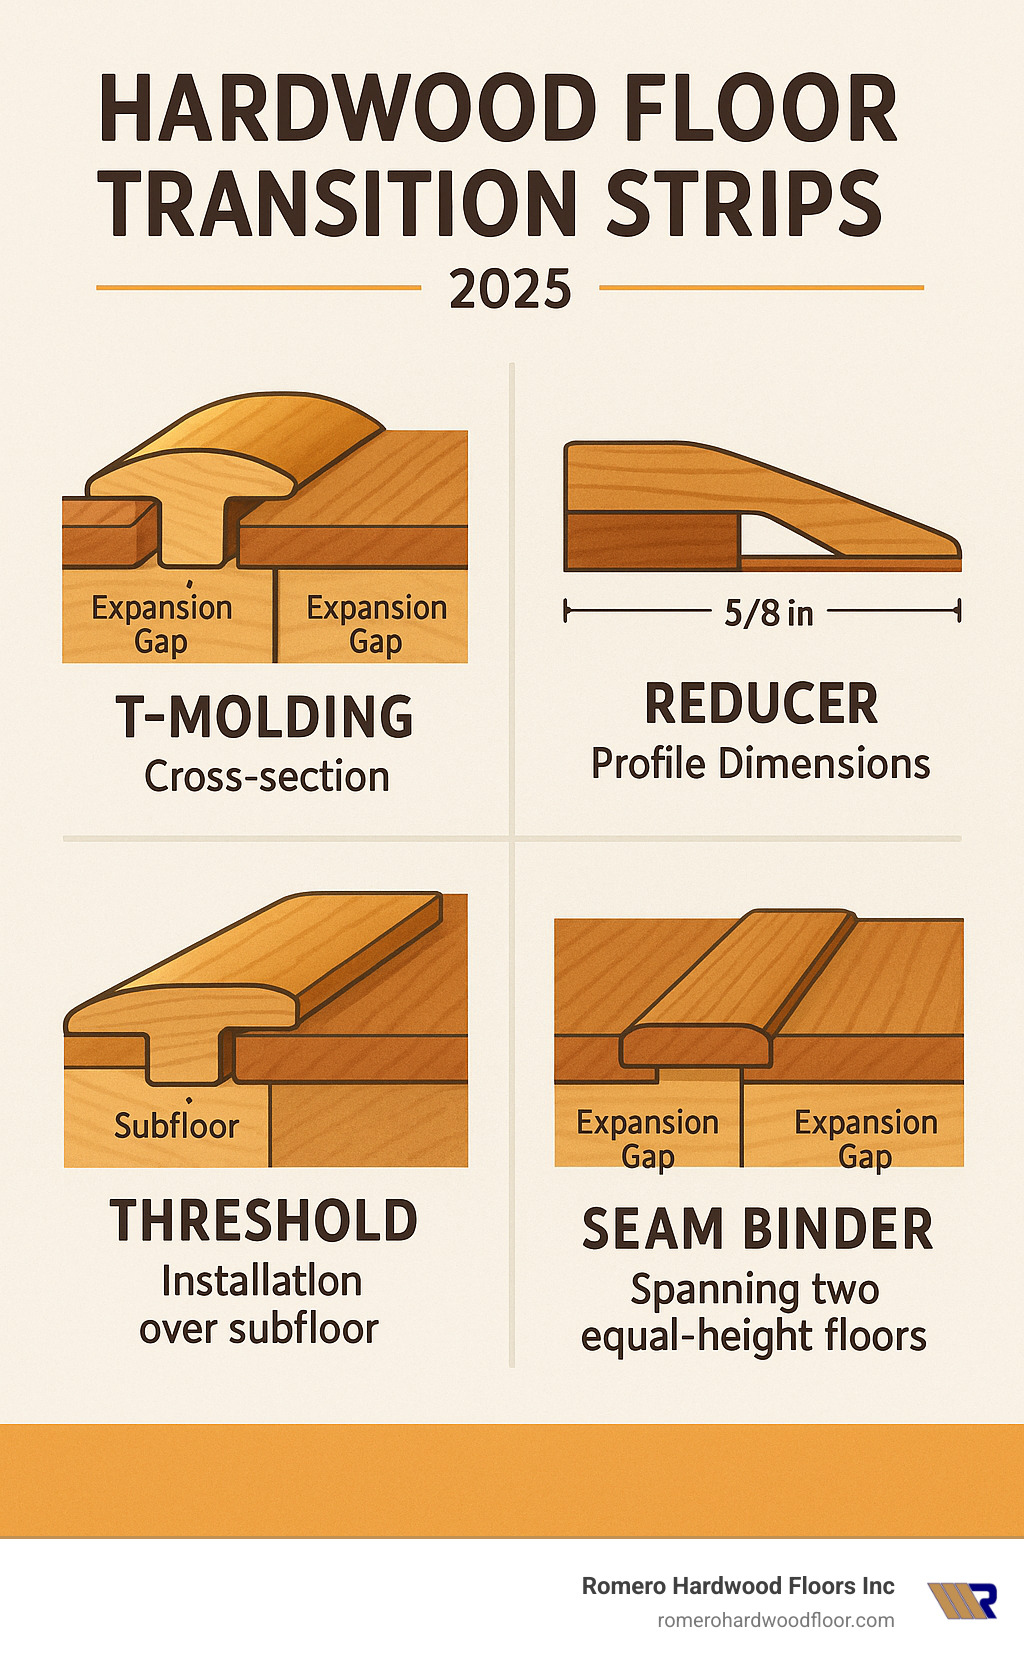
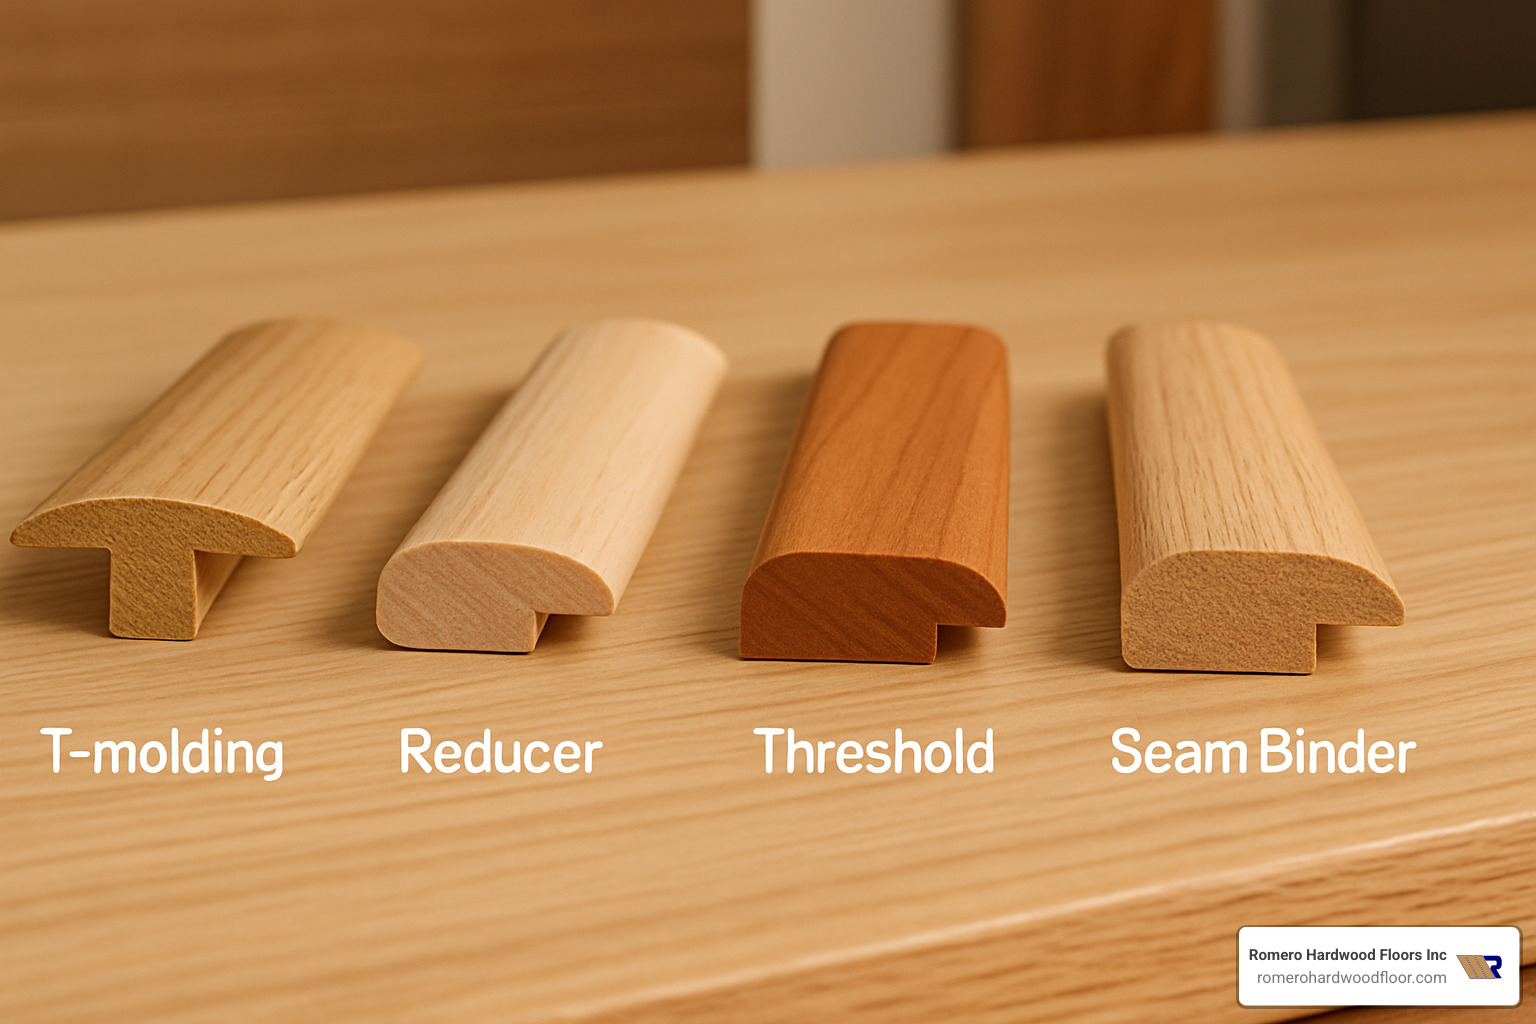
- T-Molding: Connects floors of equal height (typically 2″ x 5/8″)
- Reducers: Bridges height differences between materials
- Thresholds: Transitions between different flooring types in doorways
- Seam Binders: Joins two wood floors (available 1-3/4″ to 5″ wide)
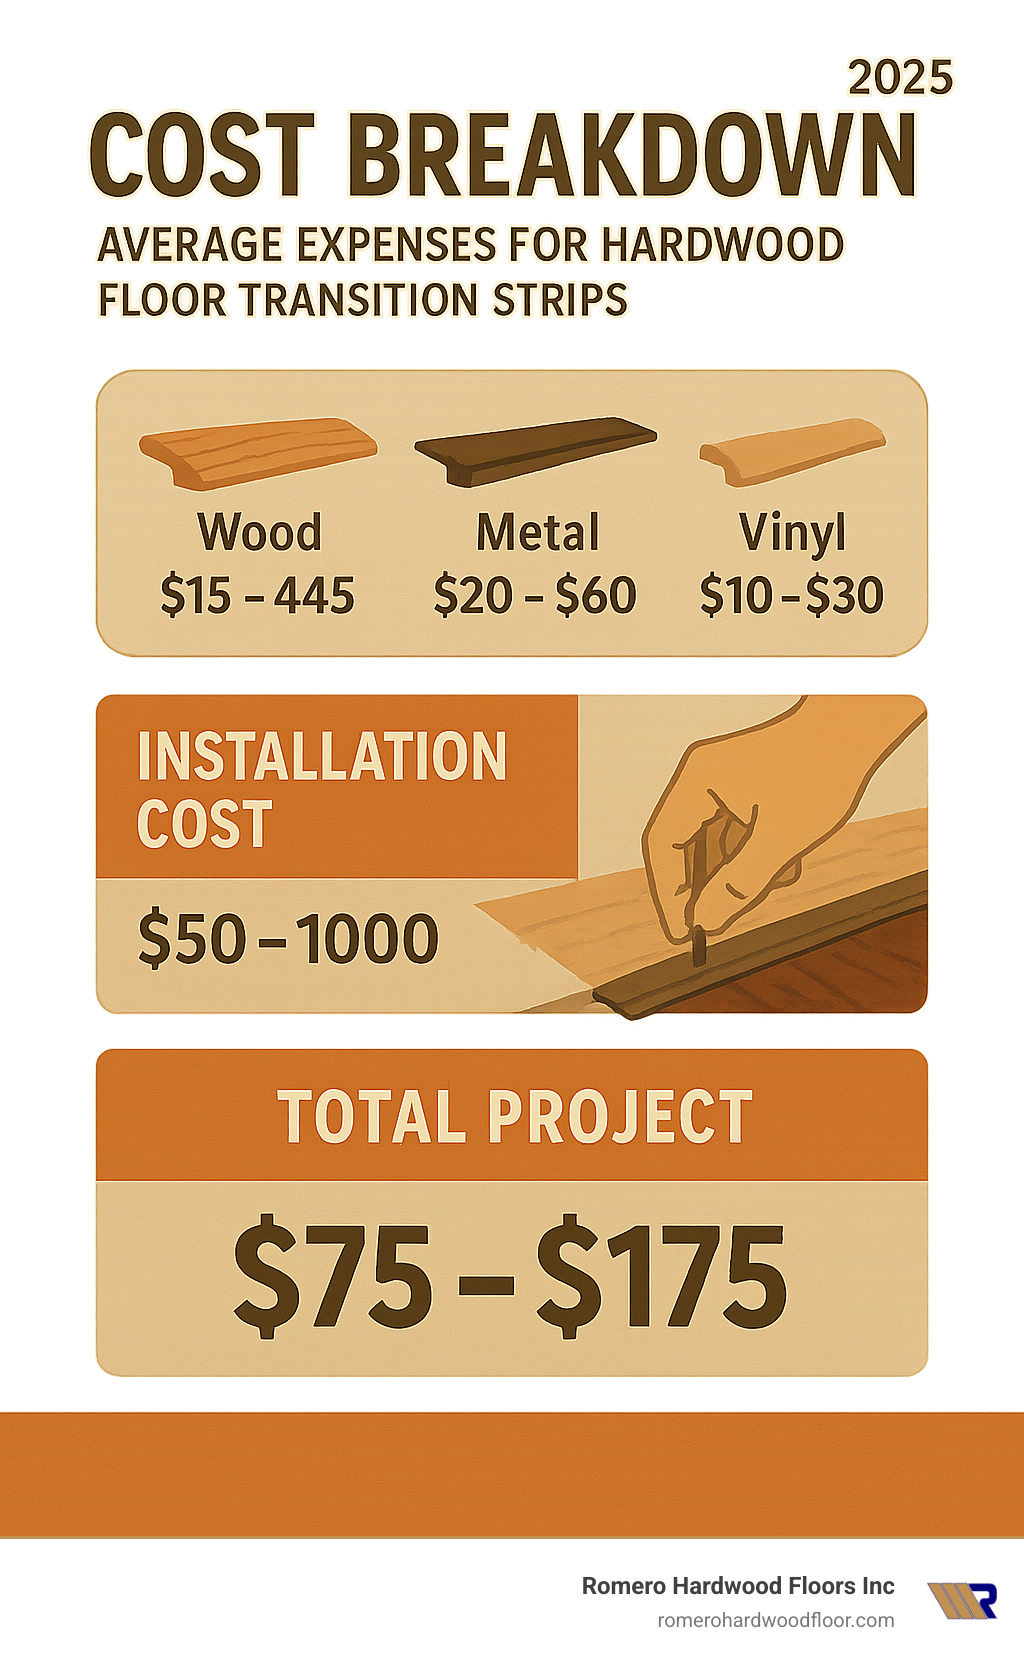
- Price Range: $10-$30+ per piece for standard strips, custom options 3x higher
- Materials: Oak, maple, cherry, walnut, hickory to match major flooring brands
As one flooring expert noted: “In a perfect world, your flooring would flow seamlessly from room to room. In the real world, however, you cannot help but transition from one flooring type to another.”
Safety is the top priority. Different flooring materials often vary in thickness, creating potential trip hazards. Transition strips eliminate these dangerous height differences while allowing floors to expand and contract naturally.
Aesthetics matter too. The right transition strip can make or break the flow between rooms. Whether you’re connecting hardwood to tile, carpet, or vinyl, the proper strip creates visual harmony throughout your home.
I’m Francisco Romero, owner of Romero Hardwood Floors Inc., and I’ve been installing and perfecting hardwood floor transition strips for over 15 years in the Revere, MA area. My team has solved countless transition challenges, from simple doorway strips to complex multi-level installations that require custom millwork and precise color matching.
Quick Hardwood floor transition strips definitions:
Best Hardwood Floor Transition Strips of 2025
Finding the perfect hardwood floor transition strips has become much easier in 2025, with manufacturers now offering beautiful options in oak, maple, cherry, walnut, and hickory to match virtually every major flooring brand on the market. After installing thousands of transition strips across Beverly, Chelsea, Danvers, and surrounding Massachusetts communities over the past 15+ years, I can tell you that the quality and variety available today is simply incredible.
The real game-changer this year is the 4-in-1 multi-function strip that adapts to different situations. One flooring expert perfectly described it as “like a Swiss Army Knife because it has a lot of interchangeable parts.” These innovative strips can function as T-molding, reducers, thresholds, or seam binders depending on how you install them.
Oak remains the undisputed champion for matching existing floors, but we’re seeing more homeowners choose maple for its clean, consistent grain and walnut for dramatic contrast. The standard sizes of 1-3/4″ x 36″ and 2″ x 36″ work for most residential applications, though custom lengths are readily available.
The biggest decision you’ll face is prefinished versus unfinished strips. Prefinished saves time and guarantees a consistent factory finish, while unfinished strips allow perfect color matching through custom staining. In my experience, unfinished strips are worth the extra effort when you’re trying to match older floors that have developed character over time.
T-Molding Hardwood Floor Transition Strips
T-molding creates seamless transitions between floors of equal height, making it the go-to choice for doorway applications where the same flooring continues from room to room. The classic “T” shape sits perfectly between two floor surfaces, typically measuring 2″ wide by 5/8″ thick.
Floating floor installations absolutely require T-molding to cover the necessary expansion gaps. Without it, you’ll have unsightly 1/4″ to 1/2″ gaps that collect dust and debris. We’ve installed countless floating floors throughout Malden, Medford, and Melrose, and proper T-molding makes all the difference in achieving that professional look.
The beauty of T-molding lies in its simplicity. It allows floors to expand and contract independently while maintaining a smooth walking surface. Large rooms often need T-molding breaks where spline joints aren’t practical, and doorways between identical flooring materials look infinitely better with proper transitions.
Reducer Hardwood Floor Transition Strips
Reducers solve the height difference puzzle by tapering gracefully from your higher hardwood surface down to lower flooring materials. Standard flush reducers typically measure 3/4″ on the hardwood side and taper to 1/8″ on the opposite end, while overlap reducers for floating floors max out at 5/8″ thickness.
The choice between flush and overlap reducers depends entirely on your installation method. Flush reducers work beautifully for glued-down installations, creating that seamless, built-in appearance. Overlap reducers are specifically designed for floating floors with underlayment, accommodating the slight movement that’s natural in these installations.
Wheelchair accessibility is a crucial consideration that many homeowners overlook. Properly installed reducers create gradual slopes that meet ADA compliance requirements, ensuring safe navigation for everyone. We frequently encounter height differences when transitioning from hardwood to vinyl or tile, especially in kitchen and bathroom applications throughout Peabody, Reading, and Salem.
Custom reducers can be rip-cut to accommodate specific height differences that don’t match standard profiles. This flexibility has saved countless projects where off-the-shelf options just wouldn’t work.
Threshold & Seam Binder Options
Thresholds excel at bridging completely different flooring types, particularly in wood-to-carpet transitions where you need both height adjustment and secure carpet edge attachment. These specialized profiles grip carpet edges securely while providing a finished appearance that looks intentional rather than improvised.
Seam binders serve a different purpose entirely – they join two wood floors of equal height while creating visual separation. Available in widths from 1-3/4″ to 5″, they’re perfect for open floor plans where you want defined zones without height changes. The 5″ wide seam binders make particularly bold statements in large spaces where subtle transitions would get lost.
Unfinished stainable pieces offer the ultimate in customization, allowing perfect color matching that makes transitions virtually disappear. This option requires more work upfront but delivers results that look like they were always part of the original floor design.
Open floor plan applications have driven much of the innovation in seam binders. Modern homes often feature flowing spaces that still benefit from visual breaks, and wide seam binders provide that definition without creating actual barriers to movement or sight lines.
How to Choose the Right Transition Strip
Choosing the perfect hardwood floor transition strips feels overwhelming at first, but it becomes straightforward once you understand the key factors. Location matters most – a busy hallway needs different considerations than a quiet bedroom doorway. Material compatibility comes next, followed by traffic patterns and moisture exposure levels.
We’ve learned through countless installations across Revere and surrounding communities that measuring height differences precisely prevents safety issues down the road. ADA compliance requirements also factor into commercial projects and accessible residential installations.
| Material | Durability | Cost Range* | Best Use | Moisture Resistance |
|---|---|---|---|---|
| Oak Hardwood | Excellent | $15-$45 | High traffic, residential | Moderate |
| Metal/Aluminum | Superior | $20-$60 | Commercial, heavy traffic | Excellent |
| Vinyl/PVC | Good | $10-$30 | Moisture areas, budget | Superior |
*Average costs based on internet data, not actual Romero Hardwood Floors pricing
Traffic level determines durability needs. High-traffic areas like main hallways and entryways demand robust hardwood or metal options that can handle constant foot traffic without showing wear. Lower-traffic bedrooms and offices can use more budget-friendly materials.
Moisture exposure significantly impacts material choice. Bathrooms, kitchens, and laundry rooms benefit from metal or vinyl strips that won’t warp or swell when exposed to humidity and occasional water spills.
Height measurement requires precision to prevent dangerous trip hazards. Even small differences can cause falls, especially for elderly residents or anyone with mobility challenges.
Installation method varies depending on your floor type. Floating floors need different profiles than nail-down installations, and the expansion requirements differ significantly between the two approaches.
Matching Species & Finish
Getting the color harmony right makes the difference between a professional-looking installation and an obvious patch job. Oak remains our go-to recommendation because it’s available in both red and white varieties that complement most flooring we install throughout Saugus, Somerville, and Stoneham.
Exact species matching works perfectly when you can source strips from the same manufacturer as your flooring. The grain patterns and undertones align naturally, creating seamless transitions that look intentional rather than forced.
Custom staining opens up possibilities when exact matches aren’t available. Unfinished strips can be stained to match your existing floors precisely, though this adds time and complexity to the project. We often recommend this approach for unique or discontinued flooring colors.
Complementary tones sometimes work better than attempting perfect matches. Choosing undertones that harmonize rather than clash creates pleasing transitions without the awkward “almost but not quite” look that screams mistake.
Prefinished convenience offers consistency and durability straight from the factory. These finishes typically last longer than field-applied stains and eliminate the guesswork involved in color matching.
For more guidance on creating cohesive color schemes throughout your home, check out our hardwood floor installation patterns guide.
Measuring Height Differences
Accurate measurement determines whether you need flush reducers, overlap reducers, or T-molding. We use precision calipers to measure differences down to 1/16″, because even small variations can create safety hazards or installation problems.
Measuring both surfaces means accounting for every layer – flooring, underlayment, adhesive, and any subfloor variations. What looks like a simple transition often involves multiple thickness variables that affect the final height difference.
Accounting for expansion becomes critical with floating floors. These installations require additional clearance for seasonal movement, which affects both the gap size and the type of transition strip needed.
Checking multiple points along the transition line ensures consistent results. Subfloors aren’t always perfectly level, and small variations can cause problems if you only measure at one spot.
Documenting findings helps when ordering materials and prevents costly mistakes. We record measurements for each transition point, noting any special requirements or potential challenges.
Height differences as small as 5/16″ create tripping hazards, especially for elderly residents or wheelchair users in our accessible installations throughout Wakefield, Winchester, and Winthrop. Taking time to measure accurately prevents safety issues and ensures smooth, professional-looking results.
Installation & Finishing Tips
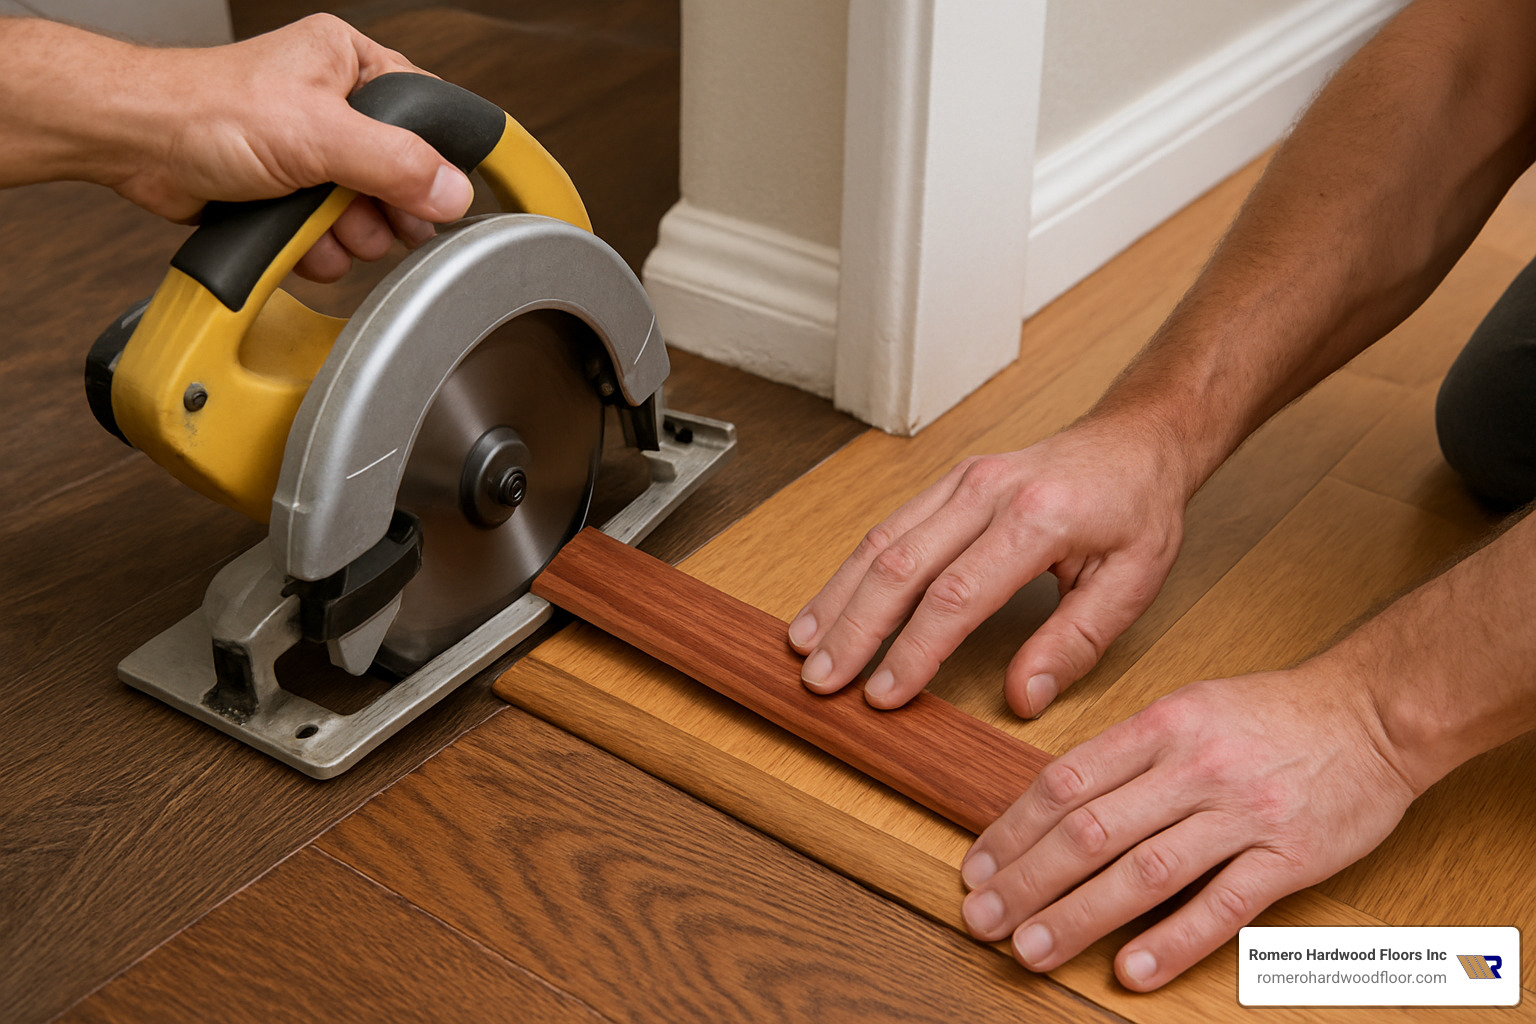
Installing hardwood floor transition strips properly makes the difference between a professional-looking job and one that screams “DIY disaster.” After 15+ years of perfecting these installations across Massachusetts, I can tell you that having the right tools and understanding the key techniques will save you both time and headaches.
Your miter saw is your best friend for getting those perfectly straight cuts. A fine-tooth blade prevents tear-out on the wood grain. Drill bits are essential for pilot holes – trust me, you don’t want to split a $40 walnut strip because you skipped this step. For securing strips, you’ll choose between construction adhesive for permanent installations or stainless steel screws for removable ones.
Calipers give you the precise height measurements that separate amateur work from professional results. And if you’re working with unfinished strips, a router opens up custom edge profiling possibilities that can make your transitions truly seamless.
The most critical aspect many homeowners miss is expansion gap requirements. Floating floors need that 1/4″ to 1/2″ breathing room, and your transition strips must accommodate this movement. Ignore this rule, and you’ll have buckling floors within a year. For detailed insights from seasoned professionals, this pro installer discussion covers real-world challenges we face daily.
DIY Install Steps for Hardwood Floor Transition Strips
Subfloor preparation sets the foundation for everything that follows. Clean out all debris from the joint area and check for any squeaks or loose boards. A level transition starts with a level base.
Measuring and cutting requires patience and precision. Cut your strips to exact length using that miter saw, remembering the old carpenter’s rule: measure twice, cut once. A fine-tooth blade prevents those frustrating tear-outs that can ruin an expensive piece.
Test fitting before final installation catches problems while they’re still easy to fix. Dry-fit the strip to ensure proper height transition and complete gap coverage. This step reveals any adjustments needed before you commit with adhesive or screws.
Securing the track varies by strip type. Some hardwood floor transition strips use mounting channels that get fastened first, while others rely on construction adhesive applied directly to the subfloor. Follow manufacturer instructions exactly – they’ve tested these methods extensively.
Installing the profile is where everything comes together. Snap-in profiles click into place satisfyingly when done right. Screw-down types need pilot holes to prevent splitting. Always maintain those expansion gaps we discussed earlier.
Sanding and sealing unfinished strips completes the installation. Sand smooth with 120-grit paper, then apply matching finish. This extra step lets you achieve perfect color harmony with your existing floors.
The biggest mistakes I see are installing strips too tight against floors (which prevents natural expansion), ignoring height differences (creating dangerous trip hazards), poor color matching (making transitions the focal point for all the wrong reasons), and inadequate fastening that leads to loose strips over time.
Professional-Grade Finishing
Our professional installations often go beyond standard DIY approaches because clients want that seamless, high-end look. Custom routing creates unique edge profiles like Roman ogee or round-over details that complement traditional home styles throughout our Revere service area.
Flush mounting techniques ensure strips sit perfectly level with both floor surfaces. This eliminates any raised edges that catch shoes or create cleaning challenges. It’s more time-intensive but creates that “built-in” appearance that adds real value.
Net-fitting represents the highest level of transition work – essentially eliminating visible transition strips through precise scribing and custom milling. We use this technique in luxury installations where clients want completely seamless room-to-room flow.
Color blending through custom staining creates gradual transitions rather than abrupt changes. This technique works particularly well in open floor plans where you want subtle definition between spaces without obvious dividing lines.
These advanced techniques require professional tools and experience, but understanding them helps you communicate your vision clearly when working with contractors. For insights into avoiding common pitfalls that can compromise even professional work, review our guide on hardwood floor installation mistakes.
Cost, Maintenance & Where to Buy

Hardwood floor transition strips range from $10-$30+ per piece for standard profiles, with custom millwork options costing 3x higher. Based on internet pricing data (not our actual costs), expect to pay $15-$45 for quality oak strips, $20-$60 for metal options, and $10-$30 for vinyl alternatives.
Pricing Factors:
- Species Premium: Exotic woods like walnut command higher prices
- Custom Millwork: Hand-routed profiles can cost $45-$135+ per piece
- Length Requirements: Longer strips (72″) cost more than standard 36″ pieces
- Finish Quality: Prefinished strips include factory finishing costs
Maintenance Requirements:
- Regular Cleaning: Vacuum debris from grooves and edges
- Refinishing: Sand and re-stain unfinished strips as needed
- Inspection: Check for loose fasteners or damage annually
- Replacement: High-traffic strips may need replacement every 10-15 years
Where to Purchase:
- Local flooring retailers offer hands-on selection and expert advice
- Online suppliers provide wider selection but require precise measurements
- Specialty millwork shops create custom profiles for unique applications
- Big box stores carry basic profiles at competitive prices
Frequently Asked Questions about Hardwood Floor Transition Strips
Over my 15+ years installing hardwood floor transition strips throughout Massachusetts, I’ve heard just about every question homeowners can ask. Here are the most common concerns that come up during our consultations in Revere, Beverly, and surrounding communities.
Do I always need a transition strip between rooms?
The short answer is no – but there are important exceptions that could affect both safety and your flooring warranty. When the same flooring material continues between rooms at exactly the same height, you can often skip the transition strip entirely. This creates a clean, seamless flow that many homeowners prefer.
However, transition strips become essential when you’re dealing with:
Different flooring materials like hardwood transitioning to tile, carpet, or vinyl. Without a proper strip, you’ll have an ugly gap that collects dirt and creates a tripping hazard.
Height differences between floors – even small variations can cause stubbed toes and potential liability issues. I’ve seen homeowners try to ignore 1/4″ height differences, only to regret it later when guests trip.
Floating floor installations that require expansion gaps. Your manufacturer’s warranty likely depends on maintaining proper gaps, and transition strips are the only way to cover these gaps attractively.
Building code requirements for accessibility compliance, especially in commercial installations or homes designed for aging in place.
The key is understanding that skipping transition strips isn’t just about aesthetics – it’s about safety and protecting your flooring investment.
Can transition strips be stained to match older floors?
Absolutely, and this is one of my favorite challenges! Unfinished hardwood floor transition strips can be custom-stained to match existing floors with remarkable precision. The trick is patience and the right technique.
Start with test staining on a sample piece or the back of your actual strip. I always tell homeowners to test multiple stain combinations because lighting conditions can dramatically affect how colors appear. What looks perfect in your garage workshop might look completely wrong in your living room.
Build color gradually with multiple thin coats rather than trying to achieve the perfect match in one heavy application. This gives you much more control and prevents blotchy results that scream “DIY disaster.”
Match the sheen level as carefully as you match the color. If your existing floors have a satin finish, your transition strip needs the same sheen. A semi-gloss strip next to satin floors will stick out like a sore thumb.
For valuable or antique floors, I honestly recommend professional staining. The cost difference is minimal compared to the potential heartbreak of ruining a expensive transition strip – or worse, having it clash with floors you can’t easily replace.
What tools are required for a seamless install?
You don’t need a full cabinet shop to install hardwood floor transition strips properly, but having the right tools makes the difference between a professional-looking result and an obvious DIY job.
A miter saw with a fine-tooth blade is absolutely essential for clean cuts. I’ve seen too many installations ruined by rough cuts from circular saws or hand saws. The investment in a decent miter saw pays for itself in the first project.
A drill with appropriate bits for pilot holes prevents splitting in hardwood strips. Nothing’s more frustrating than splitting a $30 strip because you skipped a 30-second pilot hole.
A level ensures proper strip alignment – crooked transition strips are impossible to ignore once they’re installed. Your eye will go straight to them every time you walk through the room.
Calipers for precise height measurements eliminate guesswork. I use digital calipers that measure to 1/64″ because small measurement errors create big installation problems.
A router for custom edge profiling is only needed for advanced installations, but it opens up possibilities for truly seamless transitions that look like they were built with the house.
Don’t forget safety equipment – glasses and dust masks are non-negotiable. I’ve pulled too many wood splinters out of eyes over the years to skip this reminder.
The reality is that most homeowners can achieve excellent results with basic tools and patience. The key is taking accurate measurements and not rushing the installation process.
Conclusion
Upgrading your home with quality hardwood floor transition strips is one of those small details that makes a big difference. Think of them as the finishing touch that ties everything together – like the perfect frame on a beautiful painting. They eliminate dangerous tripping hazards, create smooth visual flow between rooms, and show the kind of attention to detail that guests notice and future buyers appreciate.
The safety benefits alone justify the investment. No one wants to worry about family members or guests stumbling over uneven floor transitions. The right strips create safe, accessible pathways throughout your home while allowing your floors to expand and contract naturally.
But it’s the aesthetic impact that really transforms a space. When done correctly, transitions become virtually invisible – guiding the eye smoothly from room to room without drawing attention to themselves. When done poorly, they stick out like a sore thumb and can make even the most beautiful flooring look amateurish.
At Romero Hardwood Floors Inc., we’ve been perfecting transition strip installation since 2006 across our service areas from Gloucester to Woburn. We’ve handled everything from simple doorway strips in cozy Cape Cod homes to complex multi-level commercial installations in busy office buildings. Our experience means we understand the nuances of species matching, precise height transitions, and professional finishing techniques that create seamless results.
The little things matter most in flooring. We’ve seen gorgeous hardwood installations undermined by poorly chosen or badly installed transition strips. We’ve also seen modest flooring projects liftd to look truly professional with the right transition details. It’s amazing how much difference these seemingly small components can make.
Whether you’re planning a DIY weekend project or need professional installation, don’t underestimate the importance of quality transition strips. They’re the unsung heroes of flooring – working quietly behind the scenes to keep your family safe while making your floors look their absolute best.
For more information about our comprehensive flooring services and to explore our top-rated hardwood floors, contact our team today. We’re here to help you step up your flooring game with transitions that are both beautiful and built to last. After all, the best transitions are the ones you never notice – they just work perfectly, day after day.
