Hardwood floor clear coat repair: Flawless fix 2025
Your Guide to Flawless Floors
Hardwood floor clear coat repair is a common concern for homeowners dealing with peeling, scratched, or cloudy polyurethane finishes on their floors. If you want to learn more about what gives polyurethane its protective power, see the concise overview on polyurethane.
Quick Clear Coat Repair Overview:
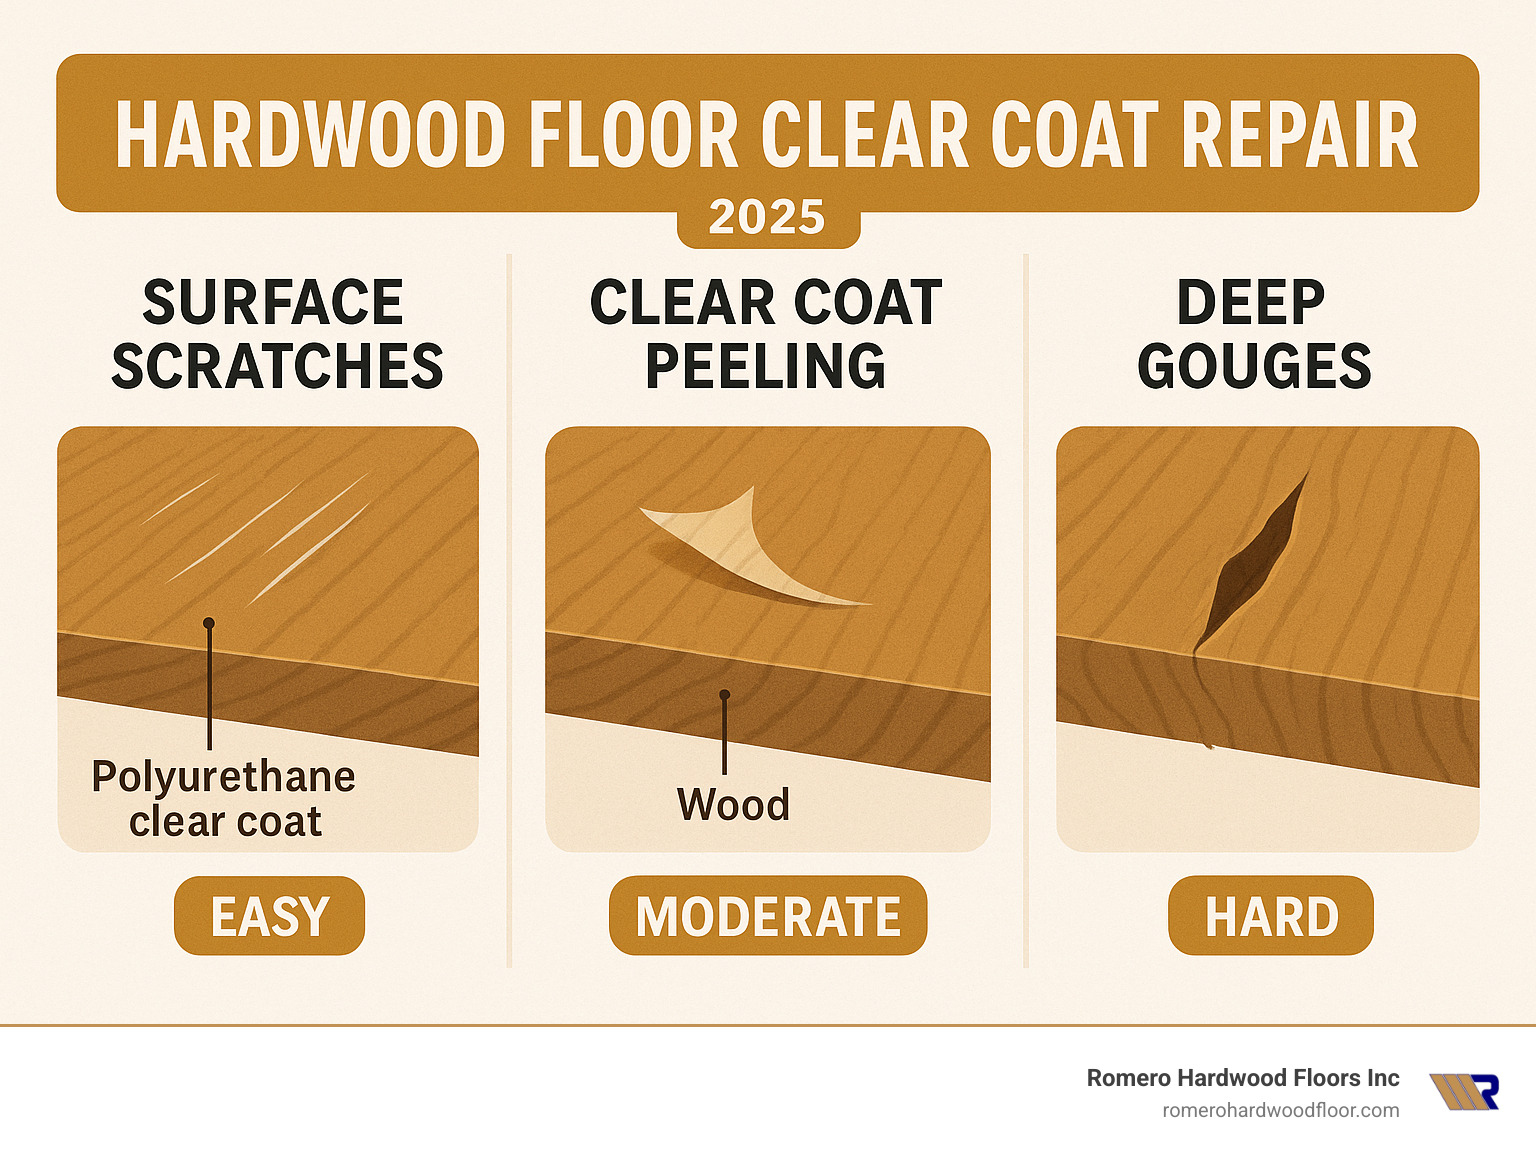
- Surface scratches: Light sanding + 1–2 coats of matching polyurethane
- Peeling areas: Remove loose finish, sand smooth, apply 2–3 thin coats
- Cloudy finish: Clean with proper products or light abrasion + recoat
- Deep gouges: May require wood filler before clear coat application
- Spot repairs: Work well for areas under 2–3 square feet
- Full refinishing: Needed when damage covers more than 30% of floor
Your hardwood floors take a beating every day. Chair legs scrape across the surface. Kids drop toys. Pets scratch and scuff. Even something as simple as DEET from bug spray can chemically dissolve your floor’s protective finish, as one forum user found the hard way.
The good news? Most clear coat damage doesn’t require expensive professional refinishing. With the right approach, you can restore those worn spots and make them nearly invisible. According to the 2022 Remodeling Impact Report, homeowners who refinish their hardwood floors give the project a perfect “Joy Score” of 10 – and spot repairs can deliver similar satisfaction at a fraction of the cost.
The key is identifying whether you’re dealing with surface-level clear coat damage or deeper issues that penetrate into the wood itself. Surface damage is perfect for DIY repair. Wood damage often needs professional attention.
I’m Francisco Romero, owner of Romero Hardwood Floors Inc. in Revere, MA. Over my 15+ years in the hardwood flooring industry, I’ve helped countless homeowners tackle hardwood floor clear coat repair projects, from simple spot fixes to complete floor restorations. This guide will walk you through the exact process my team uses to achieve professional-quality results.
Explore more about hardwood floor clear coat repair:
First, Identify the Damage: Is It Just the Clear Coat?
Think of your hardwood floor’s clear coat as its superhero shield! This clear, protective layer – often made of tough polyurethane – works hard every single day. It stands guard against scratches, spills, and all the little mishaps life throws its way. When this important shield gets worn down or damaged, it leaves the beautiful wood underneath vulnerable. That’s when we start thinking about hardwood floor clear coat repair.
Damage to your clear coat can show up in a few different ways:
You might see scratches, which are those tell-tale lines or grooves. Some are super shallow, just skimming the surface, while others can dig deeper, even reaching the wood itself. Then there are scuffs, often left by shoes, furniture, or maybe even an excited pet. These usually don’t break through the clear coat but leave dull or discolored marks.
Sometimes, the clear coat might start peeling or flaking away. This can happen for several reasons, like if the original finish wasn’t applied perfectly, or if chemicals (remember that unfortunate DEET incident from earlier?!) or too much moisture got to it. You might also notice a cloudy finish, where your floor looks milky, hazy, or just not as clear as it should be. This could be from trapped moisture, certain cleaning products, or even how the finish was applied.
And, of course, there’s water damage, which often shows up as white spots or rings, indicating moisture has gotten trapped. Lastly, chemical damage can literally melt or degrade the clear coat, leaving a sticky mess or a bare patch.
It’s super important to figure out if the damage is only to the clear coat or if it’s gone deeper into the wood. If you see bare wood, or if the wood itself is gouged, stained, or discolored, your repair might be a bit more involved than just a simple clear coat fix. For more insights into different types of floor damage, swing by our guide on Fixing Scratched Floors.
Assessing the Extent of the Problem
Before you grab any tools, let’s play detective! Taking a moment to really look at the damage will help you choose the best repair plan.
First, consider the localized damage vs. widespread wear. Is it just a tiny spot where your favorite chair scrapes, or are large areas of your floor looking tired? High-traffic zones like hallways, entryways, or spots where furniture frequently moves (think under your dining room table or that home office chair) are often the first to show wear from furniture scuffs and even pet scratches.
Next, let’s try a couple of simple tests:
- The Water Drop Test: This is a fun, easy way to see how well your floor is sealed. Find a hidden spot and drop a few tiny drops of plain water onto the floor. If the water soaks right in, your floor probably isn’t sealed very well. If it leaves a temporary white ring, you might have a different type of finish like varnish. But if the water just beads up nicely and doesn’t change the color or soak in, congratulations! You have a polyurethane finish, which is exactly what we’re talking about with hardwood floor clear coat repair.
- The Fingernail Test: For those pesky scratches, gently try to catch your fingernail on the scratch. If your nail glides smoothly over it, you’re likely dealing with a surface scratch that’s only in the clear coat. But if your nail catches or snags, it means the scratch is deeper and might have gone into the wood itself.
When to Spot Repair vs. When to Refinish the Entire Floor
Ah, the age-old question! While we certainly love changing entire floors, many small issues can be fixed with a quick spot repair, saving you time, effort, and money. It’s all about finding the right fix for the right problem.
Here’s a handy comparison to help you decide:
| Feature | Spot Repair | Full Refinishing |
|---|---|---|
| Damage Size | Small, isolated areas (under 2-3 sq. ft.) | Widespread wear, large damaged areas (>30% of floor) |
| Damage Depth | Clear coat only, or very shallow wood penetration | Deep gouges, widespread bare wood, extensive staining |
| Floor Age | Any age, for localized issues | Older floors, significant overall dullness/wear |
| Desired Outcome | Blend existing finish, quick fix, temporary protection | “Like new” appearance, long-term durability, color change |
| Cost | Significantly lower | Higher, but provides full restoration |
| Time Commitment | Hours to a day | Multiple days to a week or more |
| Disruption | Minimal, localized | High (furniture removal, fumes, dust) |
We often suggest a spot repair for those minor scuffs, small peeling patches, or light scratches. It’s a fantastic way to keep your floor looking beautiful and extend its life without the big job of a full refinish. However, if your floor is showing a lot of damage, has widespread peeling, or deep wear that exposes much of the bare wood, a full refinish is usually the best long-term solution. Our team at Romero Hardwood Floors Inc. is here to help with expert Refinish Hardwood Floors services for homes and businesses across Beverly, Chelsea, Danvers, East Boston, Gloucester, Lynnfield, Malden, Manchester by the Sea, Marblehead, Medford, Melrose, Nahant, Peabody, Reading, Revere, Rockport, Salem, Saugus, Somerville, Stoneham, Swampscott, Wakefield, Winchester, Winthrop, and Woburn, MA.
Your Step-by-Step Guide to Hardwood Floor Clear Coat Repair

A spot repair is well within most DIYers’ reach. Gather everything first so you can work quickly and cleanly.
Essential Tools and Materials
- 220-grit sandpaper (150-grit if edges are rough)
- Sanding block
- Mineral spirits or denatured alcohol
- Tack cloth
- Small angled brush or foam pad
- Matching polyurethane (oil- or water-based, correct sheen)
- Painter’s tape
- Gloves, goggles, respirator
- Optional: wood filler for deep gouges
Full scratch-fix directions live in our DIY Guide to Hardwood Floor Scratch Repair.
Step 1 Choose the Right Finish
Identify whether the existing finish is oil- or water-based (amber tone and slower dry time usually signal oil). Then match the sheen: matte, satin, semi-gloss, or gloss. Always test your choice in a hidden corner before committing. More details are in our Best Hardwood Floor Finish article.
Step 2 Prep the Area

- Vacuum, then wipe with mineral spirits; let dry.
- Tape a tidy rectangle around the damage.
- Lightly sand inside the tape until the surface is smooth and dull. Feather pressure as you reach good finish.
- Fill any deep pits; sand flush after it cures.
- Vacuum again and pass a tack cloth. Zero dust is the goal.
Step 3 Apply New Clear Coat
- Stir (don’t shake) the poly.
- Lay a very thin coat, starting at the centre and feathering onto the old finish.
- Let dry per label, then scuff-sand with 220-grit and wipe clean.
- Add 1–2 more thin coats, widening your feather each time so the repair melts into the surrounding floor. Two coats usually protect; three in heavy-traffic zones.
Step 4 Dry & Cure
Water-based poly is often ready for light traffic in four hours; oil-based may need overnight. Full cure usually takes 72 hours to a week. Hold off on rugs and heavy furniture until then. For more tips, see the forum thread we linked earlier.
Troubleshooting and Pro Tips for a Seamless Finish
Even careful jobs develop the occasional hiccup. Here are the quick fixes we use in the field.
Bubbles
Cause: Shaken can, thick coat, high humidity.
Fix: If wet, drag the brush lightly to pop. If dry, sand smooth, clean, re-coat thinly (stirred, not shaken).
Streaks or Lap Marks
Cause: Too much product or poor feathering.
Fix: Dry, sand lightly, vacuum, tack, apply a razor-thin coat using long strokes that extend past the repair edge.
Sheen Mismatch
Too shiny: After full cure, buff gently with 0000 steel wool or a white abrasive pad.
Too dull: Add one more thin coat or burnish with a clean towel after a week.
Prevention is easiest—buy the right sheen and test first.
Advanced Blending Tricks
- Light woods (maple, birch) stay clearer with water-based poly; darker woods often welcome the warm tone of oil-based.
- In busy hallways, add an extra coat for durability.
- For a small mid-board repair, score a shallow line across the plank so it looks like a board end; the new “end joint” hides the patch.
- Lost stain? Tint the bare spot first with a matching wipe-on stain or a drop of universal tint in clear sealer—test, test, test.
Safety & Disposal
Ventilate well, wear a respirator rated for organic vapours, and lay oily rags flat outdoors until fully dry to prevent spontaneous combustion. Drop cloths and tape save hours of cleanup.
Need help beyond a spot fix? Romero Hardwood Floors Inc. serves Beverly, Saugus, Somerville and the rest of the North Shore with full Hardwood Floor Repair Techniques and refinishing services.
Frequently Asked Questions about Clear Coat Repair
We get a lot of great questions from homeowners tackling hardwood floor clear coat repair projects, and we’re always happy to share our insights. Here are some of the most common ones that come our way, along with our best advice to help you achieve beautiful results!
How long does a polyurethane clear coat repair need to dry?
Ah, the age-old question of patience! The truth is, there isn’t a single magic number for how long your polyurethane clear coat repair needs to dry. It really depends on a few key factors:
First, consider the type of product you’re using. Oil-based polyurethane generally takes longer to dry than water-based polyurethane. Then, there’s your environment! The temperature and humidity in your home play a huge role. Higher temperatures and lower humidity usually speed up drying, while cool, damp conditions can slow things down considerably.
As a general guideline, your repair might be dry to the touch in as little as 2-4 hours (especially for water-based poly). It’s typically ready for a light recoat in 12-24 hours. But here’s the crucial part: while it feels dry, it needs much longer to fully cure and harden. This curing process can take several days to a week. For regular foot traffic and placing furniture back, we advise allowing at least 72 hours for the finish to cure before significant use. Always check the manufacturer’s specific instructions on the product label for the most accurate drying and curing times.
Can I repair the clear coat on engineered hardwood floors?
Yes, you absolutely can perform a clear coat repair on engineered hardwood floors, but you need to approach it with extreme caution and a gentle hand.
The main difference with engineered hardwood is its very thin top layer of real wood, often called the veneer. While you can certainly do a light scuff-sanding to prepare the surface for a clear coat repair, going too aggressively with your sanding can wear right through that delicate veneer. If that happens, it’s irreparable damage that would necessitate board replacement, which is a much bigger project!
So, our best advice? Always, always test in a hidden spot first to see how your floor reacts. If you’re unsure about the extent of the damage, or if it covers a large area, it’s always safer to consult with a professional. We’re happy to assess the situation for you! For more on engineered wood, see our Engineered Hardwood Floor Refinishing guide.
Why does my repaired spot look shinier or duller than the rest of the floor?
This is a very common and often frustrating challenge in hardwood floor clear coat repair projects, and it’s usually due to a sheen mismatch. Think of sheen as the level of gloss or dullness of your finish. Polyurethane comes in various sheens like matte, satin, semi-gloss, and high-gloss.
The primary reason for a mismatch is simply not buying a new clear coat that exactly matches the sheen of your existing floor. But it’s not always that straightforward! The number of coats applied can slightly alter the final sheen, and even your application technique can play a role. Also, your existing floor has likely seen years of wear and tear, and its original sheen might have naturally dulled or changed over time due to sunlight exposure and foot traffic.
The good news is that minor differences often blend in over time as the floor continues to get used and the new finish “wears in.” If the difference is significant, you have a couple of options: you can re-sand the repaired area very lightly and apply a new coat with a closer sheen match. Alternatively, if the spot is too shiny, you can very gently buff it with 0000 steel wool (the finest grade) once it’s fully cured. Just be sure to go slowly and check your progress frequently!
Maintaining Your Restored Hardwood Floor
Phew! You did it. You successfully tackled that hardwood floor clear coat repair, and your floors are looking fantastic again. Give yourself a pat on the back! But now that your floors are gleaming, the secret to keeping them that way is all about thoughtful, consistent care. Think of it as protecting your hard work and your beautiful investment for years to come.
First things first, let’s talk about daily habits. Those tiny specks of dust, dirt, and grit that get tracked in? They might seem innocent, but they’re actually tiny pieces of sandpaper just waiting to scuff up your clear coat. So, make it a daily ritual to sweep or vacuum your hardwood floors. Use a soft-bristled broom or a vacuum cleaner with a special hardwood floor attachment. When spills happen (because, let’s face it, life happens!), tackle them immediately. A damp cloth with a mild, manufacturer-recommended floor cleaner is your best friend here. What you don’t want to use are harsh chemicals, abrasive cleaners, or those steamy mops – they can seriously dull or even damage your perfectly repaired clear coat.
Next, let’s protect those beautiful surfaces from the furniture that lives on them. Applying felt pads to the legs of all your furniture is such a simple step, but it makes a huge difference. Think of all those chairs sliding across the floor – felt pads are their cozy little slippers, preventing unsightly scuffs and scratches. Just remember to check and clean those pads regularly, as grit can sometimes accumulate on them.
Another great trick for busy areas is to strategically place area rugs or mats. Pop them in entryways where shoes come off, in front of sinks where splashes are common, and especially under dining tables. They act as an extra layer of defense in those high-traffic zones that see the most wear and tear. And speaking of shoes, a simple house rule of “no shoes indoors” can drastically reduce the amount of dirt, grit, and moisture tracked onto your pristine floors. Your feet (and your floors!) will thank you.
Finally, consider the long game. Depending on how much foot traffic your home sees, you might want to think about periodic maintenance coats. This isn’t a full-blown refinish! It simply involves a light buffing of your entire floor and then applying a fresh, thin coat of clear finish. It’s like a rejuvenating spa treatment for your floors, refreshing their appearance and significantly extending the life of your clear coat without the need for extensive sanding.
At Romero Hardwood Floors Inc., we’re passionate about helping you not just get beautiful floors, but keep them beautiful. From our base in Revere, MA, we’ve been serving communities across the North Shore and Greater Boston area for over 15 years, including Somerville, Stoneham, Swampscott, Wakefield, Winchester, Winthrop, and Woburn, MA. While we love empowering you with DIY repair knowledge, sometimes you need the pros. For extensive damage or a complete floor change, consider our professional Hardwood Floor Repair and Refinishing services. We’re always here to help with all your Hardwood Floor Repair needs.
