Buff Hardwood Floor Scratches: 1 Easy Fix
Why Buffing Is Your Best Solution for Light Floor Scratches
Quick Answer for Buffing Hardwood Floor Scratches:
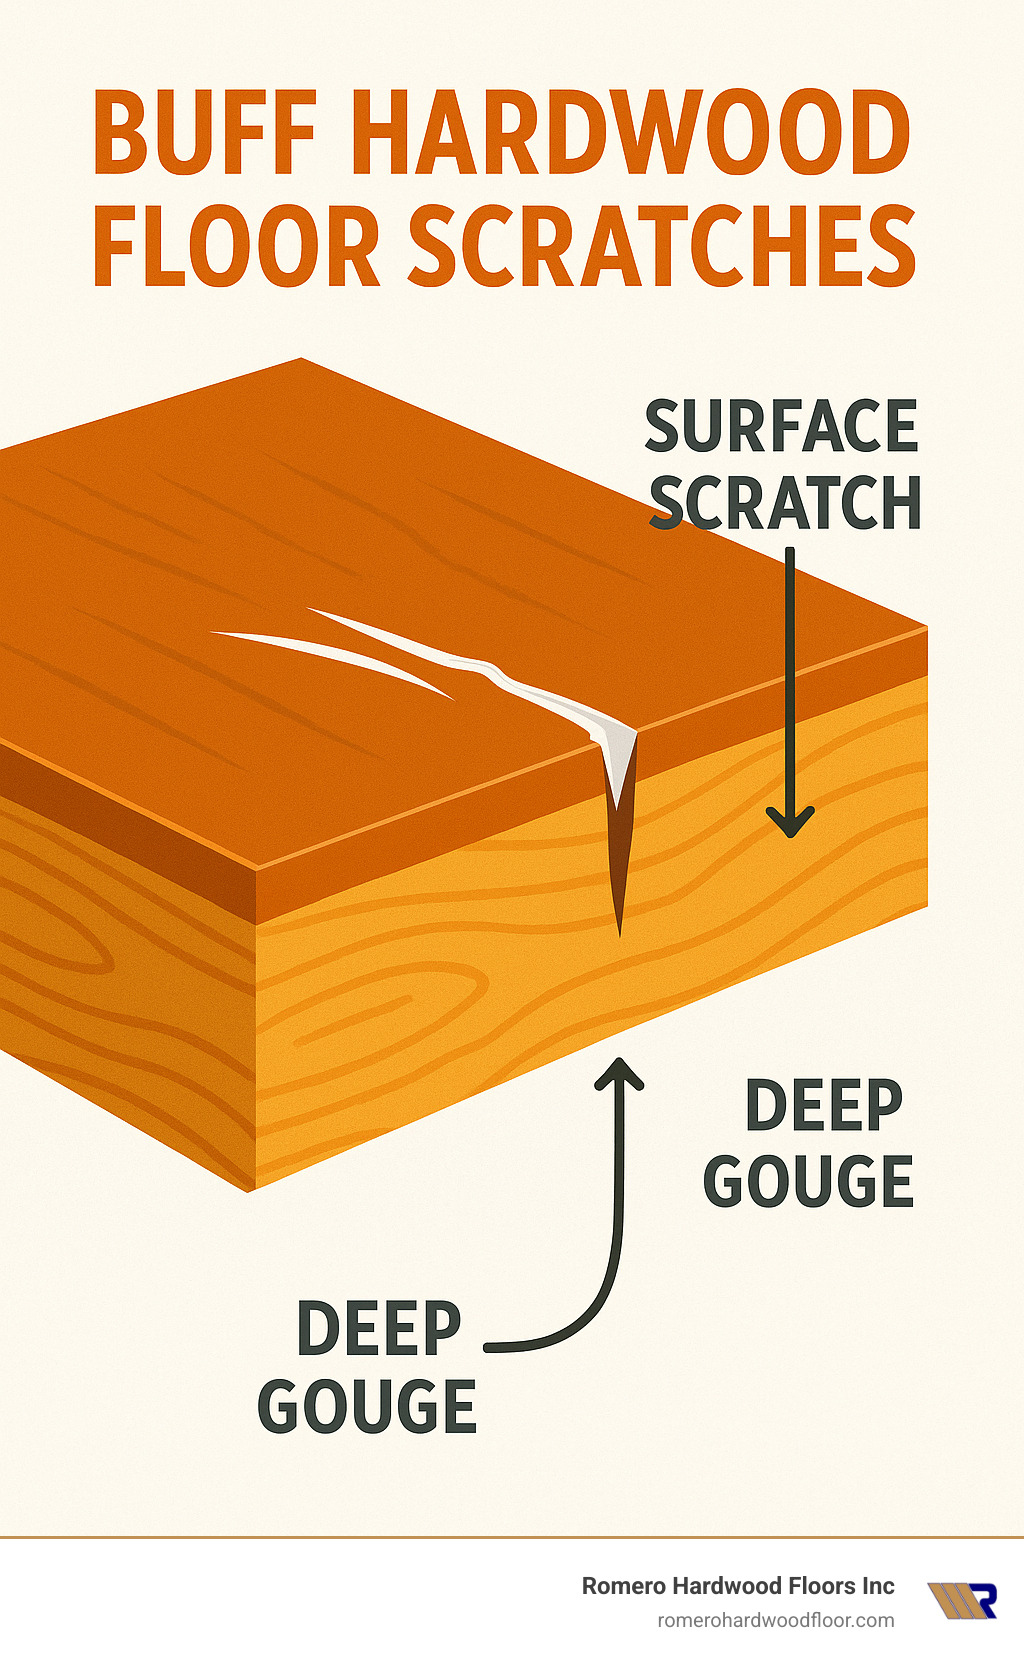
- Best for: Surface scratches in the finish layer only
- Cost: $50-$100 DIY vs. $100-$900+ professional (average internet data, not Romero pricing)
- Time: 4-6 hours for an average room
- Results: Removes light scratches and restores shine
- Not suitable for: Deep gouges that reach the wood
Light scuffs from pets, shoes, or moving furniture usually live in the clear finish on top of your hardwood, not in the wood itself. Buffing targets that finish layer, erasing minor damage without the dust, downtime, or high cost of full sanding.
How it works: A fine‐grit screen gently abrades the scratched finish. A fresh coat of finish is then applied, bonding to the newly roughed-up surface and leaving the floor glossy and smooth again.
As Francisco Romero—owner of Romero Hardwood Floors Inc. since 2006—I’ve helped hundreds of homeowners revive floors this way. When the damage is shallow, buffing is the fastest, cleanest, and least expensive fix.
Further reading:
- Hardwood Floor Repair
- Flooring restoration and refinishing
- Prefinished hardwood flooring refinishing
When Is Buffing the Right Choice for Your Floors?
Run a fingernail across a scratch. If it catches lightly but you don’t feel bare wood, buffing should fix it. If your nail dives in or you see raw wood, you’ll need sanding or board replacement.
Buffing is ideal for:
- Light surface scratches and scuffs
- Dull traffic lanes where finish has lost its shine
- Minor heel marks and pet claw marks
Skip buffing if you have:
- Gouges into the wood grain
- Water stains or black spots
- Built-up wax layers that must be removed first
| Scratch Type | Depth | Repair Method | Cost Range* |
|---|---|---|---|
| Superficial scuff | Finish only | Buff / polish | $50-$200 |
| Minor scratch | Through finish, not wood | Buff or spot repair | $100-$400 |
| Deep gouge | Into wood grain | Sand / refinish | $300-$2,500+ |
*Average costs from online sources; not Romero Hardwood Floors pricing.
Know Your Finish
Most modern floors use polyurethane—oil-based (warm amber) or water-based (crystal clear). Both accept buffing well. If a few drops of water bead on the surface, you likely have polyurethane. If they soak in, the floor is waxed or sealed and needs special prep.
Buffing vs. Sanding
Buffing removes microns of finish with a 120-150-grit screen. It’s fast, creates minimal dust, and costs roughly $100-$250 DIY. Sanding strips finish and wood, takes days, and averages $300-$2,500+ professionally. Think of buffing as a tune-up; sanding is a full engine rebuild.
For deep damage, see our Hardwood Floor Sanding services.
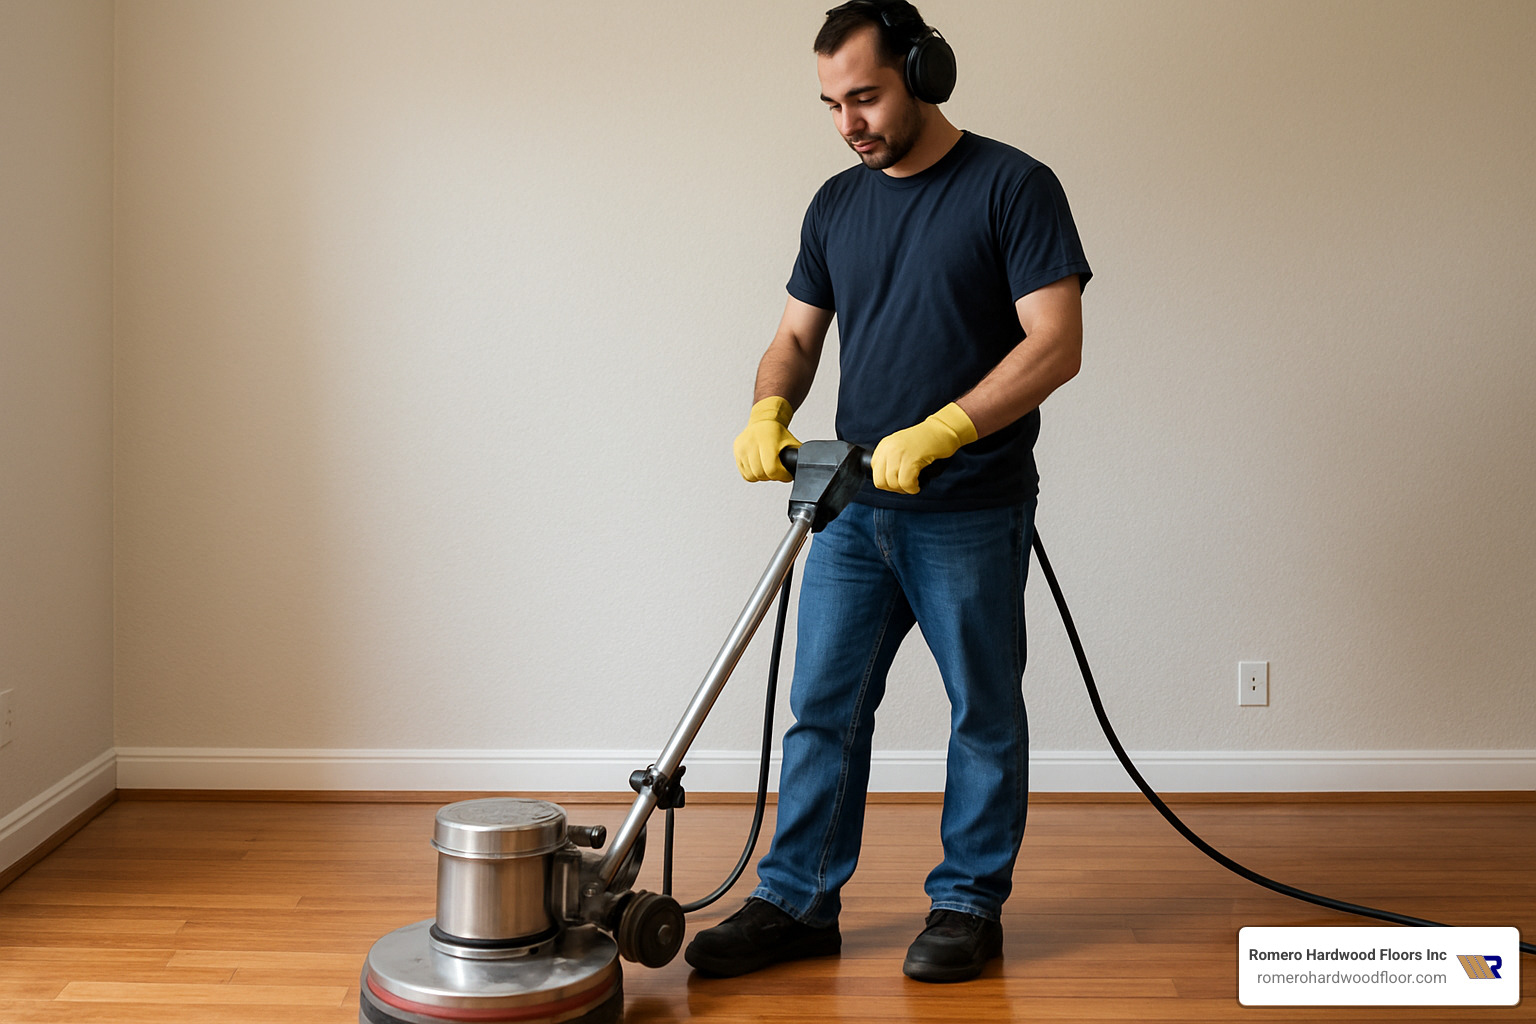
Your Step-by-Step Guide to Buff Hardwood Floor Scratches
What You’ll Need
- Rental floor buffer ($50-$150 per day)
- 120-150-grit screening pads
- Clean buffing pads
- Hardwood floor cleaner & compatible polish
- Painter’s tape, microfiber cloths
- Safety glasses, dust mask, gloves
Total DIY outlay: about $100-$250 (average online figures, not Romero pricing).
Step 1: Prep the Room
- Remove all furniture and rugs.
- Tape baseboards; cover vents.
- Vacuum, damp-mop with hardwood cleaner, let dry.
- Vacuum again—any grit left behind becomes a new scratch.
Step 2: Screen the Finish
- Attach the screening pad squarely.
- Start the buffer while moving and work in straight, overlapping passes from the far corner toward the exit.
- Aim for a uniform dull sheen. Don’t linger in one spot.
- Vacuum and tack-cloth the dust immediately.
Step 3: Buff & Polish
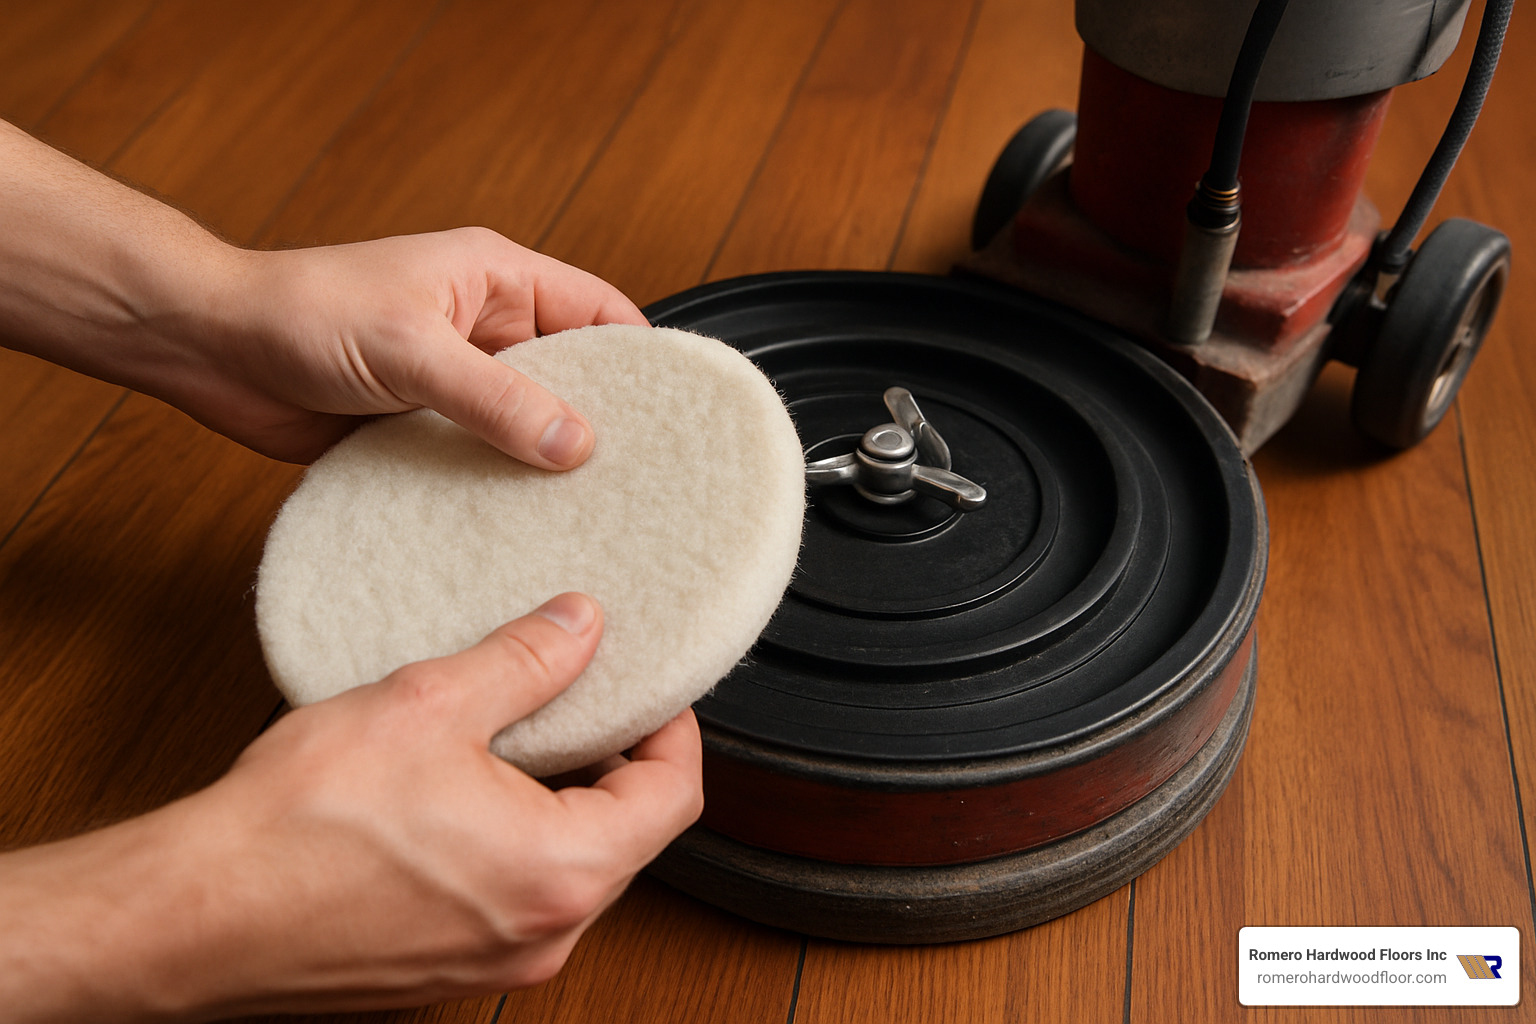
- Swap to a clean pad and wipe the buffer base.
- Pour a small puddle (≈1 oz per 10 sq ft) of polish; spread with the buffer, keeping a wet edge.
- Overlap passes slightly until the floor is coated.
- Let cure: light foot traffic after 1 hour, furniture after 24 hours.
Cost, Timeline, and Professional Considerations
Let’s talk numbers – because knowing what you’re getting into financially and time-wise helps you make the best decision for your family and your floors.
When I started Romero Hardwood Floors Inc. back in 2006, I noticed that homeowners often felt overwhelmed by the cost unknowns of floor restoration. That’s why I believe in being upfront about what you can expect, whether you’re planning to buff hardwood floor scratches yourself or hire a professional.
Cost to Buff Hardwood Floor Scratches: DIY vs. Professional
The good news? Buffing is significantly more affordable than full floor refinishing, no matter which route you choose.
If you’re going the DIY route, you’re looking at buffer rental costs of $50-$150 per day from most home improvement stores. Add in your supplies – screening pads, floor polish, and miscellaneous items – and you’re typically spending $50-$100 total. So your complete DIY investment usually falls between $100-$250 for an average-sized room.
Professional services tell a different story cost-wise. Based on internet averages (not our actual Romero Hardwood Floors pricing), you’ll see rates ranging from $1-$7.50 per square foot. That means a typical 200-square-foot room could cost anywhere from $200-$1,500, with some companies charging minimum service fees of $100-$900 regardless of room size.
These wide price ranges reflect different market conditions, floor conditions, and service levels – not actual Romero Hardwood Floors Inc. pricing.
Here’s what affects your final cost: floor condition plays a huge role – heavily scratched floors take more time and materials. Room size and layout matter too, especially if you have lots of corners or built-in furniture to work around. Geographic location influences pricing, and don’t forget about furniture moving – some companies charge extra for this service.
The reality is that professional buffing costs 3-5 times more than DIY, but you’re paying for expertise, proper equipment, and the peace of mind that comes with guaranteed results.
How Long Does It Take?
Time is often more valuable than money, especially when you’re living in the space being worked on.
For DIY enthusiasts, plan on 4-6 hours of active work time. You’ll spend 1-2 hours on preparation – moving furniture, cleaning, and protecting surfaces. The actual screening process takes 2-3 hours for most rooms, depending on your experience level and the floor’s condition. Buffing and polishing adds another 1-2 hours.
But here’s the part many people forget: drying time. You can walk on your floors after about 1 hour, but you’ll need to wait 24 hours before moving furniture back. That means your room is essentially out of commission for a full day.
Professional crews typically complete the entire process in 4-6 hours, including setup and cleanup. We’re faster because we do this every day – our experience means fewer mistakes and more efficient work patterns.
Several factors can extend your timeline: Humidity and temperature affect drying time significantly. Poor ventilation can double your wait time. Floor condition matters too – floors with heavy damage require more screening passes.
The biggest advantage of hiring professionals? Less disruption to your daily routine. While you’re at work, we can transform your floors and have them ready for light use by evening.
For those interested in exploring DIY options further, our comprehensive DIY Guide To Hardwood Floor Scratch Repair covers everything from basic scratch assessment to advanced repair techniques.
Preventing Future Scratches on Your Hardwood Floors
Daily & Weekly Habits
- Sweep or vacuum with a soft brush attachment every day.
- Wipe spills immediately; standing water ruins finish fast.
- Weekly, use a pH-neutral hardwood cleaner and a damp (not wet) microfiber mop.
Extra Protection for Busy Homes
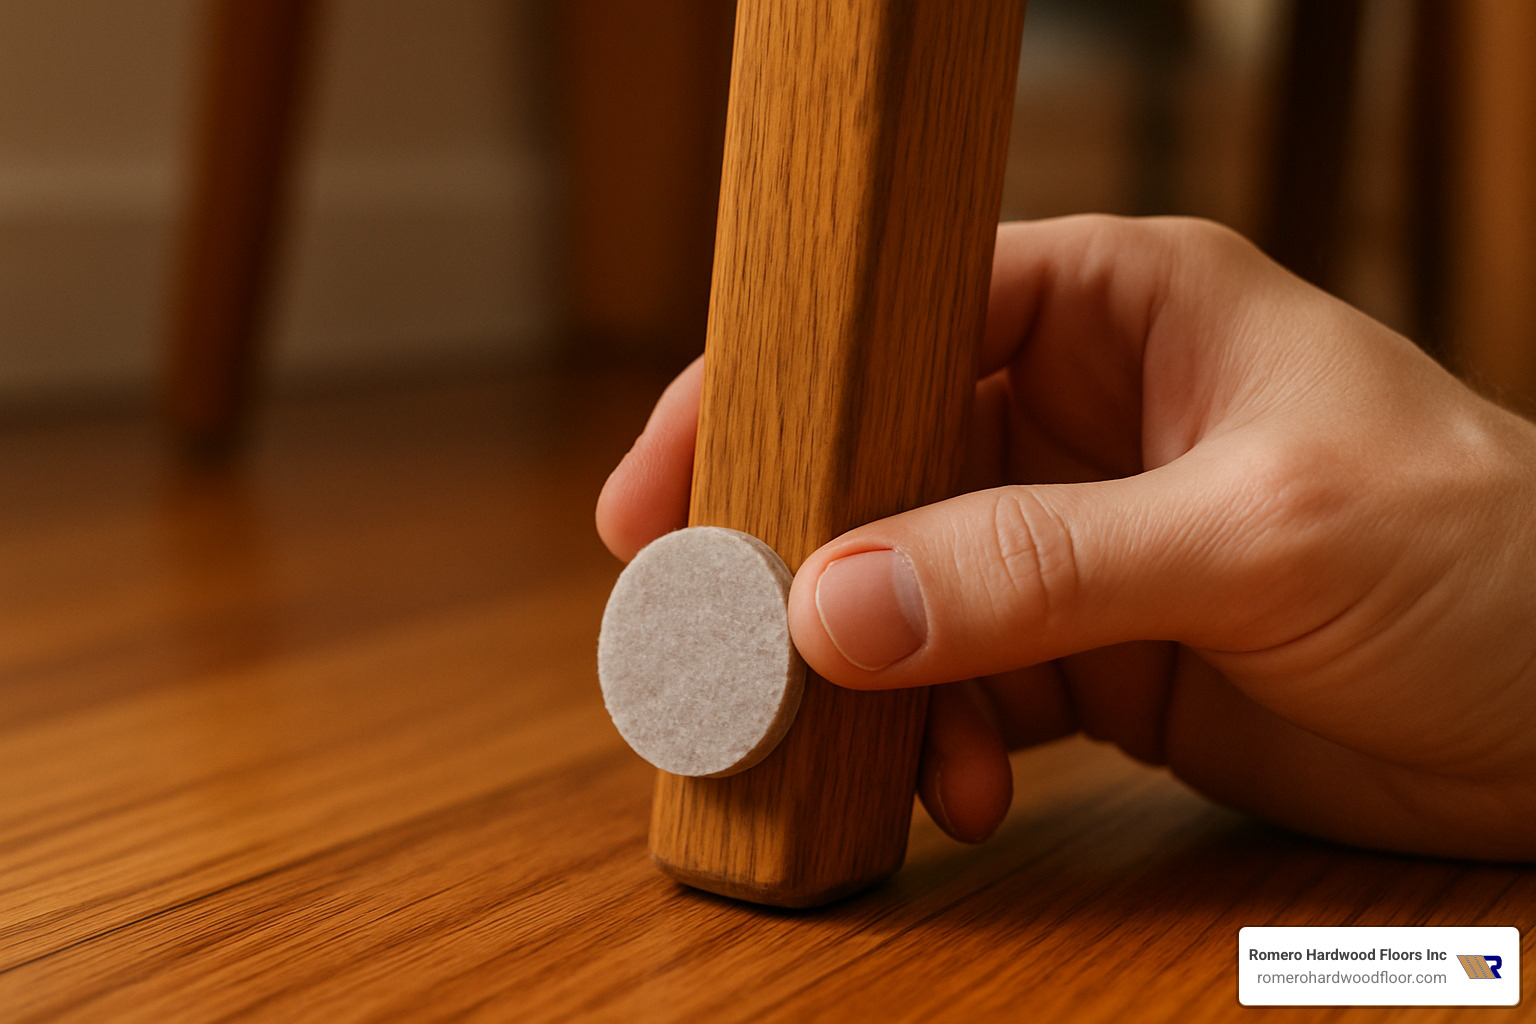
- Stick felt pads under every furniture leg and replace them when worn.
- Use doormats inside and out; consider a no-shoes policy.
- Add runners in hallways and area rugs in play zones (with non-slip pads).
- Keep pet nails trimmed and place mats under bowls.
- Maintain indoor humidity 35-55 % and block intense sunlight with curtains or UV film.
More tips in our Hardwood Floor Care Guide.
Frequently Asked Questions about Buffing Floors
Let me address the most common questions I hear from homeowners who want to buff hardwood floor scratches themselves. These are real concerns from real people, and I want to make sure you have all the information you need to make the right decision for your floors.
Can you buff engineered hardwood floors?
This is probably the question I get asked most often, and the answer is yes, but you need to be extra careful. Engineered hardwood is different from solid hardwood because it has a thin layer of real wood (called the wear layer) sitting on top of a plywood base.
Here’s what you need to know: The research shows that “for engineered wood floors, the real wood surface must be more than 1mm thick for complete sanding, as sanding usually removes at least this much wood.” Since buffing is gentler than sanding, you have a bit more wiggle room, but not much.
Before you start, check these important things:
- Your manufacturer’s warranty (some void it if you refinish)
- The thickness of your wear layer (usually 2-6mm)
- Whether your floors have been buffed before
- Any specific manufacturer restrictions
Warning signs that you shouldn’t buff engineered floors:
- Wear layer less than 2mm thick
- You can see plywood edges anywhere
- Previous buffing exposed the base layer
- Manufacturer specifically says no refinishing
The key is using lighter pressure and finer screens than you would on solid hardwood. When in doubt, it’s worth having a professional evaluate your floors first. At Romero Hardwood Floors Inc., we’ve seen too many DIY projects go wrong because someone didn’t realize their engineered floors couldn’t handle buffing.
For more detailed repair guidance, check out our More on hardwood floor repair techniques.
How often should you buff your hardwood floors?
This depends entirely on how much traffic your floors see and how well you maintain them. Think of it like changing the oil in your car – high-mileage situations need more frequent attention.
For high-traffic areas like kitchens, entryways, and family rooms, you’ll probably need to buff hardwood floor scratches every 1-2 years. These areas take a beating from daily foot traffic, spills, and furniture movement.
For moderate-traffic areas like bedrooms, dining rooms, and home offices, every 3-4 years is usually sufficient. The research indicates that “heavily used areas like kitchens may need this procedure every year, while for average usage, every 3-4 years is recommended.”
Here’s how to tell it’s time to buff:
- Your floors look dull even after a thorough cleaning
- Light scratches are becoming more noticeable
- The finish feels rough under your feet
- Water no longer beads up on the surface
The good news is that regular buffing actually extends the life of your floors by maintaining that protective finish layer. It’s much cheaper than waiting until you need a complete refinish.
Will buffing remove deep scratches or just hide them?
I wish I could tell you that buffing fixes everything, but I have to be honest – it only works on scratches in the finish layer, not the wood itself. Understanding this difference is crucial to getting the results you want.
Buffing will completely remove:
- Surface scratches in the polyurethane finish
- Light scuff marks from shoes or pet claws
- Dull areas where the finish has worn thin
- Minor water marks that haven’t penetrated the wood
Buffing cannot remove:
- Deep gouges that go through the finish into the wood
- Scratches where you can see bare wood
- Dents or indentations in the wood surface
- Severe water damage or black stains
The research confirms that “buffing will only remove scratches at the surface level of your flooring. For deeper scratches, another floor repair method like sanding is needed.”
Here’s a simple test: Run your fingernail across the scratch. If it catches slightly but doesn’t go deep, buffing will likely remove it. If your nail catches significantly or you can see wood grain in the scratch, you’ll need more aggressive repair methods.
For scratches that are too deep for buffing, you may need to refinish hardwood floors for complete restoration. Don’t worry though – even if buffing doesn’t remove every single mark, it will dramatically improve your floors’ overall appearance and protect them from further damage.
Restore Your Floors with Confidence
Buffing is a forgiving DIY project: you’re working only on the clear coat, not the wood itself. Take your time with prep, wear protective gear, and you can achieve results close to professional quality.
If you find scratches that go beyond the finish—or you simply prefer to hand the project off—Romero Hardwood Floors Inc. is ready to help across Revere and surrounding communities. Visit our Hardwood Floor Repair page for a free consultation.
Beautiful hardwood floors add comfort and value to your home. A quick buff every few years keeps them that way without the mess or cost of full refinishing. Now that you know how, you can scratch that problem for good!
