Best Lacquer for Wood Floors: Top 3 Stunning Picks 2025
Finding the Perfect Protection for Your Hardwood Investment
The best lacquer for wood floors depends on your specific needs, but here are the top options according to our research:
- Bona Traffic HD – Best overall for high-traffic areas with 24-hour cure time
- Vermont Natural Coatings PolyWhey – Best eco-friendly option with minimal odor
- Junckers ProTech – Best budget-friendly single-part lacquer
- Loba Fusion – Best for commercial applications and extreme durability
- Vermeister – Best for long-term durability with low toxicity
When it comes to protecting your hardwood floors, choosing the right finish makes all the difference. The best lacquer for wood floors provides a transparent, durable shield that improves the natural beauty of wood while defending against daily wear, spills, and scratches. Unlike oil finishes that penetrate the wood, lacquer creates a protective film on the surface, offering superior resistance to moisture and stains.
Modern lacquers have evolved significantly from their solvent-heavy predecessors. Today’s water-based formulations deliver impressive durability with significantly lower VOC emissions, making them safer for your home and family. Two-part systems like Bona Traffic HD can withstand heavy foot traffic for up to 25 years before requiring a full resand, while options like Vermont Natural Coatings offer eco-friendly protection without compromising performance.
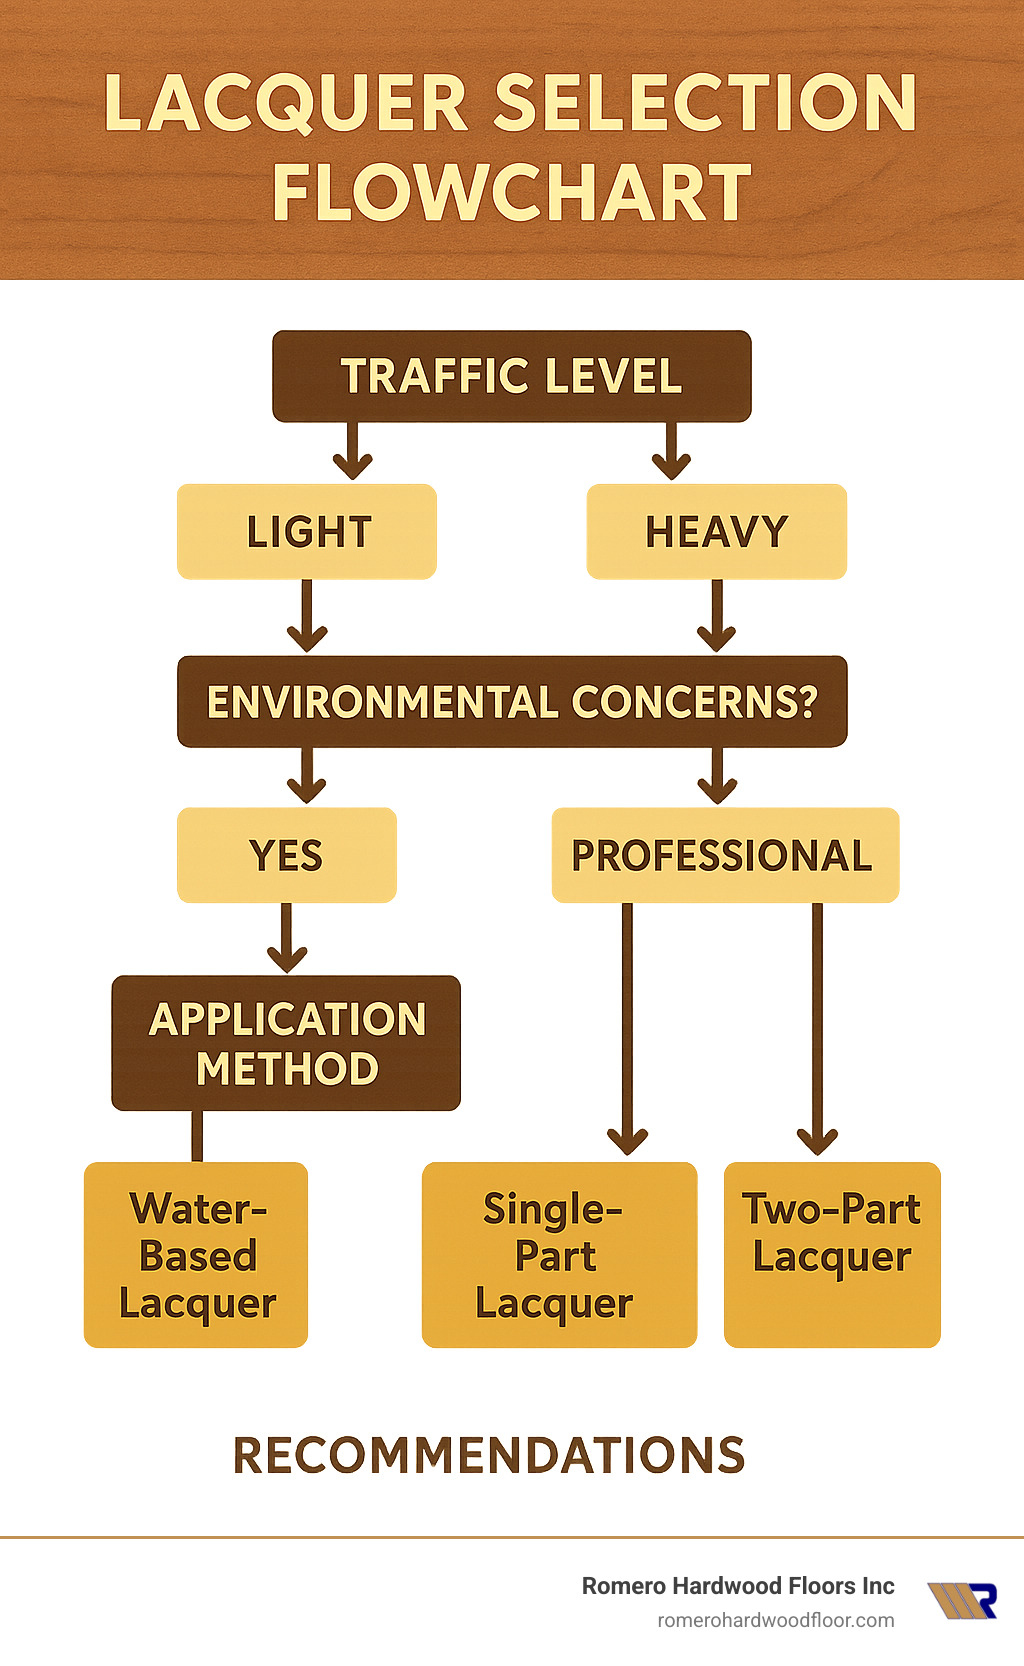
The right lacquer choice depends on several factors: your home’s traffic patterns, desired sheen level, environmental concerns, and whether you’re planning DIY application or hiring professionals. Water-based lacquers typically dry in under 2 hours between coats, allowing for faster project completion compared to traditional oil-based finishes.
I’m Francisco Romero, owner of Romero Hardwood Floors Inc., and with over 15 years of experience applying the best lacquer for wood floors across countless residential and commercial projects in the Revere, MA area, I’ve seen how the right finish can transform and protect hardwood investments for decades.
Best lacquer for wood floors terms explained:
– Hardwood Floor Varnishing
– removing old varnish from wood floors
– grey varnish for wooden floors
Lacquer 101: What Sets It Apart From Oils, Poly & Hard Wax
Ever wondered why some hardwood floors seem to glow with a protective shield while others have a more natural, lived-in look? The secret lies in the finish. I’ve spent years helping homeowners understand these differences, and it all starts with one fundamental distinction: lacquer creates a protective layer on top of your wood rather than soaking into it.
Think of lacquer as a transparent shield for your floors. Unlike oil finishes that penetrate deep into the wood grain, lacquer sits proudly on the surface, creating a barrier against spills, scratches, and daily wear. This film-forming characteristic is what gives lacquered floors their distinctive look and impressive durability.
In my experience working with Boston-area homeowners, I’ve found that lacquer typically outperforms oils in busy households. A quality two-part lacquer can protect your investment for up to 25 years before needing a complete refinish. Compare that to oil finishes, which—while undeniably beautiful—often need refreshing every 6 months to 2 years in high-traffic areas.
| Feature | Lacquer | Oil Finish | Polyurethane | Hard Wax Oil |
|---|---|---|---|---|
| Durability | High (5-25 years) | Moderate (needs regular refreshing) | High (similar to lacquer) | Moderate to High |
| Appearance | Clear, uniform, various sheens | Natural, matte, improves grain | Similar to lacquer, can yellow | Natural with slight sheen |
| Maintenance | Low regular maintenance, difficult spot repair | Higher regular maintenance, easy spot repair | Low regular maintenance, difficult spot repair | Moderate maintenance, spot-repairable |
| Repairability | Requires full recoat or refinish | Easy spot repairs | Requires full recoat or refinish | Spot-repairable |
| VOC Levels | Variable (water-based lowest) | Low to moderate | Moderate to high (oil-based) | Low (most formulations) |
| Water Resistance | Excellent | Moderate | Excellent | Good |
| Application Difficulty | Moderate to High | Easy to Moderate | Moderate | Easy to Moderate |
When it comes to appearance, lacquer gives you options. Want a modern matte finish that hides dust and footprints? Or perhaps a semi-gloss that brings out the wood’s natural warmth? Lacquer delivers a consistent look with sheen levels from ultra-matte to high-gloss. Oil finishes, while more limited in sheen options, excel at showcasing wood’s natural depth and character.
The maintenance trade-off is something I always discuss with clients. Lacquered floors are easier for day-to-day cleaning—just a quick sweep and occasional damp mop. But if damage occurs (think: dropped kitchen knife or dragged furniture), repairs can be challenging and often require professional help. Oiled floors need more regular maintenance but allow for easier spot repairs.
Types of Wood Floor Lacquer
The world of floor lacquers has expanded dramatically since I started in this business. Here’s what you need to know about today’s options:
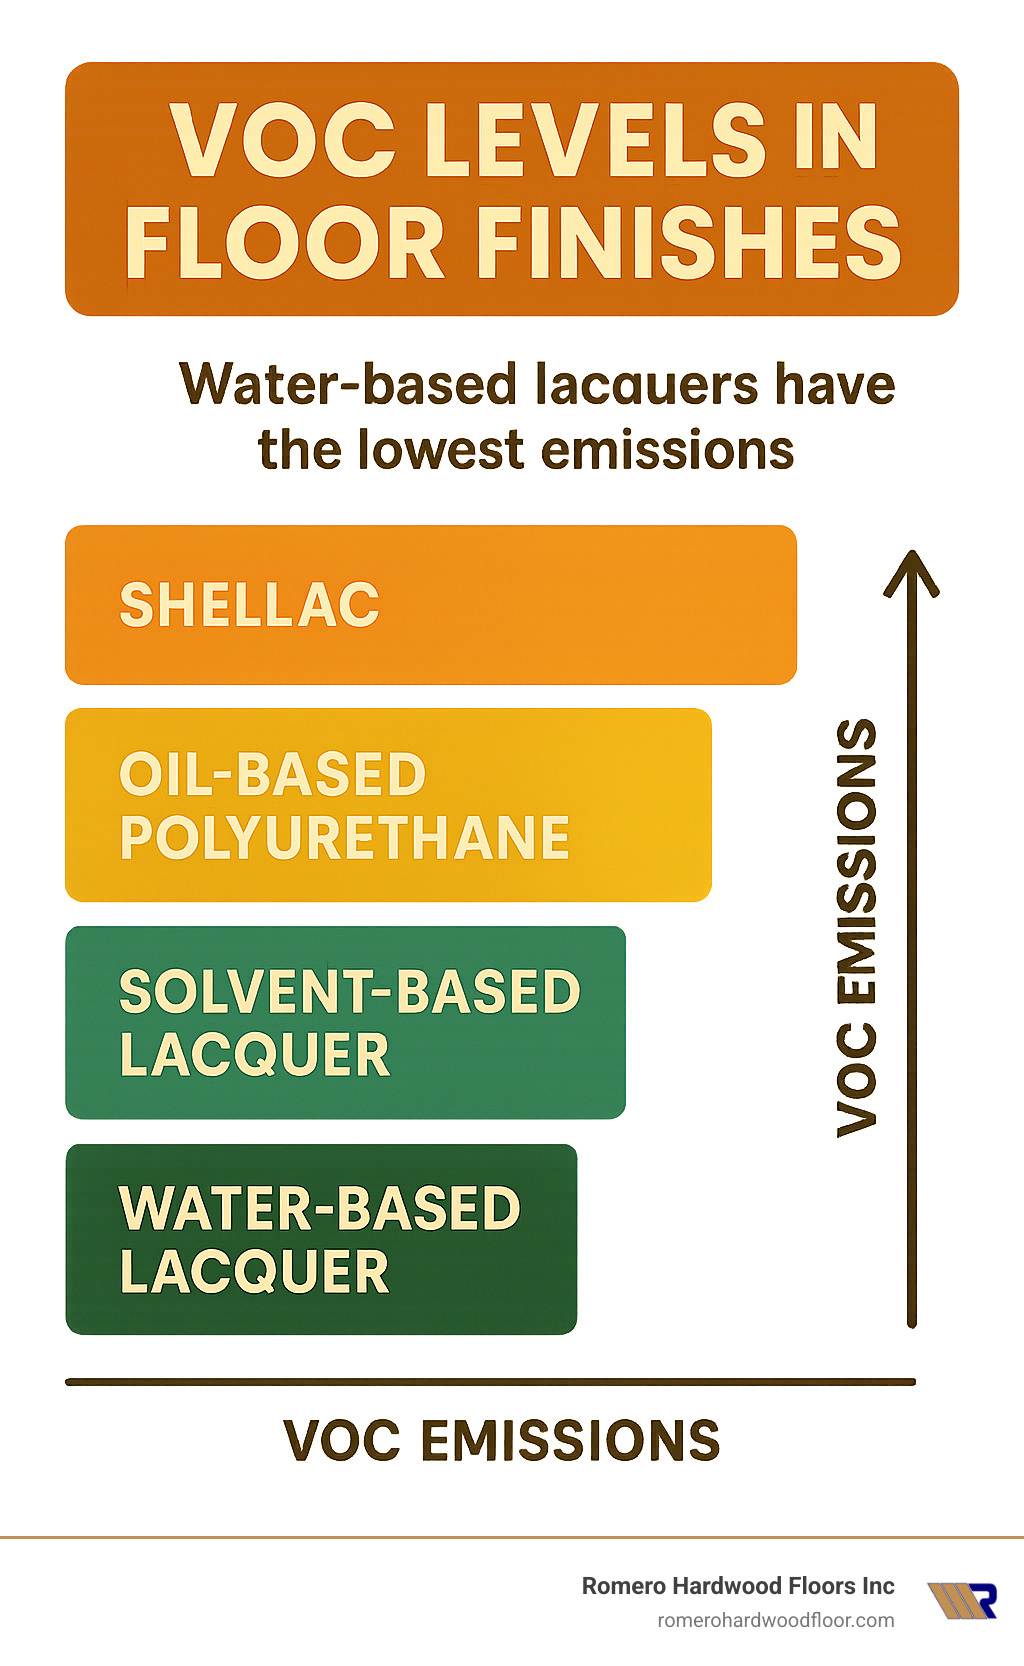
Water-based lacquers have become my go-to recommendation for most homes. They dry quickly (often under 2 hours between coats), emit minimal odor, and won’t yellow like traditional finishes. Plus, they contain roughly half the VOCs of solvent-based products—a huge benefit for families with children, pets, or allergy concerns. Clean-up is simple with just soap and water.
Solvent-based lacquers still have their place, particularly in historic renovations where a traditional amber tone is desired. They penetrate slightly deeper and provide excellent moisture resistance, but those benefits come with stronger fumes that require proper ventilation and sometimes temporary relocation during application.
Polyurethane lacquers combine polyurethane resins with either water or solvent bases to create extremely durable finishes. I often recommend these for kitchens and busy entryways where resistance to scratches, heat, and household chemicals is paramount.
Acrylic lacquers are worth considering if you have light-colored woods like maple or ash. They resist yellowing better than other formulations and offer excellent UV resistance, though they’re slightly less durable than polyurethane options.
Two-part systems (also called “catalyzed” or “conversion” lacquers) are the workhorses of the industry. Products like Bona Traffic HD mix a resin with a hardener just before application, creating an exceptionally tough finish through chemical reaction. While more expensive initially, these products often prove more economical over time due to their extended lifespan.
Low-VOC formulas have been a game-changer for environmentally conscious clients. Vermont Natural Coatings PolyWhey uses dairy byproducts instead of traditional petroleum-based ingredients, creating a remarkably durable finish with minimal environmental impact.
For more detailed information about varnish options, check out our comprehensive guide on Wood Floor Varnish.
Pros & Cons At a Glance
After applying countless gallons of best lacquer for wood floors over the years, I’ve developed a clear picture of their strengths and limitations:
The biggest advantages of choosing lacquer include its fast drying time, allowing projects to be completed in days rather than weeks. The superior hardness protects against daily wear, while excellent stain resistance gives you valuable minutes to wipe up spills before they penetrate. Most homeowners appreciate the low maintenance requirements—regular sweeping and occasional damp mopping is usually sufficient.
On the flip side, some lacquers (particularly oil-based) carry an ambering risk, gradually yellowing over time. Major damage typically requires full-sand repairs rather than spot fixes. Application can be tricky for DIYers, with potential for bubbles or lap marks. Quality two-part systems often come with a higher initial cost, though this typically pays off through extended lifespan.
Many modern lacquers now incorporate anti-slip additives for improved safety—particularly important in homes with young children or elderly residents. These microscopic particles provide traction without significantly altering the appearance of your beautiful floors.
For those interested in the science behind eco-friendly formulations, you might want to explore scientific research on eco lacquers to understand how manufacturers are developing safer alternatives without compromising performance.
Product Roundup: The Best Lacquer for Wood Floors

After thousands of square feet of hardwood flooring installations across Beverly, Chelsea, Danvers, and beyond, I’ve had my hands on just about every lacquer on the market. Some shine brilliantly for years while others… well, let’s just say they taught me what to avoid recommending to my clients. Here’s my honest assessment of the standout performers that consistently deliver exceptional results.
Top Pick Overall – Best Lacquer for Wood Floors
Bona Traffic HD
When clients ask me for the absolute best lacquer for wood floors, I don’t hesitate to recommend Bona Traffic HD. This two-part waterborne polyurethane is the heavyweight champion of floor finishes, delivering commercial-grade protection that stands up to whatever life throws at it.
What makes Bona Traffic HD exceptional is its perfect balance of durability and practicality. You can literally walk on it just 24 hours after the final coat, which is remarkable for such a tough finish. With VOC levels under 5%, it won’t force you to evacuate your home during application either – just a mild odor that dissipates quickly.
I’ve applied this finish in busy restaurants throughout Revere and Medford where it faces constant chair-dragging and foot traffic, yet it continues to look beautiful years later. At 8-10 m² per liter coverage, it’s efficient too. Customers consistently rate it 4.9 out of 5 stars across 28 reviews, and while it’s certainly not the cheapest option, its exceptional lifespan makes it cost-effective over time.
For those wanting to showcase their wood’s natural beauty while ensuring maximum protection, Bona’s professional-grade finishes are simply best.
Low-VOC Champion – Best Lacquer for Wood Floors
Vermont Natural Coatings PolyWhey
For families with young children, pets, or anyone concerned about indoor air quality, Vermont Natural Coatings PolyWhey is my go-to recommendation as the best lacquer for wood floors with minimal environmental impact.
This innovative finish has a fascinating origin story – it’s partially derived from whey protein, a byproduct of cheese making. But don’t let that fool you into thinking it’s somehow less effective. In independent testing, it tied for the most durable eco-friendly finish, resisting tough stains from wine, whiskey, and even turmeric.
What truly sets PolyWhey apart is its Greenguard Gold certification, confirming it meets the strictest standards for indoor air quality. The application experience is remarkably pleasant – no headache-inducing fumes or need to stay elsewhere during application. I’ve installed this finish for numerous clients in Winchester and Swampscott with chemical sensitivities or young children, and they consistently rave about both its performance and peace of mind.
Curious about the science behind this eco-friendly breakthrough? Check out Vermont Natural Coatings: The Least Toxic Wood Varnish? for a deeper dive into what makes this product special.
Budget-Friendly Single-Part Option
Junckers ProTech
Not every project justifies the investment in a premium two-part system. For homeowners balancing quality with budget considerations, Junckers ProTech offers excellent value without major compromises.
This ready-to-use water-based lacquer eliminates the intimidation factor for DIY enthusiasts – no mixing required, just open and apply. With a dry time of about 3 hours between coats and walkable after 8 hours, weekend warriors can transform their floors without extended downtime.
I’ve used Junckers ProTech extensively in residential projects throughout East Boston and Gloucester where it provides reliable protection for normal household wear. It’s particularly well-suited for bedrooms, living rooms, and other areas that don’t face extreme traffic or moisture exposure.
While it won’t match the bulletproof durability of two-part systems, it strikes an excellent balance between performance and accessibility. Available in satin, semi-gloss, and gloss sheens, it adapts to your preferred aesthetic while keeping your budget intact.
For more information about dependable yet affordable options, visit our guide on Hard Wearing Wood Floor Varnish.
High-Traffic Commercial Hero
Loba Fusion
When durability is non-negotiable, especially in commercial environments, Loba Fusion stands as the best lacquer for wood floors under punishing conditions. This two-component polyurethane system is the finish I trust when failure simply isn’t an option.
With an impressive expected lifespan of up to 25 years with proper maintenance, Loba Fusion represents serious long-term value despite its higher initial investment. Its optional anti-slip additive is particularly valuable for commercial spaces where safety concerns are paramount – providing crucial traction without compromising the finish’s appearance.
I’ve installed this workhorse in restaurants, retail stores, and office buildings throughout Somerville and Salem where it continues to perform beautifully despite constant abuse. Its superior chemical and abrasion resistance means it shrugs off everything from coffee spills to high heel traffic.
Covering approximately 8-10 m² per liter, it’s efficient to apply and its excellent flow properties ensure a smooth, professional-looking result. Perhaps most importantly for commercial clients, its minimal odor means businesses can reopen quickly after application without lingering chemical smells greeting customers.
Application & Maintenance Mastery
Choosing the best lacquer for wood floors is just the beginning of your hardwood journey. As we’ve learned from thousands of projects across Massachusetts, even the finest lacquer won’t perform to its potential without proper application and ongoing care.
Think of lacquer application as an art form with scientific precision. Your floor’s beauty and longevity depend on getting these details right. At Romero Hardwood Floors Inc., we’ve refined these techniques over years of serving homeowners from Revere to Winchester and everywhere in between.
Before that first drop of lacquer touches your floor, thorough preparation creates the foundation for success. We always start with a deep cleaning to remove all traces of dirt and contaminants that could compromise adhesion. Next comes careful repair work – filling cracks, addressing loose boards, and ensuring the surface is structurally sound. The sanding process follows, typically progressing through multiple grits (starting with coarser 36-40 grit and finishing with finer 120-150 grit) to create the perfect canvas. Our dustless sanding technology keeps your home cleaner throughout this process.
Many professional applications benefit from a specialized sealer coat before the actual lacquer. These sealers serve several important purposes: improving adhesion, preventing side-bonding (where boards stick together at edges), and minimizing grain raise. We select the appropriate sealer based on your specific wood species and chosen lacquer system.
When it comes to the actual lacquer application, more isn’t better! Most professional applications involve one coat of sealer followed by 2-3 thin coats of lacquer, with light abrasion between each layer. This methodical approach yields far superior results than attempting to apply fewer, thicker coats. Water-based products typically need 2-3 hours between coats, while full curing can take anywhere from 24 hours to 2 weeks depending on the specific lacquer.
Once your beautiful floor is finished, proper maintenance becomes essential. The best lacquer for wood floors deserves appropriate care! Use only neutral-pH cleaners specifically formulated for hardwood. Place felt pads under furniture legs to prevent scratches, clean spills promptly, and maintain indoor humidity between 35-55% to prevent wood movement. Regular dust mopping or gentle vacuuming (with a floor attachment) keeps abrasive particles from damaging your finish.
For a complete guide to keeping your floors looking their best for years to come, visit our comprehensive Hardwood Floor Care Guide.
Step-by-Step Application Checklist
For homeowners brave enough to tackle DIY lacquer application, here’s our professional roadmap to success:
Start with thorough preparation by removing all furniture and floor coverings from the space. Clean carefully and repair any damaged areas before masking off adjacent areas to protect from overspray. Check that your room temperature sits between 65-75°F with humidity at 40-60% for optimal application conditions.
The sanding process is critical and follows a progression – starting with coarse grit (typically 36-40) if refinishing, then moving through medium (60-80) to fine grits (100-120). Always sand with the wood grain when possible. Don’t forget edge sanding for areas the main sander can’t reach, followed by screening the entire floor with a buffer and fine pad.
After sanding comes the most overlooked yet crucial step: cleaning. Vacuum thoroughly using a HEPA vacuum, then tack the floor with a slightly dampened microfiber cloth to capture any remaining dust particles. A perfectly clean surface is non-negotiable before applying finish.
When you’re ready to apply the lacquer, stir it gently (never shake, which creates bubbles). If using a two-component system, carefully mix in the hardener according to manufacturer instructions. Apply with the recommended tool – typically a T-bar, roller, or pad – maintaining a wet edge to prevent visible lap marks. Apply thin, even coats following the wood grain, and allow proper drying time between applications. Lightly abrade between coats with a fine screen or pad, removing all dust before applying subsequent layers.
Take extra care with your final coat for a flawless finish. Allow full curing time before replacing furniture or rugs – at minimum 24 hours before light foot traffic, 72 hours before replacing furniture (with felt pads!), and 1-2 weeks before placing area rugs.
Common Mistakes to Avoid
Even experienced DIYers can stumble into these lacquer application pitfalls. Consider these your warning flags!
Applying thick layers is probably the most common error. That “more is better” instinct leads to uneven drying, extended cure times, and a higher likelihood of bubbles and imperfections. Multiple thin coats will always outperform a single thick one.
Poor ventilation can sabotage your results even with low-VOC water-based products. Adequate airflow is essential during application and curing. Without it, you’ll face extended drying times and potentially trapped solvents in the finish.
Skipping the abrade between coats might seem like a time-saver, but it’s a serious mistake. That light scuffing creates a mechanical bond for the next layer – skip it, and you risk adhesion problems and a less durable finish.
Mixing incompatible products is a recipe for disaster. Not all lacquers and sealers play nicely together. Combining different brands or technologies can lead to adhesion issues, clouding, or complete finish failure. Stick with products from the same system for best results.
Inadequate surface preparation remains the number one cause of finish failure. Rushing through or skimping on proper sanding and cleaning will haunt you later. Invest the time upfront for long-lasting results.
Ignoring temperature and humidity conditions can undermine your hard work. Environmental factors significantly impact lacquer application – too cold and the finish won’t flow properly; too humid and it may cloud or take too long to dry.
Long-Term Care for Lacquered Floors
With thoughtful care, your lacquered floors can maintain their beauty for many years. Think of maintenance as a rhythm – weekly, monthly, and annual care all play important roles.
Weekly attention keeps problems from developing in the first place. A gentle dust mop or vacuum with a soft floor attachment removes the abrasive particles that can scratch your finish over time. This is also your chance to spot any new scratches or damage early, when they’re easier to address.
Monthly deeper cleaning maintains the finish’s luster. Use only manufacturer-approved hardwood floor cleaners with a slightly damp (never wet) microfiber mop. This is the perfect time to address any scuffs with recommended products. Remember – less moisture is always better when cleaning wood floors.
Annual inspection helps you stay ahead of wear patterns. Pay special attention to high-traffic areas like entryways and kitchen work zones. If you notice the finish beginning to look dull in these areas, it might be time for professional screening and recoating. Addressing wear before it reaches the wood itself can save you from a full refinishing job.
Most lacquered floors benefit from recoating every 3-5 years, depending on traffic levels. This maintenance step – which involves lightly abrading the surface and applying a fresh coat of finish without full sanding – can dramatically extend your floor’s lifespan and maintain its protective qualities.
For minor scratches that don’t penetrate to the wood, specialized touch-up products can help. However, be realistic about the results – these repairs are typically visible upon close inspection. For a truly seamless repair, professional recoating is usually necessary.
The best lacquer for wood floors deserves the best care. With these maintenance practices, your investment will continue to improve your home’s beauty and value for decades to come.
Cost, Health & Environmental Considerations
Let’s talk dollars and sense when it comes to the best lacquer for wood floors – because protecting your beautiful hardwoods is an investment worth making wisely.
When budgeting for your floor finishing project, material costs typically range from $0.80 to $3.00 per square foot based on internet averages (not Romero Hardwood Floors pricing). The wide range reflects the significant quality differences between basic single-component lacquers and premium two-part systems like Bona Traffic HD. Professional application generally adds another $3 to $10 per square foot for labor, depending on your location and project complexity.
If you’re considering the DIY route, you’ll save on labor but need to factor in equipment rental. A weekend rental package for a drum sander, edger, and buffer typically runs $200-$400 for a standard 500 square foot area. Don’t forget to include costs for sandpaper, applicators, and safety equipment in your calculations!
Beyond the price tag, health considerations have become increasingly important for many of our clients throughout Massachusetts. I’ve noticed a dramatic shift in preferences over my years in the business – families are now specifically asking for low-VOC options, even when they cost a bit more.
Modern water-based lacquers contain roughly half the VOCs of traditional solvent-based products, creating a healthier indoor environment during and after application. For those with chemical sensitivities, asthma, or young children, specialty products like Vermont Natural Coatings PolyWhey offer exceptional performance with minimal emissions.
When evaluating health claims, look for trusted third-party certifications like Greenguard Gold or DIBt (a rigorous German certification). These independent verifications ensure products meet stringent emission standards rather than relying solely on manufacturer claims.
Environmental considerations extend beyond just VOC levels. Some environmentally conscious homeowners are now also asking about PFAS content (“forever chemicals”) in floor finishes. Several manufacturers have responded by creating PFAS-free formulations and clearly labeling their products accordingly.
Water-based lacquers generally have a significantly lighter environmental footprint than their solvent-based counterparts – not just during application but throughout their production cycle. Bio-based options like PolyWhey take sustainability a step further by incorporating renewable resources (in this case, whey protein from cheese manufacturing) into their formulations.
For a deeper dive into selecting the perfect finish for your specific situation, check out our comprehensive guide on the Best Hardwood Floor Finish.
DIY vs Professional Application
“Should I hire a pro or tackle this myself?” It’s one of the most common questions I hear from homeowners considering a floor refinishing project.
DIY application can certainly save money upfront, but it comes with significant considerations. Floor finishing is a skill developed through experience – the difference between a professional application and a first-time DIY effort is usually immediately visible in the final result. Those subtle roller marks or uneven sheen levels that might seem minor initially can become more noticeable over time.
Professional-grade sanding equipment makes a tremendous difference in achieving a perfectly smooth surface. While rental machines are available, they’re typically older models that may not perform as consistently as the equipment professionals use daily. The learning curve on proper sanding technique is steep, and mistakes can leave permanent marks or unevenness.
Another consideration often overlooked is warranty protection. Many premium lacquer manufacturers only honor their warranties when products are applied by certified professionals. If you’re investing in a high-end finish like Bona Traffic HD, this warranty protection can provide valuable peace of mind.
Safety should never be an afterthought. Professional teams come equipped with proper respiratory protection, ventilation systems, and safety gear, particularly important when working with finishes that emit fumes during application and curing.
Perhaps the most significant difference is timeline. My professional team can typically transform a 500-square-foot hardwood floor from sanding to final coat in 2-3 days. First-time DIYers often find the project stretching well beyond a week, which means longer displacement from those rooms.
If you’re leaning toward the DIY approach, I’d recommend reviewing our detailed guide on Hardwood Floor Varnishing for step-by-step instructions and professional tips.
Are Low-VOC Lacquers Worth It?
“Are these eco-friendly lacquers really worth the premium price?” This question comes up frequently in client consultations, and my answer is increasingly: absolutely yes.
For households with chemical sensitivities, the value is undeniable. I’ve worked with clients who previously couldn’t remain in their homes during traditional refinishing but were able to stay comfortably during application of products like Vermont Natural Coatings PolyWhey. The difference in odor and emissions is remarkable – you can literally smell the difference (or rather, not smell it).
Families with young children and pets particularly benefit from low-VOC options. These products not only minimize exposure to harmful fumes during application but also cure faster, allowing kids and four-legged family members to return to normal routines sooner. As a father myself, this peace of mind is worth every penny.
Even for those without specific sensitivities, low-VOC products contribute to better overall indoor air quality. Many conventional finishes continue to off-gas at low levels for months after application, whereas eco-friendly alternatives typically reach full cure with minimal ongoing emissions.
The durability question has been largely addressed by modern eco-friendly formulations. In the early days of green finishes, there was often a noticeable performance gap compared to conventional products. Today’s leading eco-friendly lacquers perform remarkably well in independent testing – Vermont Natural Coatings tied with Vermeister as the most durable non-toxic floor finish in abrasion resistance tests.
One insider tip: don’t limit yourself only to products with expensive certifications. Some excellent small manufacturers produce outstanding low-VOC products but can’t afford the costly certification process. A bit of research beyond the certification labels can reveal additional environmentally responsible options.
For those interested in diving deeper into the science behind these advancements, the latest scientific research on non-toxic finishes provides fascinating insights into how manufacturers are developing safer alternatives without compromising performance.
Frequently Asked Questions about the Best Lacquer for Wood Floors
What sheen level hides scratches best?
When it comes to concealing those inevitable scratches, not all sheens are created equal! Matte and satin finishes are your best friends for hiding imperfections. The science is simple – these lower-sheen options reflect less light, which makes small scratches and daily wear much less noticeable.
For most of our clients in Revere and surrounding Massachusetts communities, especially busy households with children or four-legged family members, we typically recommend a satin finish. It offers that perfect middle ground – excellent scratch concealment while still providing a subtle, beautiful luster that improves your wood’s natural character.
Ultra-matte finishes technically offer the very best scratch-hiding properties, but there’s a trade-off. Some homeowners find them a bit too flat or lifeless, especially in rooms with limited natural light. If you’re considering this option, I always suggest viewing samples in your actual space before making a final decision.
How long before pets can walk on a newly lacquered floor?
I get this question constantly from our pet-loving clients! While it’s tempting to let Fido or Fluffy roam free as soon as possible, patience truly pays off here.
For water-based lacquers, keep those paws off for at least 24 hours, though 48-72 hours is significantly better for long-term results. Even though premium products like Bona Traffic HD technically allow human foot traffic after 24 hours, pet claws can be surprisingly damaging to a finish that hasn’t reached its full hardness.
Solvent-based lacquers require even more patience – a minimum of 72 hours, but ideally up to 5 days before pet access. Complete chemical curing can take up to 30 days, during which time your finish remains somewhat vulnerable to claw damage.
A helpful tip I share with all our pet owners: consider trimming your pet’s nails right before your floor refinishing project begins. This simple step can significantly reduce the risk of accidental scratching when they’re finally allowed back on the newly finished surface.
Can I apply lacquer over an old oiled floor?
This is one of those questions where I wish I had better news! In most situations, you simply cannot apply lacquer directly over an oiled floor with good results. Oil penetrates deep into the wood fibers, and this residual oil interferes with proper lacquer adhesion, leading to peeling, bubbling, or complete finish failure.
The proper professional approach requires several steps:
- Sand the floor completely to remove all traces of oil (typically down to bare wood)
- Clean thoroughly with appropriate solvents to remove any residual oil
- Allow the floor to dry completely (moisture testing is crucial here)
- Apply a suitable primer/sealer specifically designed for this transition
- Apply your chosen lacquer according to the manufacturer’s instructions
I should mention that you might come across specialized “conversion primers” that claim to allow lacquer application over oil without full sanding. In my 15+ years of experience throughout Massachusetts, the results with these products vary tremendously. For reliable, long-lasting results that won’t require costly repairs later, complete sanding to bare wood remains the professional recommendation.
If you’re considering this transition for your home in Revere or surrounding areas, contact us for a professional assessment of your specific situation.
Conclusion

After diving deep into wood floor finishes, one thing becomes clear: finding the best lacquer for wood floors is about matching your specific needs with the right product. For most homes, water-based two-part systems like Bona Traffic HD offer that sweet spot of durability and reasonable VOC levels that many homeowners are looking for. If you’re particularly concerned about indoor air quality or have family members with sensitivities, bio-based options like Vermont Natural Coatings PolyWhey deliver impressive protection with minimal environmental impact.
Remember though, even the finest lacquer in the world won’t perform well if it’s poorly applied. The preparation and application process matter just as much as the product you choose. Those careful sanding steps, the meticulous cleaning between coats, and allowing proper drying time aren’t just professional fussiness – they’re essential steps that determine how your floors will look and perform for years to come.
I’ve seen how a properly lacquered floor can transform a home. There’s something magical about walking into a room where the hardwood gleams with a protective finish that showcases the natural beauty of the wood. It’s not just about aesthetics either – a quality lacquer creates a practical surface that stands up to daily life while remaining relatively easy to maintain.
At Romero Hardwood Floors Inc., we’ve been helping homeowners throughout Revere and neighboring Massachusetts communities protect and beautify their hardwood investments since 2006. Our team stays current with the latest product developments and application techniques, ensuring we can recommend the perfect solution for your specific situation. We understand that your floors are both a significant investment and an important part of your daily life.
Whether you’re considering refinishing existing hardwood or installing new flooring, we invite you to explore our comprehensive refinish services or reach out for a personalized consultation. Our expertise in selecting and applying the best lacquer for wood floors ensures your hardwood investment will remain beautiful and protected for decades, adding lasting value to your home.
After all, there’s nothing quite like the warm welcome of beautifully finished hardwood floors – and the right lacquer makes all the difference in preserving that beauty for generations to come.
