Cheap Floating Flooring: 7 Powerful Affordable Options 2025
Affordable Floating Floor Solutions That Transform Your Space
Cheap floating flooring typically costs between $0.99-$3.50 per square foot for materials alone, making it one of the most budget-friendly flooring options available. Here’s what you need to know:
| Type | Average Cost/Sq.Ft. | Best For | Durability |
|---|---|---|---|
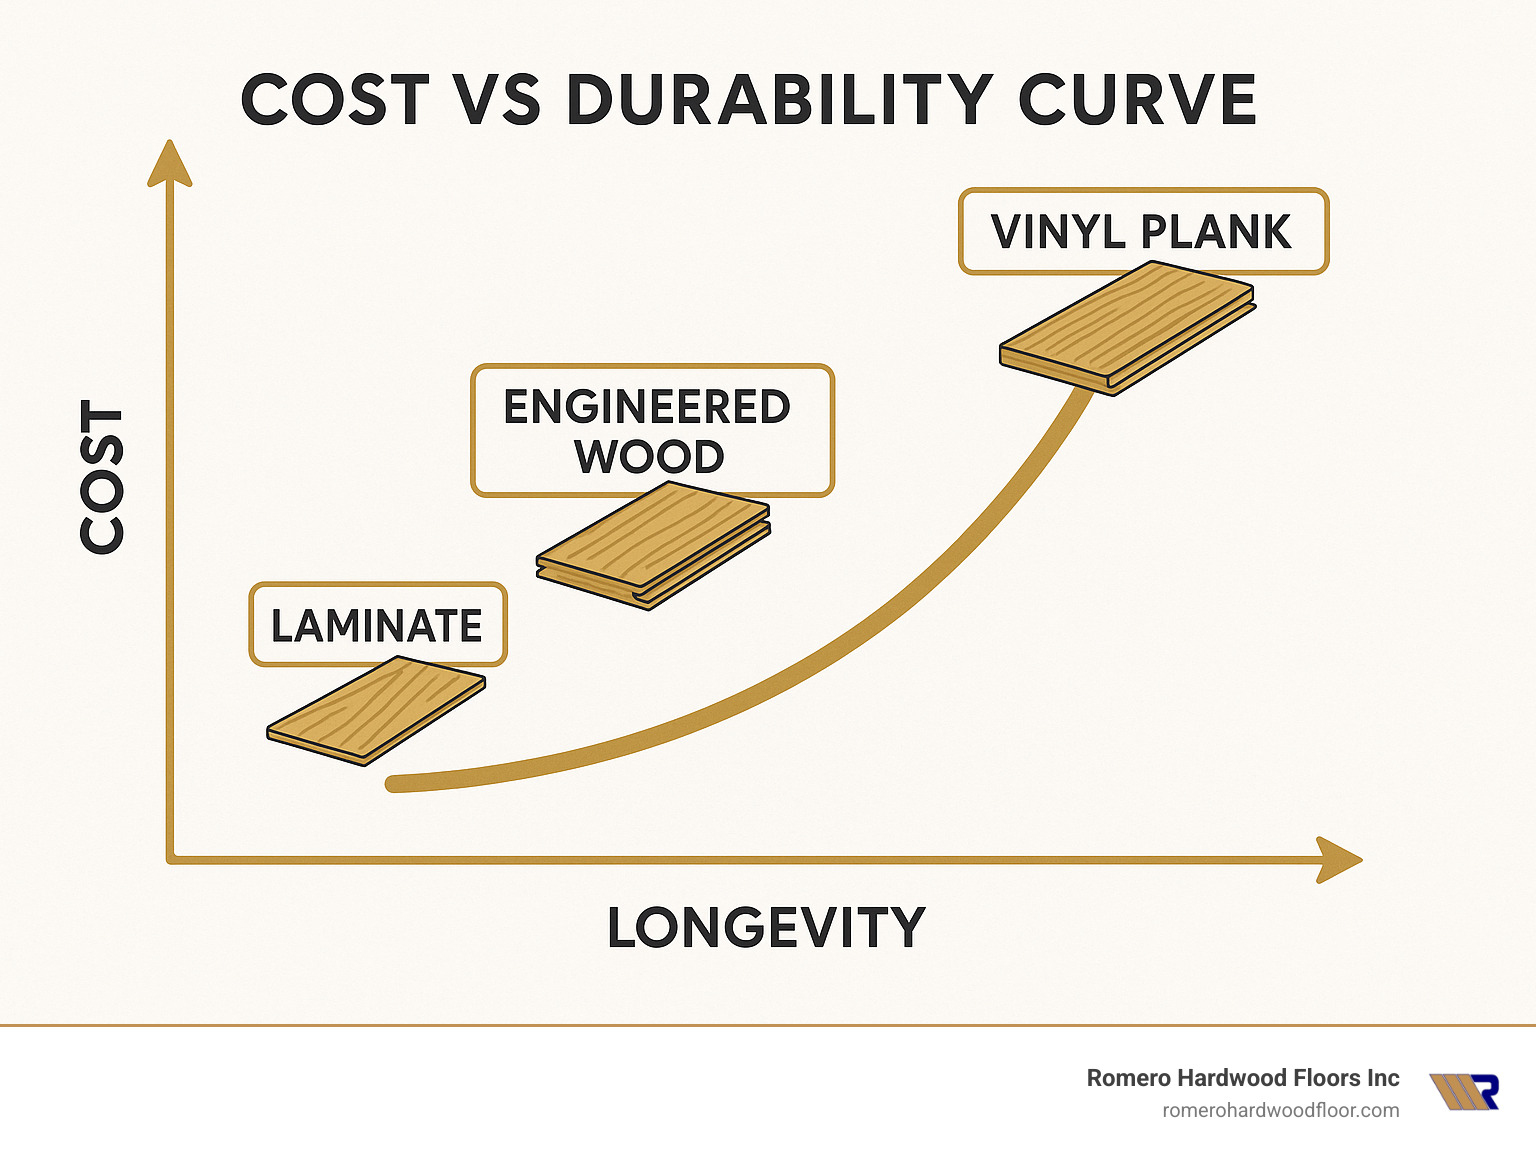
| Laminate | $0.99-$2.50 | Living areas, bedrooms | 7-15 years |
| Vinyl Plank | $1.50-$3.50 | Bathrooms, kitchens | 10-20 years |
| Engineered Wood | $2.50-$6.00 | Living rooms, dining rooms | 15-30 years |
Cheap floating flooring offers homeowners a practical solution to transform their spaces without draining their bank accounts. Unlike traditional nail-down hardwood that requires specialized tools and expertise, floating floors use innovative click-lock systems that simply connect plank to plank, creating a surface that “floats” above your subfloor.
This installation method eliminates the need for nails, staples, or glue, making it perfect for DIY enthusiasts and budget-conscious renovators. The affordability doesn’t mean sacrificing style either—today’s floating floors come in countless designs that convincingly mimic the look of expensive hardwoods, stone, or tile.
Whether you’re updating a single room or renovating your entire home, floating flooring provides an accessible path to beautiful results without the premium price tag of traditional materials.
I’m Francisco Romero, owner of Romero Hardwood Floors Inc., and I’ve installed hundreds of cheap floating flooring systems over my 15+ years in the industry, helping homeowners throughout Revere, MA achieve beautiful results while staying within their budgets.

Glossary for cheap floating flooring:
– Laminate floor installation tips
– Laminate floor repair specialists
– Laminate floor cleaning services
What Is Floating Flooring & How Does It Work?
Ever wondered why it’s called “floating” flooring? It’s not because it magically hovers above your floor (though that would certainly be a conversation starter at dinner parties!). The name comes from the clever installation method where the floor isn’t actually attached to what’s underneath it.
Cheap floating flooring works through an ingenious edge design. Most modern versions use what we call a “click-lock” or “snap-lock” system. Think of it like those satisfying puzzle pieces that snap together perfectly. Each plank connects firmly to its neighbors without needing any nails or glue. Once assembled, the entire floor surface acts as one unified layer that simply rests—or “floats”—on top of your subfloor, held in place by its own weight and the walls around it.
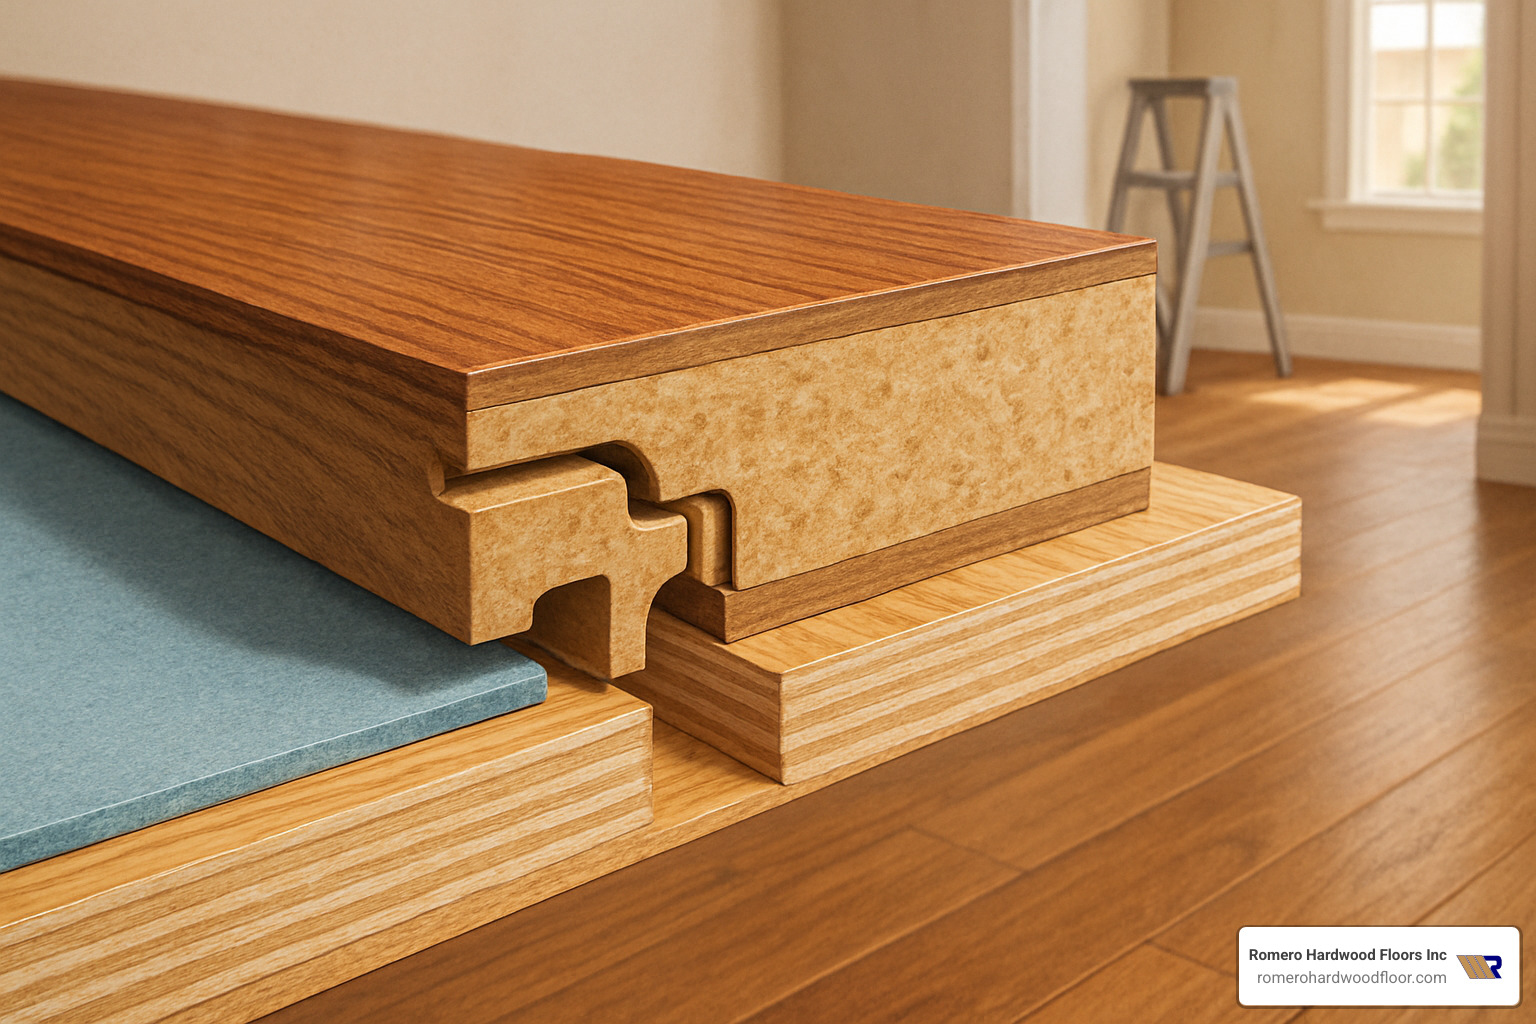
One crucial detail that’s easy to overlook is the expansion gap—a small space (usually 1/4 to 1/2 inch) that we always leave around the edges of the room. This isn’t a mistake or sloppy installation! This gap is intentional and allows your flooring to naturally expand and contract with temperature and humidity changes without buckling or warping.
Between your subfloor and the floating floor lies an unsung hero: the underlayment. This thin layer of foam or cork does so much more than you might think. It smooths out minor imperfections in your subfloor, absorbs sound (your downstairs neighbors will thank you), adds insulation, creates a moisture barrier in many cases, and makes walking on your floors more comfortable.
Cheap Floating Flooring Basics
When comparing cheap floating flooring to traditional hardwood, the differences are substantial. With traditional hardwood, each individual board must be permanently attached to the subfloor with nails or staples. This old-school method demands specialized tools, significant skill, and considerably more time.
Floating floors, on the other hand, connect to each other rather than to the subfloor. This fundamental difference makes installation much faster—often 2-3 times quicker than traditional methods. You’ll need fewer specialized tools, and in many cases, you can install your new floor right over existing flooring (goodbye, demolition mess!). Plus, if you ever need to replace or remove it later, the process is much more straightforward.
“I love seeing the look on homeowners’ faces when we transform their entire living room in just one day,” shares Francisco Romero of Romero Hardwood Floors Inc. “With traditional hardwood, that same space might take two or three days to complete. The time savings alone makes floating floors worth considering for many of our customers.”
Moisture management is another critical aspect that makes cheap floating flooring so practical. Most options include some form of moisture barrier, either integrated into the underlayment or as a separate plastic sheet layer. This barrier is essential when installing over concrete slabs or in moisture-prone areas like basements, as it prevents ground moisture from seeping up and damaging your beautiful new floors.
Main Types of Cheap Floating Flooring
The floating floor market offers several distinct product categories, each with its own advantages, limitations, and price points. Understanding these differences is key to selecting the right cheap floating flooring for your specific needs.
Laminate
Laminate flooring represents one of the most affordable floating floor options, typically starting around $0.99 per square foot for basic styles. This budget-friendly material consists of several layers:
- A high-density fiberboard (HDF) core
- A photographic layer that realistically mimics wood, stone, or tile
- A transparent wear layer that protects against scratches and fading
Durability is measured by the AC (Abrasion Class) rating:
– AC1: Light residential use (bedrooms)
– AC2: General residential use
– AC3: Heavy residential/light commercial use
– AC4: General commercial use
– AC5: Heavy commercial use
For most homes, AC3 rated laminate provides the sweet spot of durability and value. As Francisco Romero explains, “We often recommend AC3 laminate to our clients in Revere and surrounding communities. It stands up well to families with children and pets without breaking the budget.”
Modern laminates have also addressed their traditional weakness: water sensitivity. Many newer products feature improved water-resistant or even waterproof properties, making them suitable for kitchens and powder rooms. However, these improved water-resistant features typically come at a higher price point.
Want to explore the best value laminate planks for your project? Check out our detailed guide on the best cheapest laminate flooring options.
Vinyl Plank
Vinyl plank flooring, often abbreviated as LVP (luxury vinyl plank) or LVT (luxury vinyl tile), has surged in popularity due to its outstanding water resistance and realistic appearance. While entry-level products start around $1.50 per square foot, most quality options range from $2.00-$3.50 per square foot.
The structure of vinyl plank typically includes:
1. A rigid or flexible core (SPC or WPC in higher-end products)
2. A printed vinyl layer with realistic wood or stone visuals
3. A clear wear layer (measured in mil thickness, with 12-20 mil being ideal for residential use)
4. Often, an attached pad underlayment
“The game-changer with vinyl plank is its 100% waterproof construction,” notes Francisco. “This makes it perfect for bathrooms, kitchens, and basements where moisture is a concern. We’ve installed it in countless homes throughout Revere and East Boston where water exposure is a concern.”
Beyond water resistance, vinyl plank offers excellent slip resistance, making it safer for households with young children or elderly residents. It’s also one of the most comfortable floating floors to walk on, especially versions with attached cushioned backing.
Engineered Wood
For homeowners wanting real wood on a budget, engineered wood floating floors offer an excellent compromise. These products feature a genuine hardwood veneer atop multiple layers of plywood or HDF, combining the beauty of real wood with the installation convenience of floating floors.
Price points typically start around $2.50 per square foot for basic options but can range up to $6.00 or more for premium species and finishes. While this makes engineered wood more expensive than laminate or vinyl, it’s still significantly more affordable than solid hardwood.
Most engineered wood floating floors use either:
– Click-lock edges similar to laminate
– Traditional tongue-and-groove edges that require glue between boards
The major advantage of engineered wood is its authentic appearance and feel – because the surface is genuine wood, it has the warmth and character that’s difficult to replicate in synthetic materials. However, this authenticity comes with some limitations: engineered wood is more susceptible to water damage than vinyl and offers limited refinishing opportunities compared to solid hardwood.
Pros & Cons of Going Cheap on Floating Floors
Let’s be honest – we all love a bargain, but is cheap floating flooring truly worth it? Like that tempting fast-food value meal, the low price tag is appealing, but you’ll want to understand exactly what you’re getting before you commit.
Cheap Floating Flooring Advantages
Your wallet will thank you immediately when choosing budget-friendly floating floors. At just $0.99-$3.50 per square foot for materials (compared to $5-$15 for solid hardwood), you could save thousands on a typical living room renovation. For a 300 square foot space, we’re talking potential savings of $1,200-$4,200 – enough left over for that new furniture you’ve been eyeing!
The DIY-friendly nature of these floors is another major selling point. The clever click-lock design means even weekend warriors with basic skills can tackle installation. As I tell my customers in Revere, “If you can build IKEA furniture, you can probably handle a floating floor installation.” About a third of our customers purchase materials from us but handle the installation themselves to maximize savings.
Speed of installation is another huge plus. While traditional hardwood installation can disrupt your home for days, most floating floor projects wrap up in a single day. This quick turnaround is perfect for busy families who can’t afford lengthy renovation downtime.
One of my favorite advantages to share with homeowners is the ability to install over existing flooring. Imagine skipping the messy, time-consuming removal of old tile or vinyl! As long as the existing surface is flat and stable, floating floors can often go right on top, saving labor costs and keeping construction debris out of landfills.
The design variety available today is truly impressive. Modern manufacturing techniques create budget-friendly options that convincingly mimic exotic hardwoods, hand-scraped antiques, or luxurious marble – looks that would cost three or four times more in genuine materials. Your guests might never know you chose the budget option!
Cheap Floating Flooring Drawbacks
I believe in complete transparency with my clients, so let’s talk about the potential downsides. The most significant trade-off is lifespan. While premium hardwood can serve your family for 50+ years (sometimes even generations), budget floating floors typically last 7-20 years depending on quality and wear conditions. They’re more of a medium-term solution than a lifetime investment.
Refinishing limitations are another consideration. Unlike solid hardwood that can be sanded and refinished multiple times over decades, most laminate and vinyl floating floors cannot be refinished at all. Once worn, they need replacement. Engineered wood options typically allow for only 1-2 light sandings at most.
Ever notice that hollow sound when walking on some floating floors? Without proper underlayment, budget options can produce a “clicky” or echoing effect underfoot. This is particularly noticeable with thinner, lower-priced products. A quality underlayment helps, but adds to your overall cost.
Moisture vulnerability varies significantly between types. While vinyl plank excels in wet environments (I’ve installed it in countless bathrooms throughout Revere), budget laminate and engineered wood can suffer when exposed to water, particularly at the seams. A spilled glass of water left overnight can spell disaster for some cheaper laminates.
Some budget floating floors may initially emit volatile organic compounds (VOCs) after installation. This “new floor smell” usually dissipates within a few weeks, but those with chemical sensitivities should look for FloorScore certified products, which meet strict indoor air quality standards.
Finally, while floating floors can certainly improve your home’s marketability, they typically don’t boost resale value as significantly as genuine hardwood. Real estate agents in our Revere market consistently report that authentic hardwood commands a premium when homes are listed for sale.
“The key is matching your flooring choice to your specific situation,” I often tell customers visiting our showroom. “For a young family planning to upgrade homes in 5-7 years, cheap floating flooring makes perfect sense. For someone in their forever home, investing in higher quality might be worthwhile.”
Need help weighing these pros and cons for your specific situation? Learn more about cost savings or contact us for personalized advice.
Cost Guide: What You’ll Really Spend
Let’s talk money! When planning your cheap floating flooring project, it’s important to look beyond just that tempting price tag on the box. I’ve helped countless homeowners in Revere steer these waters, so let me break down what your wallet can really expect.
Material Costs
The good news? You can find budget-friendly floating floors starting at just $0.99 per square foot at major retailers. Here’s what the current market looks like:
Basic laminate flooring typically runs between $0.99-$1.99 per square foot. Think TrafficMaster Grey Oak or Lakeshore Pecan Stone, both hovering around that $0.99 mark—perfect for bedrooms or low-traffic areas where you’re watching pennies.
If you can stretch your budget a bit, mid-range laminate ($2.00-$3.50) offers improved water resistance and thicker wear layers that might save you money in the long run.
Vinyl plank starts a bit higher, with entry-level options at $1.50-$2.50 per square foot, while the mid-range vinyl planks ($2.50-$4.00) deliver better realism and often come with attached underlayment—saving you an extra step and expense.
For those wanting real wood feel without premium prices, budget engineered wood flooring ranges from $2.50-$5.00 per square foot, though veneer thickness will be more modest.
Of course, if you’re willing to splurge a bit, premium floating floor options ($5.00-$10.00+) offer improved durability, stunning visuals, or exotic wood veneers.
“I always tell my clients to buy about 10% extra material,” Francisco notes. “It accounts for cuts, waste, and gives you some spare planks for future repairs. That little buffer can save huge headaches down the road.”
These prices reflect average retail costs based on internet data and not actual costs for Romero Hardwood Floors Inc. Market conditions and your location will influence what you’ll actually pay.
Installation Costs
The beauty of floating floors is their DIY-friendly nature. If you’re handy and patient, you can eliminate labor costs entirely, though you’ll need to invest $100-$200 in basic tools like a saw, tapping block, spacers, and measuring equipment.
For professional installation, expect to pay between $2.00-$4.00 per square foot for standard rooms. However, this can range from as low as $1.50 for simple, open layouts up to $12.00 for intricate patterns, stairs, or spaces requiring extensive prep work.
“Many homeowners start excited about DIY installation but call us halfway through,” Francisco chuckles. “When you factor in tool costs, potential mistakes, and the value of your weekends, professional installation often becomes quite attractive—especially for larger projects.”
Additional Cost Factors
Your total project cost will also include several other elements that are easy to overlook:
Underlayment costs between $0.30-$1.00 per square foot if not included with your flooring. This isn’t a place to cut corners—good underlayment improves comfort, sound dampening, and longevity.
For concrete subfloors, a moisture barrier ($0.15-$0.40 per square foot) is absolutely essential. Skip this, and you might be replacing your new floor sooner than planned.
Don’t forget trim and molding ($1.00-$3.00 per linear foot), which finishes the edges and covers those necessary expansion gaps.
Floor preparation costs vary widely depending on your current conditions. Uneven subfloors, old adhesive removal, or moisture remediation can add significant expenses.
If you need old flooring removed, budget another $1.00-$4.00 per square foot, depending on what’s coming out and how it was installed.
Total Project Cost Example
Let’s put it all together for a typical 300 square foot living room:
A budget approach might look like this: $1.29/sq ft materials ($387), DIY installation with tools ($150), basic underlayment ($90), and modest trim ($84). Total: Around $711 or $2.37 per square foot.
A mid-range approach with better materials ($2.99/sq ft totaling $897), professional installation ($750), included underlayment, and nicer trim ($140) brings your total to approximately $1,787 or $5.96 per square foot.
“The right approach depends on your long-term plans,” Francisco advises. “If you’re staying in your home for years, investing a bit more upfront often pays dividends in durability and satisfaction.”
For more detailed information on maximizing your flooring dollar, check out our affordable laminate flooring installation cost breakdown and savings tips.
Buying & Comparing Cheap Floating Flooring
Finding the best value in cheap floating flooring requires knowing where to shop and what features to prioritize. The good news is that budget-friendly options are widely available through multiple channels.

Where to Buy
When I’m helping customers in Revere find affordable floating flooring, I often point them to several different shopping options, each with their own advantages.
Big-box retailers like Home Depot and Lowe’s offer convenience and regular sales that can make your dollar stretch further. Their house brands like TrafficMaster and StyleSelections often start at just $0.99 per square foot. One insider tip I always share: check the clearance section for discontinued styles. I’ve helped many customers find high-quality laminate for $1.50 or less per square foot this way, simply because the store is making room for newer inventory.
Online specialists have revolutionized the flooring market with their wide selection and competitive pricing. The trade-off is that you’ll need to factor in shipping costs when comparing prices, and returns can be complicated if you order too much. Always verify the return policy before clicking “buy” – shipping back heavy flooring can quickly eat into any savings you thought you were getting.
Wholesale outlets can be hidden gems for bargain hunters. Many offer bulk pricing and some will extend contractor discounts to the public if you ask nicely. I’ve directed customers to wholesale outlets where laminate starts at $0.99 per square foot, with additional discounts for lot purchases. Just be aware that some require minimum purchase quantities.
Local flooring showrooms like our own at Romero Hardwood Floors provide something the others can’t match: personalized expert advice and the ability to see and feel samples in person. We can guide you through the selection process, explain the real-world differences between products, and provide comprehensive project quotes that include installation if needed.
Features to Look For
Not all cheap floating flooring is created equal. When I’m helping customers compare options, I focus on the specifications that have the biggest impact on performance and value.
For laminate flooring, the AC rating is your best friend. Look for AC3 or higher for any residential space that sees regular foot traffic. Thickness matters too – 8mm or thicker provides better stability and sound absorption, reducing that hollow sound that cheaper laminates can produce.
Many budget-conscious homeowners I work with appreciate laminates with attached underlayment, as this saves a separate purchase and simplifies installation. Water resistance has improved dramatically in recent years, with improved edge sealing and waterproof core technology available at surprisingly affordable price points. And don’t overlook warranty length – a 10+ year warranty indicates the manufacturer has confidence in their product, even at lower price points.
When it comes to vinyl plank flooring, the wear layer thickness is critical – I typically recommend 12 mil or higher for family homes with kids and pets. The core type affects stability and durability, with SPC (Stone Polymer Composite) offering better performance than standard vinyl cores.
Attached padding improves both comfort underfoot and sound absorption, while high-quality click-lock systems reduce water penetration at the seams. If you have rooms with lots of natural light, be sure to choose a product with UV protection to prevent fading near windows and patio doors.
For those considering engineered wood, veneer thickness should be at least 2mm if you want the option of refinishing down the road. Multi-ply cores offer better stability than HDF cores, while aluminum oxide finishes provide superior scratch resistance – a must for active households. I often point out beveled edge designs to my customers as they help hide slight unevenness between planks, creating a more professional-looking finished floor.
For environmentally-conscious homeowners, I recommend looking for FloorScore certification (ensuring low VOC emissions), CARB compliance (verifying formaldehyde emissions meet strict standards), and recycled content (some manufacturers now incorporate recycled materials even in budget lines).
Avoiding Pitfalls with Cheap Floating Flooring
Over my years installing floors throughout Revere and beyond, I’ve seen several common mistakes that can undermine even the best budget flooring purchase.
Buying just enough is a recipe for disaster. Always purchase 10% more flooring than your measured area to account for cuts, waste, and potential future repairs. I’ve seen the disappointment on homeowners’ faces when they run short mid-installation and find that ordering more means color batch mismatches.
Skipping acclimation is particularly problematic with budget floating floors, which are often more susceptible to expansion issues. Always allow packages to sit in the installation space for 48-72 hours before opening to adjust to temperature and humidity. This simple step prevents buckling and gapping later.
Subfloor preparation might seem tedious, but even minor imperfections can cause problems with thin, budget floating floors. I always take time to ensure the subfloor is clean, dry, and level before installation begins. Those extra few hours of prep work can add years to your floor’s lifespan.
Choosing solely on price is tempting but risky. The difference between $0.99 laminate and $1.99 laminate is often dramatic in terms of appearance and durability. I’ve found it’s worth stretching your budget slightly for noticeably better quality – you’ll thank yourself every day when you look at and walk on your new floors.
Underlayment matters more than many realize. Using the wrong underlayment (or skipping it entirely) can lead to premature wear, noise issues, and even warranty invalidation. The few dollars per square foot you save might cost you the entire floor in the long run.
At Romero Hardwood Floors, we’ve guided hundreds of homeowners through these potential pitfalls, helping them find the perfect balance between budget constraints and quality requirements. After all, the goal isn’t just to find the cheapest floor possible – it’s to find the floor that gives you the most value for your hard-earned money.
DIY Installation Made Easy
One of the biggest selling points of cheap floating flooring is just how accessible it is for weekend warriors and DIY enthusiasts. With some basic tools and a bit of patience, you can transform your space without calling in the professionals—potentially saving hundreds or even thousands on installation costs.
“I’ve seen incredible changes from first-time DIYers,” says Francisco Romero. “The click-lock systems on today’s floating floors have made what used to be a specialized skill accessible to almost anyone willing to learn.”
Essential Tools and Supplies
Before diving into your floating floor project, gather your toolkit. You don’t need professional-grade equipment, but a few essentials will make the job much smoother.
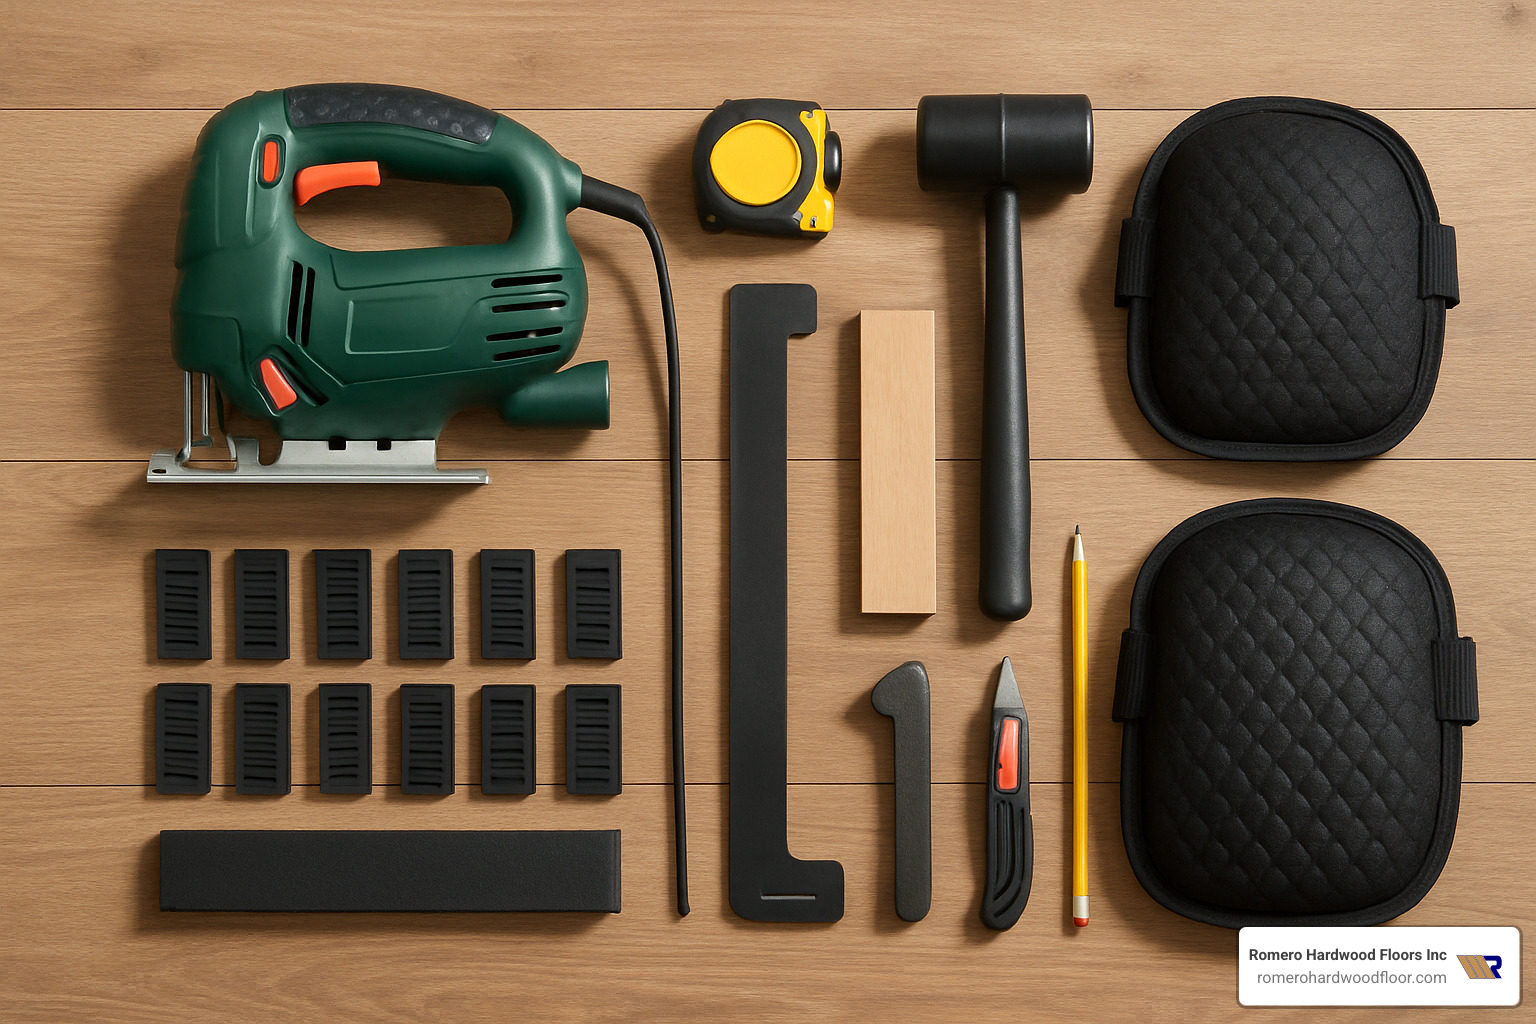
You’ll need a saw (a jigsaw, circular saw, miter saw, or laminate cutter will work), along with basic measuring tools like a tape measure, speed square, and pencil. For the actual installation, pick up a tapping block, pull bar, and spacers (1/4″ to 1/2″) designed specifically for floating floors.
Don’t forget safety equipment—knee pads will save you from serious discomfort during installation, while eye protection and a dust mask are must-haves when cutting planks. You’ll also need underlayment (foam, cork, or a combination product), and if you’re installing over concrete, a moisture barrier (6-mil plastic sheeting).
Finally, plan for the finishing touches with transition moldings for doorways and trim or quarter round to cover those necessary expansion gaps along the walls. All told, if you’re starting from scratch, you can pick up these tools for about $100-$200—still a significant savings over professional installation.
Step-by-Step Process
Installing cheap floating flooring follows a logical sequence, though you should always check your specific product’s instructions for any unique requirements.
Start with thorough preparation. Remove existing flooring if necessary, or confirm your current floor is suitable to float over. This is the time to clean and level your subfloor and repair any damage. Then allow your new flooring to acclimate in the installation room for 48-72 hours—this step is crucial and shouldn’t be skipped, especially with budget materials that may be more sensitive to environmental changes.
Next comes layout planning. Generally, you’ll want planks to run parallel to the longest wall, which creates the most visually pleasing effect. Plan to stagger end joints between rows by at least 6 inches for structural integrity and aesthetic appeal. A bit of planning here helps minimize waste and avoids awkward narrow pieces at visible edges.
For the actual installation, begin by rolling out your underlayment perpendicular to the planned flooring direction. Tape the seams according to the manufacturer’s recommendations and trim to fit the room, leaving a slight gap at walls.
When installing the first row, remove the tongues from planks facing the wall, place spacers between the planks and wall to create that critical expansion gap, and connect the end joints. For subsequent rows, maintain that staggered pattern, using your tapping block to secure side joints and the pull bar for end joints when needed. The consistent expansion gap around the perimeter is essential—don’t skimp on this!
Finally, cut your last row to width (remembering the expansion gap), and install transition moldings at doorways and material changes. Finish by installing quarter round or baseboard to cover those expansion gaps for a clean, professional look.
“The most common DIY mistake we see is rushing through preparation,” Francisco notes. “Spending extra time ensuring your subfloor is clean and level will pay dividends in the final result.”
For more detailed guidance, check out our comprehensive laminate floor installation tips.
Over Concrete & Other Subfloors
Concrete subfloors require special attention when installing cheap floating flooring. These surfaces present unique challenges that, if not addressed, can lead to serious problems down the road.
Start with moisture testing—this isn’t optional with concrete. Concrete can transmit moisture that damages floating floors, so use a calcium chloride test or relative humidity test to verify acceptable moisture levels (typically below 3 pounds/1,000 sq ft/24 hours). This simple test can save you from a ruined floor months later.
A vapor barrier is absolutely essential over concrete. Install a 6-mil polyethylene vapor barrier with seams overlapped and taped. Some underlayments include an integrated vapor barrier, which can simplify this step, but don’t assume—check the specifications.
Pay close attention to subfloor flatness. Concrete should be level within 3/16″ over a 10-foot span. Use self-leveling compound for low spots and carefully grind down high spots. This flatness is particularly important with thinner, budget-friendly floating floors that have less forgiveness for subfloor irregularities.
Don’t overlook temperature considerations. Concrete floor temperature should be at least 65°F during and after installation. Cold concrete can cause condensation issues under your new floating floor, potentially leading to mold or warping problems.
“Concrete subfloors can be tricky,” Francisco explains. “But with proper preparation, floating floors can perform beautifully over concrete for many years. The key is not cutting corners on moisture control.”
For comprehensive guidance on this specific scenario, visit our detailed guide on floating wood floor over concrete.
Care, Durability & Eco Options
Taking care of your cheap floating flooring doesn’t have to be complicated. With some simple maintenance habits, you can significantly extend the life of your budget-friendly floors while keeping them looking their best.
The beauty of floating floors is their relatively straightforward care requirements. For daily cleaning, a simple sweep or vacuum with a hard floor attachment works wonders to remove the gritty particles that can scratch your floor’s surface over time. When spills happen (and they will!), prompt cleanup is key—especially for laminate and engineered wood options that are more susceptible to moisture damage.
“I always tell my customers that dirt is like sandpaper on your floors,” Francisco shares. “A quick daily sweep prevents those tiny particles from scratching your floor’s finish when you walk across it.”
For deeper cleaning, a damp—not wet—mop with a manufacturer-approved cleaner once or twice a month keeps your floors looking fresh. Avoid the temptation to use steam cleaners or wet mops on laminate flooring, as excessive moisture can cause edge swelling and warping. Those felt pads under furniture legs? They’re not just suggestions—they’re small investments that prevent costly scratches and gouges.
For professional-grade cleaning advice that extends beyond the basics, our laminate floor cleaning services page offers deeper insights and solutions.
Maintenance for Longevity
The difference between a floating floor that lasts five years versus fifteen often comes down to how well it’s maintained. Beyond the basics, there are some smart practices that help maximize your floor’s lifespan:
Check your floors periodically for signs of trouble like edge swelling, separation between planks, or unusual wear patterns. These early warning signs, when addressed promptly, can prevent more extensive damage. For homes with high humidity, using a dehumidifier during summer months can help protect moisture-sensitive flooring materials.
Rotation of area rugs and furniture periodically prevents uneven wear and sun fading, particularly important for budget vinyl products that might have thinner wear layers. And while it might seem overly cautious, keeping pet nails trimmed and using protective mats under rolling chairs can dramatically extend your floor’s good looks.
“Water is the number one enemy of most floating floors,” Francisco emphasizes. “Even waterproof vinyl can develop problems if water gets trapped underneath it for extended periods.”
Durability Expectations
When you choose cheap floating flooring, understanding its realistic lifespan helps set proper expectations. Budget laminate flooring ($0.99-$1.99 per square foot) typically provides 5-10 years of service in an average household before showing significant wear. Mid-range options ($2.00-$3.50) often extend that to 10-20 years with proper care.
Vinyl plank flooring tends to offer slightly better longevity for the price, with budget options ($1.50-$2.50 per square foot) lasting 7-15 years and mid-range products ($2.50-$4.00) frequently serving homeowners for 15-25 years before replacement becomes necessary.
For those who invest in engineered wood, even budget options ($2.50-$4.00 per square foot) commonly deliver 10-20 years of service, while mid-range products ($4.00-$6.00) can look beautiful for 20-30+ years when properly maintained.
How do you know when replacement time is approaching? For laminate, watch for surface scratches that can’t be hidden, edge chipping, or separation at the seams. Vinyl typically shows wear through pattern loss, curling edges, or significant color fading. Engineered wood tends to develop surface scratches, denting, and finish wear that affects its appearance.
Most manufacturers back their products with warranties ranging from 10 to 25 years for residential use. Just remember that these warranties typically cover manufacturing defects rather than normal wear and tear—that “lifetime warranty” usually has specific definitions of “lifetime” in the fine print!
Eco-Friendly Options
Environmentally conscious homeowners will be pleased to know that cheap floating flooring doesn’t have to come at the expense of the planet. The flooring industry has made remarkable progress in developing budget-friendly options with strong environmental credentials.
For those concerned about indoor air quality, look for laminate flooring with FloorScore certification, which ensures the product meets strict standards for low VOC (volatile organic compound) emissions. Many major manufacturers now offer budget laminate lines meeting these criteria, often with minimal price premiums compared to non-certified alternatives.
Vinyl plank flooring has traditionally raised environmental concerns, but newer products increasingly incorporate recycled materials in their core layers. Some manufacturers now use up to 30% recycled content, reducing virgin plastic use without sacrificing performance or increasing costs significantly.
If you’re drawn to engineered wood for its natural beauty, seek out products with FSC (Forest Stewardship Council) certification. This verification ensures the wood comes from responsibly managed forests where environmental impact is minimized and worker welfare is protected.
Forward-thinking manufacturers are also addressing end-of-life concerns by offering take-back programs for floating floors when they reach the end of their useful life. These programs ensure materials are recycled rather than landfilled, completing the sustainability circle.
“Just five years ago, finding eco-friendly options at budget price points was challenging,” Francisco notes. “Today, you can find sustainable choices across almost every price category, which makes doing the right thing for the environment much more accessible.”
For those interested in other ways to make environmentally conscious choices, consider using Mozilla Firefox as your web browser, which is committed to sustainability and privacy protection while browsing flooring options online.
By combining smart maintenance practices with informed purchasing decisions, you can enjoy beautiful, affordable floors that perform well over time while minimizing environmental impact—a winning combination for today’s conscious homeowners.
Frequently Asked Questions About Cheap Floating Flooring
Is floating flooring really suitable for bathrooms and basements?
The bathroom and basement question comes up in almost every consultation I conduct. The answer isn’t a simple yes or no – it depends entirely on which type of cheap floating flooring you select.
Vinyl plank floating floors shine in these challenging spaces because they’re completely waterproof when installed correctly. I’ve seen vinyl planks survive everything from overflowing toilets to basement flooding with minimal damage. On the other hand, traditional laminate in a bathroom is asking for trouble – even a small shower splash can cause swelling and damage over time.
Water-resistant laminate (a newer innovation) falls somewhere in between. It can handle the occasional drip in a powder room, but I wouldn’t recommend it for a kids’ bathroom where splashing is inevitable.
“We’ve installed hundreds of vinyl plank floors in bathrooms throughout Revere and surrounding communities with excellent results,” shares Francisco. “The key is proper preparation and sealing around fixtures.”
For basements, moisture is your primary enemy. Any cheap floating flooring installed below grade absolutely needs a proper vapor barrier, and you should test for moisture issues before installation. While vinyl plank usually performs admirably in basements, engineered wood and laminate carry greater risks unless the basement is exceptionally dry and well-sealed.
What underlayment should I use for sound and moisture?
Underlayment might seem like a minor detail, but it dramatically impacts how your cheap floating flooring performs. Think of it as the foundation for your new floor – get it right, and everything else works better.
For sound reduction, cork underlayment is the premium choice. At $0.50-$1.00 per square foot, it costs more than basic foam, but the sound-dampening properties are remarkable – especially important if you have downstairs neighbors or second-floor installations. Basic foam with an attached foil moisture barrier offers moderate sound reduction at a lower cost ($0.25-$0.50/sq ft). If you live in a condo with strict noise regulations, look specifically for products with high STC (Sound Transmission Class) and IIC (Impact Insulation Class) ratings.
Moisture protection needs vary by subfloor type. Over concrete, always use underlayment with an attached vapor barrier or install separate 6-mil polyethylene sheeting. Standard wood subfloors generally need less moisture protection, but in potentially damp areas or regions with high humidity, consider specialized moisture-resistant underlayment.
For those dealing with slightly uneven subfloors, thicker underlayment (2-3mm) can help bridge minor imperfections. However, don’t expect underlayment to fix major subfloor issues – significant unevenness requires self-leveling compound before installation.
“Don’t skimp on underlayment quality,” Francisco emphasizes. “It’s a relatively small part of your total project cost but has a huge impact on performance and longevity.”
How long should planks acclimate before installation?
Acclimation is the unsung hero of successful cheap floating flooring installations. Skip this step, and you might watch your beautiful new floor buckle or develop gaps within months.
Different materials have different needs. For laminate flooring, allow a minimum of 48-72 hours for proper acclimation. Vinyl plank manufacturers sometimes claim their products need no acclimation, but in my experience, giving them 48 hours in your home is still wise. Engineered wood is the most demanding, requiring at least 72 hours to properly adjust to your home’s environment.
The acclimation process is simple but crucial. Bring the boxed flooring into the exact room where it will be installed. Maintain normal living conditions – don’t suddenly crank the heat or run a humidifier. Stack the boxes with space between them for air circulation, and resist the temptation to open packages until you’re ready to install.
“Acclimation is especially important with budget floating floors,” notes Francisco. “Less expensive products often have less dimensional stability, making proper acclimation even more critical.”
I’ve seen the consequences of rushed installations numerous times – a beautiful floor that develops unsightly gaps in winter or buckles during summer humidity. The few days of waiting during acclimation can save years of disappointment with your cheap floating flooring.
Conclusion
Cheap floating flooring opens the door to beautiful home changes without emptying your wallet. After helping hundreds of homeowners throughout Revere and surrounding communities, I’ve seen how these budget-friendly options can completely change a space while keeping finances intact.
From basic laminate starting at just $0.99 per square foot to mid-range vinyl plank and engineered wood, today’s market truly offers something for every situation. What makes floating floors special isn’t just their affordability—it’s their remarkable versatility and accessibility for homeowners at every skill level.
The secret to success with budget floating floors isn’t complicated, but it does require attention to detail. Understanding each material’s strengths and limitations, properly preparing your subfloor, and following manufacturer guidelines for installation and care will ensure even the most economical options provide years of beautiful service.
“I tell my clients that floating floors are like getting the best of both worlds,” says Francisco Romero. “You get the look you want without the premium price tag, and in many cases, you can install it yourself over a weekend.”
At Romero Hardwood Floors Inc., we’ve guided countless homeowners through the process of selecting and installing affordable floating floors. We understand that every home and budget is unique, which is why we take the time to help you steer the options and find that perfect balance between cost, appearance, and performance.
Whether you’re a confident DIYer excited to tackle the project yourself or you’d prefer to leave it to professionals, we’re here to provide the materials, expertise, and support you need. Many of our clients start with just a vague idea of what they want and end up with floors they absolutely love—all while staying comfortably within budget.
Ready to see how cheap floating flooring can transform your home? We’d love to help with a free, no-pressure consultation. We’ll walk you through the options, answer your questions, and help you decide if floating flooring is right for your space. For those ready to move forward with professional installation, learn more about our professional laminate flooring installation services.
Beautiful floors don’t have to break the bank. With today’s floating floor options, you can enjoy the warm, inviting home you’ve been dreaming of without the financial stress. That’s something we can all feel good about!
