Flooring Installations: 10 Proven Ways to Avoid Costly Mistakes
Why Finding the Right Flooring Installation Service Matters
Flooring Installations are one of the biggest home improvement decisions you’ll make, and choosing the wrong contractor can turn your dream project into a costly nightmare.
Quick Answer for Flooring Installation Services:
– Professional installers handle measurement, subfloor prep, installation, and cleanup
– Average costs range from $3-15 per sq ft (internet data, not Romero pricing)
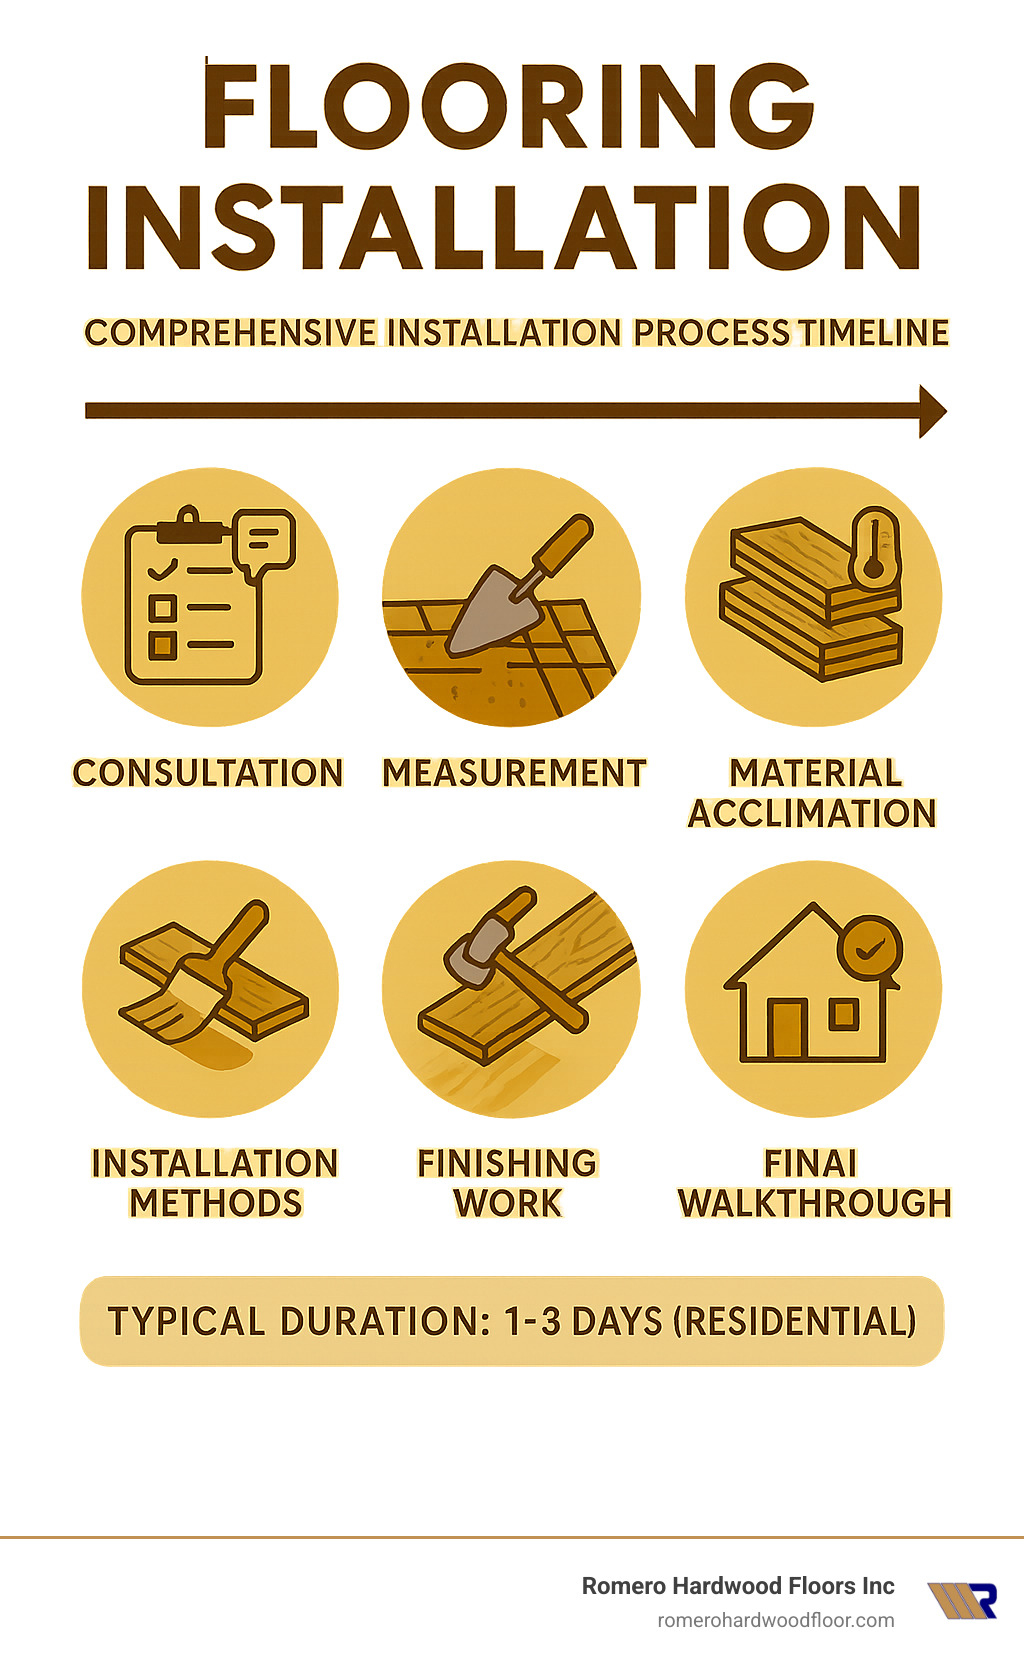
– Timeline typically takes 1-3 days for most residential projects
– Key credentials include licensing, insurance, and manufacturer certifications
– Popular methods include nail-down, glue-down, floating, and stretch-in installation
The flooring industry has exploded with options in recent years. Luxury vinyl plank, engineered hardwood, waterproof laminate – the choices feel endless. But here’s the thing: even the best materials fail without proper installation.
According to industry data, customers spend an average of $3,600 on vinyl flooring projects alone, including labor and materials. That’s a significant investment that deserves professional handling.
The stakes are high. Poor installation voids warranties, creates safety hazards, and leads to expensive repairs down the road. Professional installers bring specialized tools, experience with subfloor preparation, and knowledge of proper expansion gaps that DIY projects often miss.
I’m Francisco Romero, owner of Romero Hardwood Floors Inc., and I’ve been perfecting Flooring Installation techniques for over 15 years across residential and commercial projects in the Revere, MA area.
Flooring Installation word roundup:
– laminate wood flooring
– residential concrete floor installers
– residential vinyl flooring installer
Flooring Installation 101: Picking the Right Material
Walking into a flooring showroom can feel overwhelming – rows upon rows of samples, each promising to be “the perfect choice” for your home. Understanding what makes each material tick will help you make the right decision for your space and lifestyle.
Surface durability is where the rubber meets the road. If you’ve got kids racing around your Revere home or a dog who thinks sliding across the kitchen is an Olympic sport, you need flooring that can take a beating. Hardwood might scratch from dog claws, but it can be refinished multiple times over decades. Vinyl, on the other hand, laughs in the face of pet accidents and high heels.
The resale value conversation comes up in almost every consultation we do. Quality hardwood installation typically adds the most value to your home, followed by well-chosen tile in the right spaces. That doesn’t mean other materials are bad investments – just that buyers tend to get excited about gleaming hardwood floors.
Moisture resistance becomes your best friend in Massachusetts homes. Our humid summers and wet springs can wreak havoc on the wrong flooring choice. Basements, bathrooms, and kitchens need materials that won’t buckle, warp, or grow mold when things get damp.
Don’t overlook acoustics – especially if you live in a multi-story home or have neighbors below. Hard surfaces like tile and hardwood can turn every footstep into an announcement. Carpet naturally muffles sound, while proper underlayment during Flooring Installation can help other materials play more quietly.
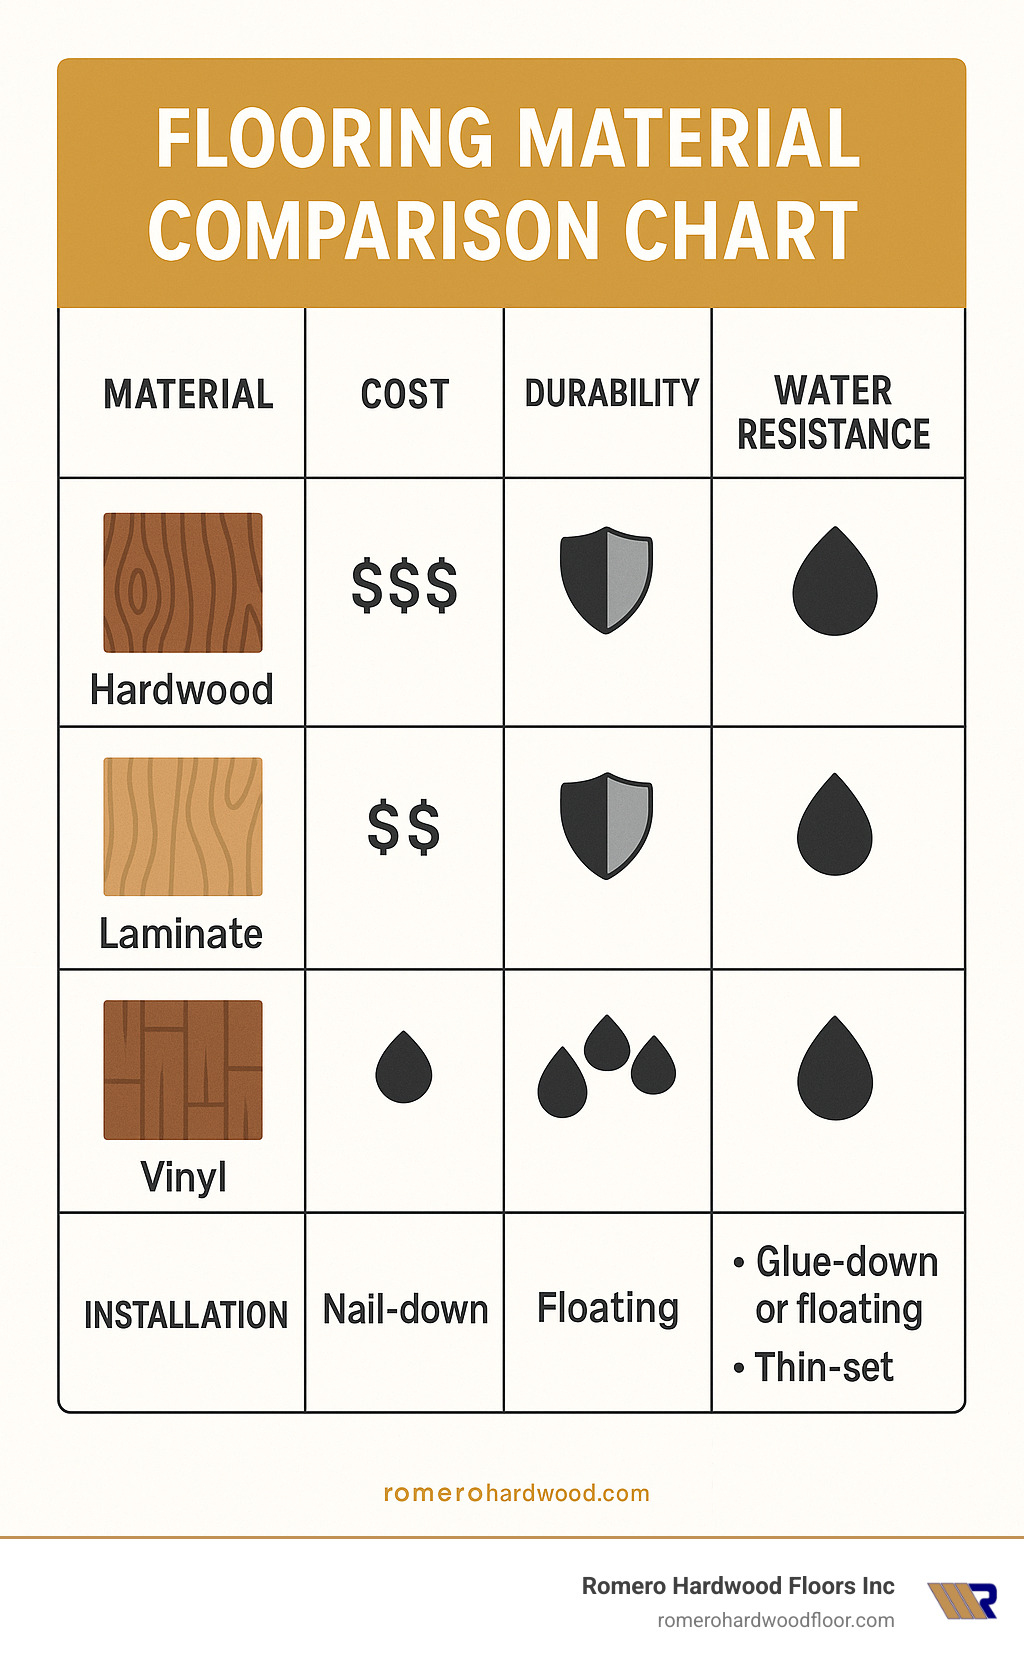
Cost ranges vary wildly based on material quality and installation complexity. According to internet data, you might pay anywhere from $2 to $18 per square foot installed, with premium materials and complex layouts pushing costs even higher.
Hardwood vs Engineered Boards – Which One Wins?
Solid hardwood is the traditional choice – planks cut from single pieces of wood that can be sanded and refinished multiple times throughout their life. You’re typically looking at 3-5 refinishing cycles with quality solid hardwood, making it a true generational investment.
Engineered hardwood takes a different approach – real wood veneer over a plywood or fiber core. The layered construction makes engineered boards much more stable in challenging environments.
Humidity tolerance is where engineered really shines. Solid hardwood expands and contracts with moisture changes, sometimes creating gaps in winter or cupping in summer. Engineered boards stay much more stable, making them perfect for basements or homes without consistent climate control.
Luxury Vinyl Plank (LVP) & Sheet Vinyl Essentials
Luxury vinyl has completely transformed from the cheap, obviously fake flooring your grandmother might have had. Today’s products are so realistic that we sometimes have to look twice to tell them apart from real hardwood.
The game-changer is the waterproof core technology. We’re talking true 100% water resistance, not just “water-resistant” marketing speak. Spill a glass of wine, let the dog’s water bowl overflow, even deal with a minor plumbing leak – quality LVP handles it all without batting an eye.
Wear layer thickness determines how long your floors will look great under daily abuse. For busy family areas, we recommend at least 12-mil wear layers – they’re worth the extra investment.
Laminate, Tile & Carpet Quick Facts
Laminate flooring has shed its reputation as the “fake wood” option. Today’s laminate offers impressive scratch resistance and wood grain textures so realistic they fool most visitors. The click-lock installation system makes it a favorite for weekend warriors tackling DIY projects.
Tile installations require attention to detail, especially around grout lines. Porcelain tiles offer superior durability and stain resistance compared to ceramic options, while large format tiles minimize grout lines for cleaner, more contemporary looks.
Carpet installation relies on the stretch-in method using tack strips around room perimeters. Quality padding affects everything from comfort underfoot to how long your carpet looks good.
Proven Flooring Installation Methods and When to Use Them
The difference between a floor that lasts decades and one that fails within years often comes down to choosing the right installation method. Each Flooring Installation technique serves specific purposes, and understanding when to use each one can save you thousands of dollars in future repairs.
Nail-down installation has been the trusted choice for solid hardwood for over a century. This method drives fasteners at precise angles through the tongue-and-groove connections, creating rock-solid stability that allows for multiple refinishing cycles over the floor’s lifetime.
Glue-down methods shine when you’re working over concrete subfloors or need extra stability for wider planks. Modern urethane adhesives provide excellent bond strength while still allowing the natural seasonal movement that keeps floors healthy.
The floating click-lock system has been a game-changer for both DIY enthusiasts and professionals. These planks connect to each other without any fasteners to the subfloor, creating a unified surface that moves as one piece.
Stretch-in carpet installation might look simple, but it requires serious skill and the right tools. Professional power stretchers create uniform tension across the entire surface, while tack strips around the perimeter hold everything in place.
Expansion gaps around room perimeters aren’t suggestions – they’re requirements. These gaps allow materials to breathe with humidity changes. Skip them, and you might wake up to buckled floors after the first humid summer.
Underlayment selection varies dramatically based on your goals. Moisture barriers protect against subfloor dampness, sound-dampening options reduce noise transmission between floors, and thermal barriers work with radiant systems.
For more detailed information about professional methods, check out our complete guide to residential flooring installation.
Flooring Installation for Hardwood: Nail-Down vs Glue-Down
Moisture testing comes before everything else in our hardwood installations. We test both the subfloor and the hardwood planks because moisture content differences can spell disaster down the road.
Nail-down installation works beautifully over wood subfloors and gives you the most secure attachment possible. Our specialized flooring nailers countersink fasteners below the surface, leaving clean lines that disappear completely.
Glue-down hardwood becomes your best friend when you’re working over concrete subfloors where nailing simply isn’t possible. Modern urethane adhesives create incredibly strong bonds while maintaining just enough flexibility for seasonal movement.
Carpet Flooring Installation: Stretch-In or Glue-Down?
Tack strips form the foundation of stretch-in installations, creating anchor points around the room’s perimeter. Proper placement is crucial – too close to the wall and you can’t get adequate stretch, too far and you’ll have gaps.
Power stretchers separate professional installations from amateur attempts. While knee kickers have their place for detail work, only power stretchers can create the uniform tension across large carpet areas that prevents premature wear and wrinkles.
Basement applications often call for glue-down methods due to moisture concerns and concrete subfloors. Glue-down eliminates the air space under carpet that can trap moisture and create perfect conditions for mold growth.
Floating Flooring Installation: The DIY Favorite
Floating installations have democratized Flooring Installation by making professional-quality results accessible to determined DIYers, while also offering unique advantages in challenging professional situations.
Click joints have evolved into incredibly sophisticated connection systems that rival traditional fastening methods for strength and durability. Modern click systems handle normal expansion and contraction beautifully.
Vapor barriers protect floating floors from subfloor moisture migration, and they’re essential even over wood subfloors in many situations. We’ve seen too many beautiful floating floors develop problems because someone skipped this crucial step to save a few dollars.
The Professional Flooring Installation Process: From First Call to Final Walk-Through
When you call a professional Flooring Installation company, you’re not just hiring someone to lay floors – you’re partnering with experts who turn your vision into reality while protecting your biggest investment.
The journey starts with an initial consultation where we sit down and really get to know you. What’s your lifestyle like? Do you have kids who spill everything, or pets who think the house is their personal racetrack? These details matter because they guide us toward materials and finishes that’ll actually work in your real life.
In-home measurement comes next, and this is where experience really shows. We’re not just measuring square footage – we’re spotting the quirks every home has. That slightly crooked wall, the built-in cabinet that juts out, the heating vent that needs special attention.
Subfloor evaluation reveals what’s hiding beneath your current floors. We’ve seen everything from squeaky spots that drive families crazy to moisture issues that could destroy a beautiful new installation. Catching these problems early saves you from costly surprises later.
Project scheduling balances material delivery timing with your family’s schedule. Nobody wants to live in chaos longer than necessary, so we provide realistic timelines and keep you updated if weather or other factors cause delays.
The installation itself follows proven methods, but the real difference shows in our professional cleanup. Quality contractors don’t just sweep up the big pieces – we use dust control systems and leave your home cleaner than we found it.
Warranties protect your investment with both material coverage from manufacturers and labor guarantees from professional installers. When something goes wrong (and occasionally it does), you want someone who stands behind their work.
Step-by-Step Flooring Installation Checklist
Professional Flooring Installation follows a detailed checklist that prevents the costly mistakes that plague DIY projects and inexperienced installers.
Moisture readings happen before any material touches your subfloor. We test both the existing subfloor and your new flooring materials to ensure they’re compatible. Moisture problems caught early save thousands in repairs later.
Leveling compound application sounds technical, but it’s basically creating the perfect foundation for your new floors. Even small bumps and dips in the subfloor will show through finished flooring.
Material acclimation lets your new flooring adjust to your home’s temperature and humidity. Hardwood needs about a week to get comfortable in its new environment, while engineered products typically need less time.
Trim removal and reinstallation provides those clean, professional edges that separate amateur work from expert craftsmanship. We carefully remove baseboards and quarter-round molding, label everything for easy reinstallation.
What’s Included in a Full-Service Package?
A comprehensive Flooring Installation package eliminates surprises and gives you one point of contact for the entire project.
Old floor removal includes everything from carpet and padding to tile and hardwood. We handle the heavy lifting, literally, and know the proper techniques for removing different materials without damaging subfloors underneath.
Disposal services mean you don’t have a dumpster sitting in your driveway for weeks. We remove all debris from your property and follow proper disposal methods, including recycling materials when possible.
Dust control systems keep the mess contained to work areas. We use plastic barriers and air filtration equipment because nobody wants to find sawdust in their kitchen cabinets months after installation.
DIY vs Hiring the Pros: Budget, Tools & Common Pitfalls
Every homeowner eventually weighs the “save money” appeal of DIY against the security of hiring a pro. Here are the key facts, minus the fluff:
- Labor costs: Professional installation averages $2–$18 per sq ft (internet data, not Romero pricing). Materials can add $1–$15 per sq ft, and luxury projects can exceed $50+ per sq ft when you choose premium products or patterns.
- Tool rentals: A flooring nailer or stapler rents for $40–$80/day; a carpet power stretcher often tops $100/day. Over a multi-day project, tool fees can erase DIY savings.
- Hidden costs: Warranty voids, subfloor mistakes, and personal injury bills quickly dwarf any labor you hoped to save.
For a deeper dive into moisture science, see this external reference on subfloor moisture considerations.
Must-Have Tools for DIY Flooring Installation
- Tapping block & pull bar – protect click-lock edges.
- Spacers – keep correct expansion gaps.
- Jamb saw – under-cut door frames for clean transitions.
- Moisture meter – verify subfloors meet manufacturer limits.
- Safety gear – knee pads, eye protection, dust mask.
Top 5 DIY Mistakes That Void Warranties
- Skipping acclimation – planks must sit in the home environment first.
- Wrong adhesive – each flooring type requires a specific formula.
- No vapor barrier – moisture migration destroys floors from below.
- Bad layout planning – narrow slivers at walls invite failure.
- Tiny or missing expansion gaps – boards need space to move with humidity.
If any of these points make you uneasy, the peace of mind that comes with a licensed, insured installer is worth every penny.
How to Choose a Flooring Contractor & Estimate Your Budget
Finding the right contractor feels overwhelming when you’re staring at a dozen different quotes and trying to figure out who you can trust with your home. The truth is, the cheapest bid often becomes the most expensive mistake you’ll ever make.
License and insurance verification should be your first step, not an afterthought. A legitimate contractor will gladly provide proof of licensing and insurance certificates. If they hesitate or make excuses, keep looking.
Manufacturer certifications separate the pros from the pretenders. Certified installers have invested time and money in advanced training, which means they know the latest techniques and have access to better warranties.
Review scores tell the real story, but dig deeper than just star ratings. Read recent reviews from local customers and look for patterns. Does the same complaint pop up repeatedly? Do they respond professionally to negative feedback?
Labor quotes should break down exactly what you’re getting for your money. Vague estimates that lump everything together make it impossible to compare contractors fairly. Quality contractors provide detailed line items for labor, materials, preparation work, and cleanup services.
Financing options can make the difference between settling for cheap flooring now or getting the quality installation you really want. Established contractors often partner with financing companies to offer promotional rates that make premium installations surprisingly affordable.
For more detailed guidance on selecting qualified professionals, check out our comprehensive resource on Flooring Installation Contractors.
Vetting Credentials: Questions to Ask Before You Sign
The conversation you have before signing a contract reveals everything you need to know about a contractor’s professionalism and capabilities.
References from recent projects should be readily available, not something they need to “dig up later.” Quality contractors are proud of their work and maintain relationships with satisfied customers.
Project photos showcase their actual work quality, not stock images from manufacturer websites. Look for clean installation lines, proper transitions between rooms, and attention to details like trim work.
Timeline guarantees with real consequences show a contractor stands behind their scheduling promises. Anyone can say they’ll finish in three days, but contractors who offer penalty clauses for delays take their commitments seriously.
Estimating Material Needs & Total Project Cost
Getting accurate cost estimates prevents the sticker shock that derails projects halfway through completion.
Waste factors of 5-10% account for cutting waste, damaged pieces, and keeping a few extra planks for future repairs. Simple rectangular rooms need less waste allowance than spaces with lots of angles, closets, and built-in features.
Subfloor repairs can dramatically impact your budget if found mid-project. Squeaky floors, uneven surfaces, or moisture damage need addressing before new flooring goes down. Professional contractors inspect subfloors during initial estimates and identify potential repair costs upfront.
High-end upgrade costs can reach 3 times average pricing when you fall in love with premium materials or complex installation patterns. That gorgeous Brazilian cherry or intricate tile design comes with premium labor requirements that affect your bottom line.
Based on internet data (not Romero Hardwood Floors pricing), professional Flooring Installation typically ranges from $3-15 per square foot for standard installations, with luxury projects reaching $45+ per square foot for premium materials and complex work.

Frequently Asked Questions about Flooring Installation
Let’s tackle the questions we hear most often from homeowners considering new flooring. These answers come from real conversations with customers over our 18+ years in business.
How long will my project take?
Here’s the honest answer: most residential Flooring Installation projects take 1-3 days, but it really depends on what you’re getting done.
Hardwood installations need a bit more patience. Your beautiful new planks typically require 2-3 days of acclimation in your home before we even start installing. Once we begin installation, expect 1-2 days for most rooms.
Floating floors like luxury vinyl and laminate are the speed demons of the flooring world. We can often complete average-sized rooms in 1-2 days since there’s no nailing or extensive subfloor prep required.
Now, if you’re doing something more ambitious – multiple rooms, staircases, or dealing with subfloor issues – your project might stretch to 5-7 days. We always provide detailed schedules during our initial consultation.
Will installers move my furniture?
Yes, we offer furniture moving services for an additional per-room charge. It’s one of those things that makes your life infinitely easier during installation.
We handle the standard household furniture – beds, dressers, sofas, dining tables, and most everything else you’d expect. Our crew has the right equipment and experience to protect your belongings while giving us the workspace we need.
Heavy or specialty items like pianos, large aquariums, or priceless antiques might need special arrangements. We’ll discuss these during your consultation so there are no day-of surprises.
Here’s a pro tip: remove personal items, artwork, and anything fragile before we arrive. Think jewelry boxes, picture frames, electronics, and that collection of ceramic cats your aunt gave you.
How do I maintain my new floors?
The beauty of modern flooring is that maintenance doesn’t have to be complicated. Each material has its own personality when it comes to care.
Hardwood floors are surprisingly low-maintenance once you know the basics. Regular sweeping or vacuuming removes the grit that causes scratches. For deeper cleaning, use a damp mop with wood floor cleaner – never soak the floor.
Vinyl floors are practically maintenance-free, which is why busy families love them. Simple sweeping and mopping with mild cleaners keeps them looking new. Skip the harsh chemicals – they’re not needed and can actually dull the finish over time.
Carpet thrives with regular vacuuming and professional cleaning every 12-18 months. The secret to long carpet life? Address spills immediately. Blot, don’t rub, and use appropriate cleaners for the spill type.
Tile floors need attention to both the tile surface and grout lines. Regular cleaning prevents buildup, but don’t forget to seal grout annually. This prevents staining and keeps moisture from sneaking underneath your beautiful installation.
Conclusion
Your home deserves floors that make you smile every time you walk through the door. Flooring Installation is more than just a home improvement project – it’s an investment in your family’s comfort, your property’s value, and your peace of mind for years to come.
After reading about materials, methods, and contractors, here’s the truth: the right installation team makes all the difference. You can have the most beautiful hardwood or luxury vinyl on the market, but poor installation will turn your dream into a nightmare faster than you can say “warranty void.”
At Romero Hardwood Floors Inc, we’ve been perfecting our craft since 2006, bringing punctual, guaranteed craftsmanship to every project across the greater Boston area. From Beverly’s historic homes to Woburn’s modern developments, we’ve learned that great flooring isn’t just about the materials – it’s about the experience.
Our 18+ years of experience means we’ve seen every challenge imaginable. Squeaky subfloors in century-old Marblehead homes? We’ve got it covered. Moisture issues in Revere basements? No problem. Complex transitions in open-concept Winchester layouts? That’s just another Tuesday for our team.
We serve homeowners and commercial property owners throughout Beverly, Chelsea, Danvers, East Boston, Gloucester, Lynnfield, Malden, Manchester by the Sea, Marblehead, Medford, Melrose, Nahant, Peabody, Reading, Revere, Rockport, Salem, Saugus, Somerville, Stoneham, Swampscott, Wakefield, Winchester, Winthrop, and Woburn with the same commitment to excellence.
The stress-free experience you deserve starts with our first conversation. We handle the heavy lifting – literally and figuratively. From measuring your space to moving furniture, from subfloor preparation to final cleanup, we take care of everything so you can focus on the fun part: enjoying your gorgeous new floors.
Long-term value comes from doing things right the first time. Our guaranteed workmanship, competitive pricing, and attention to detail mean you’ll be walking on beautiful floors for decades, not dealing with callbacks and repairs next year.
Ready to transform your space? Your dream floors are just a phone call away. Contact Romero Hardwood Floors Inc today for your free consultation and find why we’ve been the trusted choice for discerning homeowners who want it done right.
For comprehensive guidance on your next project, explore our Hardwood Floor Installation Guide and take that first exciting step toward floors that will make your house feel like the home you’ve always wanted.
