Gluing Solid Hardwood Floors to Concrete: 5 Powerful Benefits 2025
The Reality of Gluing Solid Hardwood to Concrete
Let’s get straight to what many homeowners are wondering about. Gluing solid hardwood floors to concrete is indeed possible, though it comes with some important considerations.
Can you glue solid hardwood directly to concrete?
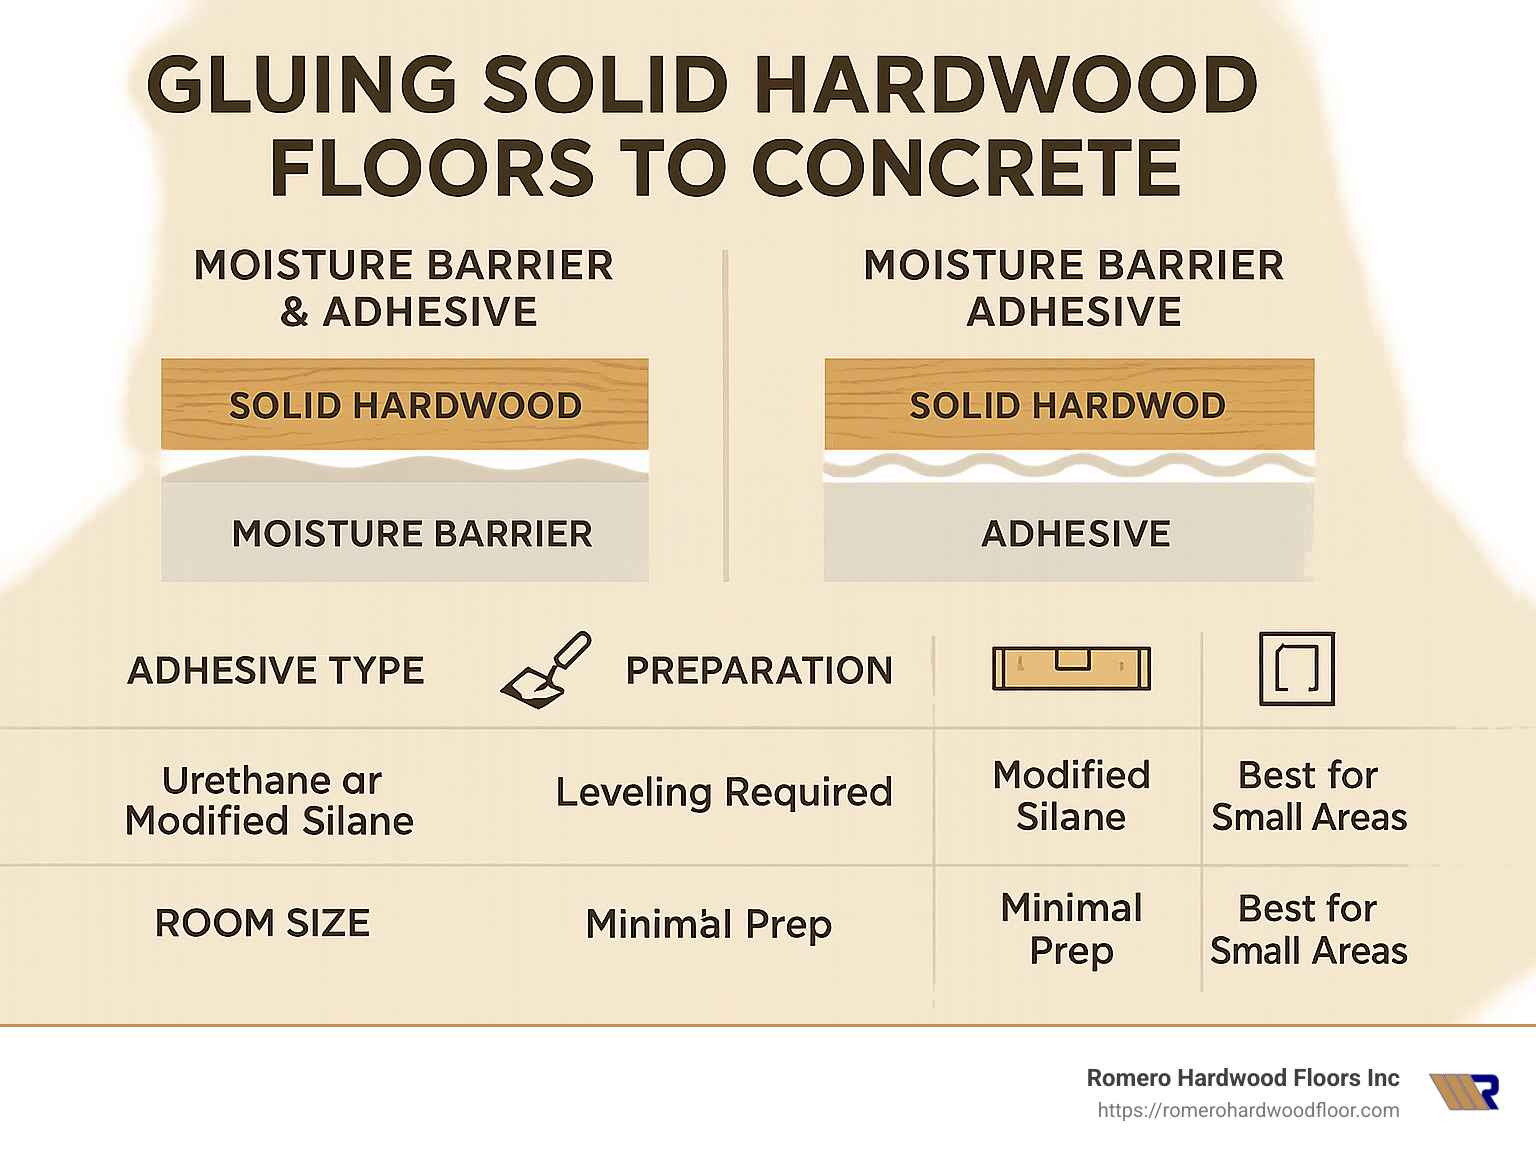
- Yes, but with limitations – Best for small areas under 60 square feet
- Requires proper preparation – Moisture testing, subfloor leveling, and vapor barriers are essential
- Special adhesives needed – Use urethane or modified silane adhesives with high shear strength
- Consider alternatives – Engineered hardwood is generally better suited for concrete installation
The conventional wisdom around hardwood installation has evolved significantly over the years. I remember when many pros would flat-out refuse to glue solid hardwood to concrete! Today, thanks to advances in adhesive technology and installation techniques, what was once considered impossible is now a viable option in certain situations.
That said, this isn’t a project to take lightly. The major challenges include managing moisture that naturally transfers from concrete, accommodating wood’s natural expansion and contraction cycles, and ensuring the adhesive maintains its grip over decades. Without proper preparation and execution, you might find your beautiful new floors buckling, cupping, or even detaching within just a few months.
I’m Francisco Romero, owner of Romero Hardwood Floors Inc. With over 15 years of experience installing hardwood flooring, I’ve successfully completed numerous projects gluing solid hardwood floors to concrete. The key has been developing specialized techniques that account for these unique challenges to ensure lasting, beautiful results.
If you’re exploring options for hardwood over concrete, you might also find these related guides helpful:
– floating wood floor over concrete
– heated hardwood floors on concrete
– installing hardwood floors on concrete slab
Each method has its own advantages, and understanding the differences will help you make the best choice for your specific situation. In the following sections, we’ll dive deeper into exactly when gluing solid hardwood floors to concrete makes sense, and how to do it properly if you decide to go this route.
Gluing Solid Hardwood Floors to Concrete: When It Makes Sense
Despite what many industry professionals might tell you, gluing solid hardwood floors to concrete can be successful under the right conditions. At Romero Hardwood Floors, we’ve found that about 10% of hardwood installations over concrete can be suitable for solid hardwood, while the remaining 90% are better served by engineered products.
I remember one homeowner in Revere who called us after the project was complete, absolutely thrilled with his decision: “I was amazed how strong the floor was after the glue cured. You couldn’t move these boards with a sledgehammer!” He had installed solid maple directly over concrete using proper moisture barriers and adhesives.
The key is understanding when this installation method makes sense:
| Installation Method | Best For | Challenges | Cost Range | Moisture Resistance |
|---|---|---|---|---|
| Glue-Down Solid | Small areas (<60 sq ft), Above-grade | High adhesive cost, Limited expansion | $10-30/sq ft | Moderate with barrier |
| Nail-Down (requires plywood) | Traditional installations, Any size room | Added height, Extra labor | $12-35/sq ft | Good |
| Floating Floor | DIY, Large areas, Basements | Can sound hollow, Not solid hardwood | $8-25/sq ft | Excellent |
Why choose glue-down over concrete?
There are several compelling reasons why homeowners and contractors might opt for gluing solid hardwood floors to concrete:
Sound deadening is a major benefit. A full-spread adhesive creates a continuous bond that minimizes hollow sounds and echoing footsteps. This is particularly valuable in multi-story buildings or homes with open floor plans where acoustics matter.
The low profile installation is another advantage. Unlike nail-down methods that require a plywood subfloor (adding ¾” height), glue-down directly to concrete maintains the original floor height. This becomes crucial when matching to existing floors or when door clearances are tight.
Thermal conductivity is a third benefit that surprises many homeowners. For homes with radiant heating systems embedded in concrete slabs, direct glue-down provides superior heat transfer compared to installations with plywood underlayment.
One Massachusetts client in Revere shared her experience with us: “We needed to match our existing hardwood in the living room, but the kitchen had a concrete slab. The glue-down method gave us a seamless transition without a height difference at the doorway. It looks like it was all installed at the same time!”
Primary challenges of gluing solid hardwood floors to concrete
Before deciding on this installation method, it’s important to understand the significant challenges involved:
Seasonal movement presents the biggest physical challenge. Solid hardwood naturally expands and contracts with seasonal humidity changes. When glued to concrete, this movement is restricted, potentially causing buckling or gaps if not properly accommodated. This is why room size limitations are so important when considering gluing solid hardwood floors to concrete.
Moisture management is absolutely critical. As one flooring expert we work with notes, “Moisture is the leading cause of failure in glued-down solid hardwood floors over concrete, with improper moisture testing or barriers responsible for up to 80% of installation issues.” This isn’t something to take lightly or skip to save money.
The adhesive expense can be surprising to homeowners. A full trowel glue-down installation requires significant quantities of specialty adhesive. Five gallons of premium adhesive typically covers only about 130 square feet, making this method considerably more expensive than others. When we explain this to clients, they often need to reconsider their budget expectations.
Preparing the Concrete: Moisture, Flatness, Cleanliness
The success of gluing solid hardwood floors to concrete depends almost entirely on proper subfloor preparation. I’ve seen countless beautiful installations fail within months simply because someone rushed through this critical stage. Trust me, the extra time spent here pays dividends for decades!
Moisture testing & barriers are non-negotiable
Concrete slabs are like giant sponges – even ones that look bone-dry can silently transmit moisture vapor that will destroy your hardwood investment. This isn’t something you can eyeball or guess at:
“I thought my 2-year-old basement slab was dry enough,” shares Marcus from Revere. “Six months after installation, my beautiful oak floor started cupping. Turns out my concrete was releasing moisture equivalent to a small pond!”
Professional moisture testing is absolutely essential:
A hygrometer test using the ASTM F-2170 protocol involves drilling small holes in your concrete and placing sensors to measure internal moisture. For solid hardwood, you need readings below 75% relative humidity – anything higher spells trouble.
Calcium chloride testing (ASTM F-1869) measures the moisture vapor emission rate. Your results should show less than 3 pounds of moisture per 1,000 square feet per 24 hours before proceeding.
New concrete needs time to cure properly. Your slab should be at least 30 days old before testing begins, and slabs younger than 60 days typically contain too much moisture for any hardwood installation.
After testing confirms acceptable moisture levels, you’ll still need proper barriers:
Liquid urethane sealers create a continuous moisture barrier when applied at the correct thickness. Products like Bostik MVP4 work beautifully when properly applied.
6-mil polyethylene sheeting can work in some situations but must be fully adhered to prevent shifting or tearing during installation.
Surface preparation checklist before gluing solid hardwood floors to concrete
Beyond moisture control, the concrete itself needs to be properly prepared:
Your subfloor must be flat within 1/8″ over a 6-foot radius. This isn’t just being picky – even small dips or bumps can break adhesive bonds or cause boards to rock. Use a long straightedge to check multiple areas of your floor, marking problem spots with chalk.
Any high spots should be ground down with a concrete grinder, while low areas need patching with a cement-based leveling compound. This isn’t a job for regular grout or caulk – use products specifically designed for floor leveling.
The concrete must be thoroughly cleaned of all dust, paint drops, oil stains, or other contaminants. Even minor residue can prevent proper adhesion. A shop vacuum followed by a damp mop usually works well, but stubborn stains might require degreasing solutions.
If your concrete has sealers or curing compounds, they’ll need removal before gluing. Test porosity by dropping water on the surface – it should absorb within minutes rather than beading up.
Finally, your HVAC system should be running normally for at least 48 hours before installation begins. This stabilizes the environment and allows the concrete to reach equilibrium with the room’s conditions.
“If vapor pressure exceeds 10 pounds, I always recommend applying a specialized epoxy sealer to block moisture transmission,” notes Francisco at Romero Hardwood Floors. “It’s an extra step that’s saved countless floors over the years.”
Climate control isn’t just for comfort – it’s critical for successful installation. Your indoor temperature and humidity should be maintained at normal living conditions throughout the process and afterward.
For more comprehensive information about preparing concrete subfloors for hardwood installation, visit our detailed subfloor prep guide.
Selecting Adhesive, Wood Species & Expansion Details
Choosing the right materials is critical when gluing solid hardwood floors to concrete. The wrong adhesive or wood species can lead to installation failure regardless of perfect subfloor preparation.
Matching board width & species to glue-down success
Not all hardwood species are equally suitable for glue-down installations on concrete:
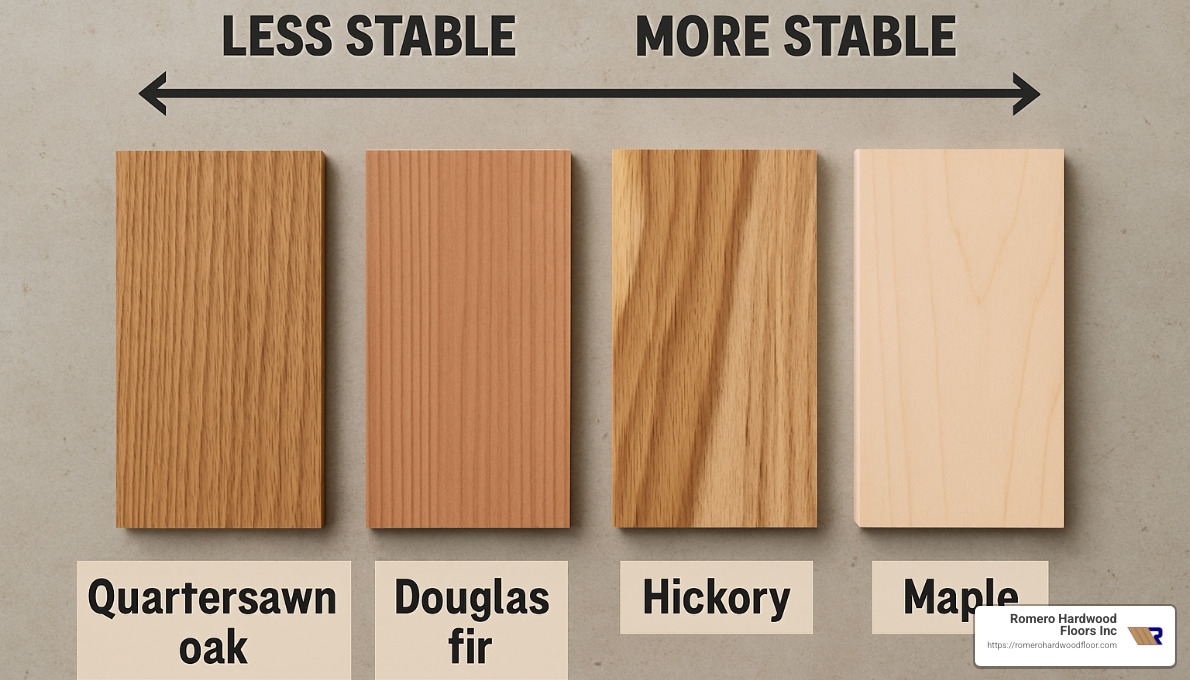
- Dimensionally stable species: Quartersawn oak and Douglas Fir are among the most stable options. As one industry expert notes, “Solid boards for glue-down must be quartersawn for maximum dimensional stability, unlike typical nail-down boards.”
- Width considerations: Narrower boards (2¼” to 4″) are significantly more stable than wider planks. For boards wider than 5″, many professionals recommend a “glue-assist” installation over plywood rather than direct glue to concrete.
- Species to avoid: Hickory and Maple have higher movement coefficients and are generally less suitable for glue-down installations, especially in wider widths.
“Circular-sawn Douglas Fir is one of the most stable species for glue-down solid hardwood over concrete,” according to our experience at Romero Hardwood Floors. “We’ve had excellent long-term results with this species in Massachusetts homes.”
Choosing the right glue for gluing solid hardwood floors to concrete
Adhesive selection is perhaps the most critical decision in the installation process:
- Moisture-cure urethane adhesives: These were the first to enable successful solid hardwood glue-downs and remain popular. Products like Bostik Best offer excellent initial grab and long-term flexibility.
- Modified silane adhesives: These newer formulations offer similar performance to urethanes but with easier cleanup and less moisture content. They’re ideal for sensitive installations.
- Strength ratings: Look for adhesives with shear strength of at least 600 lbs and vapor pressure resistance of 10 lbs or more.
- Width-specific formulations: For solid wood flooring over 150mm (about 6 inches) wide, stronger adhesives such as Sika T54 are required to prevent movement.
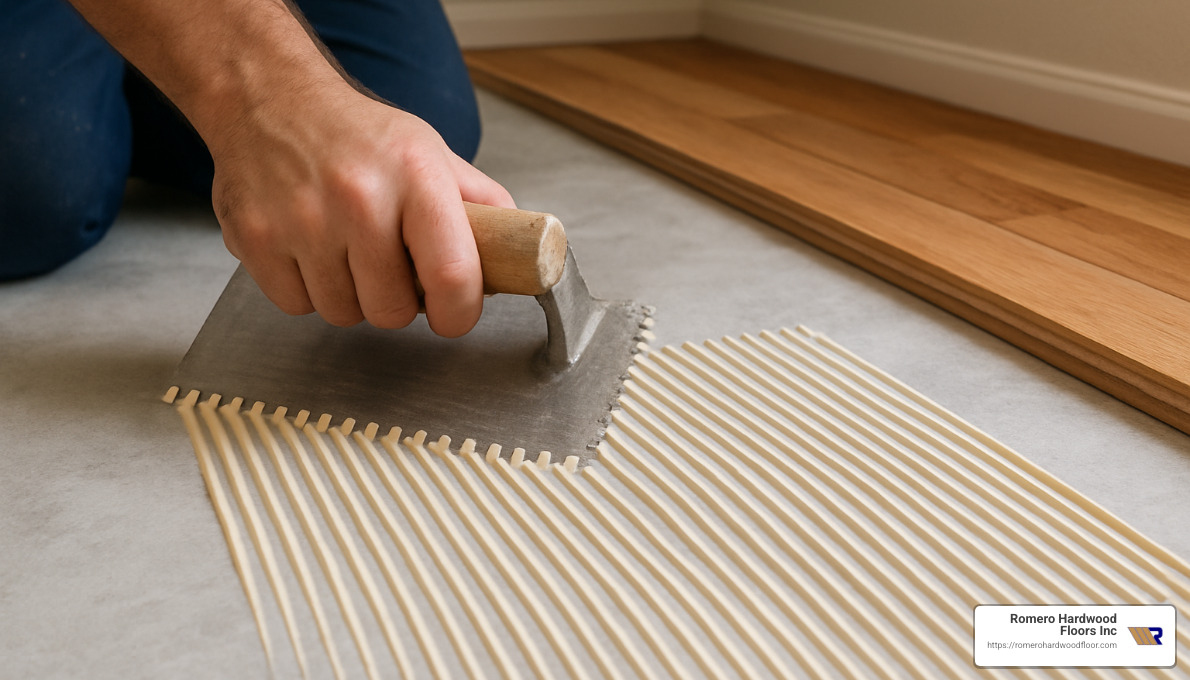
The trowel used to apply adhesive is equally important:
- For moisture barriers: 1/8″ V-notch trowel
- For standard solid hardwood: 1/4″ V-notch trowel
- For wider planks: 1/2″ V-notch trowel
“When spreading glue, use the trowel in a plowing motion (snow plow). Hold the trowel at a 45-degree angle,” advises our installation team at Romero Hardwood Floors.
For more technical information on adhesive selection, read this scientific research on adhesive selection.
Step-by-Step Guide to Gluing Solid Hardwood on Concrete
Now that you understand the prerequisites, let’s walk through the actual process of gluing solid hardwood floors to concrete. At Romero Hardwood Floors, we follow this proven methodology for lasting installations.
Acclimating and dry-laying before gluing solid hardwood floors to concrete
- Acclimation: Bring the hardwood into the installation environment at least 72 hours before installation. Stack the wood with spacers to allow air circulation around all boards.
- Target moisture content: In Massachusetts, the equilibrium moisture content (EMC) for hardwood typically ranges from 6-9%. Use a moisture meter to verify your flooring has reached this range.
- Dry layout: Before opening any adhesive, lay out the first few rows to plan your installation pattern. This helps identify any potential problems and ensures an aesthetically pleasing result.
- Rack selection: Select boards from multiple boxes to ensure color variation is distributed naturally throughout the floor.
“Acclimation is often overlooked, but it’s absolutely critical,” explains our lead installer. “We’ve seen perfectly good materials fail simply because they weren’t allowed to reach equilibrium with the home’s environment.”
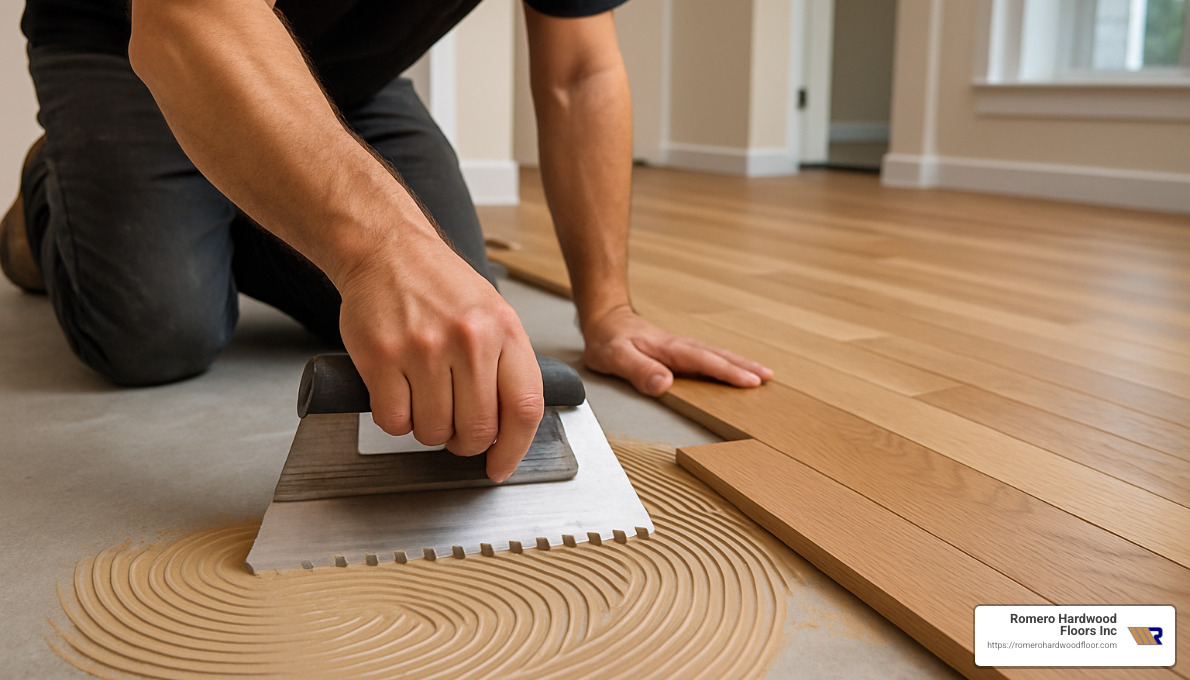
Full-spread application & board placement
- Snap chalk lines: Create perpendicular reference lines in the center of the room to ensure your installation remains square.
- Apply adhesive in sections: Work in manageable areas of about 3 feet wide. Spread adhesive using the recommended trowel, creating consistent ridges.
- Board placement: Place the first row along your chalk line, pressing firmly into the adhesive. Continue adding rows, making sure each board is snug against its neighbors.
- Check coverage: Periodically lift a board to verify 100% adhesive transfer to the wood. If you see concrete showing through, you need more adhesive or a different trowel size.
- Secure as you go: Use blue painter’s tape every 12-18 inches to hold boards together while the adhesive sets. For wider planks, consider using flooring clamps or weights.
Expansion gaps, cures & first-traffic rules
- Maintain expansion space: Leave a 1/2″ gap around all perimeter walls and fixed objects. This accommodates natural wood movement and is essential even with glue-down installations.
- Cure time: Most adhesives require 24 hours before light foot traffic and 72 hours before furniture placement or heavy traffic.
- Initial protection: Cover the newly installed floor with breathable floor protection if other construction work will continue in the space.
- Baseboard installation: Install baseboards and trim after the floor has fully cured, ensuring they don’t compress the floor or restrict movement.
“I was amazed how strong the floor was after the glue cured,” one homeowner reported. “The bond was so solid that the floor felt and sounded just like it was installed over a traditional wooden subfloor.”
Common mistakes to avoid
Based on our experience at Romero Hardwood Floors, here are the most frequent errors we see with DIY installations:
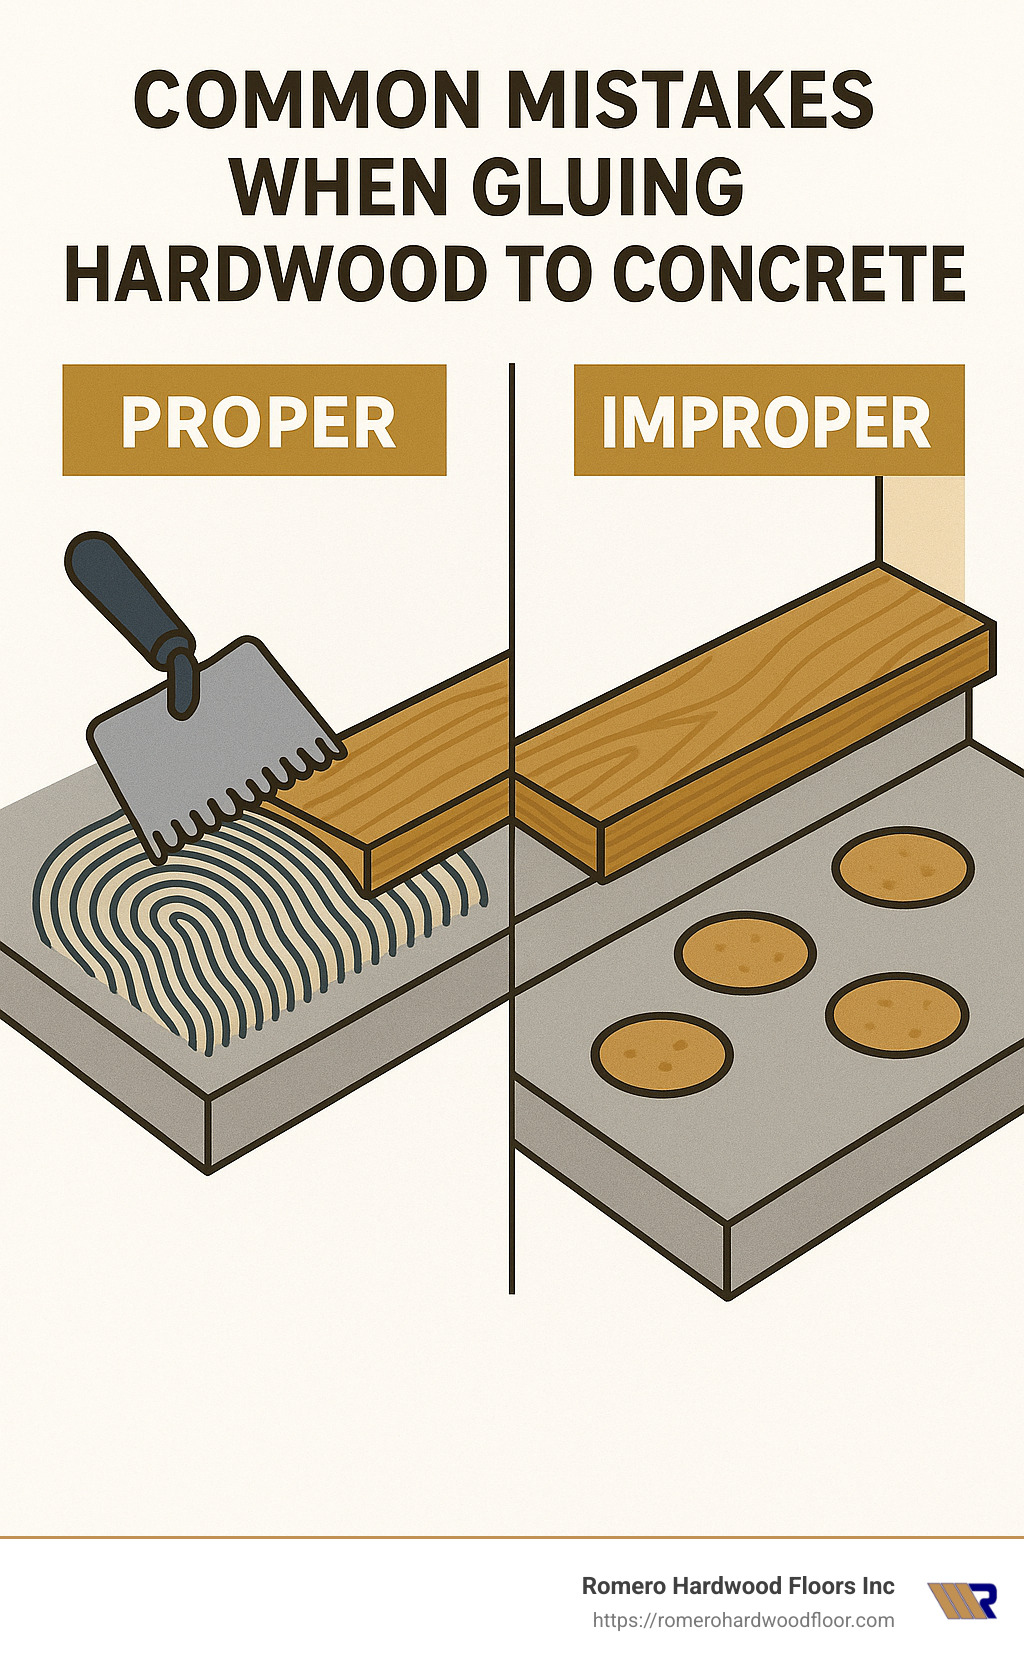
- Spot bonding: Applying adhesive only in spots rather than a full spread leads to hollow sounds and potential board separation.
- Skipping moisture testing: “Trust but verify” is our motto. Even new concrete slabs can have excessive moisture.
- Using the wrong trowel: This results in either too much adhesive (wasteful and messy) or too little (insufficient bond).
- Eliminating expansion gaps: Even glued-down floors need room to move with seasonal changes.
- Inadequate adhesive open time: Following the manufacturer’s guidelines for “open time” before placing boards is critical for proper adhesion.
Costs, Tools, Maintenance & FAQs
When considering gluing solid hardwood floors to concrete, understanding the financial commitment and practical aspects helps set realistic expectations for your project.
Most homeowners are surprised by the true cost breakdown of this specialized installation method. Based on our experience at Romero Hardwood Floors, a typical project ranges from $10-$18 per square foot, though premium installations with exotic woods or complex patterns can reach $30 per square foot.
“The adhesive alone can be a significant expense,” explains Francisco Romero. “But it’s the one area where cutting corners inevitably leads to failure.”
Here’s what typically drives the cost:
– Solid hardwood materials: $5-$15 per square foot
– Premium adhesive: $1.50-$4 per square foot
– Moisture barrier systems: $1-$3 per square foot
– Professional labor: $3-$8 per square foot
Note: These are average costs based on internet data and not actual costs for Romero Hardwood Floors.
The specialized tools required make this installation less DIY-friendly than other methods. Professional installers rely on moisture testing equipment, concrete grinders, specialized notched trowels, heavy floor rollers (150 lbs or more), and flooring straps or blue painter’s tape to ensure proper adhesion.
“The right trowel makes all the difference,” notes our lead installer. “We’ve seen beautiful floors fail because someone used a 1/8″ trowel when the job required a 1/4″ V-notch.”
Maintaining glued-down hardwood requires some special considerations too. While day-to-day cleaning remains the same as any hardwood floor, repairs can be significantly more challenging. When boards are damaged, removing them without disturbing adjacent planks requires patience and specialized tools. Additionally, it’s important to monitor for any signs of moisture intrusion, particularly around exterior walls or plumbing fixtures.
Frequently Asked Questions about Gluing Solid Hardwood Floors to Concrete
Will gluing void my floor’s warranty?
This is perhaps the most common concern we hear from Revere homeowners. The truth is, many manufacturers specifically exclude solid hardwood installations directly over concrete from their warranties. This doesn’t mean you shouldn’t do it—just that you need to understand the implications.
“Always check with your specific flooring manufacturer before proceeding,” advises Francisco Romero. “Some will honor warranties if you follow their exact installation protocols and use approved adhesives.”
At Romero Hardwood Floors, we recommend documenting all preparation steps with photos and keeping adhesive packaging. This documentation can help with potential warranty claims. When we install floors using this method, we provide our own workmanship warranty to give homeowners additional peace of mind.
How does glued solid hardwood compare to engineered for durability?
Both options can provide decades of beautiful service when properly installed, but they offer different long-term benefits.
Solid hardwood glued to concrete offers remarkable longevity—potentially 50+ years—because it can be sanded and refinished multiple times (typically 5-7 complete refinishings over its lifespan). The downside is the higher risk of moisture-related issues when installed over concrete.
Engineered hardwood typically can be refinished 1-3 times depending on veneer thickness. What makes it particularly well-suited for concrete installations is its dimensional stability. The cross-layered construction makes it significantly less prone to cupping or buckling when moisture conditions change.
“For concrete subfloors, engineered products often make more sense,” explains our installation team. “The substrate doesn’t move with humidity changes, but solid wood does. This mismatch is what causes most problems.”
Can I glue over a heated concrete slab?
Yes, but this requires additional precautions. Radiant heating systems embedded in concrete create special considerations:
Your heating system must be fully operational for at least 2 weeks before installation begins. The surface temperature should never exceed 80°F (27°C), and temperature changes must be gradual—no more than 5°F per day. You’ll also need adhesives specifically rated for use with radiant heat systems.
“We’ve successfully installed solid hardwood over radiant systems in several Revere homes,” notes Francisco. “The key is proper acclimation with the heating system operating at normal temperatures throughout the process.”
For more information about maintaining your hardwood floors for decades of beauty, visit our maintenance guide.
Conclusion
Gluing solid hardwood floors to concrete isn’t just possible—it’s a viable option that can deliver stunning results when done correctly. After guiding you through the complexities of this specialized installation method, let’s recap what we’ve learned together.
The journey of installing solid hardwood directly over concrete begins with meticulous preparation. As we’ve seen, moisture testing isn’t just a recommendation—prevent future heartache. One homeowner told me, “I wish someone had emphasized moisture testing before my first installation. It would have saved me thousands in repairs.”
The beauty of a properly executed glue-down installation lies in its seamless appearance and solid feel underfoot. When you choose the right materials—stable wood species, appropriate board widths, and quality adhesives—your floor can withstand the test of time despite the challenges of a concrete substrate.
At Romero Hardwood Floors, we’ve transformed countless concrete slabs into warm, inviting hardwood spaces throughout Revere and surrounding Massachusetts communities. Our experience has taught us that while this installation method requires specialized knowledge, the results can be truly exceptional when done right.
“The most rewarding part of our job is when clients call us years later to say their glued-down hardwood floors still look and perform beautifully,” says Francisco Romero, our founder. “That’s when we know we’ve truly delivered on our promise of quality.”
For homeowners considering this installation method, remember these critical factors for success:
- Choose wisely: Not every space is suitable for glued-down solid hardwood. Small to medium-sized rooms above grade typically yield the best results.
- Invest in preparation: The time and materials spent on proper moisture barriers and concrete preparation pay dividends in longevity.
- Select compatible materials: Quartersawn oak and narrower boards offer greater dimensional stability when bonded to concrete.
- Consider professional installation: The specialized knowledge required often makes professional installation the wisest investment for long-term satisfaction.
While gluing solid hardwood floors to concrete requires more technical knowledge than traditional installations, the reward is a beautiful, durable floor that can improve your home for decades. The low-profile installation, sound-deadening properties, and seamless appearance make it worth considering for the right applications.
At Romero Hardwood Floors Inc., we bring over 15 years of experience and Massachusetts-specific knowledge to every project. We understand the unique challenges of New England’s seasonal climate shifts and how they affect hardwood installations over concrete.
Whether you’re renovating a historic Revere home or updating a modern space in Chelsea or Beverly, we’re here to help you steer the complexities of hardwood flooring with confidence and clarity.
For more information about our professional installation services or to discuss your specific project needs, visit our installation services page or contact us for a personalized consultation.
Your beautiful hardwood floors await—let’s create them together.
