Hardwood floor installation timeline: Top 5 essential tips
Hardwood floor installation timeline is crucial for home and business owners planning renovation projects. An average project could take one to seven days, influenced by factors like area size, flooring type, and installation complexity.
A small room may be done in a day, while larger areas demand more time for precision and quality. Solid hardwood requires longer due to acclimation, while engineered wood is quicker. Pre-installation tasks like subfloor preparation also affect timelines.
I’m Francisco Romero, owner of Romero Hardwood Floors Inc., with over 15 years of experience in crafting beautiful hardwood floors. Knowing the intricacies of the hardwood floor installation timeline, I can guide you through achieving stunning spaces on schedule.
Hardwood floor installation timeline word roundup:
– Hardwood floor installation guide
– Hardwood floor installation mistakes
– Hardwood floor underlayment types
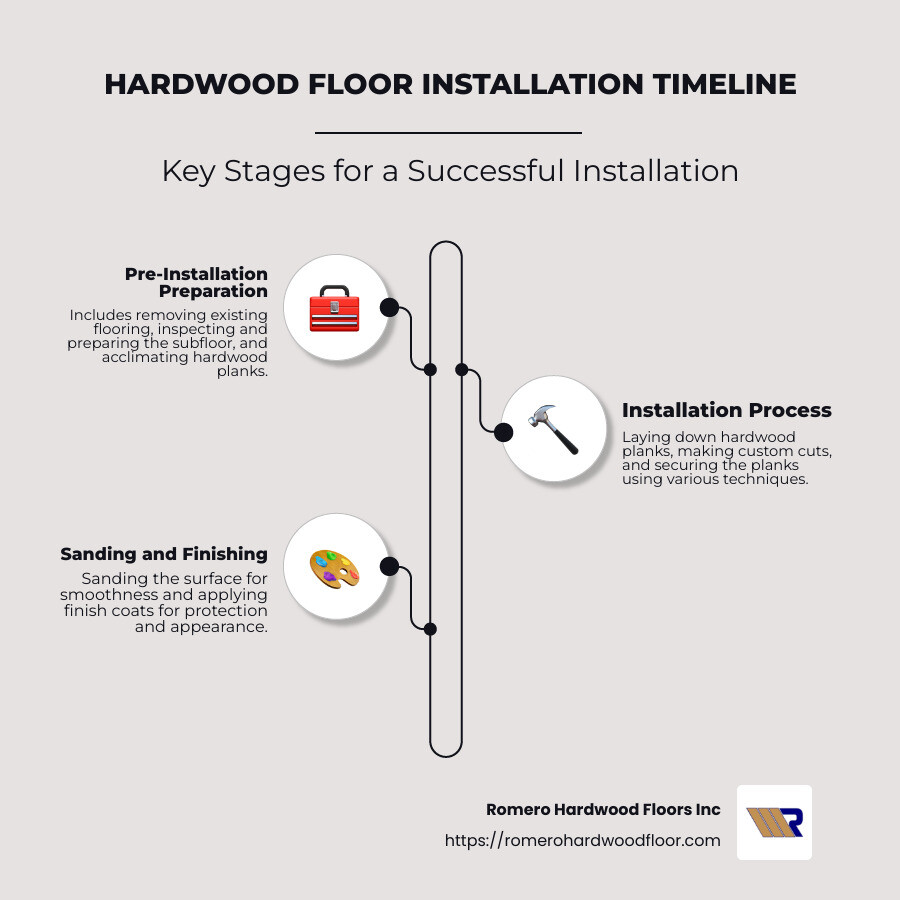
Pre-Installation Preparation
Before diving into the hardwood floor installation, prepare the area thoroughly. This step sets the stage for a smooth and successful installation. Let’s break down the essential tasks involved in pre-installation preparation.
Removing Existing Flooring
The first task is to remove any existing flooring, whether it’s carpet, tile, or laminate. This process creates a clean slate for the new hardwood. Carpet removal involves pulling up the carpet and padding, while tile and laminate removal may require specialized tools to break and lift the materials. Each type of flooring presents its own challenges, but the goal is a bare subfloor ready for inspection.
Subfloor Inspection and Preparation
Once the old flooring is out, it’s time to inspect the subfloor. This step is critical as the subfloor serves as the foundation for your hardwood. Look for imperfections such as dips, bumps, or cracks. If you find any, you’ll need to use leveling compounds or perform subfloor repairs to ensure a flat, even surface. A well-prepared subfloor prevents future issues like warping or squeaking.
Acclimating Hardwood Planks
Acclimation is a vital step in the hardwood floor installation timeline. Hardwood is sensitive to environmental conditions like temperature and humidity. Allowing the wood to acclimate helps prevent future problems such as cupping or gapping. To acclimate, store the hardwood planks in the installation area for at least three days. Cross-stack the planks to promote air circulation on all sides. This process ensures the wood adjusts to the room’s moisture content and temperature.
By following these pre-installation steps, you set a solid foundation for your hardwood flooring project. Next, we’ll explore the actual installation process, including laying planks and securing them in place.
Installation Process
Once the pre-installation preparation is complete, it’s time to start the actual installation. This phase involves laying down the hardwood planks, making custom cuts, and securing the planks in place. Each step is crucial for achieving a beautiful and durable hardwood floor.
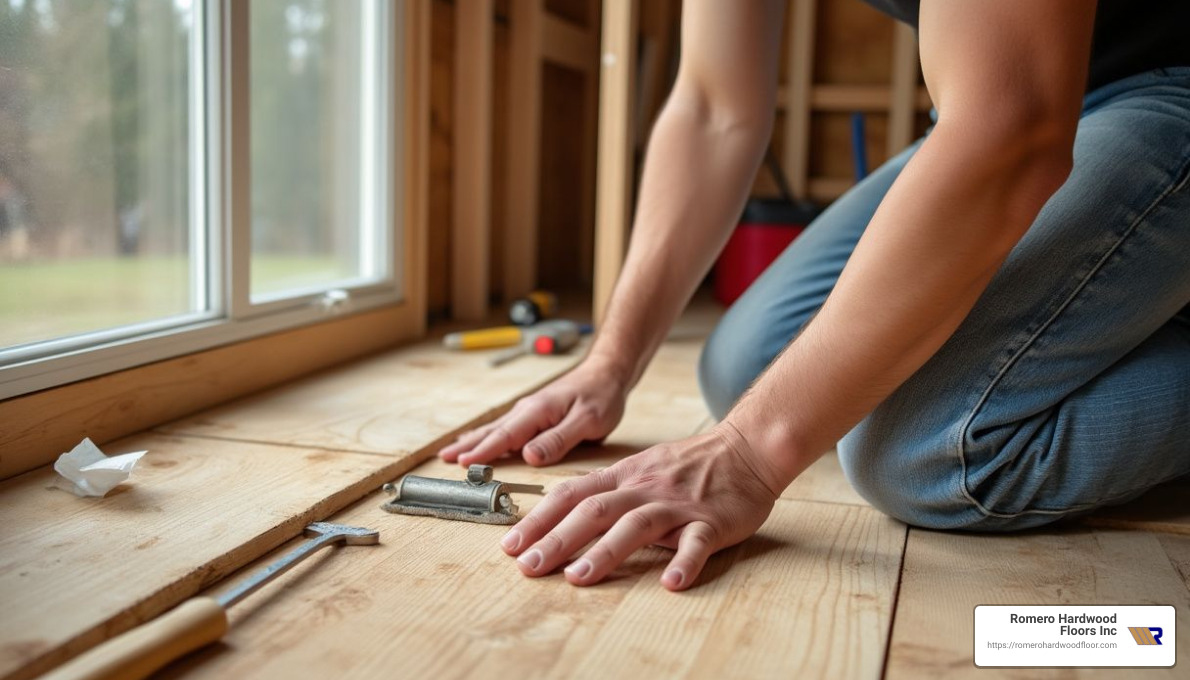
Laying Down Hardwood Planks
The first step in the installation process is laying down the hardwood planks. This involves arranging the planks according to the chosen pattern. Common patterns include the classic straight layout, the stylish herringbone, or the intricate parquet design.
- Straight Layout: This is the most straightforward method where planks are laid parallel to each other, creating a clean and timeless look.
- Herringbone: This pattern offers a zigzag design that adds a touch of elegance to any room. It’s more complex than a straight layout and requires precise alignment.
- Parquet Design: This involves creating geometric patterns and requires a high level of skill to ensure each piece fits perfectly.
Custom Cuts and Fitting
As you lay the planks, you’ll encounter areas that require custom cuts. These are typically around doorways, corners, and other architectural features. Custom cuts ensure that the flooring fits seamlessly throughout the space.
- Doorways and Corners: Precision is key. Installers use specialized saws to cut planks to fit snugly around these obstacles.
- Architectural Features: Features like columns or built-in furniture may require intricate cuts to maintain the flow and integrity of the design.
Securing the Planks
Once the planks are laid and custom cuts are complete, securing the planks is the next step. This can be done using various techniques, each suited to different types of hardwood and subfloor conditions.
- Nailing: This method involves driving nails through the planks into the subfloor. It’s commonly used for solid hardwood floors.
- Stapling: Similar to nailing, but using staples. This method offers a strong hold and is often used for engineered hardwood.
- Gluing: In this technique, adhesive is applied to the subfloor before laying the planks. It’s ideal for ensuring stability and reducing noise, especially in large open areas.
Each technique has its advantages, and the choice depends on factors like the type of hardwood and the condition of the subfloor. Proper securing ensures that the flooring remains stable and beautiful for years to come.
As you can see, the installation process is a meticulous task that requires skill and precision. With the planks laid, cut, and secured, the next step is sanding and finishing to achieve a flawless surface.
Sanding and Finishing
Once the hardwood planks are securely in place, the next crucial step is sanding and finishing. This process not only improves the floor’s appearance but also ensures its longevity and durability.
Sanding
Sanding is essential for creating a smooth surface and removing any imperfections that might have occurred during installation. This step requires specialized equipment like drum sanders and edge sanders to achieve a uniform finish across the entire floor.
- Smooth Surface: The goal of sanding is to create a perfectly smooth surface that is ready to receive the finish. This involves multiple passes with increasingly fine grits of sandpaper, starting with a coarse grit to remove major imperfections and ending with a fine grit to polish the surface.
- Imperfections Removal: Any unevenness, scratches, or blemishes left from the installation are carefully sanded away. This step is crucial for ensuring that the final finish adheres properly and looks flawless.
Applying Finish Coats
After sanding, the floor is ready for the application of finish coats. These coats serve to protect the wood, improve its natural beauty, and provide durability against daily wear and tear.
- Types of Finishes: There are primarily two types of finishes used: oil-based and water-based. Each has its own set of benefits and considerations.
- Oil-Based Finishes: These finishes are known for their durability and rich, warm tones. They take longer to dry, often requiring several days of curing time, but offer a deep, lustrous finish that improves the wood grain.
- Water-Based Finishes: These are more environmentally friendly, dry faster, and have a minimal odor. They provide a clear finish that doesn’t yellow over time, making them ideal for maintaining the wood’s natural color.
- Protection and Durability: The finish acts as a barrier against moisture, stains, and scratches, ensuring the hardwood floor remains beautiful and resilient.
- Drying Time: The drying and curing time varies depending on the type of finish used. While water-based finishes can dry within a few hours, oil-based finishes may require several days before the floor can be used. It’s important to follow the manufacturer’s recommendations for drying times to ensure the finish sets properly.
In conclusion, sanding and finishing are vital steps in the hardwood floor installation timeline. They not only improve the floor’s aesthetic appeal but also provide the necessary protection for long-lasting beauty. With the finishing touches complete, your hardwood floors are ready to be enjoyed for years to come.
Factors Affecting Hardwood Floor Installation Timeline
When planning your hardwood floor installation, understanding the factors that influence the timeline is key. Let’s explore the main aspects that can affect how long your project will take.
Size of the Area
The size of the area where you plan to install hardwood flooring is a major factor. Generally, larger spaces require more time. For example, installing hardwood in a single bedroom might be done in a day, while an entire house can take several days. Professional installers typically manage 800 to 1,000 square feet per day with a two-person crew. Always discuss your specific square footage with your installer to set realistic expectations.
Type of Hardwood
The type of hardwood you choose also impacts the timeline. Solid hardwood often requires more time due to acclimation and complex installation techniques. It needs to adjust to your home’s humidity and temperature, which can add a few days to the timeline. In contrast, engineered hardwood is more stable and requires less acclimation. Exotic species may also take longer due to their unique characteristics and installation requirements.
Subfloor Condition
The condition of your subfloor can significantly alter the installation schedule. If the subfloor is uneven or damaged, it might need repairs or leveling before hardwood installation begins. According to HomeAdvisor, subfloor repairs can cost between $1,500 and $3,000, depending on the extent of the damage. Proper subfloor preparation is crucial for a successful installation and can add time to the project.
Customizations
Customizations like intricate patterns or designs can extend the installation timeline. For instance, installing a herringbone or chevron pattern can add up to 30% more time compared to a straightforward layout. Additionally, inlays, borders, and other decorative elements require meticulous planning and craftsmanship, which can further increase the time needed.
Accessories and Trim Work
The final touches, such as installing baseboards, transitions, and molding, are essential for a polished look but can also lengthen the installation process. Precise measurements and cutting are necessary to ensure a seamless transition between different flooring materials or elevations. The average cost for installing baseboards ranges from $1 to $6 per linear foot, depending on material and complexity.
Each of these factors plays a role in determining the overall hardwood floor installation timeline. By understanding these elements, you can better plan your project and communicate effectively with your flooring professionals to achieve a smooth and timely installation.
Frequently Asked Questions about Hardwood Floor Installation Timeline
Understanding the timeline of hardwood floor installation can help you plan better and reduce disruptions. Here are some common questions and answers to guide you.
How long do you have to stay off hardwood floors after installation?
After installing hardwood floors, it’s important to let them settle to avoid damage. Generally, you should avoid walking on the floors for at least 24 to 48 hours. If you must walk on them, do so in socks only to prevent scuffing. Keep pets off during this period as well.
The type of finish applied can also affect this timeline. Water-based finishes dry faster and might allow light foot traffic sooner, while oil-based finishes take longer to cure, requiring you to stay off the floors for a bit longer.
How long does it take to install 1000 square feet of hardwood floors?
The installation time for hardwood floors largely depends on the size of the area and the crew’s efficiency. A typical two-person crew can install between 800 to 1,000 square feet per day. For a 1,000-square-foot area, expect the project to take about one to two days.
However, this is just the installation phase. You should also consider additional time for preparation, acclimation, and finishing. The overall project duration can extend to several days when these factors are included.
How long should hardwood sit in the house before installing?
Acclimation is a crucial step in the hardwood floor installation timeline. It involves letting the hardwood planks adjust to the temperature and humidity of your home. This process helps prevent future issues like warping or gaps.
Hardwood should sit in the installation area for a minimum of three days before installation. Proper storage and air circulation are essential during this time to ensure the wood acclimates evenly. This step is especially important for solid hardwood, which is more sensitive to environmental changes than engineered hardwood.
By considering these factors, you can better plan your hardwood floor installation and ensure a smooth process from start to finish.
Conclusion
At Romero Hardwood Floors Inc, we believe that installing hardwood floors is more than just a home improvement task—it’s a change that improves the beauty and value of your space. With our expert guidance and commitment to exceptional service, we ensure a successful installation process that leaves you with stunning, durable hardwood flooring.
Our team, based in Revere, MA, has been specializing in hardwood flooring installations since 2006. We pride ourselves on our competitive pricing, punctuality, and guaranteed workmanship. We understand that every project is unique, and we tailor our services to meet your specific needs, ensuring your satisfaction from start to finish.
Choosing the right flooring contractor is crucial for a successful installation. With our extensive experience and dedication to quality, we provide the expertise you need to steer the complexities of hardwood floor installation. From pre-installation preparation to the final touches, we handle every aspect with precision and care.
Transform your space with beautiful hardwood flooring by partnering with us. Our commitment to quality craftsmanship ensures that your new floors will not only look fantastic but also stand the test of time.
For more information about our services or to schedule a consultation, visit our hardwood flooring contractors page. Let us help you bring your vision to life with floors that combine elegance, durability, and timeless style.
