Concrete Solutions: How to Install Hardwood Floors on a Slab
hardwood floor on a slab: 7 Powerful Solutions for 2025
Changing Your Concrete Slab into a Beautiful Hardwood Floor
Yes, you can install a hardwood floor on a slab, but proper preparation is essential. Here’s what you need to know:
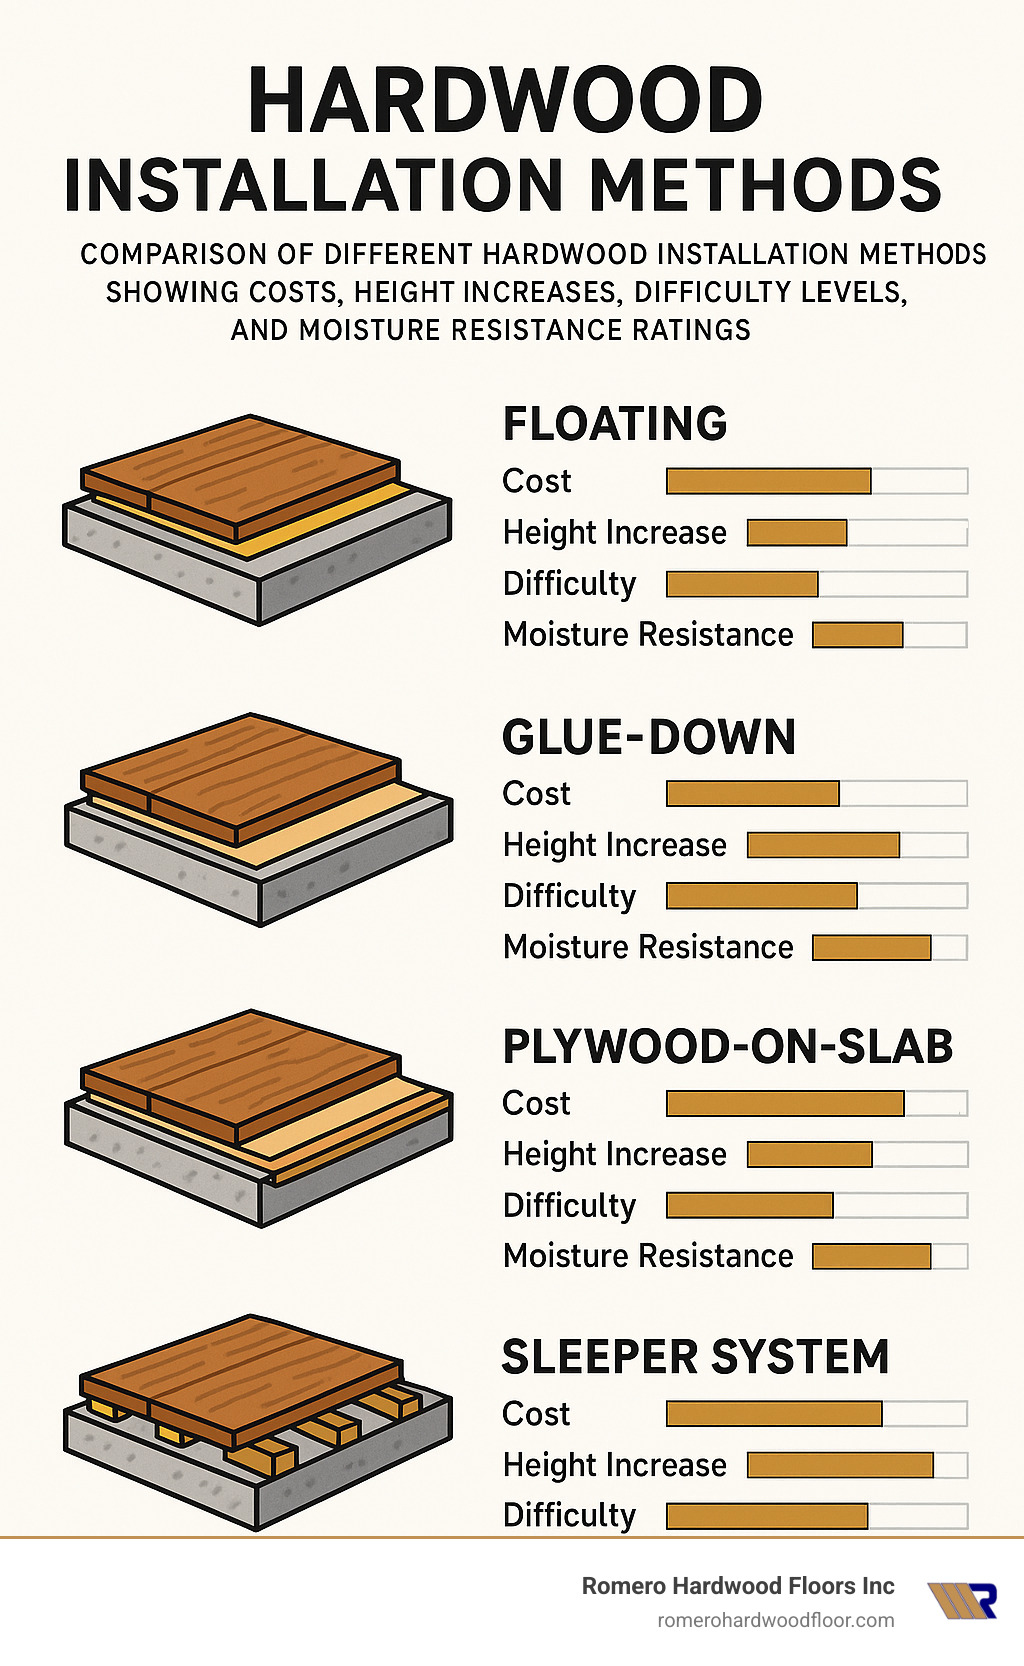
| Installation Method | Best For | Moisture Control Needed | Height Added |
|---|---|---|---|
| Floating Floor | DIY, quick installation | Vapor barrier required | 0.5-0.75″ |
| Glue-Down | Low profile, direct bond | Slab sealer mandatory | 0.25-0.5″ |
| Plywood Subfloor | Traditional feel, solid wood | Vapor barrier + plywood | 1-1.5″ |
| Sleeper System | Maximum stability | Comprehensive barriers | 1.5-2.5″ |
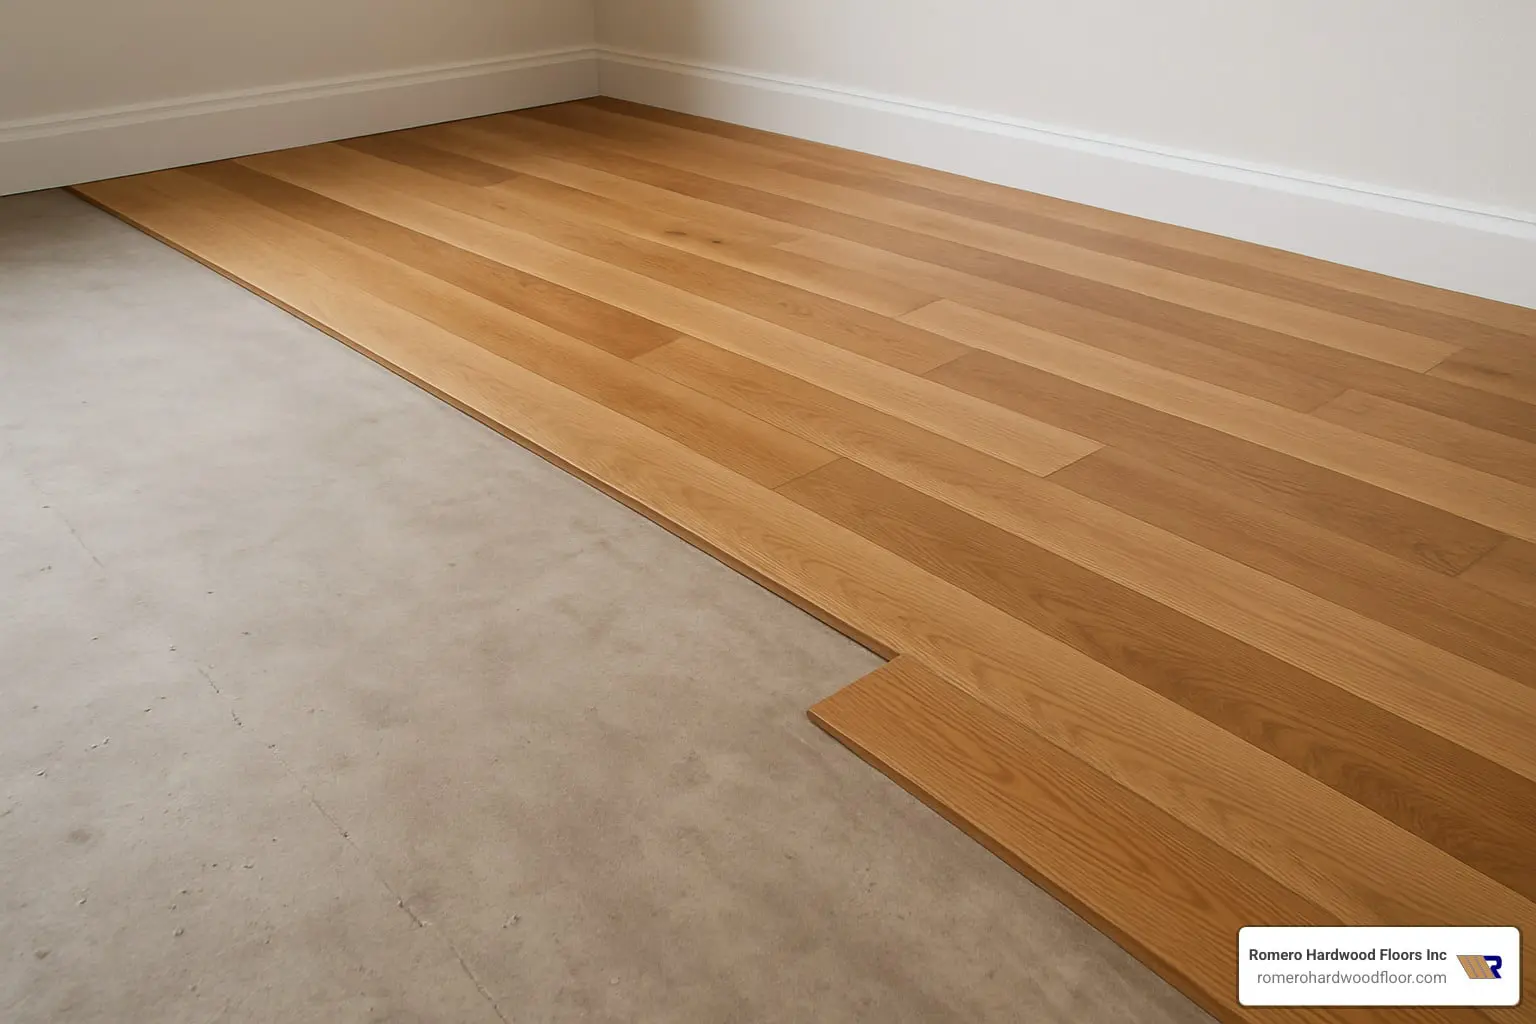
Installing a hardwood floor on a slab requires careful planning and moisture management. Concrete slabs naturally contain and transmit moisture, which can damage wood flooring if not properly controlled. The good news? With the right preparation techniques, material choices, and installation methods, you can enjoy the warmth and beauty of hardwood floors even on concrete foundations.
The key challenge lies in creating an effective moisture barrier between your concrete and wood. Unlike traditional wood subfloors, concrete slabs require specific preparation to ensure your hardwood investment remains stable and beautiful for decades. Your installation approach will depend on several factors: the age of your slab, its moisture content, its grade level (above, on, or below grade), and whether you’re choosing solid or engineered hardwood.
I’m Francisco Romero, owner of Romero Hardwood Floors Inc., and I’ve successfully installed hardwood floor on a slab for hundreds of clients throughout my 15+ years in the hardwood flooring industry, developing specialized techniques for ensuring long-lasting installations in even the most challenging concrete environments.
Handy hardwood floor on a slab terms:
– heated hardwood floors on concrete
– gluing solid hardwood floors to concrete
– floating wood floor over concrete
Understanding the Challenges of Hardwood Floor on a Slab
Ever wonder why installing hardwood floor on a slab requires special attention? It’s like bringing together two people with completely opposite personalities and expecting them to live harmoniously. Wood breathes, expands, and responds to every environmental change, while concrete is stubborn, dense, and constantly pushing moisture upward.
The biggest headache? Moisture migration. Even fully cured concrete slabs contain moisture that naturally moves from wet to dry areas. This means water vapor constantly tries to push upward from the ground, through your slab, and right into your beautiful hardwood flooring.
“I’ve seen perfectly installed floors fail not from flooding but from that sneaky moisture vapor that travels through concrete,” says our installation team leader. “By the time you notice the damage, it’s often too late.”
Your slab’s age matters tremendously too. A freshly poured concrete slab is basically a giant water reservoir – about 200 gallons in a typical home slab! This moisture needs time to evaporate before you can safely install flooring. Generally speaking:
- New slabs need at least 30 days before we even start moisture testing
- Slabs under 60 days old usually contain too much moisture for hardwood
- For best results, waiting 90 days gives the concrete time to fully stabilize
Another challenge comes from wood’s natural breathing. As seasons change, hardwood expands and contracts with humidity fluctuations. On traditional wood subfloors, both materials move somewhat together. But concrete stays rigid and unmoved, creating stress on wood flooring that’s directly attached to it.
Why Moisture Management Is Mission-Critical
Let me be crystal clear: proper moisture management isn’t just important when installing hardwood floor on a slab – it’s absolutely essential. Skip this step and you’re essentially gambling with your flooring investment.
Without proper moisture control, you risk your beautiful floors cupping (edges higher than centers), crowning (centers higher than edges), developing gaps between boards, or even complete buckling where sections lift entirely off the slab. Worse yet, trapped moisture creates the perfect environment for mold and mildew.
At Romero Hardwood Floors, we take a belt-and-suspenders approach to moisture testing:
First, we conduct Relative Humidity (RH) testing using specialized probes placed in small drilled holes. This RH testing method follows the industry standard ASTM F2170 protocol and tells us what’s happening inside your slab, not just on the surface.
We often complement this with Calcium Chloride testing, which measures the rate of moisture vapor emission from the concrete surface (measured in pounds of moisture over 1,000 square feet in 24 hours). For most hardwood installations, we want readings under 3 pounds.
“One Revere homeowner called us after their DIY floor failed,” our project manager recalls. “They’d only checked surface moisture, which showed 4%, but our RH testing revealed 85% humidity inside the slab. That hidden moisture destroyed their floor in just five months.”
Your vapor barrier selection is equally crucial. Look for products with a perm rating of 0.15 or less – this indicates how much moisture vapor can pass through the material. A 6-mil polyethylene sheet is the minimum thickness we recommend for effective moisture control, though in challenging environments we often use more robust systems.
How Grade Level Impacts Risk Profiles
Where your concrete slab sits relative to the surrounding ground dramatically affects your installation risk:
Above-Grade Slabs are concrete floors in multi-story buildings that don’t contact the ground directly. These present the lowest moisture risk, making them suitable for both solid and engineered hardwood with standard preparation.
On-Grade Slabs (ground-level floors) have moderate moisture risk requiring careful testing and proper barrier systems. Both solid and engineered hardwood can work here, though engineered offers greater stability and peace of mind.
Below-Grade Slabs (basements and lower levels) present the highest moisture risk due to ground contact and potential hydrostatic pressure – that’s water pushing up against your foundation. For below-grade installations, we strongly recommend only engineered hardwood with comprehensive moisture mitigation.
“A client in Revere once insisted on solid hardwood in their below-grade family room despite our recommendations,” shares our installation supervisor. “Six months later, the floor had cupped so badly their kids used it as a skateboard ramp. We replaced it with engineered hardwood, which has been perfect for over five years now.”
Don’t forget about exterior drainage! Even the best interior moisture barriers can be overwhelmed if water pools against your foundation. Properly functioning gutters, downspouts, and grading that slopes away from your home provide your first line of defense against moisture problems.
With proper testing, preparation, and material selection, your hardwood floor on a slab can deliver decades of beauty and performance. The key is respecting the unique challenges of this installation type and addressing them properly from the start.
Pre-Installation Checklist & Testing
Before we tackle any hardwood floor on a slab project, I always walk my clients through our comprehensive pre-installation checklist. After 17 years in this business, I’ve learned that proper preparation makes all the difference between a floor that lasts for decades and one that fails within months.
First, we carefully assess slab flatness. Your concrete should be flat within 3/16″ over a 10-foot radius or 1/8″ over 6 feet. I remember one project in Revere where we finded a 1/2″ dip in the middle of the living room slab. Had we skipped this check, that dip would have caused the floor to bounce and eventually crack. We ground down the high spots and filled the low areas with a self-leveling compound before proceeding.
Next, we verify proper curing time. This is non-negotiable—new concrete needs 30-90 days to release its initial moisture. I’ve seen too many beautiful floors ruined because someone rushed this step. Your patience here will be rewarded with decades of stable flooring.
We also ensure the space has stable climate control. Your installation area should maintain normal living conditions (temperature 60-80°F, relative humidity 35-55%) for at least five days before we begin. This sets the stage for proper wood acclimation.
A thorough cleaning is essential too. Your slab must be completely free of paint, oil, sealers, curing compounds—anything that could interfere with adhesion. I often tell clients, “If your slab isn’t clean enough to eat off of, it’s not clean enough for hardwood.”
Finally, we inspect for cracks. Small hairline cracks are normal, but significant cracks need repair before we can proceed with your beautiful new hardwood floor.
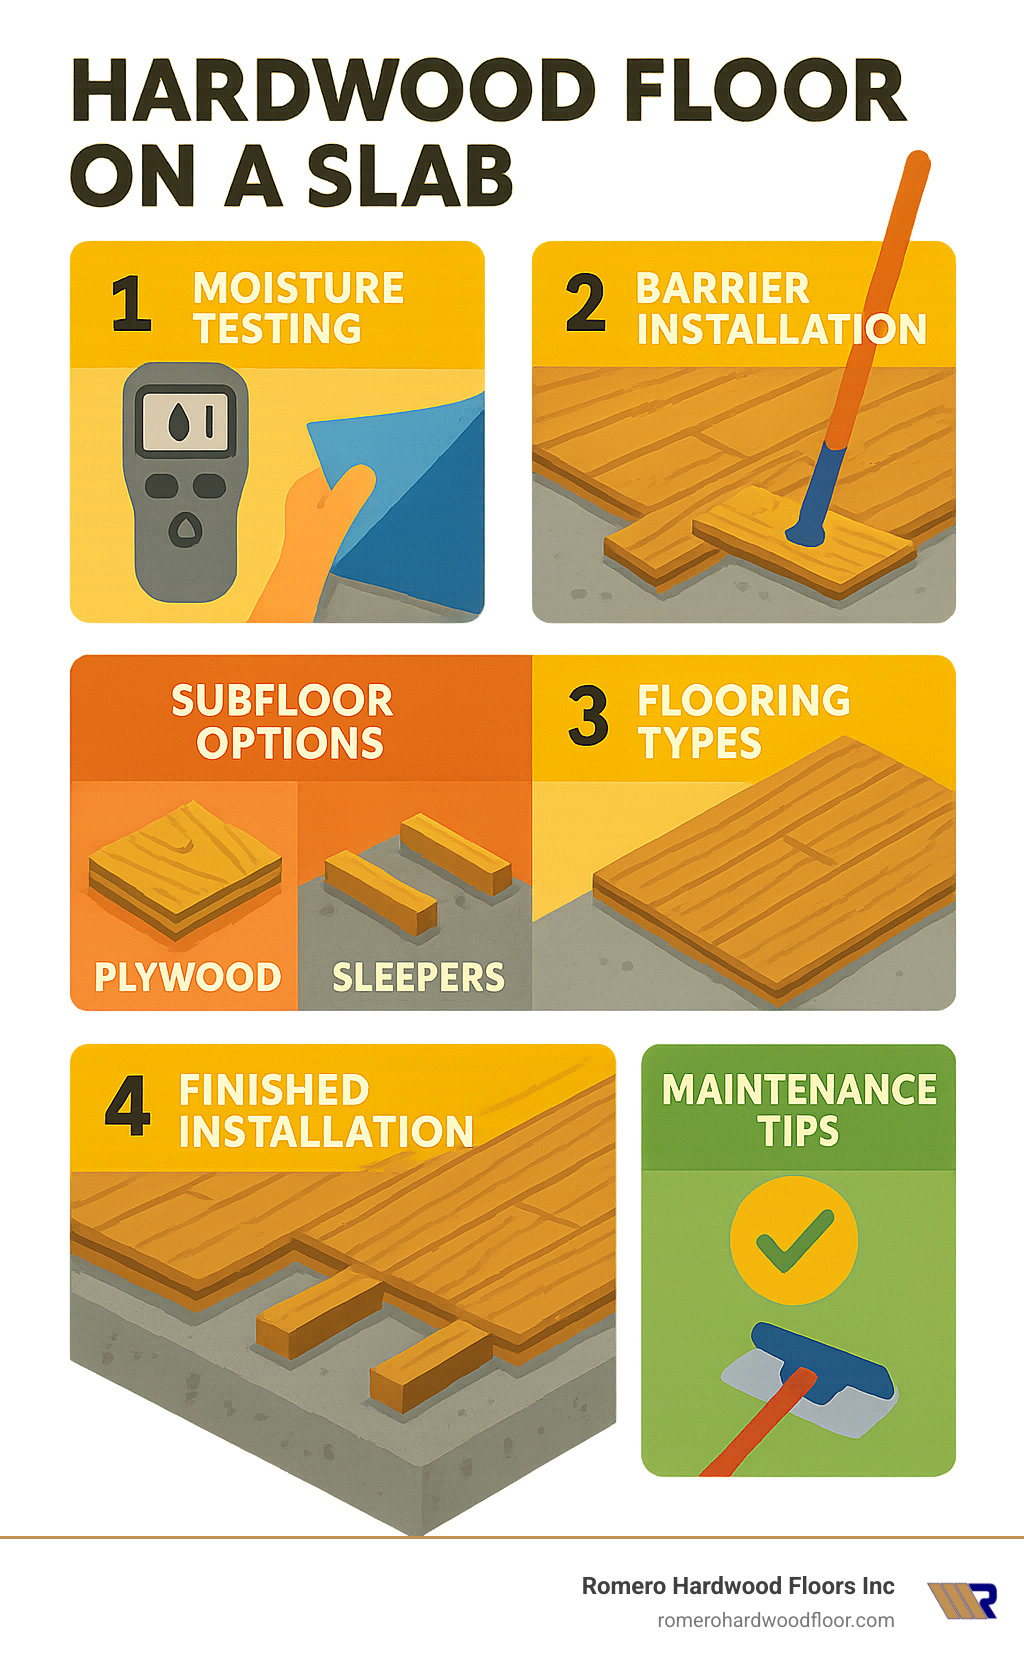
Moisture Testing Concrete & Wood
I can’t stress enough how crucial proper moisture testing is when installing a hardwood floor on a slab. At Romero Hardwood Floors, we treat moisture testing like a science, because it is one.
For concrete, we rely on three complementary methods:
The gold standard is in-situ Relative Humidity Testing following the ASTM F2170 protocol. We drill precise holes in your concrete (at 40% of slab thickness for slabs drying from one side) and insert sensors that measure the actual humidity within the slab. For most hardwood installations, we want to see readings below 75% RH. This test gives us the most accurate picture of what’s happening deep inside your concrete.
We complement this with the Calcium Chloride Test (ASTM F1869), which measures how quickly moisture is evaporating from your slab’s surface. A small dish of calcium chloride is sealed to the concrete for 72 hours, then weighed to determine moisture emission. For hardwood, we typically want readings below 3 pounds per 1,000 square feet per 24 hours.
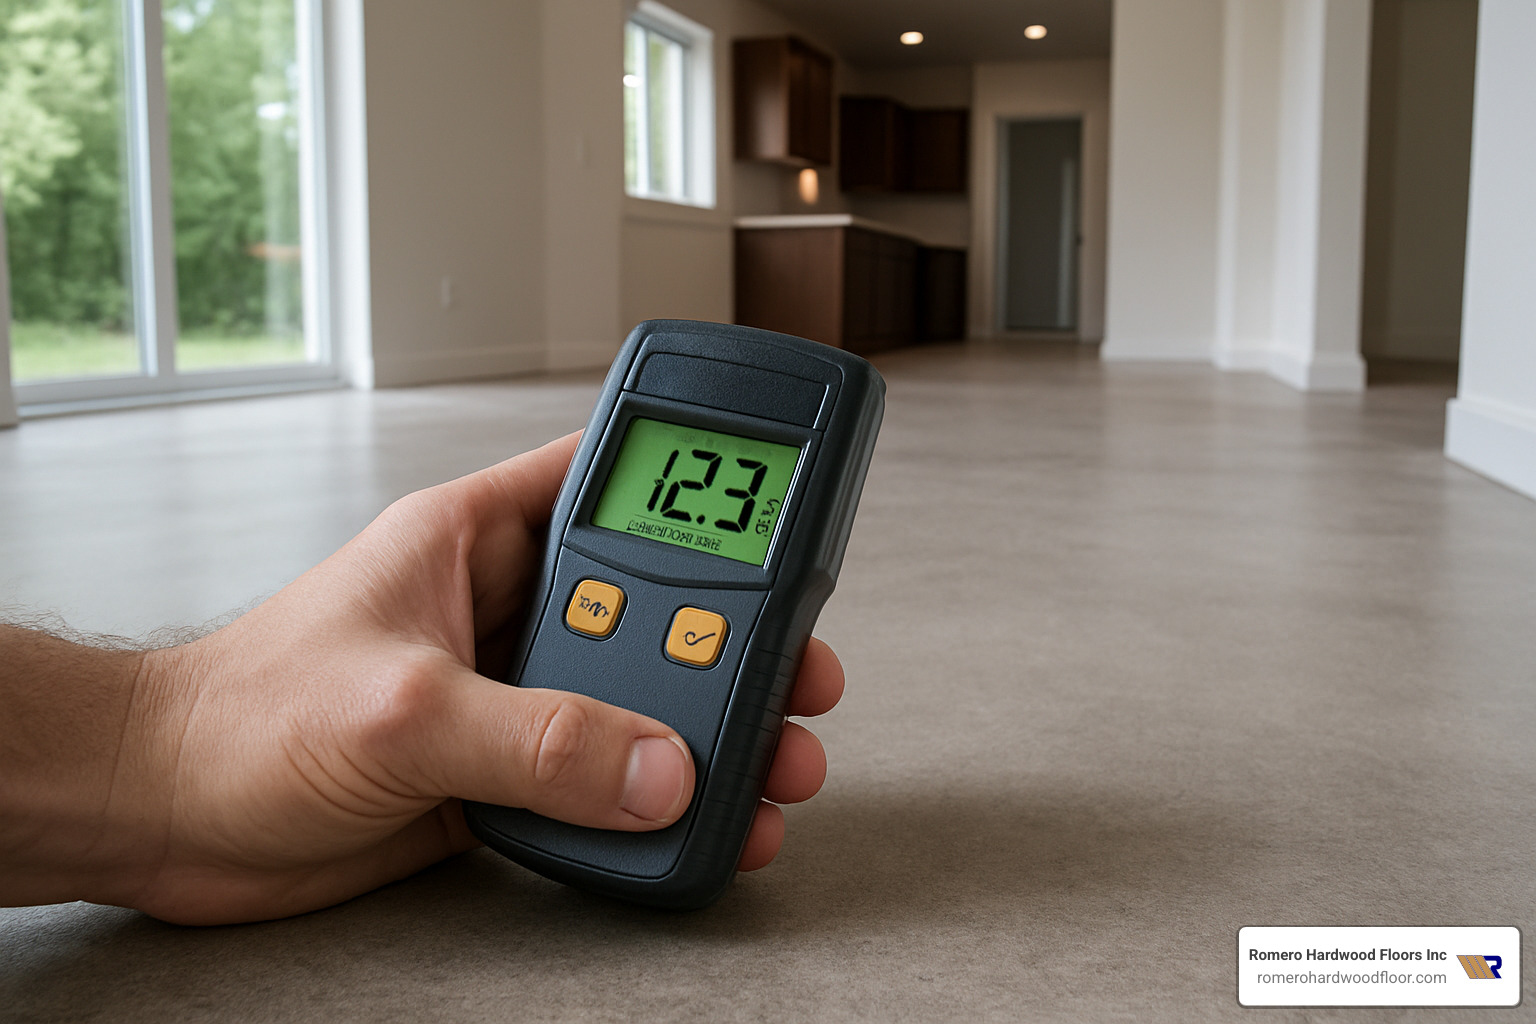
We also use electronic surface moisture meters to quickly scan for potential problem areas. While these aren’t as definitive as the other tests, they help us identify spots that might need extra attention. Our team uses professional-grade building inspection meters to ensure accurate readings.
But testing doesn’t stop with concrete. The wood itself needs careful moisture evaluation too. We use specialized moisture meters calibrated for your specific wood species. What we’re looking for is balance—ideally, your wood’s moisture content should be within 2-4% of the expected equilibrium moisture content for your region.
For narrower boards (less than 3″ wide), the moisture difference between wood and subfloor should stay within 4%. For wider planks (3″ or wider), we tighten that tolerance to 2% difference. This stricter standard for wide planks reflects their greater tendency to cup or crown with moisture changes.
Acclimating Hardwood Floor on a Slab
Proper acclimation is where science meets patience when installing a hardwood floor on a slab. This critical step allows your wood to adjust to its new environment before installation, minimizing movement after your floor is in place.
For effective acclimation, we first ensure stable living conditions in your home. Your HVAC system should be running normally, maintaining consistent temperature and humidity levels that reflect how you’ll actually live in the space. This isn’t the time to keep windows open or turn off your air conditioning to save money—those savings will cost you dearly later.
We use a technique called sticker stacking to prepare your wood. By placing small wooden spacers between layers of flooring, we allow air to circulate around all boards evenly. I’ve seen competitors simply stack boxes in the center of a room and call it “acclimation.” That’s not acclimation—that’s storage.
The time needed varies based on your specific situation. While 3-7 days is typical, we don’t just mark our calendars and assume it’s ready. Instead, we monitor with moisture meters daily, checking multiple boards and locations until readings stabilize. Only then do we know your wood has truly reached equilibrium with its environment.
Throughout this process, we keep detailed moisture documentation. These logs protect both you and us by creating a record of proper preparation. They’re also invaluable for warranty purposes should any questions arise later.
I remember a client in Salem who was renovating their entire first floor and was anxious to move furniture back. They asked if we could skip acclimation to speed things up. I explained that the few days of proper acclimation could save thousands in potential repairs down the road. They agreed to wait, and five years later, their floor remains flawless—no gaps, no cupping, just beautiful hardwood that looks as good as the day we installed it.
Choosing the Right Flooring & Installation Method
Picking the perfect hardwood flooring and installation method for your concrete slab isn’t just about aesthetics—it’s the foundation of a successful, long-lasting floor. After testing and preparing your slab, this decision becomes your most critical choice.
Solid vs. Engineered: Which Wins Over Concrete?
When installing a hardwood floor on a slab, engineered hardwood typically takes the crown, though solid hardwood has its place too.
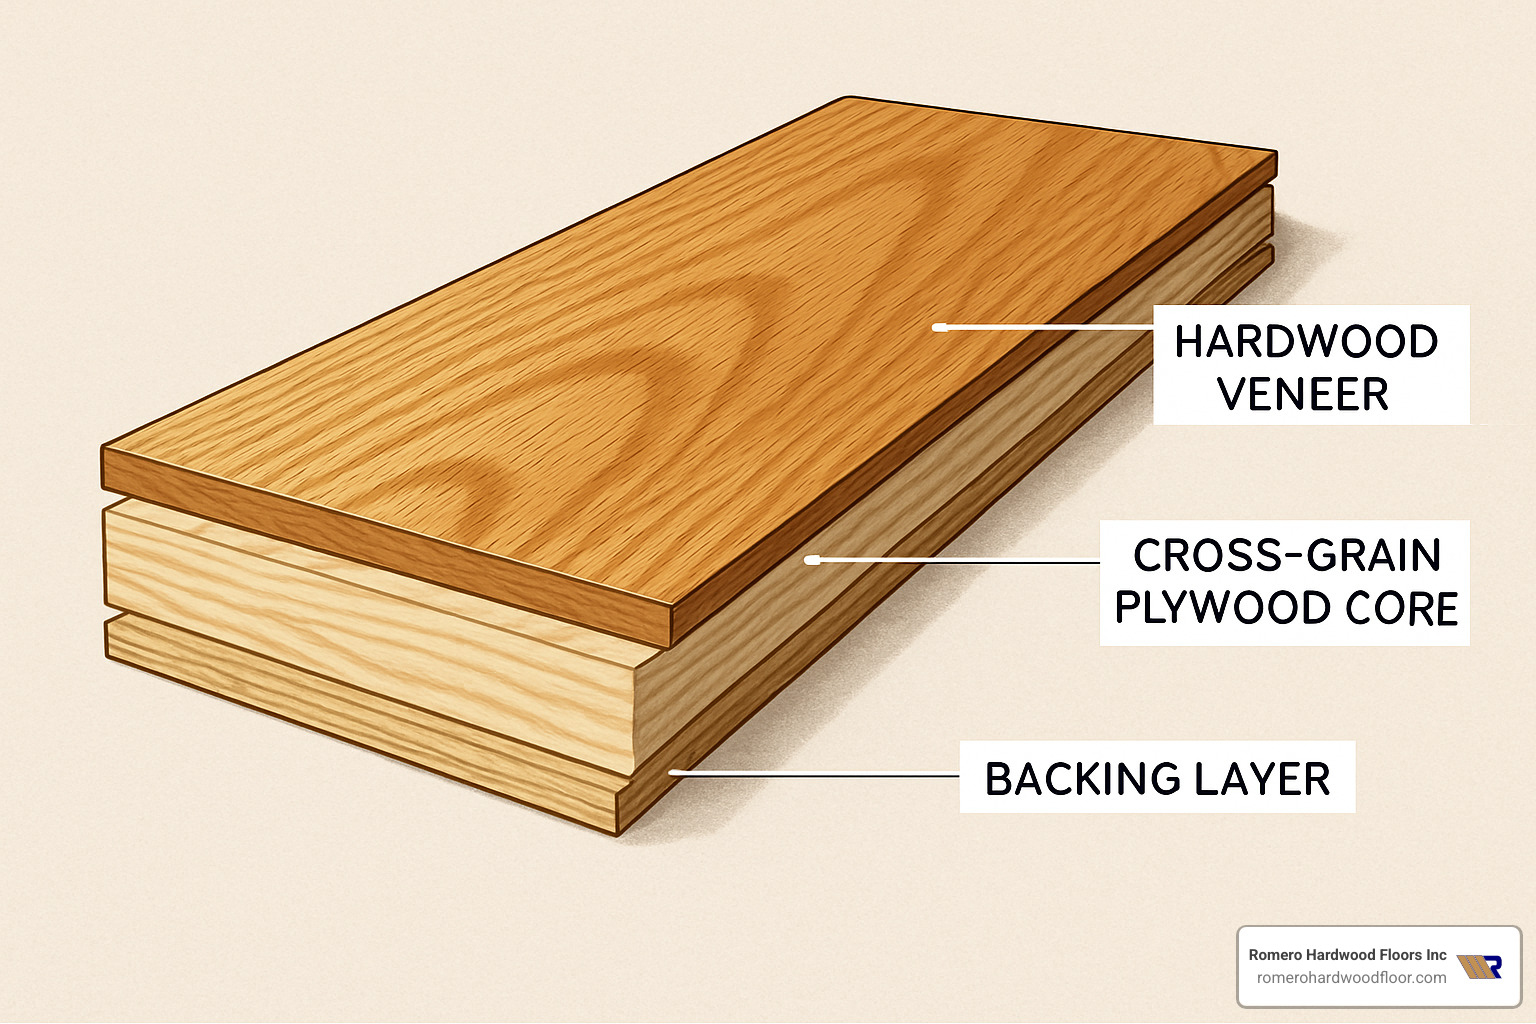
Engineered hardwood brings some impressive advantages to concrete installations. Its cross-layered plywood core gives it remarkable stability against the moisture challenges concrete presents. This layered construction (think plywood with a beautiful hardwood veneer on top) resists the expansion and contraction that can wreak havoc on solid wood floors.
“Many of our Lynn and Swampscott clients are surprised when I show them today’s engineered options,” says Francisco Romero. “The quality has improved dramatically—some of our engineered floors have wear layers so substantial they can be refinished multiple times, just like solid hardwood.”
Engineered hardwood works beautifully at any grade level—above-grade, on-grade, or even below-grade in basements where solid hardwood wouldn’t stand a chance. It’s also remarkably versatile, working with floating, glue-down, or traditional nail-down installations over a subfloor system.
That said, solid hardwood has its devoted fans, and with good reason. Its classic appeal and ability to be refinished multiple times can make it worth the extra installation considerations. For above-grade or on-grade installations with proper moisture barriers and subfloor systems, solid hardwood can perform beautifully for generations.
When choosing your wood species, stability matters as much as appearance. White oak, hickory, and many exotic hardwoods naturally resist moisture fluctuations better than maple or American cherry, making them smarter choices for concrete slab installations.
Learn more about the specific benefits of Engineered Hardwood Over Concrete on our detailed guide page.
Installation Methods for Hardwood Floor on a Slab
There are four primary ways to install a hardwood floor on a slab, each offering different benefits depending on your priorities:
Floating Installation lets engineered planks connect to each other rather than attaching to the subfloor. This method has become increasingly popular for its speed and simplicity. We lay a moisture barrier directly on the prepared concrete, add a thin foam underlayment for cushioning and sound absorption, then install click-lock or tongue-and-groove engineered planks that “float” above. While it might feel slightly less solid underfoot, many homeowners appreciate its quick installation and DIY-friendly nature.
“Floating floors have come a long way,” notes our lead installer. “The locking systems are incredibly secure now, and they handle seasonal movement beautifully because the entire floor can shift slightly as one unit.” For more details, visit our guide on Floating Wood Floor Over Concrete.
Glue-Down Installation creates a rock-solid feel by adhering hardwood directly to concrete using specialized urethane adhesives. This method produces no hollow sounds when walking and adds minimal height to your floor. The trade-off? It requires a perfectly flat slab and makes future removal challenging. Many modern adhesives include built-in moisture barriers, simplifying the process while protecting your investment. Learn more about our approach to Gluing Solid Hardwood Floors to Concrete.
Plywood-on-Slab Installation creates a traditional wood subfloor over concrete by fastening plywood panels directly to the slab. This method is ideal for solid hardwood installations, providing the familiar nailing surface that traditional hardwood requires. While it adds approximately 1-1.5″ to your floor height and requires more labor, it creates exceptional stability and a classic solid feel underfoot.
Sleeper System Installation takes moisture protection to another level by creating an air gap between concrete and wood. We attach treated wood “sleepers” (typically 2x4s) to the concrete, then install plywood over them, creating a framework that solid hardwood can be nailed to. While this adds 1.5-2.5″ to floor height and requires more labor, it provides superior moisture protection for challenging environments.
“A Lexington homeowner with three dogs wanted solid hardwood but worried about moisture from occasional accidents,” shares our project manager. “We recommended a modified sleeper system with a commercial-grade vapor barrier. Five years later, their hickory floors still look gorgeous despite the busy household.”
For step-by-step guidance on various installation methods, check out our comprehensive guide on How to Install Hardwood Floors on Concrete.
Which installation method is right for your home? It depends on your specific situation—your budget, timeline, moisture conditions, and whether you’re prioritizing stability, traditional feel, or ease of installation. Our free consultation can help you weigh these factors and find the perfect solution for your hardwood floor on a slab project.
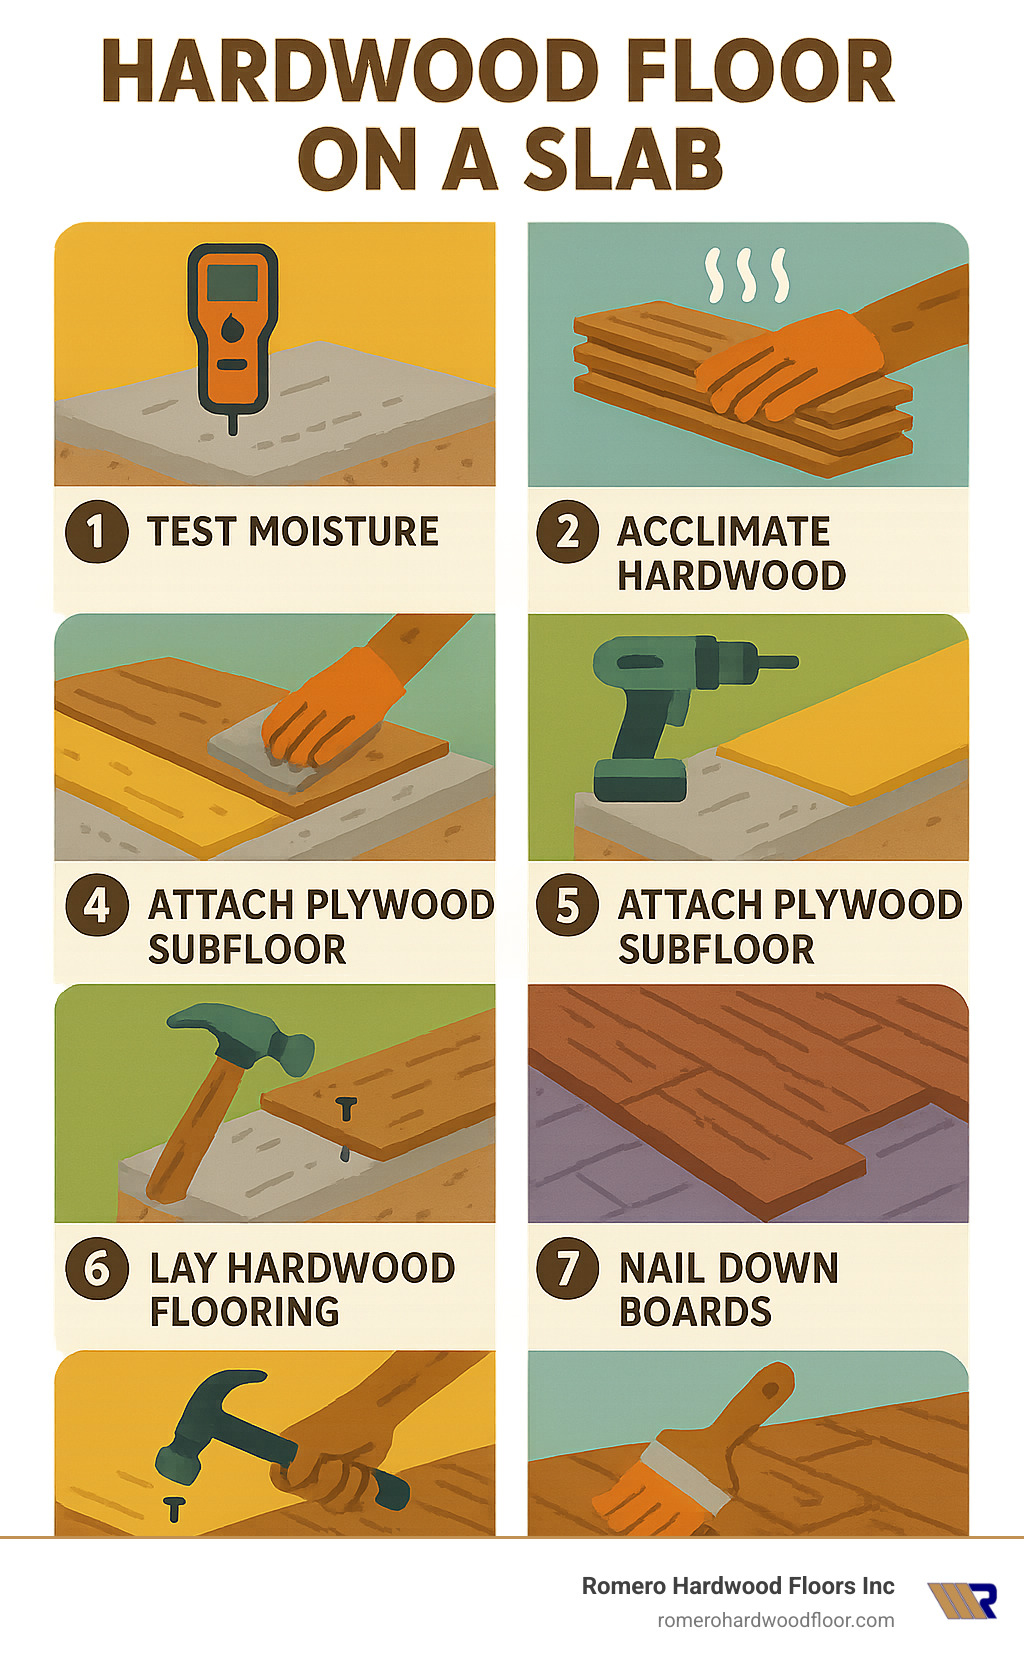
Step-by-Step Guide: Installing Hardwood Floor on a Slab
Let me walk you through the detailed process of installing a hardwood floor on a slab. While each home presents unique challenges, these steps provide a reliable roadmap to transform your concrete floor into a beautiful hardwood surface.
Before we dive into specific methods, every successful installation begins with proper preparation:
- Test moisture levels of both your concrete slab and hardwood flooring. This isn’t just a recommendation—it’s absolutely essential for preventing future problems.
- Prepare your slab by thoroughly cleaning, repairing any cracks, and leveling uneven areas. Your concrete should be flat within 3/16″ over any 10-foot span.
- Acclimate your hardwood to your home’s environment. This typically takes 3-7 days, but patience here pays dividends in long-term performance.
- Install an appropriate moisture barrier according to manufacturer specifications. This invisible layer is your floor’s first line of defense against concrete moisture.
- Plan your layout carefully, considering room shape, natural light sources, and transitions to other flooring types.
“Preparation might not be the exciting part of flooring installation, but it’s where professional installers earn their reputation,” says Francisco Romero. “When we take the time to properly prepare, the actual installation goes smoothly and the floor performs beautifully for decades.”
Floating Method Walk-Through for Hardwood Floor on a Slab
The floating installation method is particularly popular for engineered Floating Wood Floor Over Concrete. Here’s how we approach this at Romero Hardwood Floors:
We begin by rolling out a 6-mil polyethylene moisture barrier across the entire concrete surface. We overlap seams by 4-6 inches, secure them with moisture-resistant tape, and run the barrier 2-3 inches up the walls—creating a continuous moisture shield.
Next comes the underlayment—typically foam or cork—which we install perpendicular to the planned direction of your flooring. Some modern products cleverly combine the moisture barrier and underlayment in one layer, saving us time while protecting your investment.
For the actual flooring installation, we place 1/2″ spacers against the wall to maintain a crucial expansion gap. The first board goes in with its tongue facing away from the wall. For click-lock systems, we angle each new board into the previous one at approximately 30 degrees, then press down to lock them together. With glued tongue-and-groove systems, we apply a continuous bead of wood glue to the groove before connecting the boards.
“I always tell homeowners to watch for that satisfying ‘click’ sound when boards lock together,” says our lead installer. “That little sound means your floor is coming together properly.”
We maintain proper staggering of end joints (at least 6 inches) between adjacent rows, which ensures both structural integrity and visual appeal. Throughout the installation, we’re careful to maintain consistent expansion gaps around the perimeter and any fixed objects like columns or kitchen islands.
The final row often requires ripping boards lengthwise to fit the remaining space. Once the floor is complete, we install baseboards and quarter round molding to cover those expansion gaps while allowing for the natural movement your floor needs.
Glue-Down Method Walk-Through
For a more permanent installation with a solid feel underfoot, many homeowners choose the glue-down method for Gluing Solid Hardwood Floors to Concrete:
We start by applying a moisture sealer if we’re using a separate moisture barrier rather than an adhesive with built-in moisture control. This must cure completely before moving forward.
To ensure straight installation, we snap perpendicular chalk lines in the center of the room, creating a reliable reference guide. Then comes the adhesive application—using the manufacturer-recommended trowel (typically V-notched) to spread adhesive over a 3-4 board width area. We work in manageable sections to prevent the adhesive from skinning over before boards are placed.
The first row of boards goes along our chalk line, pressed firmly into the adhesive with spacers maintaining expansion gaps at walls. As we continue the installation, we pull from multiple bundles simultaneously to naturally blend color variations throughout the floor.
Attention to detail matters tremendously with glue-down installations. We press each board firmly into the adhesive and check frequently for proper alignment. In areas where boards don’t make full contact with the adhesive, we use sand-filled buckets or other weights to ensure proper bonding.
“Glue-down installations require precision and speed,” explains our senior installer. “The right trowel size is critical—too small and you won’t have enough adhesive for proper bonding; too large and you’ll waste material and potentially have adhesive squeezing up between boards.”
We’re meticulous about cleaning as we go, immediately removing any adhesive that squeezes up between boards or gets on the surface. Once the floor is installed, some adhesive manufacturers recommend rolling with a weighted roller to ensure full contact. Finally, we follow the adhesive manufacturer’s guidelines for curing time before allowing foot traffic or placing furniture.
Both floating and glue-down methods have their place depending on your specific situation. For more information about the best approach for your home, check out our guide on How to Install Hardwood Floors on Concrete.
Long-Term Care, Radiant Heat & Troubleshooting
Living with a hardwood floor on a slab is a joy, but like any premium home feature, it requires thoughtful maintenance to keep it looking beautiful for decades. And if you’re considering combining the warmth of hardwood with the cozy comfort of in-floor heating, you’re in for a treat – with some important guidelines to follow.
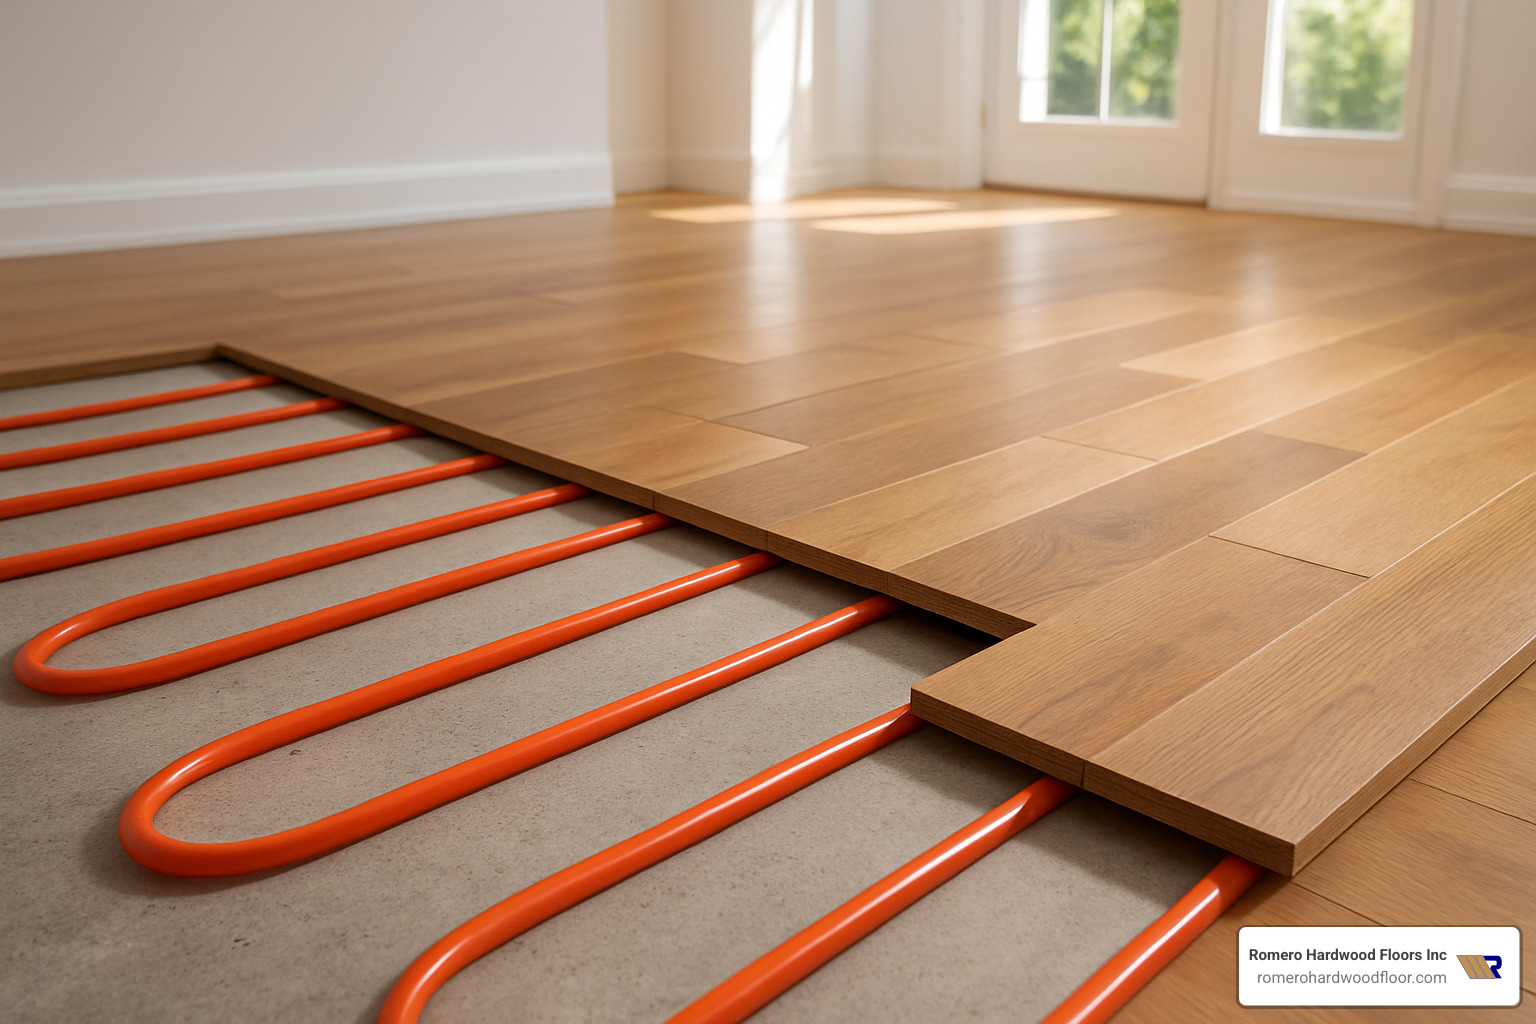
Radiant Heat Do’s & Don’ts for Hardwood Floor on a Slab
There’s nothing quite like stepping onto a warm wood floor on a chilly New England morning. Many of our Boston-area clients have successfully paired radiant heating systems with their hardwood floor on a slab installations. For Heated Hardwood Floors on Concrete, I’ve developed some practical guidelines based on our years of experience:
Engineered hardwood is your best friend when it comes to radiant heat. The cross-layered construction handles temperature changes much better than solid wood, resisting the expansion and contraction that can lead to problems.
Wood species selection matters enormously with heated floors. We’ve had great success with quartersawn white oak and walnut, while maple and hickory tend to be more problematic. As I tell my clients, “Not all woods are created equal when it comes to heat.”
Thinner is better for heat transfer. Engineered boards in the 1/2″ to 5/8″ range will feel warmer underfoot because they allow heat to pass through more efficiently than thicker products.
Keep your surface temperature below 85°F – this is non-negotiable! Higher temperatures can damage even the most stable hardwood. Installing floor temperature sensors is a small investment that provides huge peace of mind.
“One of our Winchester clients has had engineered white oak over radiant heat for eight years with zero issues,” I often share during consultations. “The secret? They followed our advice on gradual temperature changes, never raising or lowering their system more than 5°F per day.”
Stable humidity (between 35-55%) is just as important as stable temperature. Many of our clients install whole-home humidification systems to protect their investment, especially during our dry Massachusetts winters.
What to avoid with radiant heat? Thick solid hardwood (over 3/4″), soft woods like pine, and area rugs with rubber backings that can trap heat. Also, resist the temptation to crank up the heat too quickly when temperatures drop – your floor will thank you for patience.
Common Problems & Quick Fixes
Even with perfect installation, your hardwood floor on a slab might develop issues over time. Here’s how to identify and address the most common problems:
Cupping is when the edges of boards rise higher than the centers, creating a concave shape. This almost always signals moisture coming from below your floor. I remember a client in Winthrop who noticed cupping six months after installation – we finded their neighbor’s plumbing leak was sending moisture through the shared concrete slab. After fixing the leak and improving ventilation, the floor gradually returned to normal.
Crowning is the opposite – centers higher than edges. This typically happens when surface moisture (like a spill) is absorbed by the wood or when flooring wasn’t properly acclimated before installation. Controlling room humidity is crucial here. For severe cases, we might recommend light sanding after the floor has fully stabilized.
Buckling is more dramatic – sections of flooring actually lift up from the subfloor. This requires immediate attention as it indicates significant moisture issues, often from flooding. Quick response can sometimes save the floor, but severe buckling usually requires partial or complete replacement.
Gaps between boards are sometimes seasonal and normal, especially with solid hardwood in winter when indoor air becomes dry. Maintaining consistent humidity levels year-round minimizes this effect. As I tell clients, “Some seasonal movement is the nature of wood – it’s a living material, not plastic.”
Squeaks or hollow sounds in floating floors usually point to subfloor irregularities, while in glued installations, they might indicate adhesive failure. For floating floors with clip systems, we can usually replace damaged planks relatively easily using a suction cup to lift the affected board – a significant advantage over traditional glue-down installations where board replacement is much more complicated.
“Wood floors are remarkably resilient,” I often remind homeowners. “With proper care and prompt attention to any issues, your hardwood floor on a slab will continue to improve your home for generations.”
Price & Height Implications
When planning your hardwood floor on a slab project, two practical considerations deserve special attention: your budget and how the new floor will affect your home’s interior clearances. Let’s break down what you can expect.
The financial investment for hardwood over concrete varies widely depending on materials, installation complexity, and your specific home conditions. Based on internet data (not Romero Hardwood Floors’ specific pricing), here’s what homeowners typically invest:
Floating engineered hardwood installations tend to be the most budget-friendly, generally ranging from $6-$18 per square foot installed†. This method requires less labor and fewer materials than other approaches. Glue-down installations typically run slightly higher at $8-$20 per square foot installed†, reflecting the additional cost of specialty adhesives and more intensive labor.
For traditional solid hardwood lovers, a plywood subfloor system generally ranges from $10-$25 per square foot installed†, while the most comprehensive sleeper systems can range from $12-$30 per square foot installed†. These higher costs reflect the additional materials and significant labor involved in creating a traditional wood subfloor system over concrete.
“Many of our clients are surprised by the ‘hidden costs’ in concrete floor preparation,” shares our estimator. “We always include a thorough evaluation of your slab condition in our estimates to avoid surprises later.” These preparatory costs might include concrete grinding or leveling ($2-$6 per square foot†), premium moisture barriers for problematic slabs ($1-$3 per square foot†), or removal of existing flooring ($1-$4 per square foot†).
The height your new floor adds to your space is equally important to consider. This seemingly small detail can have significant implications throughout your home:
Glue-down engineered hardwood offers the lowest profile, adding only about 3/8″ to 1/2″ to your floor height. This slim profile makes it perfect for homes where door clearances and transitions are concerns. Floating installations add slightly more height, typically 1/2″ to 3/4″ with the underlayment included.
Plywood subfloor systems add approximately 1-1/2″ to your floor height (combining 3/4″ plywood plus 3/4″ hardwood). Sleeper systems are the tallest option, adding anywhere from 1-1/2″ to 2-1/2″ depending on the sleeper construction.
“I remember a beautiful Cambridge home where the client had their heart set on solid hardwood throughout their concrete-slab first floor,” recalls our project manager. “We had to carefully adjust 22 door frames to accommodate the new height. The results were stunning, but the door modifications added significantly to both timeline and budget.”
These height changes affect more than just doors. You’ll need to consider:
– Cabinet toe-kick heights (especially in kitchens)
– Transitions to other flooring materials
– Stair risers where they meet your new floor
– Appliance clearances in kitchens and laundry rooms
At Romero Hardwood Floors, we conduct detailed measurements during our initial assessment, helping you understand exactly how different installation methods will affect your home’s functionality. This careful planning has saved our clients thousands in unexpected modifications and ensures your new hardwood floor on a slab improves your home without creating new headaches.
Frequently Asked Questions about Hardwood Floor on a Slab
Can I install solid hardwood in my basement?
This is one of the most common questions we hear at Romero Hardwood Floors, and I have to be honest with you—while it’s technically possible, I generally steer my clients away from solid hardwood for basement installations.
Why? Basements are naturally more humid environments with moisture conditions that fluctuate significantly throughout the year. Solid hardwood simply wasn’t designed to handle these below-grade conditions, and I’ve seen too many beautiful (and expensive) solid wood floors warp, cup, or buckle in basement settings.
Engineered hardwood is almost always the better choice for basements because of its layered construction. Those cross-laminated layers resist the warping that solid wood undergoes when exposed to moisture changes. Plus, you can install it using floating methods that give the floor some forgiveness when minor moisture fluctuations occur. Many manufacturers even specifically warranty their engineered products for below-grade installations—something you rarely see with solid hardwood.
I remember a client in Marblehead who insisted on solid oak in their finished basement despite our recommendations. Within eight months, the floor developed severe cupping. We ended up replacing it with engineered oak that’s now been performing beautifully for over three years.
If you’re absolutely set on solid hardwood in your basement, we can make it work—but be prepared for extensive moisture mitigation systems that often include exterior foundation waterproofing. This approach can double your project cost, which is why engineered products usually make more sense both practically and financially.
How long must new concrete cure before flooring?
Patience is truly a virtue when it comes to new concrete slabs and hardwood flooring. That fresh slab contains a tremendous amount of water—roughly 200 gallons in a typical residential pour—and rushing the installation is a recipe for disaster.
At minimum, you should allow:
– 30 days before even beginning moisture testing
– 60-90 days before actual hardwood installation in most cases
– Longer curing times for humid environments or thicker slabs
I remember a recent project in Peabody where the client was eager to install hardwood in their new addition. We tested their 45-day-old slab and found it still had 85% internal relative humidity—far too wet for safe installation. After waiting another 30 days and running dehumidifiers, the levels dropped to 75%, which allowed us to proceed with confidence. That extra month of patience saved them from what would have almost certainly been a flooring failure.
The bottom line: concrete curing isn’t something you can rush, regardless of what you might read online about “quick-drying” concrete. Those moisture meters don’t lie, and neither do the laws of physics!
Do I always need a vapor barrier?
Yes, absolutely. In my 15+ years installing hardwood floor on a slab, I’ve never seen a situation where skipping the vapor barrier was a good idea—even with very old concrete.
Here’s why: concrete is porous by nature, and it will always allow some moisture vapor to transmit through it over time. Even slabs that seem bone-dry can release enough moisture vapor to damage wood flooring over the course of months or years.
The type of vapor barrier you’ll need depends on your installation method:
For floating floors, we typically use 6-mil polyethylene sheeting or a combination underlayment with an integrated moisture barrier. For glue-down installations, you’ll need either a separate moisture barrier sealer or an adhesive with built-in moisture control capabilities. With subfloor systems, we install 6-mil polyethylene under the plywood or sleeper system.
I once consulted on a failed floor in Salem where another contractor had skipped the vapor barrier on a 30-year-old slab, telling the homeowner it was “dry enough.” Within six months, their beautiful engineered maple floor was cupping severely throughout the entire 800-square-foot space. The entire floor had to be torn out and replaced—all because of a $300 vapor barrier that was omitted.
Think of a vapor barrier as cheap insurance for an expensive investment. When you’re spending thousands on beautiful hardwood flooring, that extra layer of protection is absolutely worth it.
Conclusion
Installing a hardwood floor on a slab transforms cold concrete into a warm, inviting space—but success hinges on proper preparation and expertise. While it’s certainly more complex than installing over traditional wood subfloors, the beautiful results are worth the extra care when done right.
Here at Romero Hardwood Floors Inc, we’ve spent over 17 years perfecting our concrete-to-hardwood techniques throughout Massachusetts. I’ve personally seen hundreds of successful installations from Beverly basements to Chelsea condos, and I’ve learned that moisture management isn’t just important—it’s everything.
“The most beautiful hardwood in the world won’t survive on a concrete slab without proper moisture control,” I often tell clients during consultations. “But get that right, and your floors will bring warmth and character to your home for decades.”
The journey from concrete to hardwood requires thoughtful decisions at every step. Your slab’s location relative to ground level dramatically impacts which materials will thrive in your space. While engineered hardwood typically performs better over concrete due to its dimensional stability, solid hardwood can still shine when installed with appropriate subfloor systems.
The installation method you choose affects both your budget and your finished floor height. Those seemingly minor differences can impact everything from door clearances to cabinet heights—details we carefully consider in every project plan.
I’ll never forget a project in Danvers where a client insisted on skipping the acclimation period to meet a tight move-in deadline. We respectfully declined the job rather than compromise on quality. Six months later, they called back after their rushed installation had failed, and we were able to do the job right. Today, those floors remain flawless five years later.
Whether you’re dreaming of a floating engineered floor in your Somerville basement, a sleek glue-down installation for your Salem condo, or traditional solid hardwood in your Revere living room, our team brings the expertise to guide you through every step of the process. We’ve seen it all, fixed it all, and installed it all—always with an unwavering commitment to quality that stands the test of time.
Ready to bring the warmth and beauty of hardwood to your concrete spaces? Let’s talk about changing your slab into a showpiece floor that will improve your home for years to come. Our team serves communities throughout Massachusetts with the kind of personalized service and expert craftsmanship that turns customers into friends.
For more details about our comprehensive flooring services, visit our More info about full-service flooring install page or call us today to schedule your consultation.
†Note: All pricing information represents average market costs based on internet data and does not reflect actual costs for Romero Hardwood Floors Inc. services. Please contact us directly for a personalized quote.