Hardwood Floor Putty Repair: Master 1 Flawless Fix
Understanding Hardwood Floor Putty and Filler
Your Step-by-Step Guide to Flawless Hardwood Floor Putty Repair
Now that we understand the different types of products and why they matter, it’s time to roll up our sleeves and get to work! Performing a hardwood floor putty repair is a truly rewarding DIY project that can dramatically refresh your floor’s appearance. We’ll walk you through each step, from careful preparation to that satisfying final touch. If you’re eager for even more detailed repair techniques, you can also explore our comprehensive guide on Step-by-Step Hardwood Floor Repair Techniques.
Essential Preparation for Hardwood Floor Putty Repair
Think of preparation as the unsung hero of any home improvement project. Skimping here is like trying to bake a cake without preheating the oven – it just won’t turn out right! A little effort now saves a lot of headaches later.
First things first, let’s make some space. Clear the Area by moving all furniture, rugs, and anything else that might get in your way. You need a clear, unobstructed workspace to do your best work.
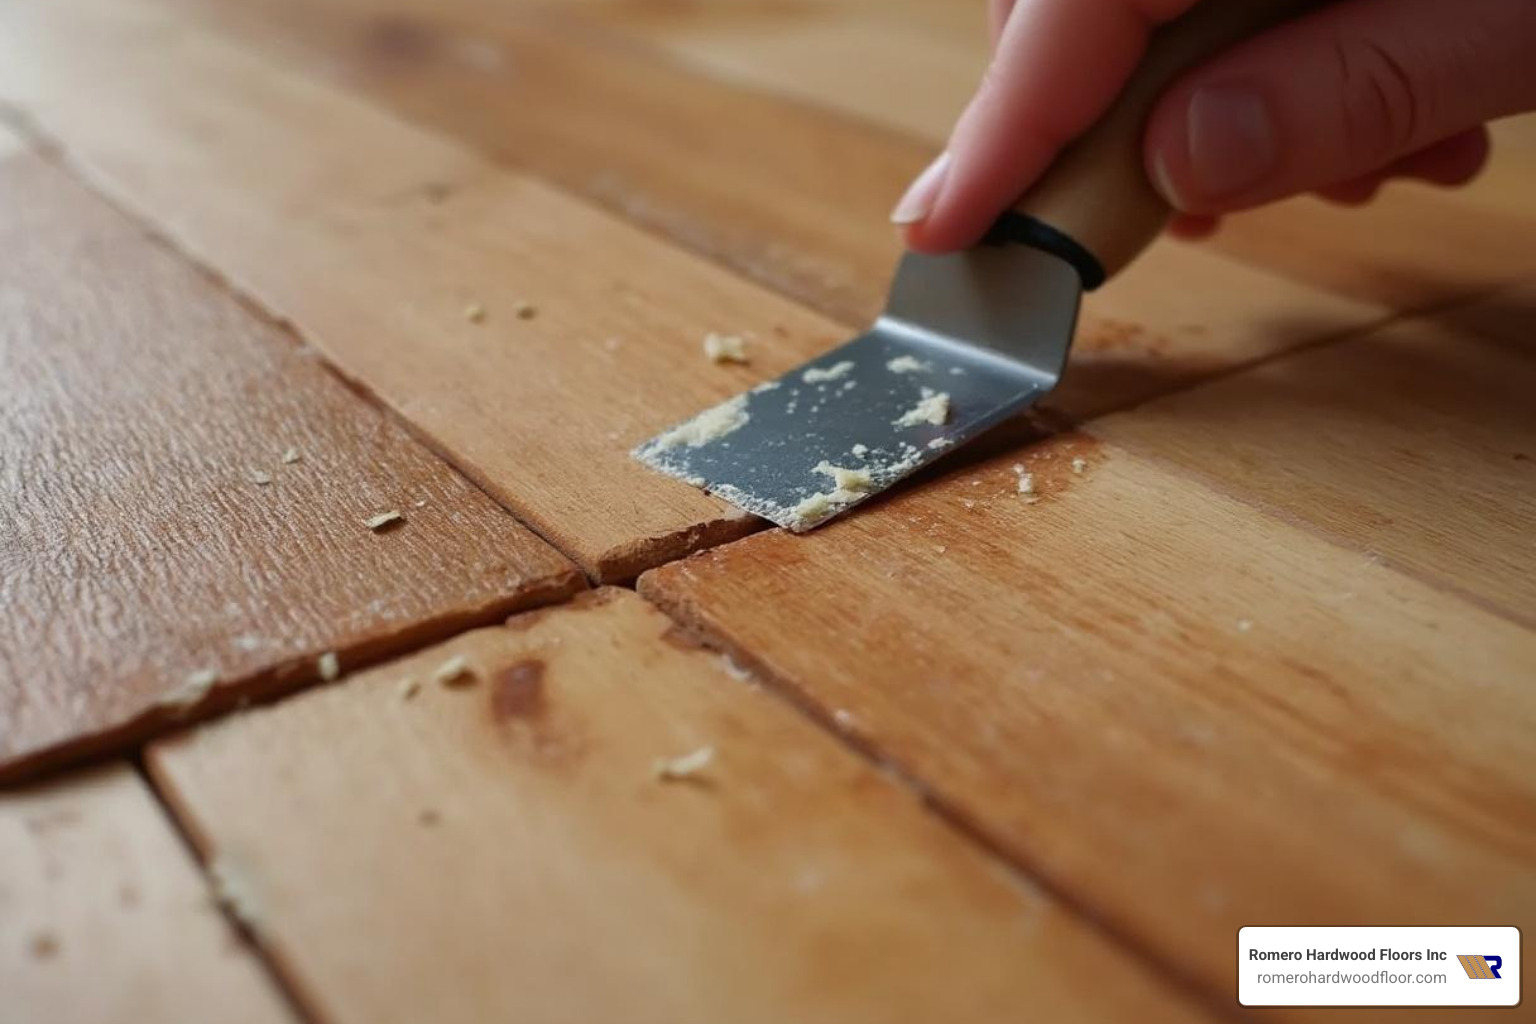
Next, it’s time to Clean the Surface. Grab your vacuum and thoroughly remove all loose dirt, dust, and tiny bits of debris from the repair spot. Then, give it a good wipe down with a damp cloth. This ensures the surface is clean and free of any grease or grime. Why is this so important? Because any dust or gunk left behind can act like a tiny barrier, preventing your filler or putty from bonding properly. We want that repair to stick!
If you’re using a wood filler (the kind that dries hard and is sandable) on an unfinished floor, a Light Sanding of the immediate repair area can be a game-changer for adhesion. We recommend a gentle pass with 120-grit sandpaper, always sanding with the grain of the wood. This creates a slightly rougher surface that the filler can really grip onto. After sanding, you guessed it – vacuum again to get rid of any sawdust. Just a quick note: this sanding step usually isn’t necessary for non-hardening putties used on already finished floors; a good cleaning is typically all you need there.
Finally, and this is a big one, consider the Optimal Humidity in your home. Hardwood floors are a bit like us; they’re happiest and most stable when the air around them is just right. For wood floors, that means maintaining a relative humidity between 30% and 50%. This range is actually recommended by the National Wood Flooring Association (NWFA) for ideal flooring stability and filler performance.
Why does this matter for your repair? Because wood naturally expands in the summer and contracts in the winter as humidity changes. Keeping your home’s humidity consistent year-round minimizes this movement, which in turn helps your repairs last longer and prevents frustrating issues like cracking or shrinking of the filler. If you don’t have a hygrometer (a fancy word for a humidity gauge), it’s a worthwhile little investment for any hardwood floor owner.
By taking the time to prepare properly, you’re truly setting yourself up for a successful and long-lasting hardwood floor putty repair.
Proven Application Techniques
Alright, now for the satisfying part: applying the filler or putty! The way you apply it really depends on what you’re using and the kind of repair you’re tackling.
For Small Cracks, Holes, and Gouges (when using a hard-drying Filler):
- Using a Putty Knife: We find a flexible putty knife works best here. Scoop a small amount of wood filler onto your knife.
- Press Firmly: Now, press that filler firmly into the crack or hole. Don’t just spread it on top; you want to make sure it really gets deep into the imperfection, leaving no air bubbles behind.
- Overfill Slightly: This is a pro tip! Apply just a little more filler than seems necessary, creating a small mound above the surface. This little “extra” accounts for any minor shrinkage as the filler dries and ensures you have plenty of material to sand down to a perfectly smooth, level surface later.
- Layering for Deep Holes: Got a really deep hole, maybe deeper than about 6mm (or a quarter-inch)? You absolutely must apply the filler in layers. Put down one layer, let it dry completely (check the manufacturer’s instructions, but often 6 hours or even overnight), and then apply the next layer. Keep going until the hole is slightly overfilled. Trying to fill a deep hole in one go is a recipe for excessive shrinking and cracking, which nobody wants!
For Gaps (when using flexible Putty or flexible Filler):
- Choose Wisely: As we discussed earlier, traditional wood filler generally isn’t the best long-term fix for gaps that experience seasonal movement. For those, a flexible wood putty or even cork strips are often better choices. However, for very minor, stable gaps, a flexible wood filler can work.
- Apply and Wipe: Squeeze a bead of putty directly into the gap or apply it with your putty knife. Then, immediately wipe away any excess with a damp cloth. If you’re using a non-hardening putty on a finished floor, you don’t want it sitting on the surface!
Troweling (for large areas on unfinished floors):
This technique involves spreading a larger amount of filler over an entire floor to fill all minor imperfections before a full sanding and finishing. While it’s certainly an option, we generally approach trowel-filling with a bit of caution, especially for older, gappy floors in climates with big seasonal changes, like here in Massachusetts. In such cases, the wood’s natural movement can cause the filler to break up and look quite messy over time. It’s usually more suitable for brand new installations or floors in very stable humidity environments.
Always remember: the more area you fill with wood filler, the more it might shrink. So, that little habit of overfilling slightly is always a good one to keep!
Drying, Sanding, and Finishing the Repair
Once you’ve applied the filler, the hardest part begins: patience! This is where many DIYers get tripped up, eager to see their hardwood floor putty repair finished. Resist the urge to rush!
Drying Time Considerations:
- Follow Manufacturer Instructions: This is the golden rule. Always, always, always follow the manufacturer’s recommended drying times on the product label. These can vary wildly between different products and brands.
- General Guidelines: As a general rule, many water-based fillers can feel dry to the touch within an hour. However, for optimal results before sanding, we strongly recommend allowing at least 6 hours, or even better, leaving it overnight. For deeper layered repairs, each layer needs to dry completely before you apply the next one, as we mentioned earlier.
- The Sandpaper Test: Here’s a simple trick to tell if your filler is truly dry and ready for sanding: if you try to sand it and it immediately clogs up your sandpaper or turns into a gooey mess, it’s not ready yet. Give it more time! We’ve heard horror stories of folks trying to sand too early, only to end up with a sticky, frustrating mess.
Sanding Techniques (for fillers that dry hard):
- Start with 120-Grit: Once your filler is completely, unequivocally dry, grab some 120-grit sandpaper. Gently sand down the excess filler. Always sand with the grain of the wood. Your goal here is to make the filled area perfectly flush and smooth with the surrounding floor.
- Finish with 150-Grit: For an even smoother, more refined finish, follow up with 150-grit sandpaper. This extra step will prepare the area beautifully for staining and finishing.
- Clean Thoroughly: After all that sanding, grab your vacuum again and thoroughly clean the area. You want to remove every speck of sanding dust, as it can interfere with how your stain and finish apply.
Staining to Match (for fillers that are stainable):
- If your floor is unfinished and you’ve used a filler that’s designed to take stain, now’s the time to apply your wood stain. Apply it evenly with a brush or cloth, then wipe off any excess according to the stain manufacturer’s instructions. That wood color can subtly change with the seasons, so achieving a perfect color match can be a bit tricky. Always, always, always test your stain on a scrap piece of wood that has been filled and sanded in the exact same way as your floor. This little test can save you a lot of grief!
- Important Note for Putty: If you used a non-hardening wood putty for a pre-finished floor, remember: you will not sand or stain it. These putties are typically already color-matched and are applied after your floor has been stained and finished. Simply wipe away any excess, and you’re done!
Applying a Protective Finish:
- Once the stain (if you used it) is completely dry, it’s time to apply a clear protective finish, like polyurethane, over the repaired area. This step is crucial! It seals and protects your repair, blending it seamlessly with the rest of your beautiful floor. Apply it according to the product’s instructions. For more in-depth knowledge on this crucial step, explore our guide on Hardwood Floor Sanding.
By carefully following these steps, you’ll ensure your hardwood floor putty repair is not only effective and strong but also beautifully integrated into your existing floor, making those imperfections virtually disappear!
Troubleshooting and Post-Repair Care
Even the most meticulous DIYer can run into a snag or two. But don’t worry, we’ve got solutions for common issues in hardwood floor putty repair, and tips for keeping your floors looking fantastic long after the repair.
Addressing Common Issues in Hardwood Floor Putty Repair
- Cracking: If your filler cracks, it’s often due to insufficient flexibility or improper drying.
- Solution: For future repairs, ensure you’re using a flexible filler, especially for gaps or areas prone to wood movement. If you’re filling deep holes, applying filler in thinner 6mm layers, allowing each to dry completely, will significantly reduce cracking. Trying to fill too much at once can lead to a brittle, cracked repair.
- Shrinking: Filler naturally shrinks as it dries. If you didn’t overfill enough, you might end up with a depression.
- Solution: Always overfill slightly when applying filler. This extra material allows for natural shrinkage and gives you enough to sand down to a perfectly flush surface. If you see shrinkage after drying, you might need to apply another thin layer, allow it to dry, and re-sand.
- Color Matching: This is arguably the trickiest part of hardwood floor putty repair. Getting the color just right can make the difference between an invisible repair and one that sticks out like a “black eye.”
- Solution:
- Test, Test, Test: We can’t stress this enough. Always test your chosen filler with your stain (if applicable) on a scrap piece of wood or an inconspicuous area before applying it to your floor.
- Mix for Custom Shades: Don’t be afraid to mix different filler colors to achieve a closer match. Many brands offer a range of shades that can be blended. You might even mix two or three shades of vinyl putty to get that perfect hue, starting darker and adding lighter tones.
- Consider Wood’s Natural Variation: Wood has grain, and wood filler does not. Also, the color of wood can change with seasons, which can affect how well your repair blends in over time. Try to match the specific spot you’re filling, rather than just the overall wood species. For knots, for example, an ebony fill might look more natural than a light-colored one.
- Putty for Finished Floors: For pre-finished floors, choose a non-hardening wood putty that is already color-matched to your floor’s finish. These are designed to blend seamlessly without sanding or staining.
- Solution:
Long-Term Maintenance for Your Repaired Floor
A successful hardwood floor putty repair is just one step in maintaining the beauty and longevity of your floors. Ongoing care is essential to keep them looking their best.
- Regular Cleaning: Keep your floors clean by regularly sweeping with a soft broom or vacuuming with a hardwood floor attachment. This prevents abrasive dirt and grit from scratching the surface.
- Use Furniture Pads: Place felt pads under all furniture legs to prevent scratches and dents. This simple step can save you countless future repairs.
- Avoid Harsh Chemicals: Use cleaning products specifically designed for hardwood floors. Harsh chemicals, abrasive cleaners, or excessive water can damage your floor’s finish and even the wood itself.
- Monitor Humidity Levels: Continue to maintain indoor humidity levels between 30% and 50% year-round. This is crucial for preventing expansion and contraction of the wood, which can stress repairs and lead to new gaps or cracks.
- Early Damage Detection: Regularly inspect your floors for any new gaps, cracks, or damage. Addressing these issues early, when they are small and minor, makes for much easier and more effective repairs.
By consistently applying these maintenance tips, we can ensure our hardwood floor putty repair stands the test of time and your floors continue to look stunning for years to come. For more detailed care instructions, refer to our comprehensive Hardwood Floor Care Guide.
Frequently Asked Questions about Hardwood Floor Putty
We get a ton of fantastic questions about hardwood floor putty repair here at Romero Hardwood Floors. It’s totally normal to feel a little overwhelmed by all the choices out there! So, we’ve gathered some of the most common questions we hear, along with our expert advice, to help you feel confident in your DIY journey.
What is the best type of wood filler for hardwood floors?
Ah, the million-dollar question! The truth is, there isn’t one single “best” type of wood filler or putty for every situation. It truly depends on what you’re trying to fix and the condition of your floor. Think of it like this: you wouldn’t use a hammer to fix a leaky faucet, right? Different jobs call for different tools!
If you’re working on an unfinished floor – meaning it hasn’t been stained or sealed yet – we often lean towards water-based fillers. Why? Because they’re incredibly user-friendly! They’re easy to spread, simple to clean up, and dry pretty quickly, allowing you to sand and finish your floor without too much waiting around. Plus, they’re generally less likely to shrink. For those super high-traffic areas where you need extra toughness, a solvent-based filler might be an option, but remember, those often come with stronger fumes, so good ventilation is key!
Now, if your floor is already finished – stained and sealed – and you’re tackling minor cosmetic fixes like a pesky nail hole or a small gouge, a non-hardening, flexible wood putty is your best friend. These putties are designed to blend right in without needing any sanding or re-staining. They stay a little bit flexible, which is great for accommodating the natural movement of your wood floor.
And speaking of movement, if you know certain spots on your floor experience a lot of shifting (like near a sunny window or a drafty door), choosing a flexible putty is crucial. This helps prevent those annoying cracks that rigid fillers can develop over time. Lastly, if you’re aiming for a super specific color match, always choose a stainable filler and, please, please, please – test it on a scrap piece of wood first! Some clever products even let you mix in wood dust from your actual floor for an almost invisible repair.
How do you fix gaps between hardwood floorboards?
Those little (or sometimes not-so-little!) gaps between floorboards are a common sight, and fixing them depends a lot on why they’re there in the first place.
Here’s the thing about hardwood floors: they’re natural, living things, and they expand and contract with changes in humidity. This means many gaps are what we call “seasonal.” They tend to widen in the dry winter months and then snuggle back together when humidity is higher in the summer. Trying to fill these constantly moving gaps with a rigid wood filler is a bit like trying to catch smoke – it just won’t stay put! In fact, we’ve seen rigid fillers crack and crumble, making the floor look even worse. As we often say, sometimes “open, honest gaps are far more attractive than dirty, poorly filled gaps.”
So, for those small, stable gaps that don’t seem to budge much, or for purely cosmetic fixes on a finished floor, a flexible wood putty can work wonders. Just press it into the gap and wipe away any extra. It’ll stay soft and won’t crack with minor movement. But for those wider, constantly moving gaps, we really advise against using hard-drying fillers. They simply don’t have the elasticity to stretch and shrink with the wood, and you’ll likely find them breaking apart within a year.
For truly wide gaps that just won’t close up, even in humid weather, more flexible solutions like cork strips can be a better long-term answer than traditional fillers. They can be tucked into the gaps and then finished over, offering a durable and much more aesthetically pleasing solution that actually moves with your floor. For most seasonal gaps, the best “fix” is often to maintain a consistent indoor humidity level (ideally between 30% and 50%) throughout the year. This helps keep your wood floor happy and minimizes all that natural expansion and contraction.
Can wood filler be used on all types of hardwood floors?
The short answer is: generally, yes! Both wood filler and putty can be used on most types of hardwood floors, whether you have solid hardwood or engineered flooring. However, the key word here is compatibility. It’s all about making sure the product you choose plays nicely with your specific floor.
Our golden rule is always to test on an inconspicuous area first. Before you go spreading that filler all over a prominent spot, try it out on a small, hidden corner of your floor. This lets you check how well the color matches, how it sticks, and if it reacts strangely with your particular wood species or finish. It’s a tiny step that can save you a lot of headache!
While most fillers are pretty versatile, some exotic or very oily wood species might have their own quirks. If you have a less common wood type, it’s always a good idea to check the filler manufacturer’s recommendations or even chat with a flooring professional. And don’t worry about engineered vs. solid hardwood – while engineered floors handle humidity a bit differently, the methods for fixing minor surface imperfections are pretty much the same for both.
With a little careful preparation and by picking the right product, hardwood floor putty repair is a fantastic and viable option for sprucing up a wide variety of hardwood floors. You’ve got this!
Conclusion: Enjoy Your Flawless Floors
We truly hope this guide has given you the confidence to dive into hardwood floor putty repair yourself! We’ve covered everything, from understanding the difference between wood filler and wood putty, to mastering the best ways to apply them, and even tackling those tricky common issues. Now, you have the know-how to bring your beautiful hardwood floors back to life.
The secret to a successful repair, in our experience, boils down to a few key things. First, it’s all about choosing the right product for your specific floor and the damage you’re fixing. Next, thorough preparation of the repair area is crucial – don’t skip those cleaning and humidity checks! Then, you need a little patience during application and drying times. And finally, paying close attention to detail when sanding and finishing will ensure a seamless look.
There’s a real sense of accomplishment when you see your hardwood floors transformed. Those once-unsightly cracks, gaps, and gouges vanish, leaving behind a smooth, inviting surface. It’s not just about making your home look better; it’s also a smart, cost-effective way to boost your home’s value and keep your floors in top shape.
But even the most enthusiastic DIYer needs to know when to call in the cavalry. While small scratches, nail holes, and minor gouges are perfect for a weekend DIY project, bigger problems often need a professional touch. Things like widespread water damage, significant warping, or deep structural issues are usually best left to the experts. If you’re facing these larger challenges, or just feel a bit overwhelmed, we at Romero Hardwood Floors Inc. are always ready to lend a hand.
We proudly serve many communities across Massachusetts, including Beverly, Chelsea, Danvers, East Boston, Gloucester, Lynnfield, Malden, Manchester by the Sea, Marblehead, Medford, Melrose, Nahant, Peabody, Reading, Revere, Rockport, Salem, Saugus, Somerville, Stoneham, Swampscott, Wakefield, Winchester, Winthrop, and Woburn. We’re known for our competitive pricing, always showing up on time, and our guaranteed workmanship.
So, don’t hesitate to get in touch for a free floor repair estimate. Let us help you keep the elegance and durability of your hardwood floors shining for many years to come. You can explore all our services at Hardwood Floor Repair Services. Your beautiful floors are waiting!
