Hardwood Flooring Install: Top Step-by-Step Guide 2024
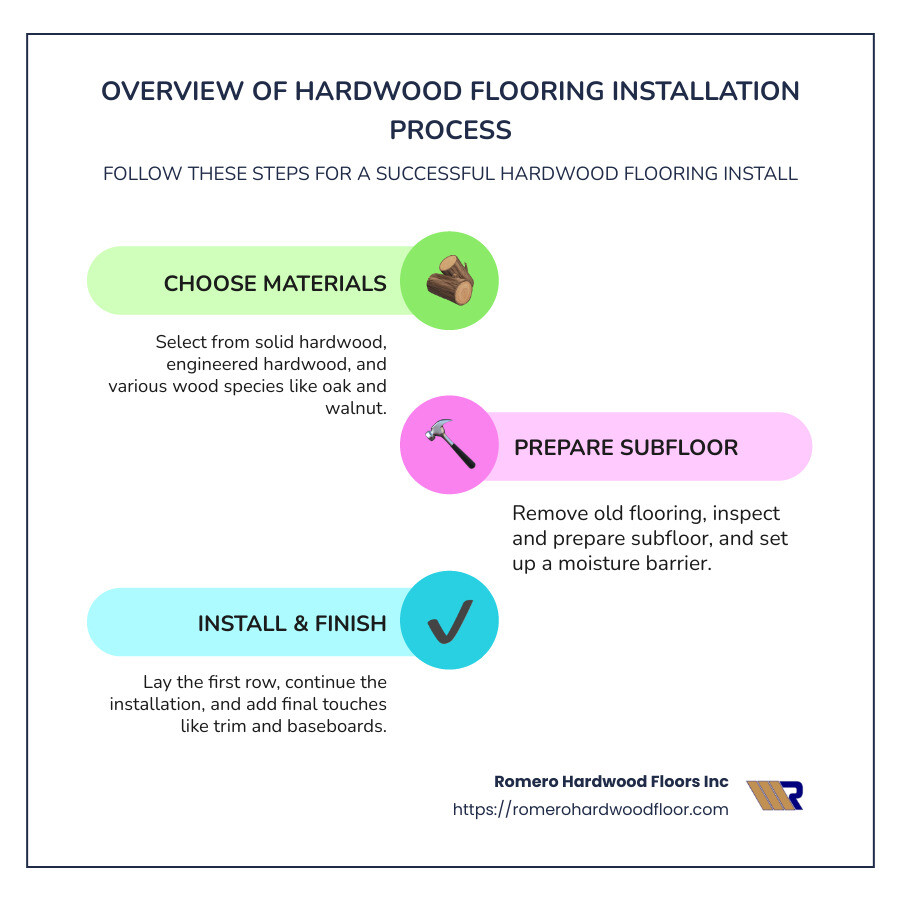
Hardwood flooring install is a fantastic way to improve your home’s aesthetics and add significant value. As a DIY project, it can be both rewarding and cost-effective if done right. To get professional-looking results, you’ll need to select the right materials, gather essential tools, and follow a meticulous plan.
In this guide, we’ll walk you through:
- Understanding different hardwood flooring options like solid and engineered hardwood
- Choosing wood species such as oak, walnut, or hickory
- Preparing your subfloor to ensure a seamless installation
- Installing hardwood floors step-by-step, from laying the first row to finishing touches
I’m Francisco Romero, the proud owner of Romero Hardwood Floors Inc. With over 15 years of experience in hardwood flooring install, I’ve helped countless homes in Revere, MA, achieve their flooring dreams. Let’s make your hardwood flooring project a success.
Similar topics to hardwood flooring install:
– engineered hardwood flooring
– hardwood flooring refinishing contractors
– wood floor
Hardwood Flooring Options
Solid Hardwood vs. Engineered Hardwood
Choosing between solid hardwood and engineered hardwood is a key decision in your hardwood flooring install. Each has its own set of benefits that can suit different needs and environments.
Solid Hardwood is cut from a single piece of wood, offering a timeless and authentic look. This type of flooring can be sanded and refinished multiple times, making it a long-lasting option. It’s best suited for areas with stable humidity levels and above-grade installations (places that are 18 or more inches above ground). However, solid hardwood is more susceptible to moisture, so it’s not ideal for basements or areas with fluctuating humidity.
Engineered Hardwood consists of a top layer of hardwood veneer bonded to multiple layers of plywood or high-density fiberboard (HDF). This construction makes it more stable and resistant to moisture, making it suitable for basements and installations over concrete subfloors. Engineered hardwood can also be a more budget-friendly option while still providing the beauty of real wood.
Pre-finished Hardwood comes with a factory-applied finish, which means you won’t need to do any on-site finishing. This can save you time and effort and often results in a more durable finish.
Popular Wood Species for Flooring
Your choice of wood species will significantly impact the look and durability of your floor. Here are some popular options:
Oak is a classic choice due to its durability and versatile grain patterns. It’s available in both red and white varieties, with white oak being denser and more moisture-resistant.
Walnut offers a rich, dark color that adds sophistication to any room. It has a smoother grain and is slightly softer than oak, making it more susceptible to dents but easier to work with.
Hickory is known for its hardness and distinctive grain patterns, making it a great choice for high-traffic areas. Its rustic appearance can add character to any space.
Maple has a smooth grain and warm tone, making it a popular choice for modern and traditional interiors alike. It’s also quite hard, making it durable for everyday use.
Cherry is sought after for its rich, deep colors that darken with age. While it’s softer than oak or maple, its unique color and smooth grain make it a luxurious option.
When selecting your wood species, consider factors like hardness, color, and grain pattern. The type of cut—plain-sawn, quarter-sawn, or rift-sawn—also affects the appearance and stability of the flooring.

Durability and Cost: The Janka hardness scale measures the resistance of wood to denting and wear. For example, hickory scores 1,820 lbf, making it one of the hardest American hardwoods. Maple scores between 1,450 and 1,500, while red oak scores 1,290. Walnut and cherry have lower Janka scores but are still suitable for flooring.
Cost Considerations: The cost of your hardwood flooring install will vary based on the species you choose. Domestic hardwoods like white oak, red oak, and maple are generally more affordable. Walnut, cherry, and ash can be pricier due to their unique characteristics. Exotic woods like teak and mahogany are the most expensive but offer unparalleled beauty and durability.
In the next section, we’ll guide you through the essential steps to prepare your space for hardwood flooring installation, ensuring a smooth and successful project.
Preparing Your Space for Hardwood Flooring Installation
Removing Existing Flooring
Before you start your hardwood flooring install, you need to remove the existing flooring. This step is crucial to ensure a smooth and level surface for your new hardwood.
1. Remove Old Flooring Materials: Begin by taking out any carpet, vinyl, or tile. Use a pry bar to carefully lift these materials. If you plan to reuse the baseboards, remove them gently to avoid damage.
2. Clean the Subfloor: After removing the old flooring, vacuum the subfloor to get rid of all debris. This ensures a clean base for your new hardwood.
3. Check for Asbestos: If you encounter old materials that might contain asbestos, stop immediately and consult a professional. Asbestos is hazardous and requires specialized handling.
4. Refinish Existing Hardwood: If you have existing hardwood floors that need refinishing, strip the old finish using a chemical stripper or by sanding. This prepares the surface for a new coat.
Assessing and Preparing the Subfloor
A well-prepared subfloor is key to the longevity and stability of your hardwood flooring. Here’s how to get it right:
1. Inspect for Damage: Check the subfloor for any signs of damage, such as cracks or loose sections. Repair any damaged areas to ensure a stable base.
2. Moisture Check: Use a moisture meter to check the subfloor’s moisture content. Hardwood is sensitive to moisture, so make sure the subfloor is completely dry. If you’re installing over concrete, consider applying a moisture barrier to prevent future issues.
3. Level the Subfloor: Use a long level to identify any high or low spots. Sand down the high spots and fill the low areas with a leveling compound. Your subfloor should be flat and smooth to avoid issues with your new flooring.
4. Plywood or OSB: For homes with wood subfloors, ensure they are at least 3/4-inch thick plywood or oriented strand board (OSB). These materials should be securely fastened to the floor joists to prevent movement.
5. Secure Loose Boards: If you find any loose boards, nail or screw them down to eliminate squeaks and ensure a solid foundation.
6. Install a Moisture Barrier: Even if you have waterproof hardwood, adding a moisture barrier like 15 to 30 lb asphalt-saturated felt or silicone vapor shield can protect your floors from spills and water vapor.
By carefully removing the existing flooring and thoroughly preparing the subfloor, you set the stage for a successful hardwood flooring install. In the next section, we’ll discuss the importance of acclimating your hardwood flooring to prevent future issues.
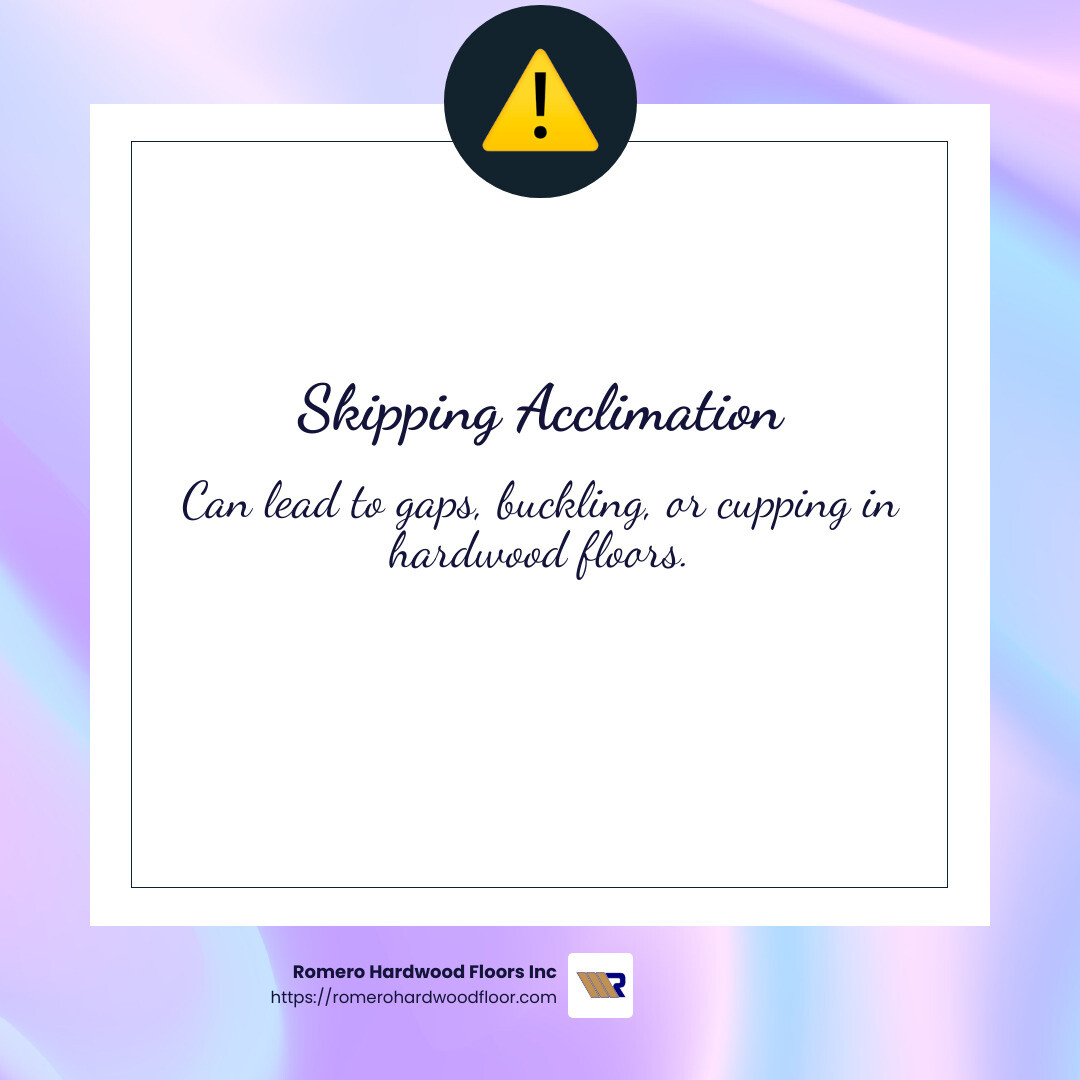
Acclimating Your Hardwood Flooring
Acclimating your hardwood flooring is a critical step to ensure a long-lasting and beautiful installation. Skipping this step can lead to serious issues like gaps, buckling, or cupping. Let’s explore why acclimation is crucial and how to do it properly.
Why Acclimation Is Crucial
Hardwood is a natural material that reacts to changes in temperature and humidity. When wood absorbs moisture, it expands. Conversely, it contracts when it loses moisture. This expansion and contraction can cause gaps between boards, buckling, or cupping if not properly managed.
Acclimating the wood allows it to adjust to the environment of your home before installation. By doing this, you minimize the movement of the wood after installation, which helps prevent damage and ensures a stable, durable floor.
How To Properly Acclimate Hardwood
Here’s how you can acclimate your hardwood flooring effectively:
1. Room Placement: Place the hardwood planks in the room where they will be installed. This helps the wood adjust to the specific conditions of that room.
2. Remove Plastic Packaging: Take off any plastic wrapping from the wood. This allows the wood to breathe and acclimate to the room’s air.
3. Stack with Spacers: Stack the boards with spacers between them. This ensures air circulates around all sides of each plank, promoting even acclimation.
4. Maintain Normal Living Conditions: Keep the room at normal living conditions—around 60-80°F and 30-50% relative humidity. This simulates the environment the floor will experience once installed.
5. Use a Moisture Meter: Check the moisture content of both the hardwood and the subfloor. The moisture content of the wood should be within 2% of the subfloor’s moisture content. This balance helps prevent future movement.
6. Allow 3-7 Days: Let the wood sit for three to seven days. This gives it enough time to adjust to the room’s conditions. For areas with significant climate differences, you might need to extend this period.
7. Mix Shades and Lengths: During acclimation, you can lay out boards from different boxes to mix shades and lengths. This step ensures a more natural and visually appealing floor once installed.
By following these steps, you can help ensure your hardwood flooring install goes smoothly and lasts for years to come. Proper acclimation not only prevents issues but also sets the foundation for a beautiful and durable floor.
In the next section, we’ll cover planning your flooring layout, including how to measure your room and decide on the direction of your floorboards.
Planning Your Flooring Layout
Before you start your hardwood flooring install, it’s crucial to plan your layout. This helps you achieve a professional look and ensures structural stability.
Measuring Your Room
First, measure the length and width of your room. This will give you the total square footage. Add 10% to this figure to account for waste and cuts. Don’t forget to measure any alcoves or closets separately and include them in your total.
Steps to Measure Your Room:
- Length and Width: Use a tape measure to find the length and width of the room.
- Square Footage: Multiply the length by the width to get the total square footage.
- Waste Allowance: Add 10% to the total square footage for waste and cuts.
- Alcoves and Closets: Measure these areas separately and add them to your total.
Determining Board Direction
The direction you lay your floorboards affects both the look and the stability of your floor.
Perpendicular to Joists: Generally, floorboards should be installed perpendicular to the floor joists. This provides structural stability and prevents the floor from sagging.
Parallel to the Longest Wall: For a more spacious look, consider laying the boards parallel to the longest wall in the room. This can make a narrow room look wider.
Natural Light Direction: In square rooms, lay the boards parallel to the direction of natural light. This minimizes the appearance of gaps between boards.
Steps to Determine Board Direction:
- Check Floor Joists: Identify the direction of your floor joists. Lay boards perpendicular to them for stability.
- Assess Room Shape: For narrow rooms, lay boards parallel to the longest wall to create an illusion of a larger space.
- Consider Natural Light: In square rooms, align boards with the direction of natural light to minimize visible gaps.
By following these guidelines, you can ensure your hardwood flooring install is both beautiful and structurally sound. Next, we’ll dive into installing the first row of flooring, including setting expansion gaps and securing the initial boards.
Installing the First Row of Flooring
The first row of your hardwood flooring install sets the foundation for the entire project. This step involves creating a straight starting line and securing the initial boards.
Setting Expansion Gaps
Before laying any boards, leave a three-quarter-inch expansion gap around the perimeter of the room. This gap allows the wood to expand and contract with changes in humidity without causing buckling or other damage. Use three-quarter-inch spacers along the starting wall to maintain this gap.
Securing the Initial Boards
Start by snapping a chalk line parallel to your starting wall, accounting for the 3/4-inch expansion gap. Place the first board along this line with the groove facing the wall. If the wall isn’t perfectly straight, you may need to scribe the first row to fit its contours.
Secure this row by face-nailing through the board about one-half of an inch from the wall side. Use a nail set to countersink the nails slightly below the surface of the wood. Continue this process for the entire first row, ensuring each board is tightly fitted to the next.
By following these steps, you can ensure a stable and secure start to your hardwood flooring project. Next, we’ll cover how to continue the installation process, including using a flooring nailer and staggering board joints.
Continuing the Hardwood Flooring Installation Process
Once the first row is securely in place, it’s time to move forward with the rest of your hardwood flooring install. This involves using a flooring nailer and ensuring the board joints are properly staggered for structural integrity and visual appeal.
Using a Flooring Nailer
A flooring nailer is an essential tool for installing the majority of your hardwood floor. It allows you to drive nails through the tongue of each board at the correct angle, ensuring a secure fit without damaging the wood’s surface.
- Position the Nailer: Place the flooring nailer so that it aligns with the tongue of the board. The nailer should sit at a 45-degree angle to the floor.
- Insert the Fastener: Load the nailer with the appropriate fasteners. Typically, you’ll use 2-inch nails or staples for this process.
- Strike with a Mallet: Use a mallet to strike the plunger on the nailer. This action drives the fastener through the tongue of the board and into the subfloor. Make sure to hit the plunger firmly to ensure the fastener is fully seated.
- Maintain Spacing: Continue this process, spacing the fasteners according to the manufacturer’s recommendations, usually every 6 to 8 inches along the length of each board.
By using a flooring nailer, you ensure that each board is securely fastened, which helps maintain the overall stability of your floor.
Staggering Board Joints
Properly staggering the board joints is crucial for both the structural integrity and the aesthetic appeal of your hardwood floor.
- Avoid H-Patterns: When laying the boards, avoid creating an H-pattern by ensuring that the ends of the boards in adjacent rows do not align. This pattern can weaken the floor and create an undesirable visual effect.
- Random Pattern: Aim for a random pattern by cutting boards at different lengths. This not only looks more natural but also distributes the load more evenly across the floor.
- Offset Joints: Ensure that the end joints of boards in one row are at least 6 inches away from the end joints in the adjacent row. This offset helps to strengthen the floor and prevent weak points.
- Check Alignment: As you continue to lay the boards, periodically check the alignment to ensure that the rows are straight and the joints are staggered correctly. Use a straight edge or a chalk line to help maintain consistency.
By following these steps, you can create a floor that is both beautiful and durable. Proper use of a flooring nailer and careful staggering of board joints are key to a successful hardwood flooring install.
Next, we’ll discuss how to deal with obstacles and make special cuts around vents, doorways, and other irregular areas.
Dealing With Obstacles and Special Cuts
Working Around Vents and Doorways
During your hardwood flooring install, you’ll encounter obstacles like vents and doorways. Here’s how to handle them smoothly:
Vents: When you reach a floor vent, you’ll need to cut the hardwood to fit around it.
- Measure and Mark: Measure the vent opening and mark the corresponding area on the hardwood board.
- Cut with a Jigsaw: Use a jigsaw to cut out the marked area. Leave a small gap around the vent for expansion.
- Install the Board: Fit the board around the vent opening and ensure it aligns with the adjacent boards.
Doorways: For a seamless look, you may need to undercut door frames to allow the flooring to slide underneath.
- Mark the Height: Use a piece of flooring as a guide to mark the height on the door frame.
- Undercut the Frame: Cut the door frame at the marked height using a handsaw or oscillating multi-tool. This allows the flooring to fit neatly under the frame.
- Slide the Board Under: Slide the board under the door frame and continue with the installation.
Cutting Boards To Fit
Accurate cuts are essential for a professional-looking hardwood flooring install. Here’s how to do it:
Measurements: Measure the space where the board will fit, accounting for the expansion gap.
- Mark the Cut Line: Mark the cut line on the board. For straight cuts, use a square to ensure accuracy.
- Use the Right Saw: For straight cuts, use a miter saw or circular saw. For intricate shapes around pipes or fixtures, use a jigsaw.
- Minimize Splintering: Always cut with the finished side up to minimize splintering.
Complex Cuts: For irregular shapes, like around pipes or other fixtures:
- Create a Template: Use a piece of paper to create a template of the shape you need to cut.
- Trace the Template: Trace the shape onto the board with a pencil.
- Cut with a Jigsaw: Carefully cut along the traced line with a jigsaw.
By following these steps, you can handle obstacles and make precise cuts, ensuring a smooth and professional hardwood flooring install. Next, we’ll cover how to install the final rows of flooring.
Installing the Final Rows of Flooring
As you near the opposite wall during your hardwood flooring install, you’ll need to change your technique for the last few rows. These rows require a more precise approach to ensure a perfect fit.
Finishing With Face Nailing Techniques
When you can’t use the flooring nailer anymore, it’s time to switch to face nailing. This method helps secure the final rows in place.
Pre-drill Holes: Pre-drill holes at a 45-degree angle through the face of the board, about half an inch from the tongue side. This prevents the wood from splitting when you drive in the nails.
Use Finish Nails: Drive finish nails into the pre-drilled holes using a hammer or brad nailer. Make sure to countersink the nails slightly below the surface. Use a nail set to ensure they are flush with the wood.
Countersinking: This step is crucial. Countersinking the nails ensures a smooth surface, making the nail heads less noticeable and the floor safer to walk on.
Using a Pull Bar for Tight Spaces
For the very last row, you’ll often need to rip the boards lengthwise to fit the remaining space, leaving an expansion gap.
Board Fitting: Measure the space and cut the boards to the correct width using a table saw. Remember to subtract the expansion gap from your measurements.
Using a Pull Bar: Place the pull bar against the wall and hook it over the edge of the board. Tap the other end of the pull bar with a hammer to draw the board tightly against the previous row. This tool is essential for achieving a snug fit in tight spaces.
Face-Nailing the Final Row: Once the board is in place, face nail it to secure it. Make sure to pre-drill and countersink the nails as you did with the previous rows.
By following these steps, you can ensure the final rows of your hardwood flooring install are securely in place and look professional. Next, we’ll discuss the finishing touches that will complete your hardwood floor installation.
Finishing Touches for Hardwood Floor Installation
Filling Nail Holes
After securing the final rows, you’ll notice some visible nail holes. Filling these is crucial for a polished look.
Wood Putty: Choose a wood putty that matches your flooring color. This ensures the filled holes blend seamlessly with the surrounding wood.
Application: Use your finger or a putty knife to press the putty firmly into each hole. This step is essential for a smooth, even surface.
Sanding: Once the putty dries, lightly sand the filled areas to ensure they are level with the rest of the floor. This will make the nail holes nearly invisible and your floor smooth to the touch.
Installing Baseboards and Trim
The final step in your hardwood flooring install is to install baseboards and trim. This not only covers the expansion gap but also adds a finishing touch to your room.
Expansion Gap Coverage: Baseboards are essential for covering the expansion gap around the perimeter of the room. This gap allows the wood to expand and contract with changes in humidity.
Quarter-Round Molding: If the expansion gap is too large for the baseboard alone to cover, add quarter-round molding. This additional trim piece will hide any remaining gaps and give a clean finish.
Wall Nailing: When installing baseboards and quarter-round molding, nail them to the wall—not the floor. This allows the floor to move naturally without causing the trim to detach or crack.
Transition Strips: Finally, install any necessary transition strips between the new hardwood and adjacent flooring materials. These strips ensure a smooth transition and prevent tripping hazards.
By carefully filling nail holes and installing baseboards and trim, you’ll achieve a professional and polished look for your new hardwood floor. Next, we’ll cover how to care for your new hardwood floor to keep it looking beautiful for years to come.
Caring for Your New Hardwood Floor
Initial Cleaning and Maintenance
Once your hardwood flooring install is complete, proper initial cleaning and maintenance are key to preserving its beauty.
Dust Removal: Use a soft-bristled broom or a vacuum designed for hardwood floors to remove any dust or debris. Avoid vacuums with beater bars, as they can scratch the surface.
Microfiber Mop: Instead of using water or liquid cleaners immediately, opt for a dry microfiber mop to pick up any remaining dust. This helps prevent any potential damage from moisture.
Furniture Placement: Wait at least 24–48 hours before placing furniture on your new floor. This allows the wood to settle properly. When moving furniture, lift it instead of dragging to avoid scratches.
Felt Pads: Attach felt pads under the legs of your furniture. This simple step helps prevent scratches and dents on your new floor.
Long-Term Care Tips
To keep your hardwood floor looking its best over the years, follow these long-term care tips:
Regular Sweeping: Sweep or vacuum regularly to remove dirt and debris. This prevents scratches and keeps your floor looking clean.
Damp Mop: For occasional deep cleaning, use a slightly damp mop. Make sure it’s only slightly damp to avoid excess water, which can damage the wood.
Spill Cleanup: Clean up spills immediately to prevent water damage. Use a soft, absorbent cloth to blot the spill and avoid rubbing, which can spread the liquid.
Area Rugs: Place area rugs in high-traffic zones to reduce wear and tear. This is especially useful in entryways and hallways.
Humidity Levels: Maintain consistent indoor humidity levels (30%–50%). This helps prevent the wood from expanding or contracting, which can cause gaps or buckling. A humidifier or dehumidifier can help regulate indoor humidity.
Finish Application: Consider applying a new coat of finish every few years. This protects the wood and refreshes its appearance, keeping your floor looking new.
By following these initial cleaning and long-term care tips, you’ll ensure your hardwood floor remains beautiful and durable for years to come. Next, we’ll discuss how to troubleshoot common issues that may arise during or after your hardwood floor installation.
Troubleshooting Common Hardwood Installation Issues
Even with careful planning, issues can arise during or after a hardwood flooring install. Here’s how to address some common problems:
Addressing Gaps Between Boards
Gaps between boards can occur due to improper acclimation or changes in humidity.
- Minor Gaps: Use a humidifier to increase moisture in the air. This can cause the wood to expand slightly and reduce the gaps.
- Larger Gaps: Fill them with wood filler or thin strips of wood. Make sure to blend the filler with the surrounding wood for a seamless look.
- Severe Cases: Consult a professional. They can assess whether any boards need to be replaced.
Pro Tip: Ensure proper acclimation of the wood before installation to prevent future gaps.
Fixing Squeaky Floors
Squeaky floors are often caused by movement between the boards and the subfloor.
- Locate the Squeak: Pinpoint the exact source of the squeak.
- Thin Finish Nail: Drive a thin finish nail at an angle through the problem board into the subfloor. Be careful not to damage the wood surface.
- Persistent Squeaks: Access the floor from below and use wood blocks to stabilize the area.
Pro Tip: Regularly check for loose boards and secure them to prevent squeaks.
Removing Burn Marks
To remove burn marks from your hardwood floor:
- Sand the Area: Gently use fine-grit sandpaper to eliminate the charred surface. Sand until smooth.
- Apply Matching Wood Stain: Use a stain that matches your floor to blend the area.
- Finish with Polyurethane: Apply a coat of clear polyurethane to restore the shine and protect the wood.
Pro Tip: Always test the stain on a small, inconspicuous area first to ensure a good match.
By addressing these common installation issues, you can maintain the integrity and appearance of your hardwood floor. Next, we’ll answer some frequently asked questions about hardwood flooring installation.
Frequently Asked Questions about Hardwood Flooring Install
Can I install hardwood floors myself?
Yes, you can install hardwood floors yourself! It’s a rewarding DIY project, but it does require some skill and patience. Beginners might find click-lock flooring easier to handle. This method involves snapping the boards together, making it less complicated than others.
For more advanced DIYers, glue-down and nail-down methods are options. Glue-down involves securing the boards to the subfloor with adhesive, while nail-down requires nailing the boards directly to a wooden subfloor. These methods need more tools and experience but offer a more permanent finish.
Pro Tip: Always follow the manufacturer’s instructions for the best results.
Do I need underlayment for hardwood flooring?
Yes, underlayment is important for several reasons:
- Solid Foundation: It provides a stable base for your hardwood flooring.
- Moisture Inhibitor: It acts as a barrier against moisture, which can damage the wood.
- Noise Dampening: It helps reduce noise, making your floors quieter.
Underlayment is especially crucial for floating floors, like click-lock installations, to prevent movement and noise. For glue-down or nail-down methods, check the specific requirements for your flooring type.
Pro Tip: Choose an underlayment that’s compatible with your hardwood flooring and subfloor.
What is the correct way to lay hardwood floors?
Laying hardwood floors correctly involves careful planning and execution:
- Longest Wall: Start by laying the first row along the longest wall in the room. This helps create a visually appealing look.
- Floor Joists: Lay the boards perpendicular to the floor joists for added stability.
- Aesthetic Result: Consider the direction of natural light. Laying boards parallel to the light source can improve the wood’s appearance.
Pro Tip: Always leave a three-quarter-inch gap around the room’s perimeter to allow for expansion and contraction.
By following these guidelines, you can achieve a beautiful and long-lasting hardwood floor. Next, we’ll look at the finishing touches to complete your hardwood flooring installation.
Conclusion
At Romero Hardwood Floors Inc, based in Revere, MA, we take pride in changing homes and commercial properties with our expert hardwood flooring installation and services. Established in 2006, we have built a reputation for our competitive pricing, punctuality, and guaranteed workmanship.
Whether you’re looking to improve the beauty of your home or upgrade your commercial space, our experienced team ensures that every project is completed to the highest standards. We understand that installing hardwood floors is a significant investment, and our goal is to add lasting value to your property.
From selecting the right materials to the final touches, we guide you through the entire process, ensuring a smooth and stress-free experience. Our comprehensive services include:
- Hardwood Floor Installation: Custom to meet your specific needs and preferences.
- Floor Sanding & Refinishing: Bringing out the natural beauty of your existing floors.
- Floor Staining: Offering a range of colors to match your style.
- Repair Services: Addressing any issues to restore your floors to their original condition.
We use only the best materials and techniques to ensure your hardwood floors are not only beautiful but also durable and long-lasting. Our commitment to quality and customer satisfaction has earned us numerous positive reviews from our clients.
Richard M. shares, “Fantastic service all around. On time and on budget. Great work ethic and service by the flooring installers which included their attention to detail and their cleanliness. New floors look fantastic and extremely satisfied with everything. Would highly recommend!”
Francisco and his team are described as “true artists” by another satisfied customer, who was amazed at how they transformed a very old floor into a work of art.
If you’re ready to enjoy the timeless elegance of hardwood floors, contact Romero Hardwood Floors Inc today for a free flooring installation estimate. Visit our Hardwood Flooring Contractors page to learn more about how we can help you achieve your flooring dreams.
Let us bring warmth, beauty, and value to your property with our expert hardwood flooring solutions.
