How to Install Hardwood Floors on Concrete: 10 Best Tips
Installing hardwood floors on concrete is a fantastic way to add beauty, warmth, and value to your home or commercial property. This guide will walk you through the essential steps to ensure a professional and long-lasting installation. But first, here’s a quick rundown:
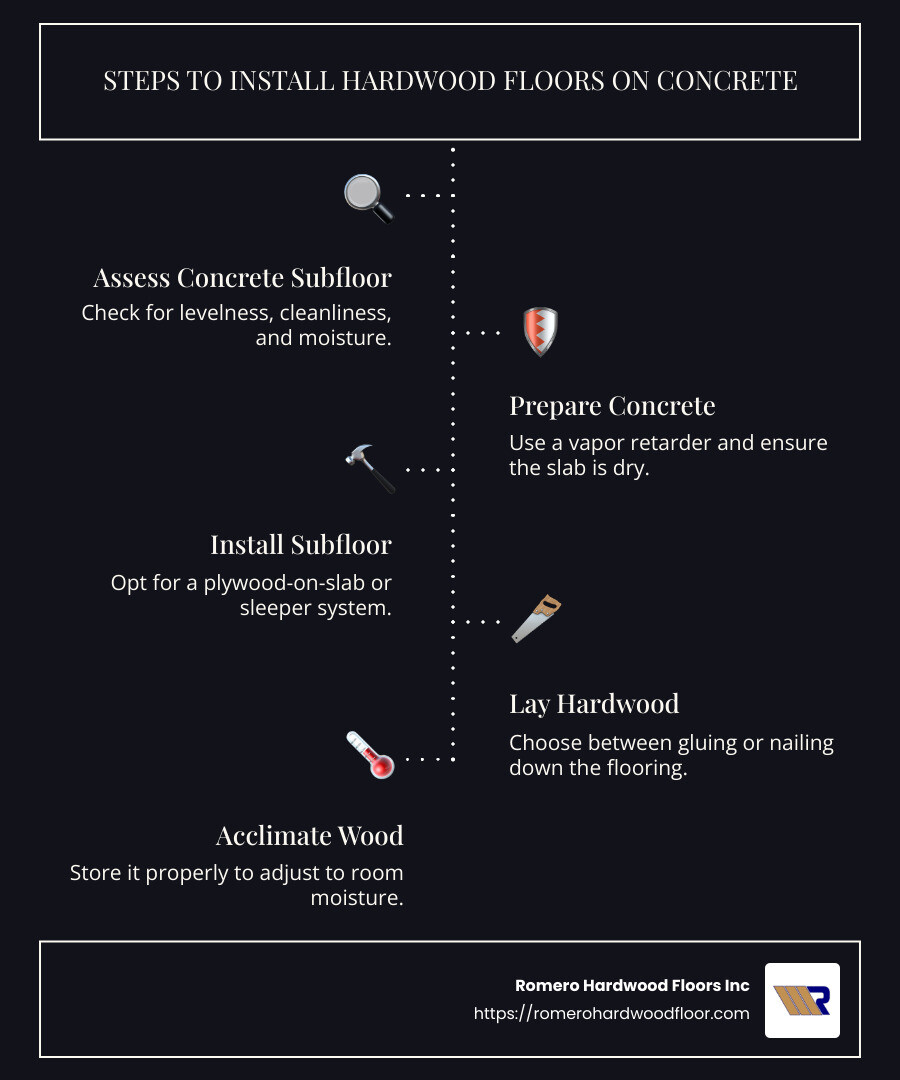
- Assess the concrete subfloor: Check for levelness, cleanliness, and moisture.
- Prepare the concrete: Use a vapor retarder and ensure the slab is dry.
- Install a subfloor: Opt for a plywood-on-slab or sleeper system.
- Lay the hardwood: Choose between gluing or nailing down the flooring.
- Acclimate the wood: Store it properly to adjust to room moisture.
Whether your style is modern, farmhouse, or contemporary, hardwood floors add a timeless appeal. They increase the value of your property and provide a durable, easy-to-maintain surface. Moreover, unlike concrete, hardwood flooring offers better insulation and sound absorption, creating a cozier and quieter environment.
At Romero Hardwood Floors Inc, we specialize in changing spaces with high-quality hardwood flooring. With over 15 years of experience, we provide custom solutions to meet your specific needs, ensuring a seamless installation from start to finish.
I’m Francisco Romero, the proud owner of Romero Hardwood Floors Inc. With extensive expertise in installing hardwood floors on concrete, my team and I are committed to delivering impeccable results that lift the aesthetics and value of your property.
Simple how to install hardwood floors on concrete glossary:
– diy hardwood floor installation
– engineered hardwood flooring installation
– how do i lay hardwood flooring
Assessing the Concrete Subfloor
Before you can install hardwood floors on concrete, it’s crucial to assess the condition of your concrete subfloor. This involves checking for levelness, cleanliness, and any potential moisture issues.
Moisture Testing
Moisture is the ultimate enemy of hardwood flooring. High levels of moisture can cause the wood to warp, buckle, or even mold over time. Therefore, it’s essential to test the concrete for moisture before proceeding with the installation.
Steps for Moisture Testing:
- Use a Moisture Meter: A moisture meter can help you determine the moisture content of your concrete. For solid hardwood, the moisture content should be below 4%. For engineered hardwood, it should be below 12%.
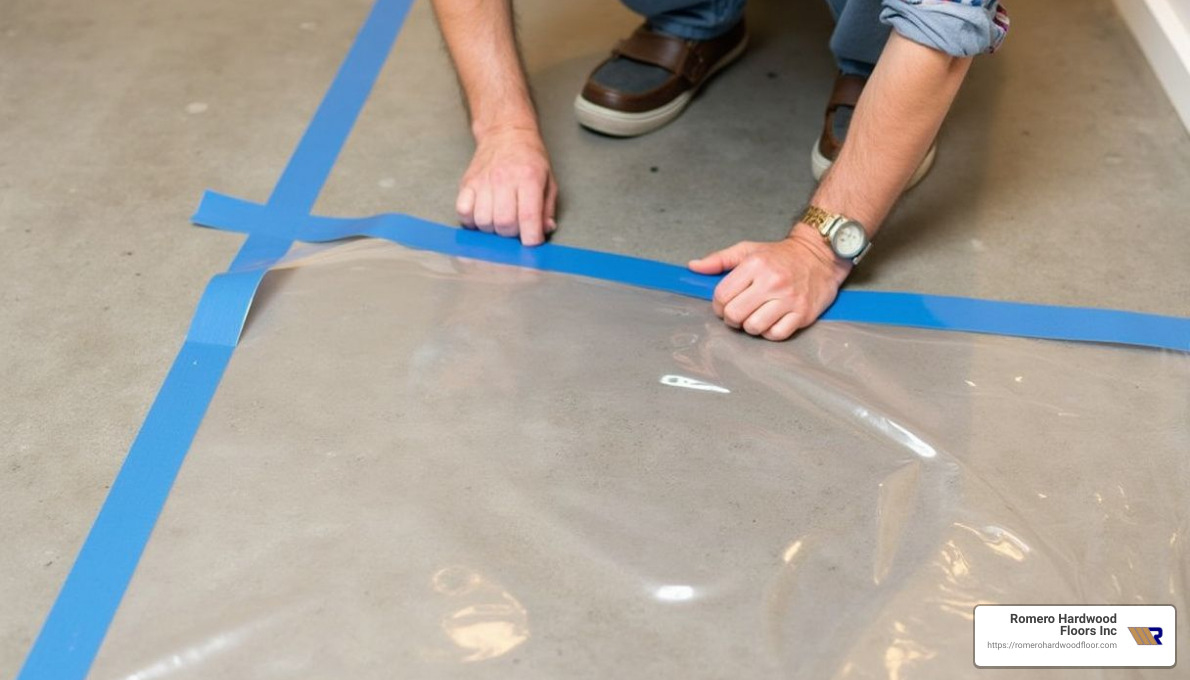
- Plastic Sheet Test: Tape a clear plastic sheet to the concrete and leave it for 24-48 hours. If moisture collects under the plastic, your concrete is too damp for hardwood installation.
- Install a Moisture Barrier: If moisture levels are high, consider installing a moisture barrier. This could be a plastic sheet or a specialized underlayment designed to block moisture.
Cleaning and Leveling
A clean and level subfloor is essential for a successful hardwood floor installation. Any irregularities can lead to problems with the installation and the final appearance of the floors.
Steps for Cleaning and Leveling:
- Clean the Surface: Remove all debris, dust, and any existing flooring materials. Ensure the concrete is free from any paint, glue, or other substances.
- Grind High Spots: Use a concrete grinder to level any high spots on the floor. This ensures a smooth, even surface for the hardwood to adhere to.
- Fill Low Spots: Use a cementitious leveling compound to fill in any low spots. This will help create a flat surface, which is crucial for preventing future warping or cracking of the hardwood.
- Check for Cracks: Inspect the concrete for any cracks. Small cracks can be filled with a concrete patching compound, but larger cracks may require professional attention.
By taking these steps to properly assess and prepare your concrete subfloor, you lay the groundwork for a successful hardwood floor installation. This foundational work ensures that your beautiful new floors will be durable and long-lasting.
Next, we’ll dive into preparing the concrete for hardwood installation, including ensuring a dry slab and installing a vapor retarder.
Preparing the Concrete for Hardwood Installation
Once you’ve assessed and prepped your concrete subfloor, it’s time to ensure it’s ready for hardwood installation. This involves making sure the slab is dry and installing a vapor retarder.
Ensuring a Dry Slab
A dry slab is essential for a successful hardwood floor installation. Excess moisture can lead to warping, buckling, or even mold growth. Here’s how to ensure your slab is dry:
Dry Naturally: If you have a new concrete slab, allow it to dry naturally. Concrete typically takes at least 30 days to cure, but for best results, wait up to 60 days.
Heat and Ventilation: Use heat and ventilation to speed up the drying process. In winter, maintain the building’s temperature near occupancy levels for at least five days before the flooring is delivered. In warm weather, ensure the building is well-ventilated.
Moisture Content Testing: Use a moisture meter to check the slab’s moisture content. For solid hardwood, the moisture content should be below 4%. For engineered hardwood, it should be below 12%. Also, conduct a plastic sheet test by taping a clear plastic sheet to the concrete and leaving it for 24-48 hours. If moisture collects under the plastic, the slab is too damp for hardwood installation.
Installing a Vapor Retarder
A vapor retarder is crucial to prevent moisture from the slab from reaching the hardwood. Here are the steps to install a vapor retarder:
Plastic Sheeting: Cover the entire slab with 4 to 6 mil polyethylene film. Overlap the edges by 4-6 inches and extend the film under the baseboard on all sides. Puncture any bubbles to release trapped air.
Asphalt Felt: Prime the slab and apply cold, cut-back asphalt mastic with a notched trowel. Allow it to set for two hours. Unroll 15-lb. asphalt felt or building paper, lapping the edges by 4 inches and butting the ends. Apply a second coating of mastic and roll out a second layer of felt in the same direction, staggering the overlaps.
Polyethylene Sheeting for Severe Moisture: If moisture conditions are severe, prime the slab and apply cold, cut-back mastic with a straightedge or fine-tooth trowel. Lay 4 to 6 mil polyethylene film over the slab, overlapping the edges by 4-6 inches. Roll the film flat or “walk” it in, stepping on every square foot to ensure adhesion.
By ensuring a dry slab and installing a vapor retarder, you create a protective barrier that helps maintain the integrity of your hardwood floors. Next, we’ll explore the different subfloor systems that can be installed over concrete.
Installing the Subfloor
To install hardwood floors on concrete, a subfloor is essential. It provides a stable base and helps manage moisture. There are three main subfloor systems: plywood-on-slab, sleeper system, and floating subfloor. Each has its own installation method and benefits.
Plywood-on-Slab System
The plywood-on-slab system involves laying plywood directly over the concrete slab. This method is straightforward and effective.
Steps to Install Plywood-on-Slab:
- Install a Vapor Retarder: Cover the entire slab with 4 to 6 mil polyethylene film. Overlap the edges by 4-6 inches and extend the film under the baseboard on all sides.
- Apply Asphalt Mastic: Prime the slab and apply cold, cut-back asphalt mastic with a notched trowel. Allow it to set for two hours.
- Lay Asphalt Felt: Unroll 15-lb asphalt felt or building paper over the mastic, lapping the edges by 4 inches and butting the ends. Apply a second coating of mastic and roll out a second layer of felt in the same direction, staggering the overlaps.
- Place Plywood Panels: Lay 3/4″ exterior plywood panels over the entire area. Leave a 3/4″ space at the wall line and 1/4″ to 1/2″ between panels. Cut plywood to fit within 1/8″ near door jambs and other obstructions.
- Fasten the Plywood: Use power-actuated fasteners to secure the plywood to the slab. Start at the center of each panel and work towards the edges, spacing fasteners 2 inches from the edges every 6-8 inches along the perimeter and 12 inches apart within the interior of the panel.
Sleeper System
The sleeper system uses treated sleepers (2x4s) embedded in asphalt mastic to create a nailing base for the hardwood.
Steps to Install the Sleeper System:
- Prepare the Slab: Sweep the slab clean and apply an asphalt primer. Allow it to dry completely.
- Install a Vapor Retarder: Lay 4 to 6 mil polyethylene film over the slab, overlapping the edges by 4-6 inches.
- Embed the Sleepers: Place flat, dry, kiln-dried, preservative-treated 2×4 sleepers in random lengths (18″ to 48″) in rivers of hot or cold asphalt mastic. Space the rows 6-7 inches on center, at a right angle to the direction of the finished flooring. Stagger the end joints, overlapping the ends by 4 inches, with a 1/4″ space between them.
- Lay Additional Vapor Retarder: Loosely lay another layer of 4 to 6 mil polyethylene film over the sleepers, overlapping the edges on top of the 2x4s.
- Nail the Finished Flooring: Nail the hardwood flooring to the sleepers through the film.

Floating Subfloor
A floating subfloor consists of two layers of plywood secured together over a vapor retarder. This system does not attach to the concrete, allowing it to “float.”
Steps to Install a Floating Subfloor:
- Install a Vapor Retarder: Cover the entire slab with 4 to 6 mil polyethylene film, overlapping the edges by 4-6 inches.
- Lay the First Layer of Plywood: Place the first layer of 3/4″ plywood panels over the vapor retarder. Leave a 3/4″ space at the wall line and 1/4″ to 1/2″ between panels.
- Lay the Second Layer of Plywood: Stagger the seams of the second layer of plywood from the first layer. Secure the two layers together with screws or nails, ensuring no fasteners penetrate the vapor retarder or the concrete.
- Install the Finished Flooring: Lay the hardwood flooring over the floating subfloor, following the manufacturer’s instructions for installation.
By choosing the right subfloor system, you ensure a stable and moisture-resistant base for your hardwood floors. Next, we’ll dive into the specific methods for installing hardwood floors on concrete.
Installing Hardwood Floors on Concrete
Gluing Down Hardwood Floors
Gluing down hardwood floors is a popular method for installing both solid and engineered wood floors directly onto a concrete subfloor. This method involves using mastic glue, which provides a strong bond between the wood and the concrete.
Here’s how to do it:
- Full Trowel Glue Method: Use a notched trowel to spread mastic glue evenly over the concrete. The ridged pattern created by the trowel helps secure the wood planks. Ensure the glue completely covers the concrete to act as a vapor barrier.
- Laying the Wood Planks: Place the wood planks onto the glue and press them firmly into place. For tongue and groove flooring, make sure each plank locks securely with the next.
Benefits:
– Strong Bond: Prevents the wood from shifting or warping.
– Insulation: Provides some soundproofing and insulation.
Considerations:
– Moisture: Ensure the concrete is dry and free of moisture.
– Wood Type: Some woods are more stable and suitable for gluing down, like circular-sawn Douglas Fir.
Nailing Down Hardwood Floors
Nailing down hardwood floors requires a plywood subfloor over the concrete. This method is typically used for solid hardwood floors.
Here’s how to do it:
- Install Plywood Subfloor: Lay a vapor retarder over the concrete and then install 3/4″ plywood panels. Secure the plywood using power-actuated fasteners.
- Nail the Hardwood: Use mechanical fasteners like cleats, nails, or staples to secure the hardwood planks to the plywood. Start at the longest, straightest wall and work your way across the room.
Benefits:
– Stability: Minimizes movement and improves durability.
– Traditional Look: Ideal for achieving a classic hardwood floor appearance.
Considerations:
– Subfloor Preparation: Ensure the plywood is level and securely fastened.
– Tools: Requires specific tools like a floor nailer.
Floating Floor
A floating floor is another method for installing hardwood floors on concrete. The planks are not attached directly to the subfloor but are instead connected to each other, allowing the floor to “float.”
Here’s how to do it:
- Install Underlayment: Lay a vapor retarder over the concrete to protect against moisture.
- Lay the Planks: Start from one corner and lay the planks, snapping them together. Ensure there is an expansion gap around the perimeter of the room.
Benefits:
– Flexibility: Can expand and contract without buckling.
– Ease of Installation: No need for nails or glue.
Considerations:
– Subfloor Condition: Must be clean and level.
– Room Size: Ideal for larger, open areas.
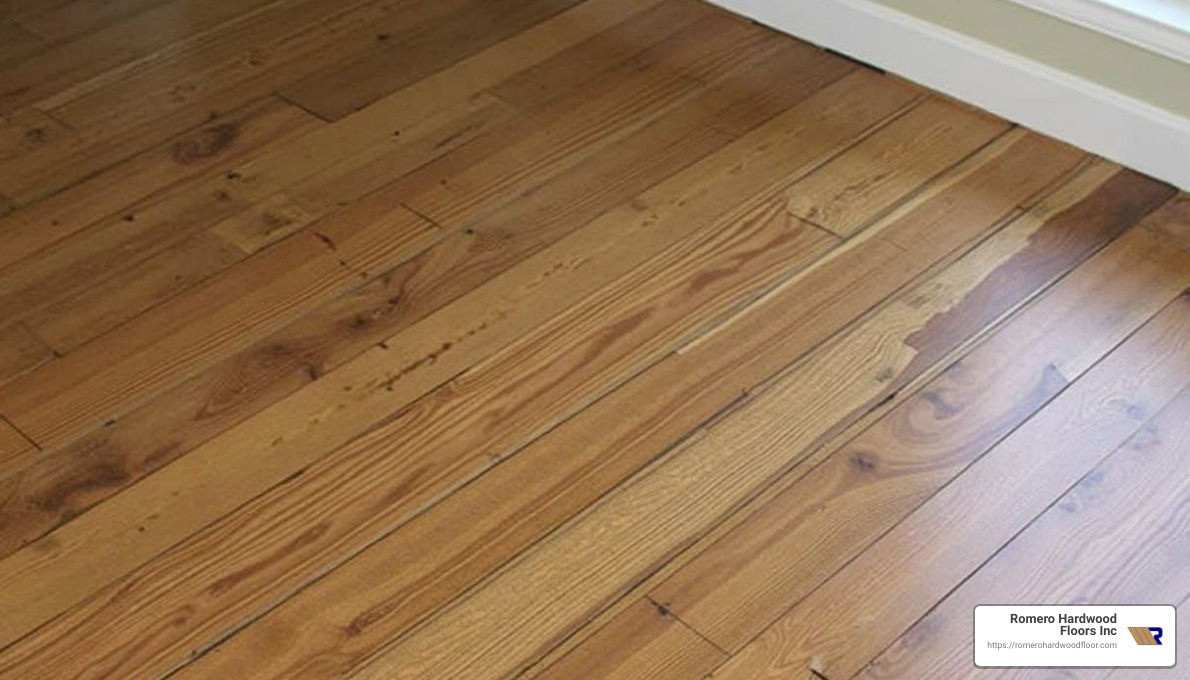
By understanding the different methods for installing hardwood floors on concrete, you can choose the best approach for your project. Whether you opt for gluing down, nailing down, or a floating floor, each method has its advantages and specific requirements. Next, we’ll discuss the process of acclimating the hardwood flooring to ensure a successful installation.
Acclimating the Hardwood Flooring
Acclimating hardwood flooring is a crucial step in ensuring a successful installation. This process allows the wood to adjust to the room’s temperature and humidity, reducing the risk of warping or gaps after installation.
Moisture Difference
Wood is hygroscopic, meaning it absorbs and releases moisture based on the environment. For a stable installation, the moisture content of the hardwood and the subfloor should be within a specific range:
- For flooring less than 3 inches wide: The moisture difference between the wood and the subfloor should be within 4%.
- For flooring 3 inches or wider: The difference should be within 2%.
Use a moisture meter to check these levels. This tool is essential for ensuring that the wood and the subfloor are compatible.
Storage
Proper storage of the hardwood flooring before installation is also important. Here’s how to do it:
- Location: Store the wood in the room where it will be installed. This helps the wood acclimate to the specific conditions of that space.
- Unboxing: Remove the wood from its packaging to allow air circulation.
- Stacking: Stack the planks in small piles with spacers between layers to facilitate airflow.
Acclimation Process
The acclimation process typically takes several days, but the exact duration depends on the wood type and the room conditions. Here’s a general guide:
- Measure Initial Moisture Content: Use a moisture meter to measure the wood’s initial moisture content upon arrival.
- Monitor Daily: Check the moisture content daily to track changes.
- Wait for Stability: The wood is considered acclimated when the moisture content stabilizes within the acceptable range relative to the subfloor.
Example: If you’re installing 5-inch-wide oak planks, ensure the moisture difference between the wood and the concrete subfloor is within 2%. This might take around 5-7 days, depending on the room’s humidity and temperature.
Important: Without a proper moisture meter, you cannot accurately determine if the flooring has been acclimated.
By following these steps, you can ensure your hardwood flooring is properly acclimated, reducing the risk of future problems like warping or gapping. Now that the wood is ready, we can move on to the actual installation process.
Frequently Asked Questions about Installing Hardwood Floors on Concrete
Can hardwood floors be installed on concrete?
Yes, hardwood floors can be installed on concrete. Both solid wood and engineered wood are viable options, but each has its own considerations.
Solid Wood: This type of flooring is more susceptible to moisture and temperature changes. Therefore, it’s crucial to ensure the concrete subfloor is dry and level before installation. A full trowel glue-down method using mastic glue is often recommended for securing solid wood to concrete.
Engineered Wood: Engineered wood is more stable and less prone to expansion and contraction. This makes it a popular choice for concrete subfloors. It can be installed using a glue-down method or as a floating floor over a moisture barrier and underlayment.
Do you need underlayment for hardwood on concrete?
Yes, using an underlayment is highly recommended when installing hardwood floors on concrete. The underlayment serves several important purposes:
- Moisture Barrier: An impermeable underlayment, often referred to as a vapor barrier, prevents moisture from seeping up from the concrete into the wood flooring. This is crucial for preventing warping and damage.
- Insulation: Underlayments can provide a layer of insulation, making the floor warmer and more comfortable to walk on.
- Soundproofing: Some underlayments help reduce noise, making the floor quieter to walk on.
For example, a common setup involves laying a plastic sheet or polyethylene film as a moisture barrier, followed by a foam or cork underlayment for insulation and soundproofing.
What do you put between concrete and wood floors?
To ensure a successful installation, you need to place specific materials between the concrete and the wood floors:
- Moisture Barrier: A plastic sheet or polyethylene film acts as a vapor barrier. This is essential for preventing moisture from reaching the wood. Make sure to tape the seams with waterproof tape to create a continuous barrier.
- Underlayment: Depending on your needs, you can use foam, cork, or other types of underlayment. This adds insulation and soundproofing, making the floor more comfortable and quiet.
- Subfloor (if needed): For certain installations, especially when using a nail-down method, a subfloor system like a plywood-on-slab or sleeper system might be necessary. This provides a surface to which the hardwood can be securely attached.
By carefully selecting and installing these layers, you can create a durable and long-lasting hardwood floor over concrete.
In the next section, we’ll dive deeper into the installation process, covering the specific techniques for gluing down and nailing down hardwood floors on concrete.
Conclusion
Installing hardwood floors on concrete can transform your space into a warm, inviting, and stylish environment. Both solid and engineered hardwood options offer unique benefits, and with the right preparation and installation techniques, you can achieve a beautiful and long-lasting floor.
Summary
To successfully install hardwood floors on concrete, follow these key steps:
- Assess the Concrete Subfloor: Ensure the concrete is clean, level, and free of cracks. Conduct moisture testing to prevent future issues.
- Prepare the Concrete: Use moisture barriers and underlayments to protect against moisture and provide insulation and soundproofing.
- Install the Subfloor (if needed): Consider using a plywood-on-slab or sleeper system for added stability.
- Install Hardwood Floors: Choose between gluing down or nailing down the hardwood, depending on your specific needs and the type of wood.
Benefits
Hardwood flooring offers several advantages:
- Aesthetics: Hardwood floors add elegance and a timeless appeal to any room.
- Durability: With proper care, hardwood floors can last for decades.
- Value: Hardwood floors can increase your home’s resale value.
- Low Maintenance: Simple cleaning routines keep hardwood floors looking great.
Romero Hardwood Floors Inc
At Romero Hardwood Floors Inc, we specialize in delivering top-quality hardwood flooring solutions for both residential and commercial properties. Established in 2006 and based in Revere, MA, we are committed to providing competitive pricing, punctuality, and guaranteed workmanship.
Our team of experts will guide you through every step of the installation process, ensuring that your concrete subfloor is properly prepared and that your new hardwood floor is installed to the highest standards. We pride ourselves on enhancing the beauty and value of your property with our expert flooring solutions.
For more information on how we can help you install hardwood floors on concrete, visit our Hardwood Flooring Contractors page.
By following these guidelines and working with a trusted professional like Romero Hardwood Floors Inc, you can enjoy the beauty and benefits of hardwood flooring in your home for years to come.
