Refinish Prefinished Floors: 7 Powerful Ways for Stunning Results 2025
Why Your Factory-Finished Floors Can Look Brand New Again
Refinish prefinished floors might seem impossible due to their tough aluminum-oxide coating, but these factory-finished boards can absolutely be restored to their original beauty. Here’s what you need to know:
Can You Refinish Prefinished Floors?
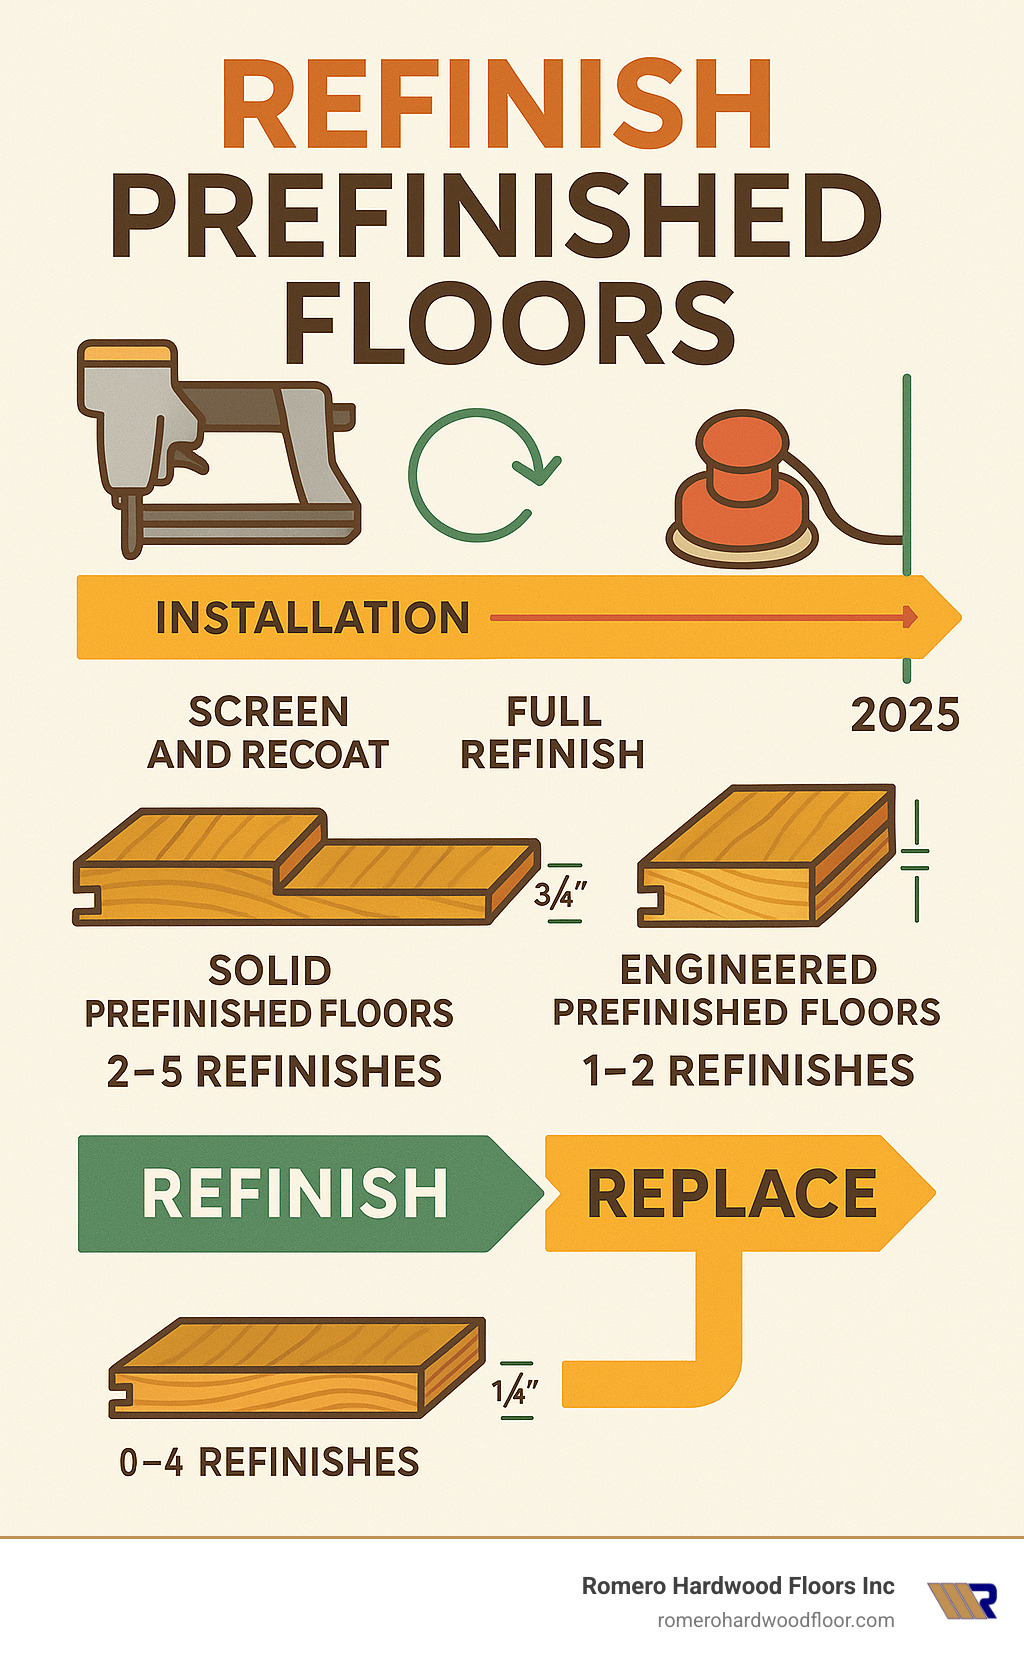
– Yes – Solid prefinished floors can be refinished 2-5 times
– Limited – Engineered prefinished floors allow 1-2 refinishes
– Challenging – Requires aggressive 36-40 grit sanding to remove factory finish
– Time-saving option – Screen-and-recoat works for light wear in just 1 day
Many homeowners think their scratched, faded prefinished floors need complete replacement. That’s simply not true. While the factory aluminum-oxide finish creates unique challenges, proper refinishing can save you 40-60% compared to full floor replacement and extend your floor’s life by 10-15 years.
The key difference from regular hardwood refinishing? Prefinished floors have that rock-hard factory coating plus micro-beveled edges that require special techniques. You’ll need to start with coarser sandpaper and decide whether to keep or flatten those bevels.
Professional pricing averages $4-$8 per square foot for full refinishing and $3.50-$6.50 for screen-and-recoat, though costs can range up to $15 per square foot for complex jobs (these are internet averages, not Romero Hardwood Floors pricing).
I’m Francisco Romero, owner of Romero Hardwood Floors Inc, and I’ve been helping homeowners refinish prefinished floors successfully since 2006 across the Greater Boston area. My 15+ years of experience have taught me that with the right approach, even the toughest factory finishes can be transformed into stunning, like-new surfaces.
Key refinish prefinished floors vocabulary:
– solid wood floor restoration
– resurfacing engineered wood floors
– sanding new hardwood floors
Prefinished vs. Site-Finished Floors: Why Factory Boards Are Different
Think of prefinished floors as the “tough guys” of the hardwood world. While your typical site-finished floor gets a few coats of polyurethane applied after installation, prefinished boards go through what’s basically boot camp at the factory.
Here’s what makes them special: each board gets individually sprayed with polyurethane, then baked in an oven with aluminum oxide particles. It’s like giving your floor a suit of armor before it even leaves the factory. The result? A finish that’s significantly harder than anything you’d get from site-finishing.
The factory process involves 5-7 layers of UV-cured polyurethane with aluminum oxide embedded throughout. This creates an incredibly durable surface that can last up to 25 years before needing attention. But here’s the catch – when it’s time to refinish prefinished floors, that same toughness becomes your biggest challenge.
Solid prefinished floors start at 3/4 inch thick, giving you room for 2-5 refinishing cycles over their lifetime. Each time you refinish, you’re removing about 1/32″ to 1/16″ of wood material. Engineered prefinished floors are trickier – they have a real wood veneer (ranging from 1/8″ to 1/2″ thick) bonded to plywood or high-density fiberboard. This construction usually limits you to just 1-2 refinishes.
| Feature | Prefinished Floors | Site-Finished Floors |
|---|---|---|
| Finish Application | Factory-applied, UV-cured | Applied on-site after installation |
| Durability | 5-7 layers with aluminum oxide | 2-3 layers polyurethane |
| Initial Hardness | Extremely hard | Moderately hard |
| Refinishing Frequency | Every 20-25 years | Every 10-15 years |
| Sanding Start Grit | 36-40 grit | 60-80 grit |
| Edge Profile | Micro-beveled | Square or micro-beveled |
Why Aluminum-Oxide Finishes Fight Sandpaper
Here’s where things get interesting – and a bit ironic. The aluminum oxide coating on your prefinished floors contains the same abrasive material found in sandpaper itself. You’re literally using sandpaper to remove sandpaper!
This creates some unique headaches. The finish hardness varies unpredictably across your floor, which means your sandpaper wears out faster and can create uneven sanding patterns. Some spots might sand easily while others feel like you’re trying to scratch diamond with a fingernail.
Traditional wisdom says to start with 80 grit, but that’s a waste of time and money when dealing with aluminum oxide. We’ve learned to start immediately with 36-40 grit using ceramic grain abrasives. These advanced abrasives are specifically designed to handle the unpredictable hardness you’ll encounter.
The aggressive sanding required means your tools will work harder and wear faster than with regular hardwood. Plan for more frequent abrasive changes and factor the additional cost into your budget.
Micro-Beveled Edges Explained
Most prefinished floors come with micro-beveled edges – tiny chamfers along each board’s edges. These aren’t just for looks; they help hide subfloor imperfections and create subtle shadow lines between planks during installation.
But when it’s time to refinish, these bevels present a real dilemma. Over time, they can trap dirt and debris, making your floors harder to keep clean. However, they also serve an important purpose: keeping the bevels intact preserves more wood material for future refinishing cycles.
You have two choices: flatten the bevels for easier cleaning or keep them for maximum refinishing potential. Sanding them flat creates a smooth surface that’s much easier to maintain, but it removes more material and reduces how many times you can refinish the floor in the future.
According to National Wood Flooring Association guidelines, the decision often comes down to your priorities. We typically recommend keeping bevels in formal areas like living rooms where you want maximum refinishing potential, and flattening them in kitchens and high-traffic areas where easy cleaning trumps everything else.
Can You Refinish Prefinished Floors? Key Challenges & Limits
Here’s the straight answer: yes, you can refinish prefinished floors, but it’s definitely not your typical weekend DIY project. The factory aluminum-oxide coating that makes these floors so durable also makes them incredibly stubborn to sand through.
Think of it this way – you’re essentially trying to remove a finish that was designed to last decades. That rock-hard coating requires aggressive sanding starting with 36-40 grit sandpaper, which is much coarser than the 60-80 grit you’d use on regular hardwood floors.
Solid prefinished floors give you the most flexibility, typically allowing 2-5 refinishing cycles over their lifetime. Each time you sand, you’re removing about 1/32″ to 1/16″ of wood material. Since you need at least 1/8″ of wood above the tongue-and-groove joint for safe sanding, measuring your floor’s thickness before starting is absolutely critical.
Engineered prefinished floors are trickier. With veneer layers ranging from just 1/8″ to 1/2″ thick, most engineered floors can only handle 1-2 refinishing cycles. Some ultra-thin veneer products can’t be refinished at all without breaking through to the plywood underneath – and trust me, that’s not a mistake you want to make.
If your floors are just showing light wear and minor scratches, screen-and-recoat might be your best friend. This gentler process uses a maroon abrasive pad to lightly scuff the existing finish, then applies a fresh topcoat. You can often walk on the floor within 24 hours, and the whole job typically wraps up in just one day.
For more detailed information about the refinishing process, check out our comprehensive guide: Can You Refinish Prefinished Hardwood Floors?
Signs It’s Time to Refinish Prefinished Floors
Wondering when it’s time to refinish prefinished floors? Your floor will usually give you plenty of warning signs before it reaches the point of no return.
The water drop test is my go-to diagnostic tool. Drop a small amount of water on your floor – if it soaks in immediately instead of beading up, your finish is worn through and needs attention. This test is especially telling in kitchens and bathrooms where moisture exposure is constant.
Deep scratches that won’t disappear with cleaning or polishing are another clear indicator. Pet scratches show up particularly well on prefinished surfaces because that hard aluminum-oxide finish doesn’t hide imperfections the way softer finishes do.
UV fading creates those telltale light and dark patches where furniture or rugs used to sit. Prolonged sunlight exposure can make your floor look like a patchwork quilt, but refinishing can restore that uniform appearance you remember from installation day.
When Replacement Makes More Sense
Sometimes being honest about your floor’s condition can save you time, money, and frustration. Not every prefinished floor is worth refinishing, and knowing when to walk away is just as important as knowing when to proceed.
Structural problems like warped, buckled, or loose boards usually indicate moisture issues or subfloor problems that refinishing simply can’t fix. Severe water damage that’s turned boards black or extremely dark rarely responds well to sanding. Insufficient veneer thickness is the death knell for engineered floors – if your veneer layer measures less than 1/8″ thick, the risk of breaking through during sanding is too high.
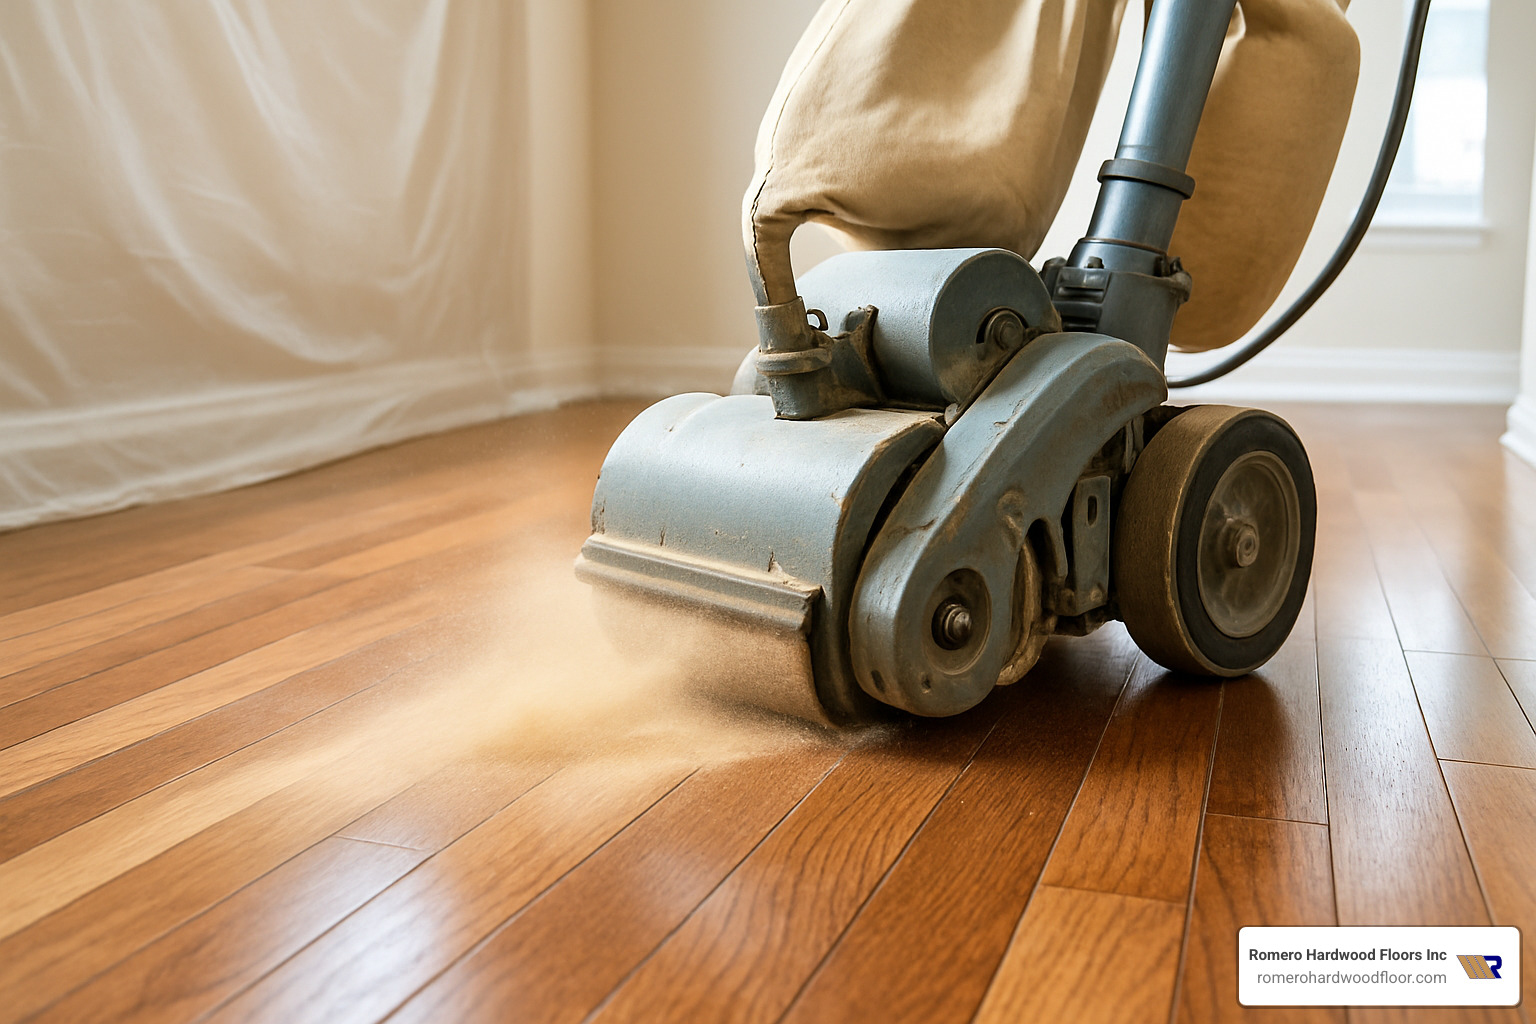
Step-by-Step Process: From Prep to Shine
Think of refinishing prefinished floors like preparing for surgery – everything needs to be perfectly planned and executed. After 15+ years of working with these tough factory finishes, I’ve learned that success comes down to respecting the aluminum oxide coating and following a proven sequence.
The biggest mistake I see homeowners make is treating prefinished floors like regular hardwood. That aluminum oxide finish laughs at your standard 80-grit sandpaper! You need to start aggressive and work your way to smooth, all while keeping that nasty dust contained.
Dust containment isn’t optional – it’s literally a health issue. Aluminum oxide particles are so fine they’ll float around your house for days if you don’t seal everything properly. I always tell my clients to think of their home as having two zones during refinishing: the work area (completely sealed) and the safe zone (where you can actually breathe).
For the technical details on sanding techniques, check out our comprehensive guide: How to Sand Hardwood Floors
And if you’re working with engineered floors specifically, don’t miss: Engineered Hardwood Floor Refinishing
How to Refinish Prefinished Floors: Full Sand & Finish
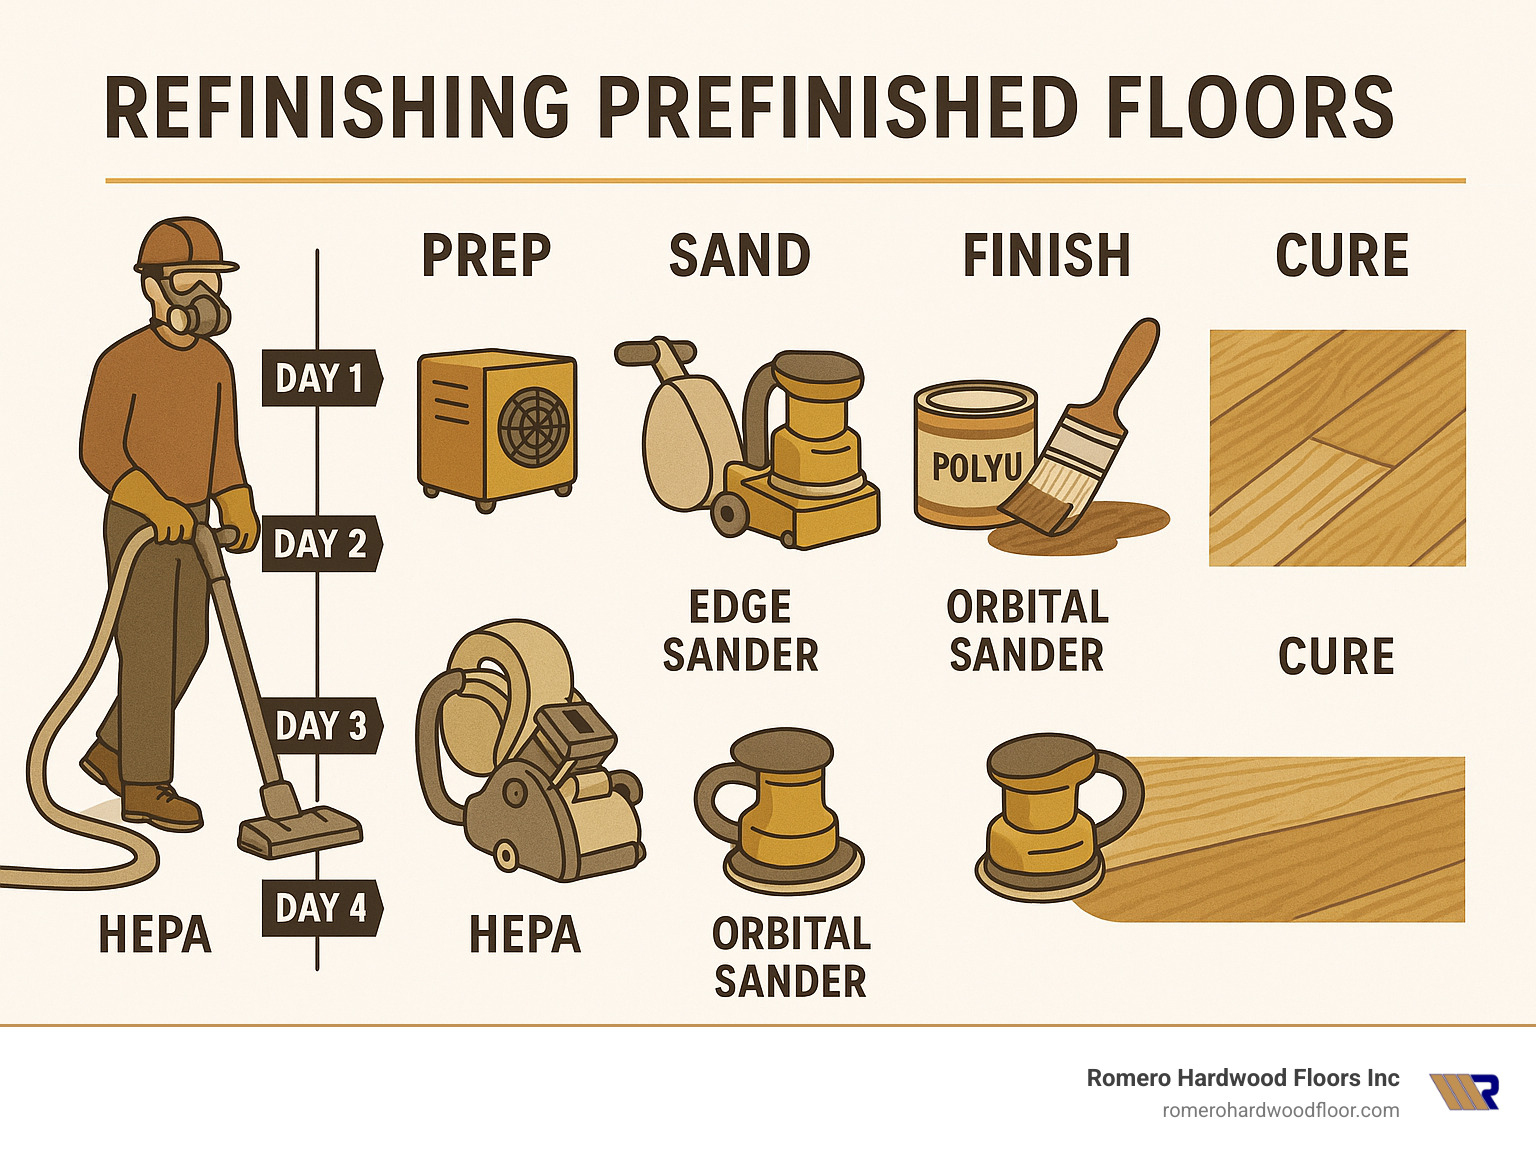
When you commit to fully refinish prefinished floors, you’re signing up for a 3-5 day project that transforms your space completely. Here’s how we tackle these challenging floors:
Getting the room ready means everything comes out – and I mean everything. We cover every window, seal every vent, and create what I call a “dust fortress” with 6-mil plastic sheeting.
Once the room is sealed, we check for protruding nails that could tear our sandpaper. Nothing ruins your day like a hidden nail head shredding a $30 sanding belt!
The cross-cut method is your secret weapon against aluminum oxide. Instead of fighting that factory finish head-on, we start with 36-40 grit sandpaper and make our first passes at 45-degree angles to the wood grain. This aggressive approach cuts through the coating efficiently rather than just polishing it.
After we’ve won the battle against the aluminum oxide, we switch to sanding with the grain using progressively finer grits – 60, then 80, then finishing with 100-120 grit. Each grit change requires a complete vacuum-out because mixing grits creates scratches that show through your final finish.
Edge work gets tricky with those micro-beveled edges. This is where you make the big decision: keep the bevels for character and future refinishing potential, or flatten them for easier cleaning. In kitchens, I usually recommend flattening them because spilled spaghetti sauce hiding in bevels isn’t anyone’s idea of fun.
The staining and finishing process requires patience. We test every stain color in a closet or under where a refrigerator will sit – trust me, you don’t want surprises with 500 square feet of stain! Two to three coats of polyurethane finish the job, with proper cure times between each coat.
Screen-and-Recoat to Refinish Prefinished Floors Fast
Sometimes you don’t need the full nuclear option to refinish prefinished floors. Screen-and-recoat works beautifully for floors that just look tired rather than truly damaged.
The magic happens with chemistry and elbow grease. We use a disc buffer with a maroon abrasive pad to scuff the surface, then apply a chemical prep solution that actually softens that stubborn aluminum oxide finish. It’s like convincing a tough guy to let his guard down – once the coating relaxes, a fresh topcoat bonds beautifully.
This process typically takes just one day, and you can walk on your floors (in socks) after 24 hours. Compare that to the 3-5 days for full refinishing, and you can see why screen-and-recoat is popular with busy families.
For more details on this faster approach, visit: Prefinished Hardwood Flooring Refinishing
Equipment & Materials Checklist
You’ll need serious equipment to tackle aluminum oxide finishes. A drum sander handles the main floor area, but you’ll also need an edge sander for the perimeter work and an orbital sander for final smoothing. The HEPA vacuum system isn’t optional – regular shop vacs just push the fine dust around.
Ceramic grain abrasives are worth the extra cost because they cut through aluminum oxide more efficiently than regular sandpaper. Start with 36-40 grit belts and discs, then progress through 60, 80, and 100-120 grit.
Safety equipment protects your health and your family’s. P100 respirator masks filter out those microscopic aluminum oxide particles that N95 masks miss completely. Safety glasses, hearing protection, and disposable coveralls complete your armor against dust and noise.
Safety First: Aluminum-Oxide Dust Precautions
Aluminum oxide dust isn’t your typical sawdust – it’s the same abrasive material used in sandpaper, and it doesn’t play nice with your respiratory system. These particles are so fine they can stay airborne for hours, floating invisibly through your house.
Creating a containment zone means sealing every possible escape route for dust. We use negative air machines to pull air out of the work area, creating lower air pressure that prevents dust from sneaking under doors or through tiny gaps.
Personal protection goes beyond a basic dust mask. P100 respirators filter out 99.97% of particles, including those microscopic aluminum oxide bits that slip right through N95 masks. Kids and pets need to stay completely away during sanding and for at least 24 hours afterward.
Cost, Timing & Alternatives: Screen vs. Full Sand
Understanding both cost and downtime helps decide whether to screen or fully sand your prefinished floors.
Professional prices (internet averages, not Romero Hardwood Floors rates) generally fall into three tiers:
- Screen-and-recoat: $3.50–$6.50 / sq ft
- Full sand & finish: $4–$8 / sq ft
- Complex repairs / specialty finishes: up to $15 / sq ft
DIY materials average about $2.50 / sq ft, but tool rental, learning curve, and potential mistakes often erase those savings.
Timing varies just as much:
- Screen-and-recoat: 1 day on site, light foot traffic after 24 h.
- Full refinish: 3–5 days on site, furniture back in 3–7 days.

DIY vs. Professional Expectations
Aggressive sanding removes a factory-baked aluminum-oxide finish that quickly chews through sandpaper—and inexperienced operators can burn, dish, or through-sand engineered veneers in minutes. Tool rental fees, HEPA vacuums, and consumables often bring total DIY costs close to professional quotes, yet without insurance or workmanship guarantees.
Dustless and Sandless Options
- Dustless refinishing couples high-power vacuums with traditional sanding, capturing ~95 % of dust.
- Sandless (wet-buff) systems chemically etch the existing finish and apply a fresh coat in a single day. These work only on lightly worn floors but avoid the aluminum-oxide sanding battle entirely.
For vetted pros in your area, explore: Hardwood Floor Refinishing Contractors
Frequently Asked Questions about Prefinished Floor Refinishing
Let’s tackle the most common questions homeowners ask when they’re considering whether to refinish prefinished floors. After 15+ years in the business, I’ve heard these questions countless times, and the answers can save you both money and headaches.
How many times can I refinish prefinished floors?
The honest answer? It depends entirely on what type of floor you have under your feet right now.
Solid prefinished floors are the champions of refinishing potential. Starting at 3/4″ thick when new, these floors can typically handle 2-5 refinishing cycles over their lifetime. Each time you refinish, you’re removing about 1/32″ to 1/16″ of material. The magic number to remember is 1/8″ – you need at least that much wood above the tongue and groove joint for safe sanding.
Engineered prefinished floors are trickier customers. With veneer layers that can be as thin as 1/8″, many engineered floors can only be refinished 1-2 times maximum. If you’ve got a thick veneer (1/4″ or more), you might squeeze out two refinishing cycles. Anything thinner, and you’re likely looking at one shot to get it right.
Here’s a pro tip: before you commit to any refinishing project, measure your floor thickness. Pop off an air vent or carefully remove a section of baseboard to access the floor edge. Use a caliper or ruler to measure both the total thickness and the veneer layer if it’s engineered. This five-minute measurement can save you from a costly mistake.
Should I keep or sand away the factory bevel?
This question keeps me up at night sometimes – not really, but it’s genuinely one of the toughest decisions in prefinished floor refinishing. There’s no universally right answer, but I can help you think through it.
Keep those bevels if you want to preserve maximum wood for future refinishes. Every time you flatten bevels, you’re removing more material than necessary. This makes sense in formal areas like living rooms where you won’t be mopping constantly, and where that traditional plank appearance adds character to the space.
Flatten the bevels when easy cleaning becomes your priority. Kitchens and bathrooms are prime candidates for bevel flattening because those tiny grooves love to collect dirt, grease, and who-knows-what-else. A smooth, continuous surface is simply easier to keep clean, even if it means you’re giving up a future refinishing cycle.
I usually tell homeowners to think about their lifestyle. Got kids tracking mud through the house? Flatten those bevels. Hosting dinner parties in a formal dining room? Keep the bevels for that classic look. The choice often comes down to maintenance convenience versus maximum refinishing potential.
How soon can I walk on the floor after refinishing?
Patience isn’t just a virtue with floor refinishing – it’s absolutely essential for protecting your investment. The cure times vary dramatically depending on what finish we use.
Water-based finishes are the speed demons of the floor finishing world. You can usually walk on them with socks after 24 hours, return to normal use after 72 hours, and move furniture back after one week. But here’s the catch – even though they feel dry, they’re still curing for a full 30 days.
Oil-based finishes demand more patience. Light foot traffic isn’t safe until 48 hours, normal use should wait a full week, and furniture shouldn’t go back for two weeks. Like water-based finishes, they continue curing for 30 days to reach maximum hardness.
UV-cured finishes are the instant gratification option – they’re ready for immediate use right after application. The UV light cures them to full hardness instantly, which is pretty amazing technology, though it requires professional application.
I always tell my clients to follow the manufacturer’s specific recommendations because temperature, humidity, and ventilation can all affect cure times. That “dry to the touch” feeling doesn’t mean the finish is ready for your dining room table. Trust me, a few extra days of patience now can save you from refinishing again much sooner than you’d like.
When you’re ready to refinish prefinished floors in the Greater Boston area, Romero Hardwood Floors Inc has the experience and equipment to handle even the toughest aluminum oxide finishes. We’ve been solving these exact challenges since 2006, and we’d love to help restore your floors to their original beauty.
Conclusion
Your prefinished floors don’t need to live with scratches, fading, and wear forever. Refinish prefinished floors successfully, and you’ll save thousands compared to replacement while bringing back that showroom shine you fell in love with originally.
The journey isn’t always simple – those aluminum oxide finishes are tough cookies that demand respect. But with the right approach, starting with aggressive 36-40 grit sandpaper and making smart decisions about those micro-beveled edges, your floors can look absolutely stunning again.
Here’s what makes the investment worthwhile: Solid prefinished floors can handle 2-5 refinishing cycles over their lifetime, while engineered floors typically allow 1-2 cycles. Each refinishing can extend your floor’s life by 10-15 years, saving you 40-60% compared to full replacement. That’s real money back in your pocket.
The key is knowing when to choose screen-and-recoat for light wear versus full refinishing for dramatic change. Sometimes a simple one-day refresh is all you need. Other times, going the full route with new stain and finish creates the perfect opportunity to completely update your home’s look.
I’ve been helping homeowners throughout the Greater Boston area refinish prefinished floors since 2006, and I can tell you this: every successful project starts with understanding what you’re working with. Those factory finishes are engineered to last, which means they won’t give up without a fight. But that same durability means once you’ve refinished them properly, you’re looking at years of beautiful, durable floors.
The bottom line? Don’t let tired-looking prefinished floors drag down your home’s appearance. Whether you’re in Beverly, Chelsea, Danvers, or anywhere in our service area, these surfaces can absolutely be restored to their former glory.
At Romero Hardwood Floors Inc, we’ve seen floors that homeowners thought were beyond saving come back to life with the right techniques and professional care. Sometimes all it takes is knowing which approach will work best for your specific situation.
Ready to see what your prefinished floors can look like with proper refinishing? We’re here to help you make the right choice for your home and budget: Hardwood Floor Refinishing Near Me
