Solid Wood Floor Restoration: Top 5 Expert Tips 2024
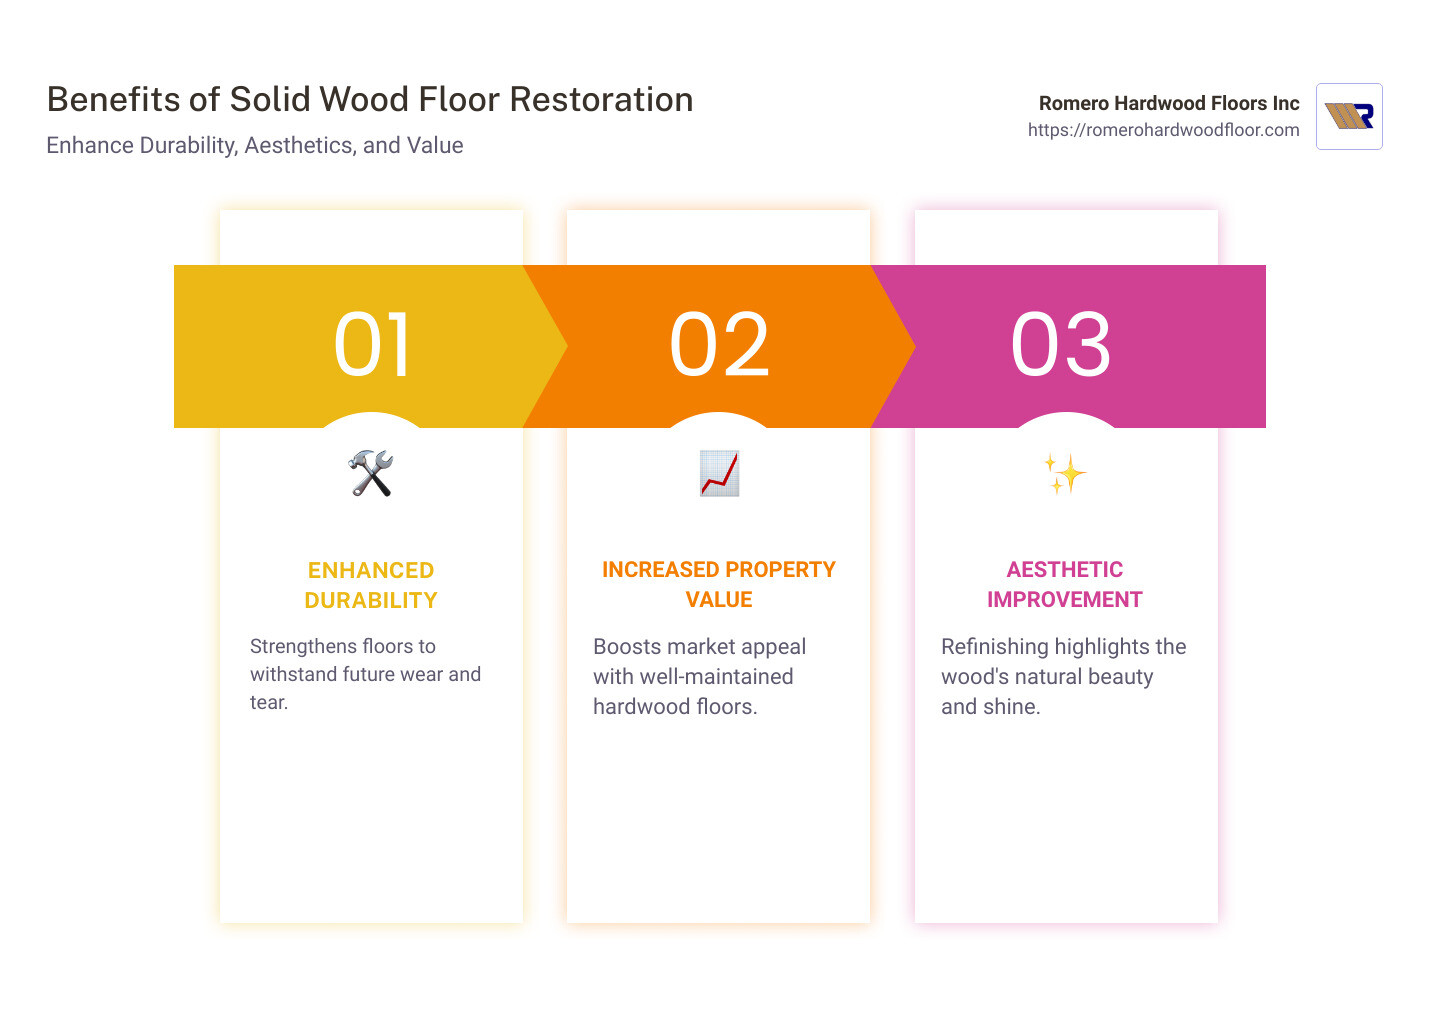
Solid wood floor restoration is a transformative process that refreshs your flooring, bringing both aesthetic and practical benefits. If your floors are showing signs of aging, a well-executed restoration can breathe new life into them. This not only extends the lifespan of your floors but also boosts the value of your property. Here’s a quick glance at the core benefits:
- Improved Durability: Proper restoration strengthens your floors, making them resilient against future wear and tear.
- Increased Property Value: Well-maintained hardwood floors are a major selling point, increasing your home’s market appeal.
- Aesthetic Improvement: Refinishing brings out the natural beauty and shine of wood, enhancing your space’s overall look.
Francisco Romero, with over 15 years in hardwood flooring, leads Romero Hardwood Floors Inc. in Revere, MA. Our expertise in solid wood floor restoration ensures breathtaking results that stand the test of time.
Understanding Solid Wood Floor Restoration
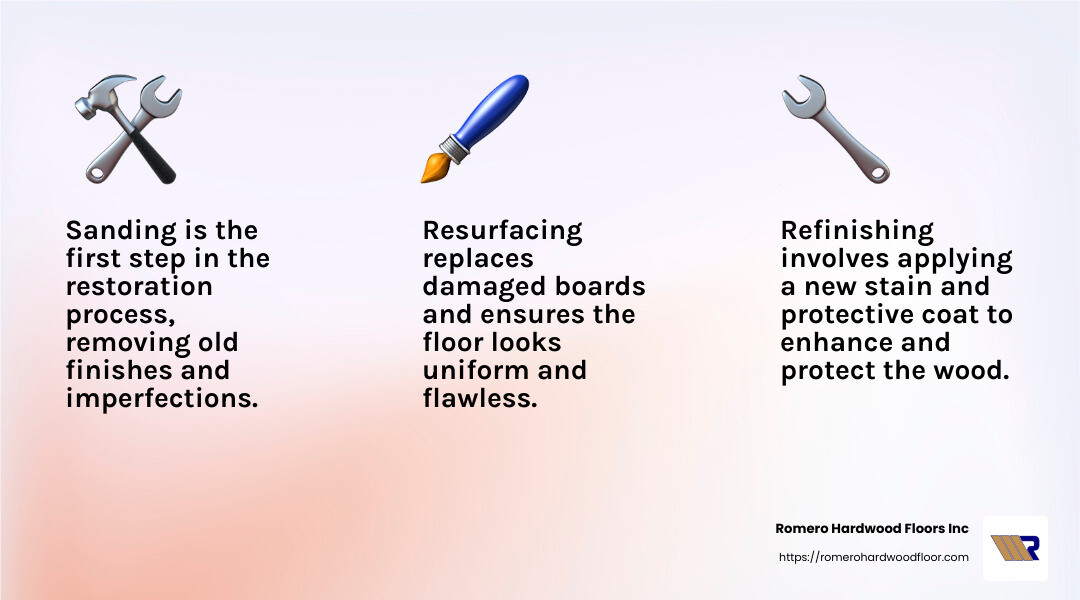
Solid wood floor restoration is more than just a facelift for your floors—it’s about reviving their original glory. This process involves several key steps: sanding, refinishing, and resurfacing. Each step requires precision and the right tools to ensure a flawless finish.
Sanding
Sanding is the first crucial step in restoring solid wood floors. It involves removing the old finish and any surface imperfections. This is typically done with a drum sander or belt sander, both of which are powerful tools designed for even, efficient sanding.
- Grit Progression: Start with a coarse grit (like 36 or 40) to strip away the old finish. Gradually move to a medium grit (60) and finish with a fine grit (100 or above) for a smooth surface.
- Technique: Always sand in the direction of the wood grain. This minimizes scratches and ensures a uniform look.
Refinishing
Once sanding is complete, the next step is refinishing. This involves applying a new stain or sealant to protect the wood and improve its natural beauty.
- Staining: Choose a stain that complements your home’s decor. Apply it evenly with a foam applicator or lamb’s wool pad, working in small sections to avoid overlap marks.
- Polyurethane Finish: After the stain dries, apply a protective coat of polyurethane. Water-based finishes dry quickly and have low odor, while oil-based finishes offer a deeper, richer look but take longer to dry.
Resurfacing
Resurfacing is sometimes necessary for floors with deeper damage. This involves replacing damaged boards and sanding them to match the existing floor.
- Professional Tools: A floor edger is essential for corners and edges that larger sanders can’t reach. For the best results, consider hiring professionals who have access to advanced tools and techniques.
Romero Hardwood Floors Inc. uses state-of-the-art equipment to ensure your floors are restored to their former glory. With a keen eye for detail and a commitment to quality, we transform tired floors into stunning centerpieces in your home.
By understanding these key steps in solid wood floor restoration, you can appreciate the craftsmanship involved and the value it adds to your home. Next, we’ll explore alternatives to traditional sanding methods that may suit your specific needs.
Step-by-Step Guide to Solid Wood Floor Restoration
Preparation
Before diving into the restoration process, proper preparation is key. Start by clearing the area. Remove all furniture, rugs, and any other items that could get in the way. This ensures a smooth workflow and prevents accidental damage.
Next, inspect the floor for any damages such as deep scratches or loose boards. Address these issues before proceeding to avoid complications later.
Finally, clean the floor thoroughly. Use a broom and vacuum to eliminate dust and debris. This step is crucial for a smooth sanding process.
Sanding
Sanding is where the real change begins. Equip yourself with a floor sander, either a drum sander or a belt sander, to remove the old finish and smooth out imperfections.
- Sandpaper Grits: Start with a coarse grit (36 or 40) to remove the existing finish. Progress to a medium grit (60) to smooth the surface and finish with a fine grit (100 or above) for a polished look.
- Vacuuming: After each round of sanding, vacuum the floor to remove dust. This prevents dust from settling into the wood and affecting the finish.
Staining and Finishing
With sanding complete, the next step is to add color and protection to your floors.
- Wood Stain: If you desire a different color, apply a wood stain. Use a foam applicator or lamb’s wool pad to apply the stain in the direction of the wood grain. Work in small sections to avoid overlap marks.
- Polyurethane Finish: Once the stain has dried, apply a protective coat of polyurethane. This seals the wood and adds a durable finish. Choose between water-based (quick-drying, low odor) and oil-based (rich finish, longer drying time) options based on your preference.
- Application Techniques: Use a lamb’s wool applicator for smooth, even strokes. Apply multiple coats for added protection, sanding lightly between coats for the best results.
Safety Gear
Throughout the process, safety is paramount. Wear a dust mask to avoid inhaling particles during sanding. Safety goggles protect your eyes, and ear protection guards against the noise of power tools.
By following these steps, you can achieve a professional-looking restoration of your solid wood floors. The careful preparation, precise sanding, and thoughtful application of stain and finish will breathe new life into your floors, enhancing both their beauty and durability.
Next, we’ll explore alternatives to traditional sanding methods that may suit your specific needs.
Alternatives to Traditional Sanding
When it comes to solid wood floor restoration, traditional sanding isn’t the only option. Let’s explore some alternatives that might suit your needs better:
Buffing
Buffing is a great alternative for floors that don’t need the heavy-duty work of sanding. This process involves using a buffer to smooth out the surface and remove minor scratches. Buffing is less invasive and can be done more frequently to maintain the floor’s appearance. It’s a quicker process and doesn’t remove as much wood, preserving the life of your floors.
Key Benefits of Buffing:
– Less Dust: Buffing produces significantly less dust than sanding.
– Preservation: It helps maintain the floor thickness by removing less wood.
– Cost-Effective: Buffing is typically cheaper than a full sanding and refinishing job.
Glossy Finish
Achieving a glossy finish can transform your floors without the need for sanding. A gloss finish provides a sleek, shiny appearance that improves the natural beauty of the wood. Applying a high-quality finish can also offer added protection against wear and tear.
Steps to Achieve a Glossy Finish:
1. Clean the Floor: Ensure the floor is free of dust and debris.
2. Apply a Gloss Coat: Use a polyurethane gloss finish. Apply with a lamb’s wool applicator for even coverage.
3. Multiple Coats: For the best results, apply several coats, allowing each to dry thoroughly.
A glossy finish not only improves aesthetics but also adds a layer of protection, making maintenance easier.
Protective Mats
Using protective mats is a simple yet effective way to prolong the life of your floors. Mats can help prevent scratches and dents caused by furniture or heavy foot traffic.
Advantages of Protective Mats:
– Damage Prevention: Mats shield the floor from scratches and spills.
– Easy Maintenance: They make cleaning easier by trapping dirt and dust.
– Versatile: Available in various styles to complement your décor.
By considering these alternatives, you can maintain the beauty and integrity of your solid wood floors without the need for extensive sanding. These methods offer practical solutions for those looking to preserve their floors with minimal disruption.
Next, we’ll dig into the cost considerations for restoring your solid wood floors, helping you weigh the benefits of DIY versus professional restoration services.
Cost Considerations for Solid Wood Floor Restoration
Restoring solid wood floors is a rewarding investment, but understanding the costs involved is crucial. Let’s break down the expenses associated with doing it yourself versus hiring a professional, and see how they compare.
DIY Costs
Taking the DIY route can be cost-effective, especially if you’re handy and have some experience with home improvement projects. Here’s what you might expect to spend:
- Sanding Equipment Rental: Renting a floor sander can cost between $50 and $100 per day. You’ll also need to budget for sandpaper, which can add another $30 to $60 depending on the grit levels required.
- Stain and Finish: Purchasing wood stain and a polyurethane finish might cost around $50 to $100, depending on the quality and quantity needed.
- Miscellaneous Supplies: Brushes, rollers, and safety gear could add another $50 to $100 to your total.
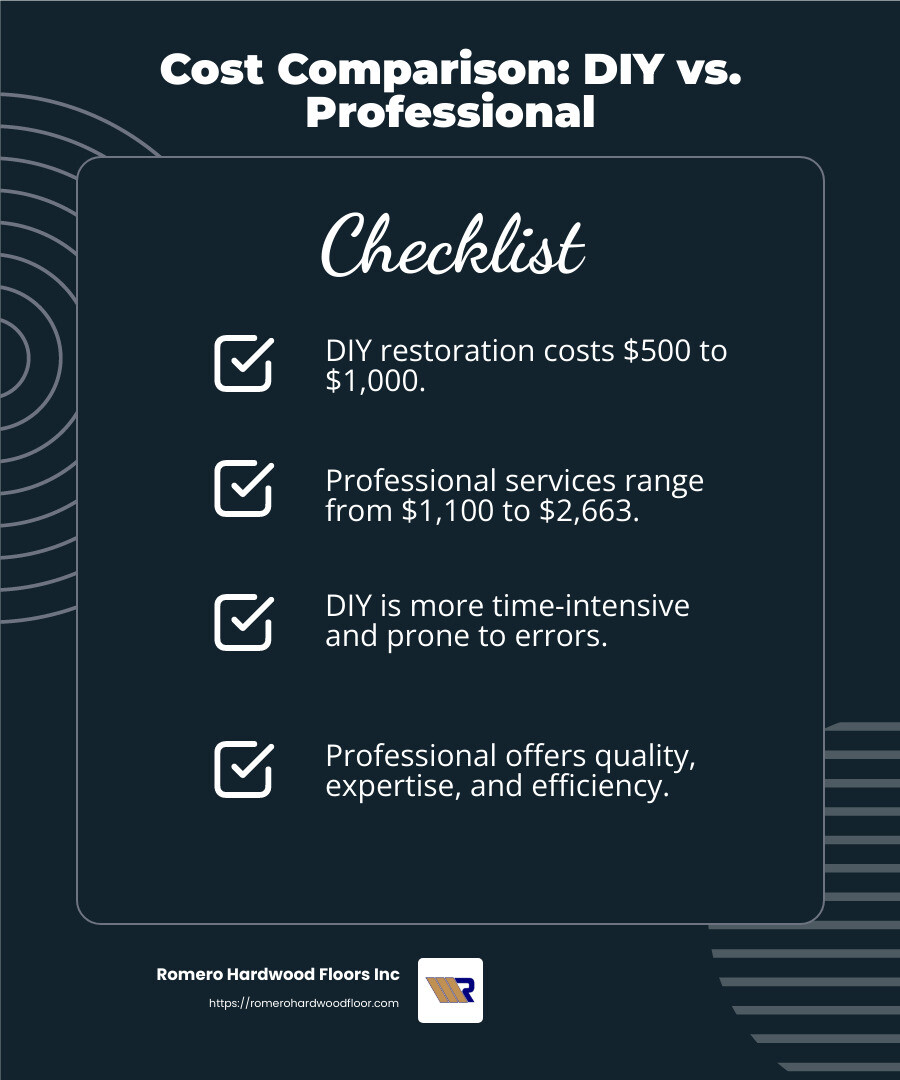
In total, DIY restoration can range from $500 to $1,000. It’s a significant saving compared to professional services, but it requires time and effort.
Professional Costs
Hiring a professional for solid wood floor restoration ensures high-quality results and saves you the hassle of doing it yourself. Here’s what to expect:
- Labor and Expertise: Professionals charge for their skill and experience, with prices ranging from $3 to $8 per square foot. This includes sanding, staining, and finishing.
- Materials Included: Most professionals include the cost of materials in their quotes, ensuring you get high-quality products.
- Additional Services: Some companies offer extras like dustless sanding or custom finishes, which can increase the cost.
Overall, professional restoration might set you back $1,100 to $2,663, but it offers peace of mind and a polished finish.
Cost Comparison
When comparing costs, DIY is generally cheaper but comes with its own set of challenges, such as the risk of mistakes and the time commitment involved. Professional restoration is more expensive upfront but guarantees expertise and efficiency.
Key Takeaways:
- DIY: Lower cost, higher effort, and potential for errors.
- Professional: Higher cost, less effort, and guaranteed quality.
Choosing between DIY and professional restoration depends on your budget, time, and confidence in handling the work. Both options have their merits, and understanding the costs can help you make the best decision for your needs.
Next, we’ll tackle some frequently asked questions about solid wood floor restoration to help you further steer your restoration journey.
Frequently Asked Questions about Solid Wood Floor Restoration
How to restore a solid wood floor?
Restoring a solid wood floor typically involves sanding, re-varnishing, and resurfacing.
- Sanding: This is the first step to remove old finishes and smooth out any imperfections. Use a floor sander for large areas and an edger for corners and tight spots. Start with coarse grit sandpaper and gradually move to finer grits for a smooth finish.
- Re-varnishing: After sanding, apply a wood stain if you want to change the floor’s color. Once the stain is dry, apply a protective finish like polyurethane. This seals the wood and adds a layer of protection against wear and tear.
- Resurfacing: This might be needed for floors with significant damage. It involves replacing damaged sections and then sanding and finishing the entire floor to ensure a uniform look.
Is it worth restoring hardwood floors?
Yes, restoring hardwood floors is often worth the effort and investment. Here’s why:
- Lifespan Extension: Restoring your floors can significantly extend their lifespan. Well-maintained hardwood floors can last for decades, even up to 100 years.
- Replacement vs. Refinishing: Refinishing is generally more cost-effective than replacing the entire floor. It also maintains the character and warmth of the original wood, which can be lost with replacement.
- Increased Property Value: Restored hardwood floors can improve the aesthetic appeal of your home, potentially increasing its value.
Can I restore a hardwood floor without sanding?
Yes, you can restore a hardwood floor without sanding in some cases. Here are a few alternatives:
- Buffing: This process involves lightly scuffing the existing finish to remove minor scratches and imperfections, then applying a new finish. It’s less invasive than sanding and can be a good option if the floor is in relatively good condition.
- Glossy Finish: Applying a new coat of finish can refresh the floor’s appearance without the need for sanding. This is ideal for floors that are dull but not deeply scratched or damaged.
- Maintenance: Regular cleaning and maintenance can prolong the time between major restorations. Using protective mats, ensuring spills are promptly cleaned, and avoiding hard-soled shoes can help keep your floors looking great.
These methods are ideal for minor touch-ups and maintaining the floor’s appearance between more extensive restorations. However, for heavily damaged floors, sanding might still be necessary to achieve the best results.
Next, let’s explore alternatives to traditional sanding that can breathe new life into your floors without the dust and hassle.
Conclusion
At Romero Hardwood Floors Inc, we understand the value of preserving the beauty and integrity of your hardwood floors. Whether you’re looking to extend the lifespan of your floors, improve your home’s aesthetic appeal, or increase property value, our solid wood floor restoration services offer expert solutions custom to your needs.
Our team brings years of experience and craftsmanship to every project, ensuring that each restoration not only meets but exceeds your expectations. We pride ourselves on our guaranteed workmanship—a promise that your floors will be restored with precision and care, bringing out their natural elegance and charm.
Choosing to restore your hardwood floors is not just a cost-effective decision; it’s an investment in the warmth and character of your home. With our professional tools and expertise, we handle everything from sanding to finishing, ensuring a seamless and rewarding experience.
If you’re considering a floor change, we invite you to explore our hardwood floor refinishing services. Let us help you breathe new life into your floors with our expert solutions and dedication to quality.
Your satisfaction is our top priority, and we’re here to make sure your floors remain a stunning feature in your home for years to come. Reach out to us today to discuss your restoration needs and find how we can improve your living space with our trusted services.
