Refinishing Prefinished Bruce Hardwood Floors: 7 Powerful Benefits 2025
Why Refinishing Prefinished Bruce Hardwood Floors Makes Sense
Refinishing prefinished Bruce hardwood floors is absolutely possible and often the smartest way to restore your floors without the massive cost of replacement. Here’s what you need to know:
Quick Answer for Refinishing Prefinished Bruce Floors:
- Solid 3/4″ Bruce floors can be refinished 3-5 times over their lifetime
- Engineered Bruce floors with 1/8″ veneer can typically be refinished 1-2 times
- Factory aluminum oxide finish requires professional-grade equipment to remove
- Micro-beveled edges add $1-2 per square foot to refinishing costs
- Total project cost ranges from $3-12 per square foot based on internet averages
Many homeowners find their 15-20 year old Bruce floors still have solid oak underneath that factory finish. As one homeowner shared: “I never liked the color, nor the micro-grooves in the pre-finished Bruce Gunstock hardwood” – but refinishing let them completely transform their space.
The key difference with prefinished floors is that baked-on aluminum oxide coating. It’s incredibly tough – up to 10 times more abrasion-resistant than regular polyurethane. This means you can’t just rent a basic sander from Home Depot and expect good results.
But here’s the good news: when done right, refinishing brings back that like-new appearance while letting you change colors completely. You can go from honey oak to rich espresso, or from dark walnut to natural blonde.
I’m Francisco Romero, owner of Romero Hardwood Floors Inc., and I’ve been refinishing prefinished Bruce hardwood floors for over 15 years throughout the Revere, MA area. My team has tackled everything from 1970s Bruce installations to modern engineered planks, helping homeowners avoid costly replacements while achieving stunning results.
Refinishing prefinished bruce hardwood floors word guide:
Prefinished vs. Site-Finished Hardwood: What Makes Bruce Different?
Bruce prefinished hardwood floors come with several distinctive features that set them apart from site-finished floors. Understanding these differences is crucial before starting any refinishing project.
Edge Shapes and Profiles
Bruce floors typically feature micro-beveled or eased edges rather than the square edges found on unfinished boards. These bevels create small grooves between planks – what one homeowner described as “micro-grooves” they never liked. The bevels serve both aesthetic and practical purposes, hiding minor subfloor imperfections and creating visual separation between boards.
Factory Aluminum Oxide Coating
The most significant difference is Bruce’s factory-applied aluminum oxide finish. This coating is baked on under controlled conditions, creating a finish that’s incredibly durable but also challenging to remove. As our research shows, this finish is up to 10 times more abrasion-resistant than site-applied polyurethane.
Solid vs. Engineered Construction
Bruce manufactures both solid and engineered hardwood floors:
- Solid Bruce floors are typically 3/4″ thick, milled from one piece of wood
- Engineered Bruce floors feature multiple layers with a real wood veneer on top
Veneer Thickness Matters
For engineered floors, the thickness of the top veneer layer determines refinishing potential:
- 1/8″ veneer: Can possibly be sanded once
- 1/6″ veneer: Allows for multiple refinishing cycles
- Thinner veneers: May only be suitable for light screening and recoating
Janka Hardness Scale
Bruce commonly uses these species with their corresponding Janka ratings:
- Hickory: 1,820 (extremely durable)
- Maple: 1,450 (very durable)
- Oak: 1,360 (durable – most common Bruce species)
- Walnut: 1,010 (moderately durable)
- Cherry: 995 (moderately durable)
| Feature | Site-Finished | Prefinished Bruce |
|---|---|---|
| Edge Profile | Square | Micro-beveled/Eased |
| Finish Application | On-site after installation | Factory-applied, UV-cured |
| Finish Durability | Standard polyurethane | Aluminum oxide (10x stronger) |
| Color Consistency | Can vary slightly | Uniform factory color |
| Installation Time | Longer (finish on-site) | Immediate use |
| Refinishing Difficulty | Standard | Requires professional equipment |
Spotting Solid vs. Engineered Boards
Before starting any refinishing project, you must determine whether your Bruce floors are solid or engineered. Here’s how we identify the difference:
The Tongue-and-Groove Inspection
Look at the edge profile of your boards. Solid hardwood typically has a more pronounced tongue-and-groove system, while engineered floors often have a modified profile for easier installation.
Wear-Layer Gauge Method
If you can access an edge (perhaps where the floor meets a transition strip), measure the thickness of the top wood layer. Use a small ruler or caliper to determine if you have enough material for sanding.
The Vent Removal Trick
Remove a floor register or air vent to expose the floor edge. This gives you a clear view of the board’s cross-section without damaging the visible floor surface. You can measure the total thickness and identify the layer structure.
Caliper Tool Measurement
For precise measurements, use a caliper tool to measure board thickness at accessible edges. You need at least 1/8″ of wood above the tongue-and-groove for safe refinishing.
Why the Factory Aluminum-Oxide Coat Matters
The aluminum oxide finish on Bruce floors presents unique challenges that require understanding before refinishing:
Extreme Abrasion Resistance
This factory finish is designed to last decades. It’s so tough that it quickly wears out standard sandpaper and can overheat rental equipment. Professional sanders know to use Norton Bluefire or similar high-quality abrasives specifically designed for these tough finishes.
Sandpaper Wear and Equipment Demands
Regular sandpaper becomes dull almost immediately when sanding aluminum oxide. Professional-grade equipment with variable speed control and proper dust collection is essential. Rental machines typically overheat and fail when attempting to remove this finish.
Health and Dust Control Requirements
Sanding aluminum oxide creates fine particles that require HEPA-filtered dust collection systems. Standard shop vacuums aren’t sufficient for capturing these microscopic particles, which can be harmful if inhaled.
Professional Equipment Necessity
As one flooring contractor noted: “Rental sanding machines are insufficient for heavy bevel removal; only high-quality professional equipment will work without overheating.” This is why many homeowners who attempt DIY refinishing of Bruce floors end up calling professionals mid-project.
For detailed guidance on handling beveled edges during refinishing, check out this comprehensive resource on refinishing beveled floors.
Can You Refinish Prefinished Bruce Hardwood Floors?
The short answer is yes – refinishing prefinished Bruce hardwood floors is definitely possible, but it requires understanding the limitations and proper techniques. Based on our experience and industry standards, here’s what determines refinishing feasibility:
Feasibility Factors
The National Wood Flooring Association (NWFA) provides clear guidelines for refinishing prefinished floors. The key factors include:
- Veneer thickness (for engineered floors)
- Number of previous refinishing cycles
- Overall floor condition
- Bevel depth and style
Sanding Limits and Cycles
Unlike site-finished floors that can often be refinished 6-8 times, prefinished floors have more limited refinishing potential due to their beveled edges and factory finish thickness.
NWFA Guidelines
The NWFA recommends never filling gaps larger than the width of a quarter, as wood filler will crack and peel within six months. This is particularly important with Bruce floors that have micro-beveled edges.
Warranty Impact
Refinishing will void any remaining manufacturer’s warranty, but for floors over 10 years old, this is rarely a concern. The value gained from refinishing typically far exceeds any warranty considerations.
For more detailed information about refinishing prefinished floors, visit our comprehensive guide: Can You Refinish Prefinished Hardwood Floors?
How Many Times Can Each Type Be Sanded?
3/4″ Solid Bruce Floors: 3-5 Refinishing Cycles
Solid Bruce hardwood floors offer the most refinishing potential. With proper technique, these floors can be sanded and refinished 3-5 times over their lifetime. Each sanding typically removes about 1/32″ to 1/16″ of material, depending on the floor’s condition.
Engineered Floors with 1/8″ Veneer: 1-2 Cycles
Engineered Bruce floors with 1/8″ veneer can typically be refinished once, possibly twice if the first refinishing was very light. Professional sanders are often hesitant to work on these floors because the margin for error is so small.
Micro-Bevel Depth Considerations
The depth of Bruce’s micro-bevels affects refinishing potential. Deeper bevels require more material removal to achieve a flat surface, reducing the total number of possible refinishing cycles.
Average Material Removal Per Sanding
Each professional refinishing cycle removes approximately:
- First pass (36-grit): 1/32″ to 1/16″
- Subsequent passes: Additional 1/64″ to 1/32″
- Total per cycle: 1/16″ to 1/8″ depending on condition
Risks & Limitations With Engineered Planks
Delamination Risks
Engineered floors can experience delamination if moisture penetrates the layers or if excessive heat is applied during sanding. This is why professional equipment with proper dust collection and temperature control is crucial.
Thin Veneer Burn-Through
The greatest risk with engineered Bruce floors is sanding through the veneer layer. Once you hit the substrate layer, the board is ruined and must be replaced. This is why many professionals recommend a conservative approach with engineered floors.
Localized Board Replacement Option
One advantage of prefinished floors is that individual damaged boards can often be replaced rather than refinishing the entire floor. This is particularly valuable for engineered floors where refinishing risks are higher.
Step-by-Step: The Process of Refinishing Prefinished Bruce Hardwood Floors
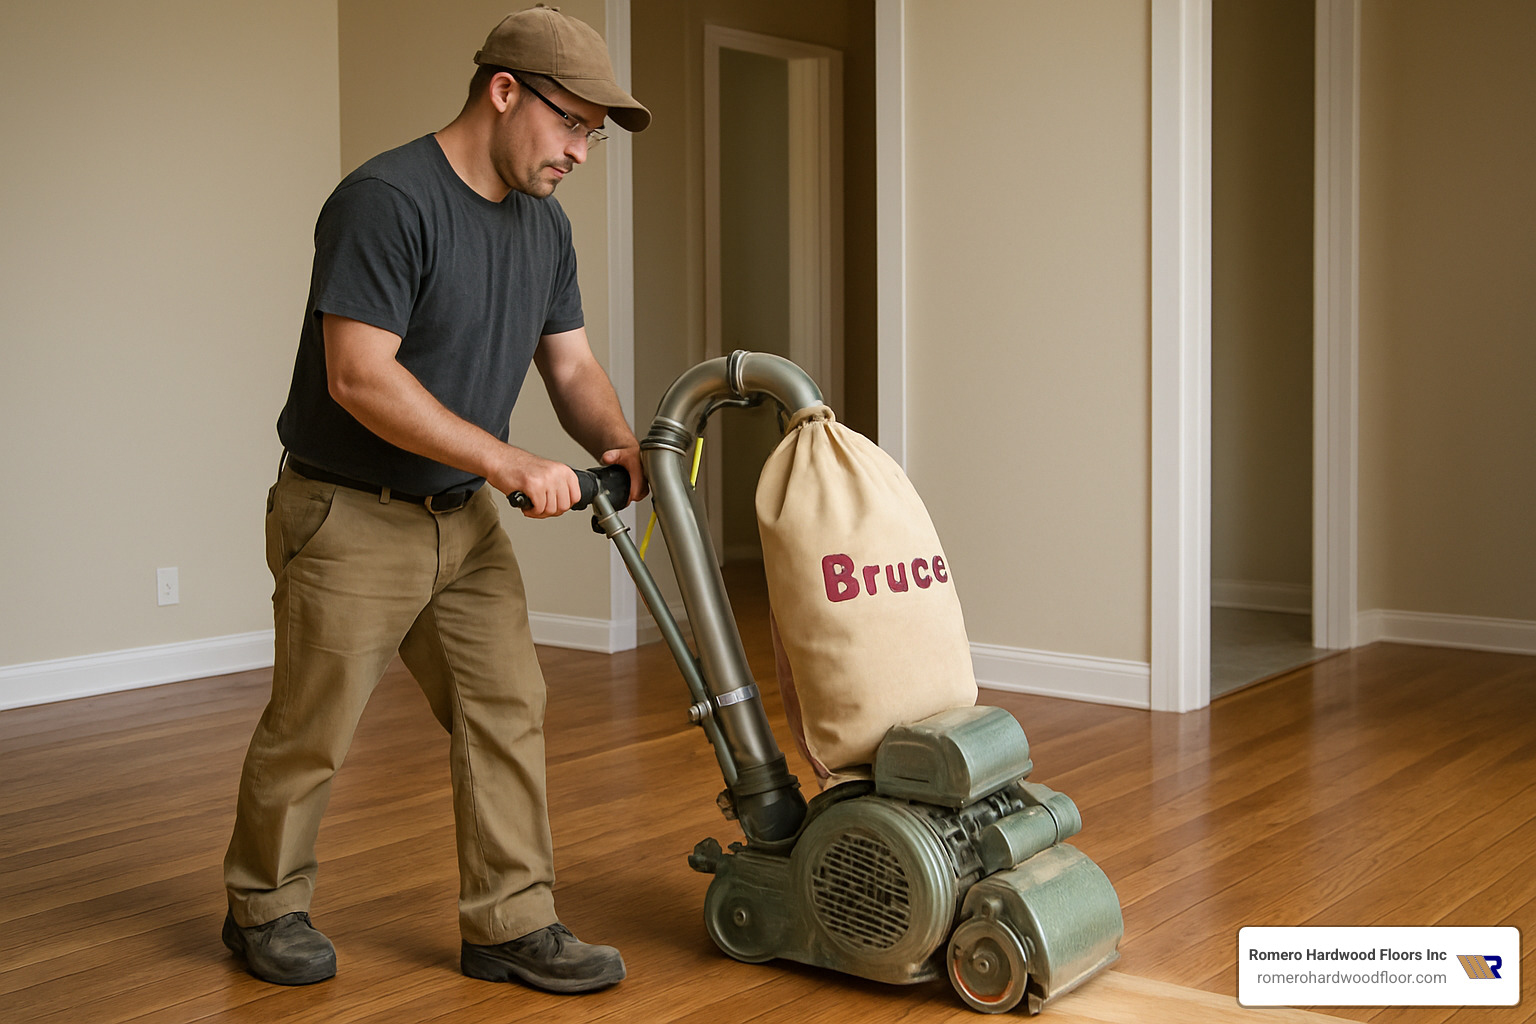
Refinishing prefinished Bruce hardwood floors requires a systematic approach that accounts for the unique challenges of factory finishes and beveled edges. Here’s our proven process developed over years of working with Bruce floors throughout the greater Boston area:
Essential Equipment Requirements
- Professional drum sander (not rental-grade)
- High-quality abrasives (Norton Bluefire or equivalent)
- HEPA-filtered dust collection system
- Edging sanders for perimeter work
- Moisture meters and humidity monitoring
- Professional-grade finish application tools
Dust Containment Strategy
Aluminum oxide particles are extremely fine and require proper containment. We use plastic sheeting to seal off the work area and maintain negative air pressure with HEPA filtration systems.
Grit Sequence Planning
The sequence typically follows: 36-grit → 60-grit → 80-grit → 100-grit screen. However, the tough aluminum oxide finish may require starting with even coarser grits or multiple passes with 36-grit.
Bevel Removal Decision
This is where many DIY projects fail. Removing bevels requires skill and experience to avoid creating an uneven surface. The decision to remove or preserve bevels affects both the final appearance and future refinishing potential.
Stain Selection Strategy
Bruce floors typically use red oak or white oak, both of which accept stain well. However, the factory finish must be completely removed for proper stain penetration.
Finish System Selection
We recommend oil-modified polyurethane for its durability and ease of recoating, though water-based systems offer faster drying times and lower VOC emissions.
1. Assess & Prep the Room
Moisture Testing Protocol
Before any sanding begins, we test moisture levels in both the wood and subfloor. Bruce floors should be at 6-9% moisture content, with no more than 2% difference between boards.
Humidity Control (35-55% Range)
Maintain indoor humidity between 35-55% during the entire refinishing process. This prevents board movement during sanding and finishing.
Complete Furniture Removal
Everything must come out – furniture, area rugs, window treatments, and wall hangings. Even small items can collect dust and interfere with the process.
Nail Setting and Fastener Check
All nails and staples must be set below the surface. Protruding fasteners will tear sandpaper and create gouges in the wood.
Gap Inspection and Documentation
Measure gaps between boards. Remember the NWFA rule: don’t fill gaps larger than a quarter. Document problem areas for discussion with the homeowner.
For professional refinishing services, learn more about our approach: Prefinished Hardwood Flooring Refinishing
2. Sanding Strategy & Grit Progression
The 36→60→80 Progression
This is the standard grit sequence, but Bruce floors often require modifications:
- 36-grit: Remove aluminum oxide finish and flatten bevels
- 60-grit: Remove 36-grit scratches and smooth surface
- 80-grit: Prepare surface for staining
- 100-grit screen: Final smoothing before finish application
45-Degree First Pass Technique
We start drum sanding at a 45-degree angle to the grain. This aggressive approach helps remove the tough factory finish more effectively than sanding with the grain initially.
Cross-Cut Method Benefits
Cross-cutting (sanding across the grain) during initial passes helps flatten the floor and removes factory finish more efficiently. This technique requires skill to avoid creating permanent cross-grain scratches.
Professional Drum Sander Requirements
Rental machines simply can’t handle the demands of removing aluminum oxide finishes. Professional sanders have:
- Variable speed control
- Proper weight distribution
- Superior dust collection
- Ability to handle aggressive sanding without overheating
HEPA Vacuum Integration
Continuous dust removal during sanding is essential. HEPA filtration captures the fine aluminum oxide particles that standard vacuums miss.
3. Tackling Micro-Beveled Edges
Edge Profile Identification
Bruce floors typically feature one of these edge profiles:
- Micro-bevel: Very slight edge chamfer
- Eased edge: Slightly rounded edge
- Full bevel: More pronounced V-groove between boards
The Do-Not-Fill Rule
Never fill bevels with wood putty or filler. As industry experts note, “bevels should not be filled with wood putty because it will crack and peel; leaving them intact preserves refinishing potential per NWFA standards.”
Extra Labor Costs ($1-$2 per Square Foot)
Removing bevels requires additional sanding time and skill. Internet averages show this adds $1-2 per square foot to refinishing costs due to the extra labor involved.
The Dime Test for Depth
Use a dime to measure remaining bevel depth after sanding. If the bevel is deeper than a dime’s thickness, you may need additional sanding passes or should consider leaving the bevels intact.
4. Color Change: Staining Options
Water-Pop Technique for Even Stain Absorption
After final sanding, we spray the floor with water to raise the grain and reveal any missed spots. This “water-popping” technique also helps stain penetrate more evenly into the wood.
Trending Color Options
Popular stain colors for Bruce oak floors include:
- Jacobean (dark brown)
- Special Walnut (medium brown)
- Provincial (honey tone)
- Ebony (very dark)
- Natural (clear finish showing wood grain)
Compatibility with Bruce Oak Species
Both red oak and white oak (Bruce’s most common species) accept stain well, but they react differently:
- Red oak: More pronounced grain pattern, warmer undertones
- White oak: Subtler grain, cooler undertones
Pigment vs. Dye Stains
- Pigment stains: Sit on the surface, more opaque, better for hiding imperfections
- Dye stains: Penetrate deeper, more transparent, improve natural grain patterns
5. Finishing for Durability
Oil-Modified Polyurethane Benefits
Our preferred finish for Bruce floors is oil-modified polyurethane because:
- Excellent durability and scratch resistance
- Easy to recoat in the future
- Warm amber tone that complements most stain colors
- Proven track record on hardwood floors
Water-Based 2K Systems
For faster drying and lower VOC emissions, water-based two-component systems offer:
- Crystal clear finish that won’t yellow
- Faster cure times
- Lower odor during application
- Excellent durability when properly applied
Sheen Level Selection
- Matte (25-35 gloss): Hides imperfections, contemporary look
- Satin (40-50 gloss): Most popular, good balance of durability and appearance
- Semi-gloss (55-70 gloss): More durable, easier to clean
- Gloss (70+ gloss): Maximum durability, formal appearance
Cure Time Considerations
- Oil-modified: 24-48 hours between coats, 7 days for full cure
- Water-based: 2-4 hours between coats, 3-5 days for full cure
For more information on finish selection, visit: Best Hardwood Floor Finish
Cost, Time & When to Replace Instead
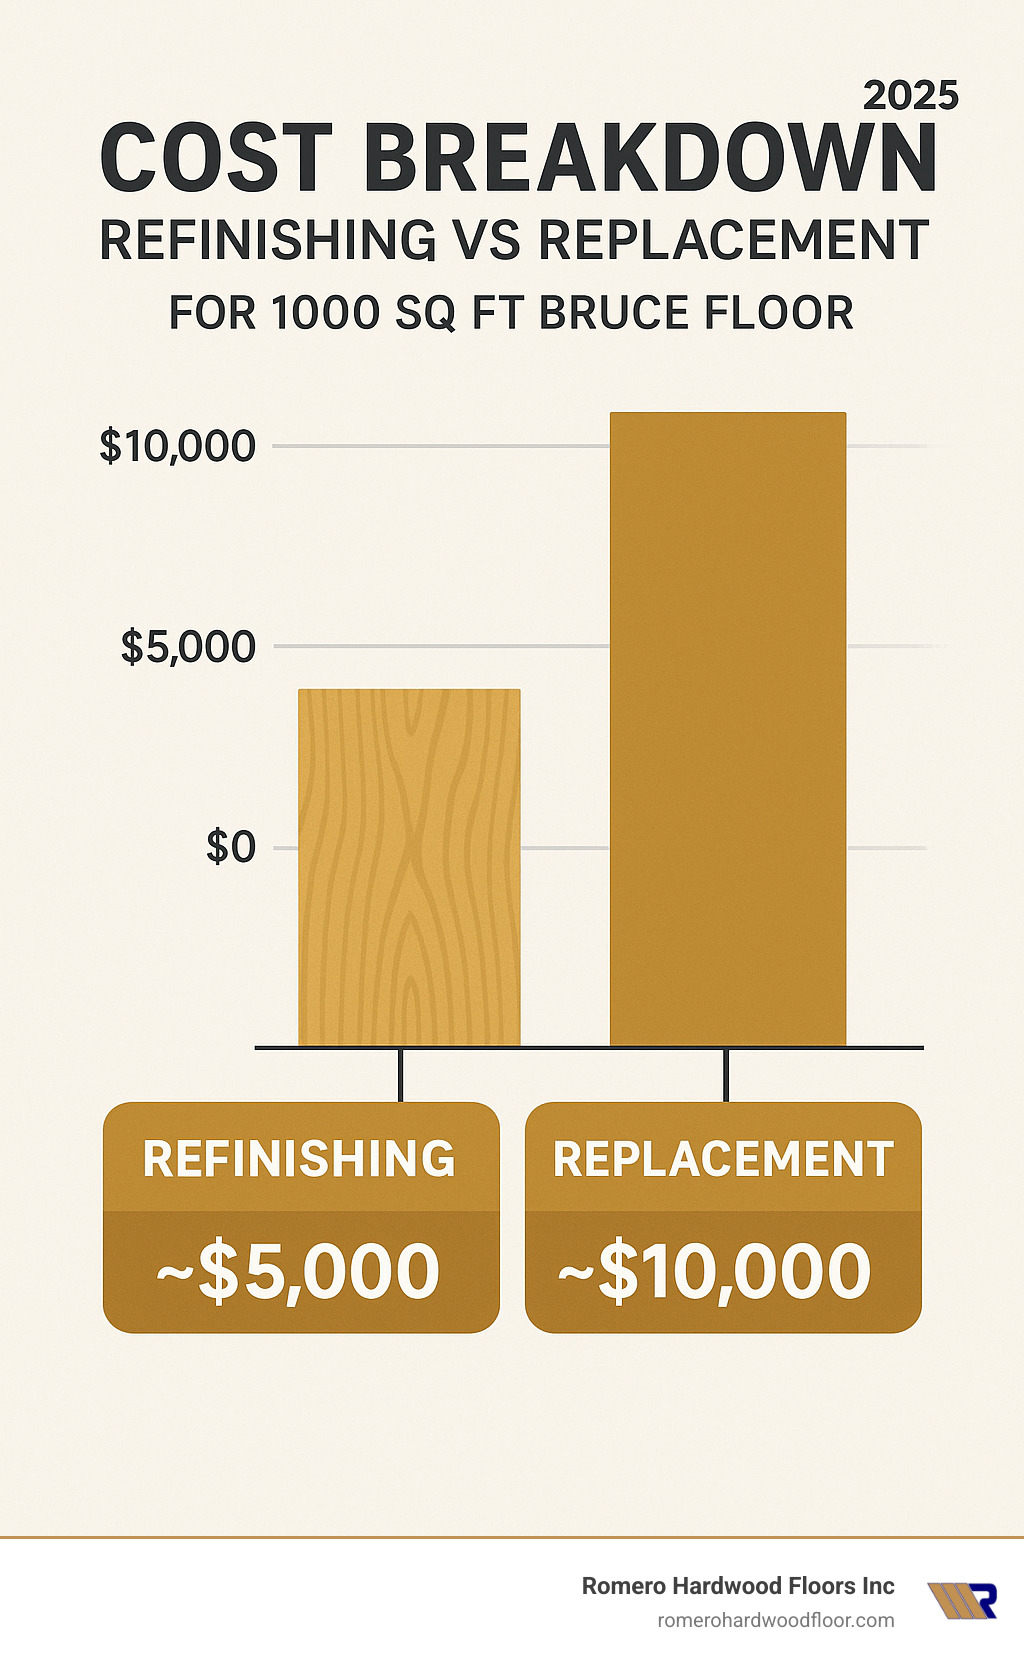
Average Internet Pricing: $3-$12 per Square Foot
Based on internet data (not Romero Hardwood Floors pricing), refinishing costs vary widely:
- Basic refinishing: $3-5 per square foot
- Standard refinishing with stain: $5-8 per square foot
- Premium refinishing with bevels removed: $8-12 per square foot
- High-end custom work: $12-36 per square foot
Bevel Removal Premium
Removing micro-bevels adds $1-2 per square foot to the base cost due to additional labor and skill required.
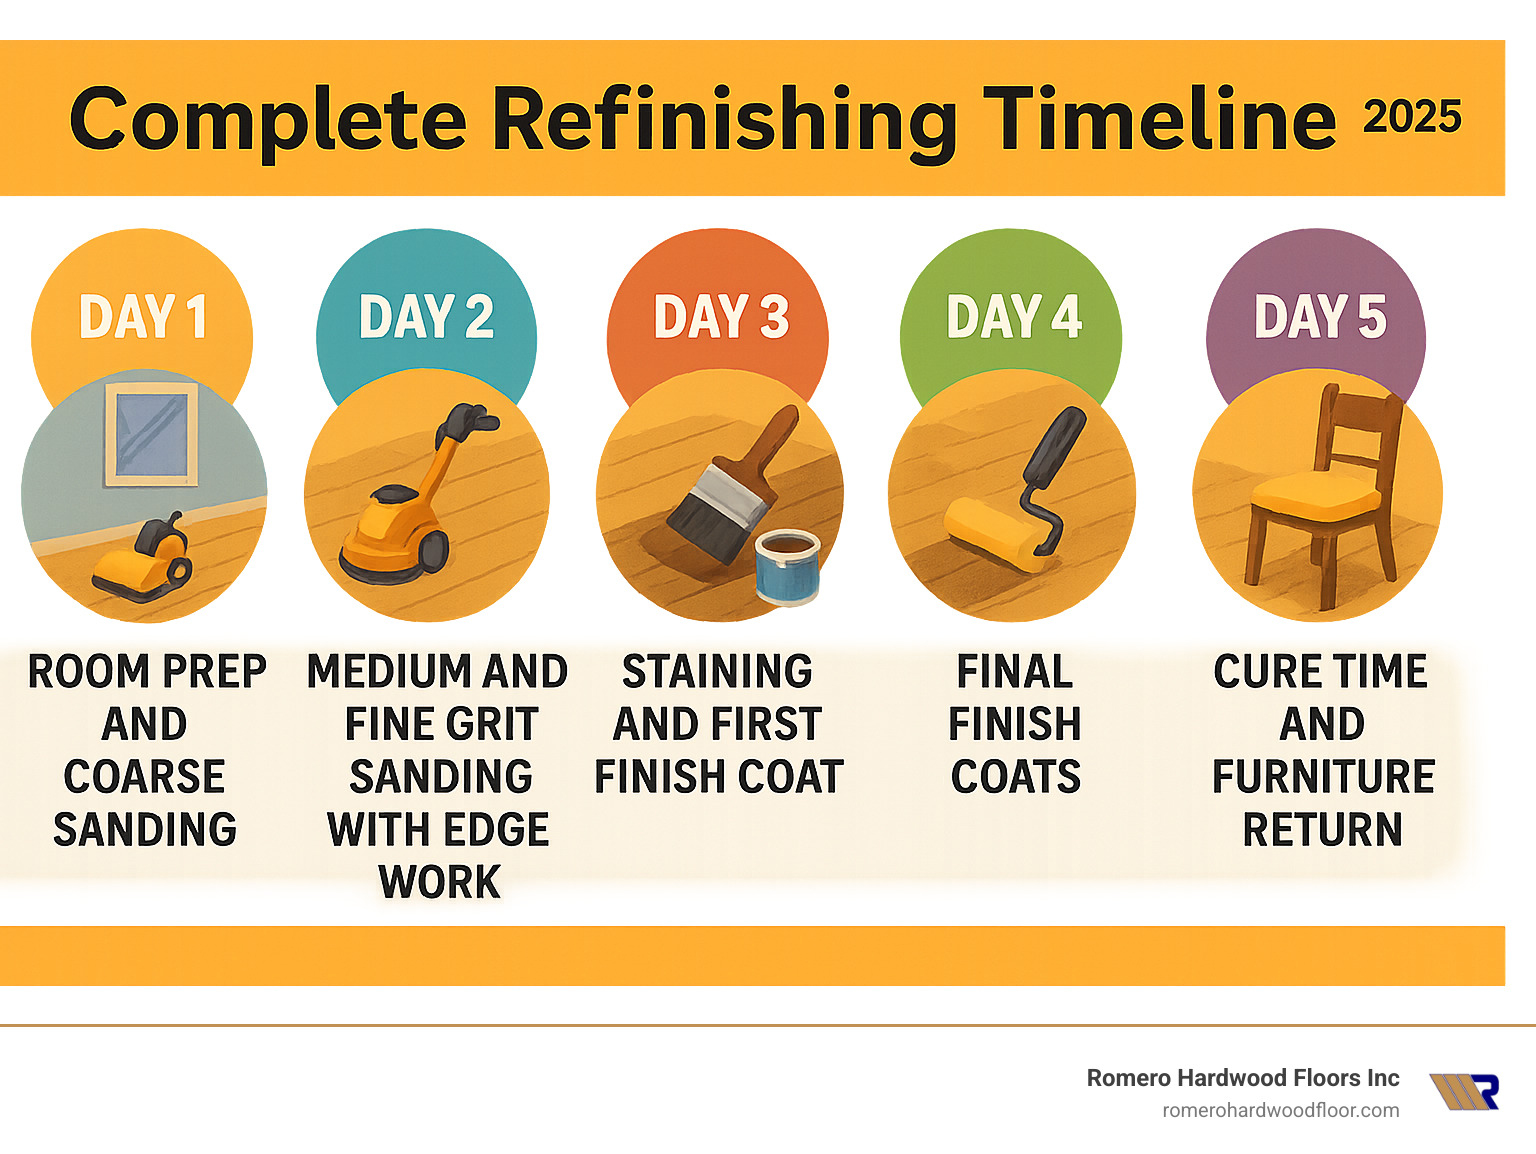
Timeline for 1,000 Square Feet
A typical 1,000 square foot Bruce floor refinishing project takes:
- Day 1: Room prep and coarse sanding
- Day 2: Medium and fine grit sanding, edging work
- Day 3: Staining and first finish coat
- Day 4: Second and third finish coats
- Day 5: Final cure time and furniture return
Occupancy Downtime
Plan for 3-5 days of limited access to the refinished area. The strong odors from oil-modified polyurethane may require temporary relocation, especially for families with young children or respiratory sensitivities.
Replacement Triggers
Consider replacement instead of refinishing when:
- Severe cupping or warping that sanding can’t correct
- Veneer thickness less than 1/8″ on engineered floors
- Extensive water damage with black staining
- Structural issues with the subfloor
- More than 25% of boards need individual replacement
DIY vs. Hiring a Pro
Tool Rental Limitations
Rental equipment simply isn’t designed for the demands of removing aluminum oxide finishes. Common problems include:
- Overheating motors
- Inadequate dust collection
- Poor sandpaper quality
- Lack of variable speed control
Dustless System Advantages
Professional dustless systems capture 99% of dust during sanding, making the process much cleaner and safer for occupants.
Skill Curve Considerations
Refinishing Bruce floors requires understanding:
- How to handle beveled edges
- Proper sanding techniques for aluminum oxide
- Stain application for even coverage
- Finish application without lap marks or bubbles
For professional refinishing services, visit: Hardwood Floor Refinishing Contractors
Maintenance & Common Mistakes After Refinishing
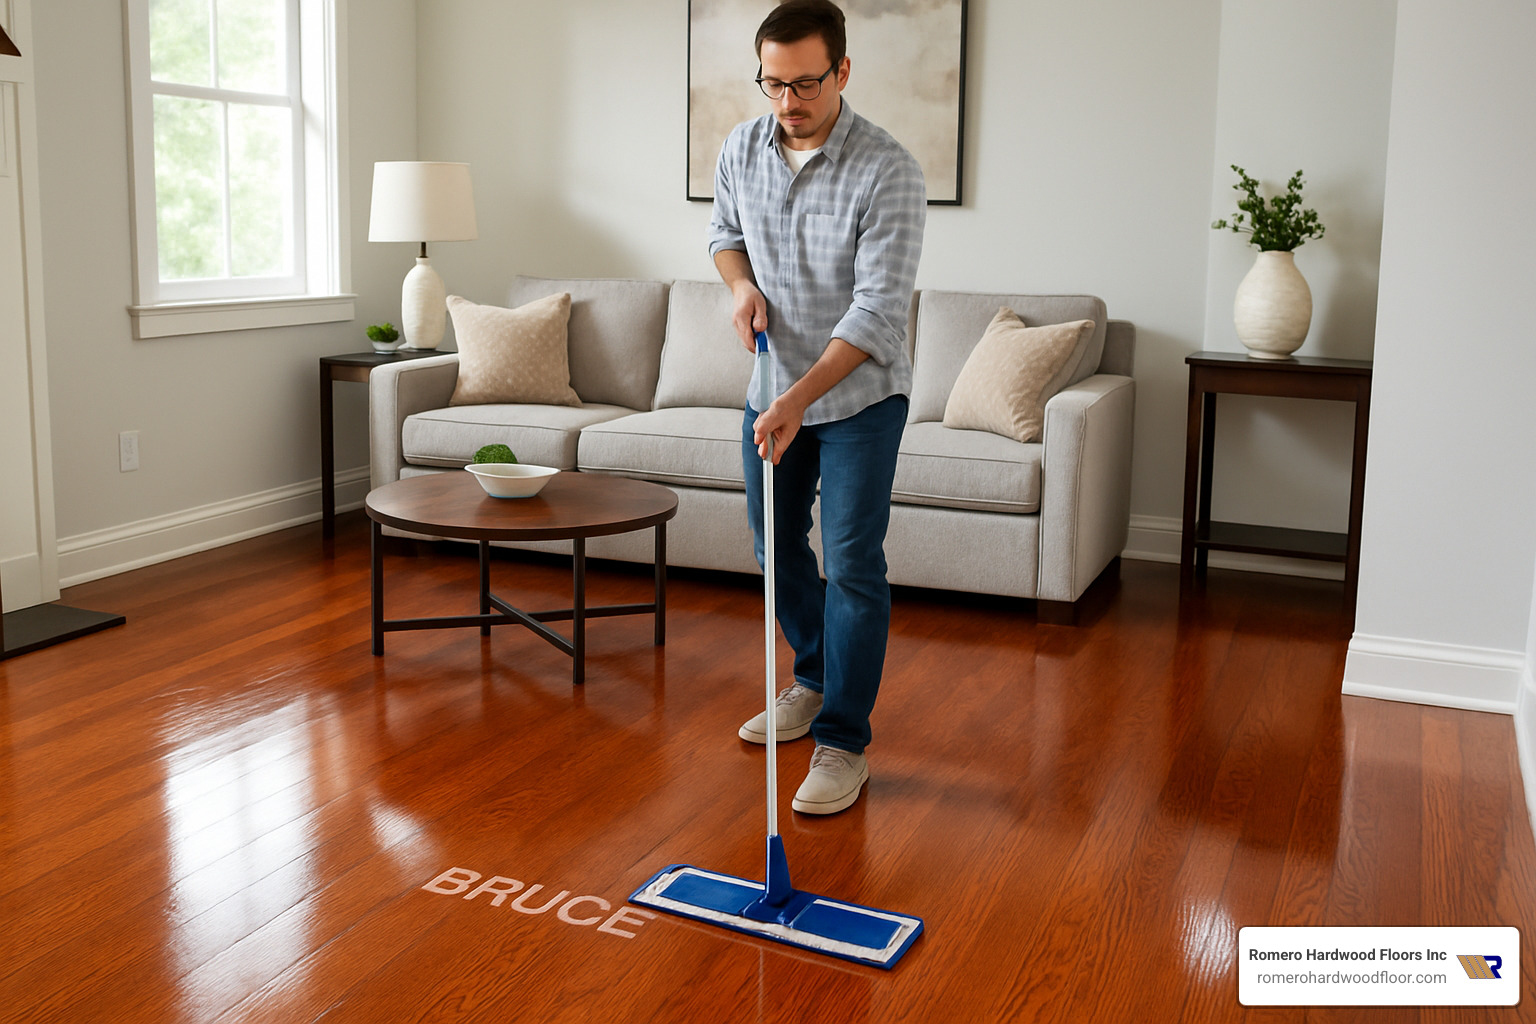
Proper Cleaning Products
After refinishing, use only hardwood-specific cleaners. Avoid:
- Murphy’s Oil Soap
- Steam mops
- Wet mopping with water
- Products containing wax or silicone
Humidity Control Systems
Maintain 35-55% relative humidity year-round using:
- Humidifiers during dry winter months
- Dehumidifiers during humid summer months
- HVAC systems with humidity control
Furniture Protection Strategy
Use furniture pads under all legs and bases to prevent scratches and dents. Replace pads annually as they wear down and collect debris.
Steam Mop Warning
Never use steam mops on hardwood floors. The heat and moisture can damage the finish and cause board movement.
Common Filler Mistakes
The biggest mistake is filling bevels or gaps with wood filler. As noted in our research, “filler cracking” occurs because wood moves with seasonal changes while filler doesn’t.
Skipping Water-Pop Consequences
Failing to water-pop before staining often results in blotchy, uneven stain absorption, especially on Bruce’s dense oak species.
For comprehensive care instructions, visit: Hardwood Floor Care Guide
Frequently Asked Questions About Refinishing Prefinished Bruce Floors
Can I change my Bruce floor from honey oak to espresso?
Absolutely! This is one of the most popular color changes we do. Bruce oak floors accept dark stains very well. The key is completely removing the factory aluminum oxide finish first. Water-popping before staining ensures even color absorption. Expect the process to take an extra day for proper stain application and drying.
Should I fill the gaps between planks?
No, never fill gaps in Bruce floors. The NWFA specifically recommends against filling gaps larger than a quarter because the filler will crack and peel within six months. Wood moves with seasonal humidity changes, but filler doesn’t. This creates stress that causes the filler to fail. Instead, accept the character that natural gaps provide.
How long before I can move furniture back?
This depends on your finish choice:
- Oil-modified polyurethane: Wait 7 days for full cure before moving heavy furniture
- Water-based finishes: Wait 3-5 days for full cure
- Light foot traffic: Usually acceptable after 24-48 hours with socks only
- Area rugs: Wait at least 2 weeks to avoid finish adhesion issues
We always provide protective pads and moving techniques to prevent damage when furniture returns.
Conclusion
Refinishing prefinished Bruce hardwood floors transforms tired, scratched floors into stunning focal points that can last decades longer. With proper technique and professional equipment, even the toughest aluminum oxide finishes can be removed and replaced with beautiful new stains and protective coatings.
The longevity benefits are substantial – solid Bruce floors can be refinished 3-5 times over their lifetime, while engineered floors with adequate veneer thickness can typically handle 1-2 refinishing cycles. This extends your floor’s useful life by decades while providing the fresh look of new installation.
Beyond appearance, refinishing provides significant value boost to your property. Updated floors with modern colors and finishes can increase home value far beyond the refinishing investment.
At Romero Hardwood Floors Inc., we’ve been the one-stop expert for Bruce floor refinishing throughout Beverly, Chelsea, Danvers, East Boston, Gloucester, Lynnfield, Malden, Manchester by the Sea, Marblehead, Medford, Melrose, Nahant, Peabody, Reading, Revere, Rockport, Salem, Saugus, Somerville, Stoneham, Swampscott, Wakefield, Winchester, Winthrop, and Woburn since 2006. Our guaranteed workmanship and competitive pricing have helped hundreds of homeowners avoid costly floor replacement while achieving stunning results.
Whether you’re dealing with 20-year-old Gunstock oak or newer engineered planks, we have the expertise and professional equipment to bring your Bruce floors back to life. The investment in refinishing pays dividends in beauty, durability, and home value for years to come.
Ready to explore refinishing options for your Bruce floors? Visit Hardwood Floor Refinishing Near Me to learn more about our services and schedule your consultation.
