Sanding New Hardwood Floors: Top 3 Expert Tips 2024
Sanding new hardwood floors is a crucial step in achieving a flawless and polished finish. This process is not just about making the surface smooth; it’s about creating a foundation that improves both the beauty and longevity of your flooring. Whether you’re working on a residential installation or a commercial property, here’s a quick rundown of what sanding involves:
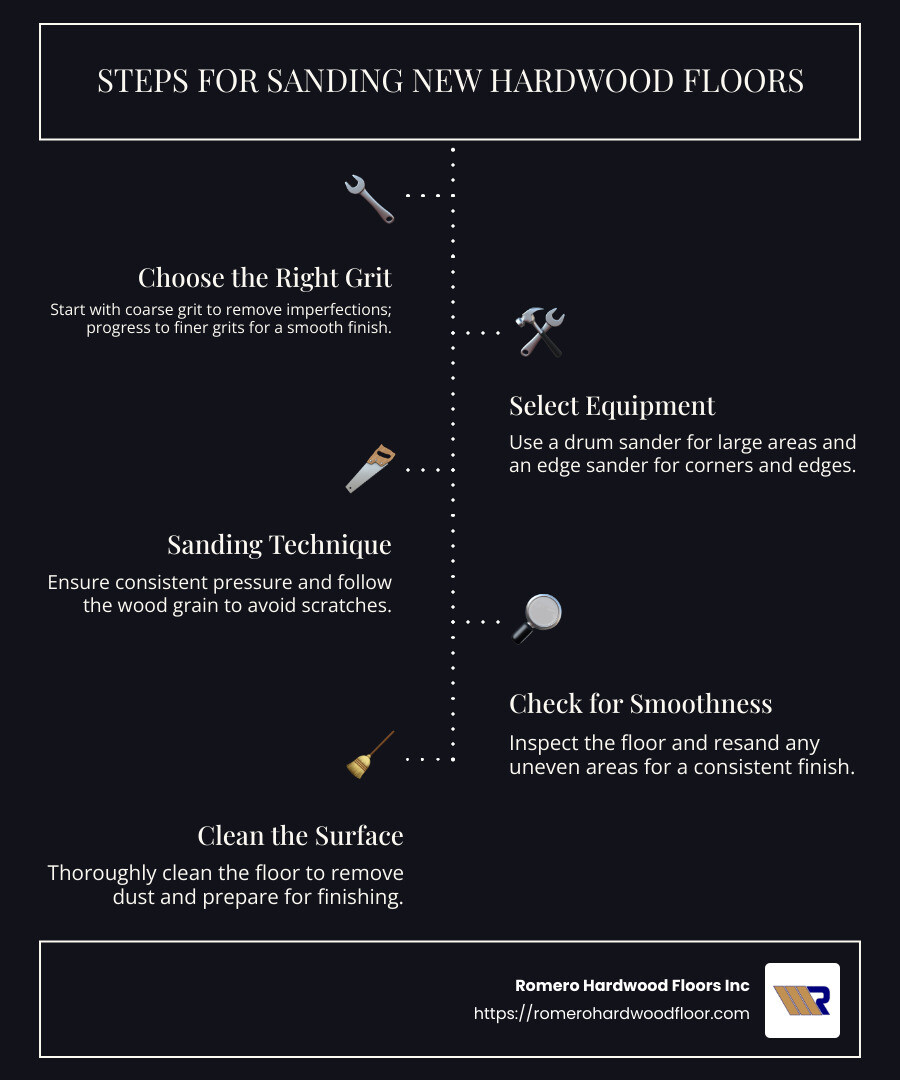
- Determine the right grit sequence: Start with a coarse grit to remove imperfections, and then transition to finer grits for a smooth finish.
- Use the correct equipment: A drum sander for the main floor area, and an edge sander for the corners and hard-to-reach spots.
- Consistency is key: Ensure every pass is even and follows the grain of the wood to avoid scratches and gouges.
For homeowners and property managers in Revere, MA, investing time in properly sanding your hardwood floors can dramatically impact the final appearance and durability of your floors.
As Francisco Romero, owner of Romero Hardwood Floors Inc., I’ve dedicated over 15 years to perfecting the craft of hardwood floor installation and restoration. My expertise in sanding new hardwood floors helps us transform spaces into timeless, neat areas our clients love. Let’s begin this journey of understanding why and how this process is paramount in achieving stunning hardwood floors.
Sanding new hardwood floors terms simplified:
– new hardwood flooring
– solid wood floor restoration
Why Sand New Hardwood Floors?
When you install new hardwood floors, you might expect them to be perfect right away. However, sanding is a critical step that ensures your floors not only look their best but also last longer. Here’s why it’s important:
Smooth Surface
Newly installed hardwood floors might look smooth, but subtle unevenness can exist. This is called “lippage,” where the edges of some boards are slightly higher or lower than others. Sanding levels out these differences, creating a perfectly smooth surface that feels great underfoot and looks flawless.
Lippage and Splinter Risk
Lippage isn’t just a cosmetic issue. Walking barefoot on a floor with uneven boards can be uncomfortable and even dangerous. Over time, these raised edges can become splinter risks. Sanding eliminates these hazards by ensuring all boards are at the same height, reducing the chance of splinters.
Stain Pooling
When staining hardwood floors, an uneven surface can lead to stain pooling. This occurs when stain collects in low spots, resulting in darker patches that can mar the floor’s appearance. By sanding the floor flat, you ensure the stain applies evenly, resulting in a consistent and beautiful finish.
Improved Durability
Sanding also helps with the longevity of your floors. Uneven boards wear at different rates, with high spots wearing down faster. This can expose the wood underneath in just a few months. Sanding ensures even wear, which prolongs the life of your finish and keeps your floors looking new longer.
By addressing these issues early on, sanding new hardwood floors sets the stage for a beautiful and long-lasting finish. This process is essential whether you’re aiming for a natural look or planning to stain the wood. In the next section, we’ll explore the step-by-step guide to sanding, ensuring you achieve the best results possible.
Sanding New Hardwood Floors: Step-by-Step Guide
Sanding new hardwood floors is a multi-step process that requires patience and precision. Each step is crucial to achieving a smooth, even finish. Let’s break it down:
Sanding Sequence
The first step in sanding is determining the sanding sequence. This involves using multiple grits of sandpaper to progressively smooth the floor. You start with a coarse grit to remove the initial roughness and then move to finer grits for a polished finish.
Grit Progression
Understanding grit progression is essential for a flawless floor. Here’s a typical sequence:
- Start with 36-grit: This is your testing grit. It helps assess the condition of your floor and determines the coarsest starting grit needed.
- Move to 60-grit: This grit takes out the scratches from the 36-grit and begins smoothing the surface.
- Finish with 80-grit or 100-grit: This is the final pass for most hardwood floors, ensuring a smooth surface ready for staining or sealing.
Using the right grit sequence ensures that all scratches from previous sanding passes are removed, leaving a perfectly smooth surface.
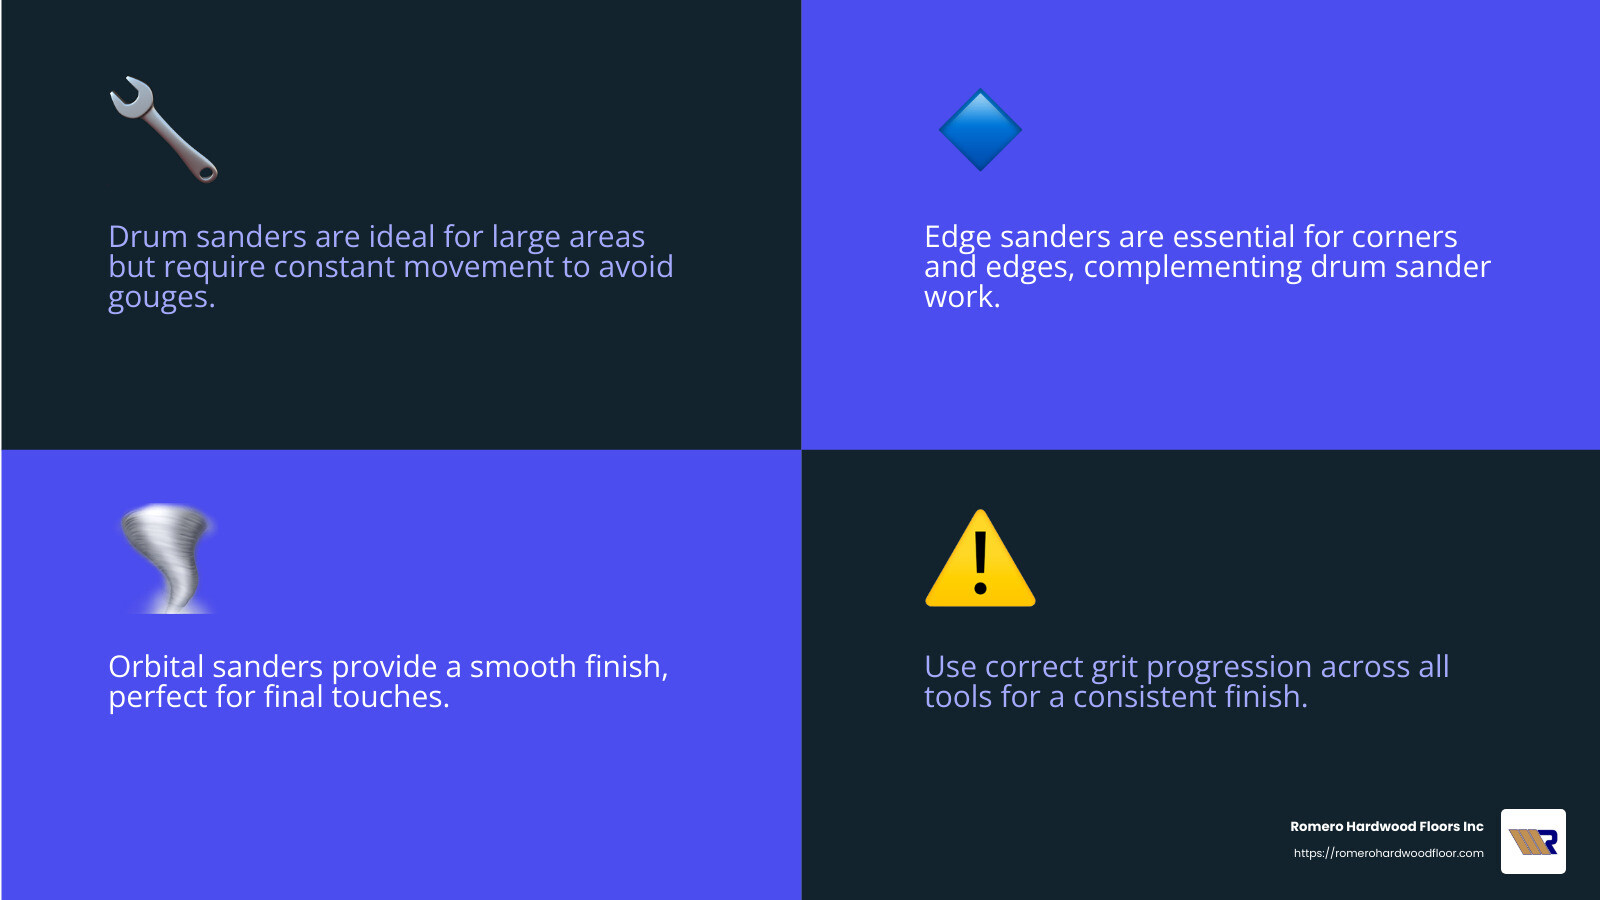
Drum Sander
The drum sander is your primary tool for sanding large areas. It’s powerful and effective at removing old finishes and leveling the floor. However, it requires careful handling:
- Keep it moving: Never stop the drum sander while it’s in contact with the floor to avoid gouging.
- Follow the grain: Always sand in the direction of the wood grain to prevent scratches.
Edger
Since a drum sander can’t reach the edges of a room, you’ll need an edger. This tool sands the perimeter of the room and around obstacles:
- Match the grit: Use the same grit progression as the drum sander to maintain a consistent finish.
- Work carefully: The edger is powerful, so ensure you maintain control to avoid uneven sanding.
By following these steps and using the right equipment, you’ll transform your new hardwood floors from rough to ready. This methodical process ensures a smooth, even surface that’s perfect for staining or sealing. Next, we’ll dig into choosing the right sanding equipment to further improve your sanding experience.
Choosing the Right Sanding Equipment
Selecting the right sanding equipment is crucial for changing your new hardwood floors into a smooth, polished surface. Let’s explore the key tools you’ll need: the drum sander, edge sander, and orbital sander.
Drum Sander
The drum sander is the powerhouse of floor sanding. It’s designed for sanding large, flat areas of your floor quickly and efficiently.
- Pros: This machine is excellent for removing old finishes and leveling uneven boards. It’s your go-to for the bulk of the sanding work.
- Cons: It requires a steady hand. If you pause while the drum is in contact with the floor, you risk leaving gouges. Always keep it moving and follow the wood grain.
Edge Sander
Next up is the edge sander. This tool reaches where the drum sander can’t—around the room’s perimeter and in tight spots.
- Pros: It’s essential for achieving a consistent finish across the entire floor, especially in corners and along walls.
- Cons: The edge sander is powerful, so be careful to maintain control. Use the same grit progression as the drum sander to ensure a seamless finish.
Orbital Sander
Finally, there’s the orbital sander. While not always necessary, it can be a valuable addition to your sanding toolkit.
- Pros: The orbital sander is less aggressive than the drum sander, making it ideal for fine-tuning the finish and smoothing out any remaining scratches.
- Cons: It’s not suited for heavy-duty sanding. Use it after the drum and edge sanders to achieve an ultra-smooth surface.
By understanding the strengths and limitations of each tool, you can choose the right equipment for your project. This ensures your new hardwood floors are flawlessly prepared for staining or sealing, setting the stage for a stunning and durable finish. Next, we’ll explore sanding techniques for different wood types to further refine your approach.
Sanding Techniques for Different Wood Types
When it comes to sanding new hardwood floors, the type of wood you’re working with matters a lot. Different woods require different techniques to achieve that perfect finish. Let’s explore how to handle two popular types: white oak and maple.
White Oak
White oak is a favorite for its durability and beautiful grain. However, like any wood, it needs careful sanding to bring out its best.
Grit Sequence for White Oak:
- Start with 60-grit: Use a drum sander to begin. This grit is perfect for removing minor imperfections and leveling the surface.
- Move to 80-grit: Follow up with 80-grit on both the drum and edge sanders. This smooths out the scratches left by the 60-grit.
- Finish with 100-grit: Use this grit on a flooring buffer to blend the areas sanded by the drum and edge sanders. This ensures a seamless finish ready for staining.
Maple
Maple is a harder wood, which means it can be a bit more challenging to sand. But with the right approach, you can achieve a smooth, even surface.
Grit Sequence for Maple:
- Begin with 36-grit: Given maple’s hardness, start with a 36-grit drum sander. This helps level the floor and tackle tougher spots.
- Switch to 60-grit: Use this grit on both the drum and edge sanders to refine the surface and reduce scratches from the initial pass.
- Move to 80-grit: Continue with 80-grit to further smooth the floor.
- End with 100-grit: Apply a 100-grit finish using a buffer. This step is crucial for preparing the floor for any staining or sealing.
Tips for Success
- Test a Small Area: Before committing to a grit sequence, test it on a small, inconspicuous area. This helps ensure you’re on the right track.
- Keep the Sanders Moving: Always move the sanders along the wood grain to avoid gouges or swirls.
- Consistency is Key: Use the same grit progression for both the drum and edge sanders to maintain a uniform finish.
By tailoring your approach to the specific wood type, you can achieve a professional-grade finish that highlights the natural beauty of your hardwood floors. Next, we’ll answer some frequently asked questions about sanding new hardwood floors to help you tackle this project with confidence.
Frequently Asked Questions about Sanding New Hardwood Floors
Do new hardwood floors need to be sanded?
Yes, sanding new hardwood floors is essential. Even if the wood is fresh from the mill, it may have slight imperfections, unevenness, or rough spots. Sanding ensures a smooth surface, reducing the risk of splinters and preparing the wood for staining or sealing. Think of it as the foundation for a great finish—without it, the end result won’t be as polished or durable.
What is the best sanding sequence for new hardwood floors?
Choosing the right grit sequence is crucial for achieving a flawless finish. Here’s a simple guide:
- Start with a coarse grit (36-grit or 60-grit) to remove any imperfections and level the floor. This step is vital for newly installed or raw wood.
- Progress to a medium grit (80-grit) to smooth out the scratches left by the coarse grit.
- Finish with a fine grit (100-grit or 120-grit) to prepare the surface for staining or sealing.
This sequence helps achieve a smooth, even surface. The key is to gradually move from coarser to finer grits.
How much wood is removed when sanding?
Sanding removes a thin layer of wood, typically between 1/32 to 1/16 of an inch. This may not sound like much, but it’s enough to eliminate scratches, stains, and small imperfections. However, be cautious—sanding too aggressively can reduce the lifespan of your floor. Each sanding pass takes away some wood, so it’s important to sand only when necessary to preserve the floor’s longevity.
By understanding these key aspects, you can confidently tackle the task of sanding new hardwood floors, ensuring a beautiful and lasting finish. Now, let’s explore the best equipment choices for this project.
Conclusion
At Romero Hardwood Floors Inc, we pride ourselves on delivering expert solutions that improve the beauty and value of your property. Our team understands that sanding new hardwood floors is a crucial step in achieving a smooth, flawless finish. This process not only prepares the wood for staining and sealing but also significantly boosts the aesthetic appeal and longevity of your floors.
Investing in professional sanding services can greatly improve your property’s value. Well-maintained hardwood floors are a timeless feature that attracts potential buyers and impresses guests. Our experienced team uses the latest techniques and equipment to ensure your floors look stunning and last for generations.
Whether you’re installing new floors or refinishing existing ones, Romero Hardwood Floors Inc is your trusted partner. We offer competitive pricing, punctual service, and guaranteed workmanship. Our commitment to quality means you can enjoy the warmth and elegance of your hardwood floors for years to come.
Ready to transform your space with expertly sanded hardwood floors? Contact us today to learn more about our services and schedule a consultation. Let us help you bring out the best in your home or business.
