
Mastering Engineered Hardwood: 4 Simple Methods for Installation
Why Engineered Hardwood Floors Are a Smart Choice for Your Home
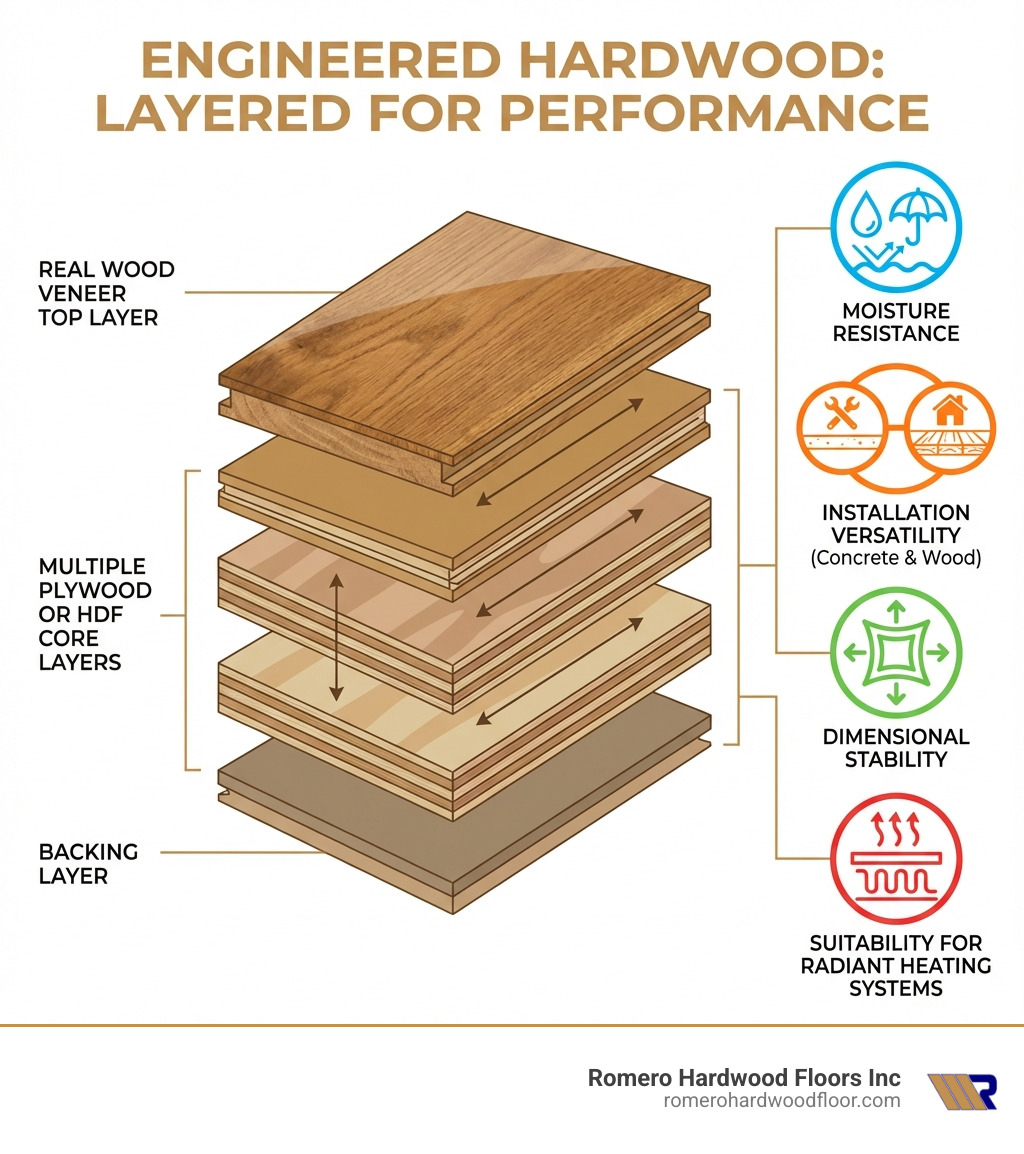
Installing engineered floors is a cost-effective way to bring the beauty of real wood into your home. Unlike solid hardwood, its layered construction provides greater stability, making it resistant to warping in humid conditions and suitable for installation in basements, over concrete, and with radiant heat systems. Many products also feature click-lock systems for faster, easier DIY installation.
There are four main installation methods:
- Floating: Planks click together over an underlayment (easiest for DIY).
- Glue-Down: Planks are adhered directly to the subfloor.
- Staple-Down: Planks are fastened to a wood subfloor with a pneumatic stapler.
- Nail-Down: Planks are secured to a wood subfloor with cleats or nails.
Regardless of the method, a few rules are universal: acclimate the flooring for 48-72 hours, ensure the subfloor is clean, dry, and level, and leave a 1/4″ to 1/2″ expansion gap around the perimeter.
What to Expect
- Timeline: 3-4 days (2-3 for acclimation, 1-2 for installation).
- Skill Level: Moderate (3 out of 5).
- Material Cost: $4.50 to $16 per square foot, plus labor.
I’m Francisco Romero, owner of Romero Hardwood Floors Inc. With over 15 years of experience installing engineered floors in Revere, MA, and for hundreds of clients, I know that proper preparation and choosing the right installation method are the keys to a floor that lasts for decades.
Before You Begin: Preparation is Key
Successful installation hinges on meticulous preparation. This stage is crucial for the longevity and structural integrity of your new flooring. The skill level for installing engineered floors is moderate (3/5), making it achievable for homeowners in areas like Beverly or Danvers, MA, but attention to detail is paramount.
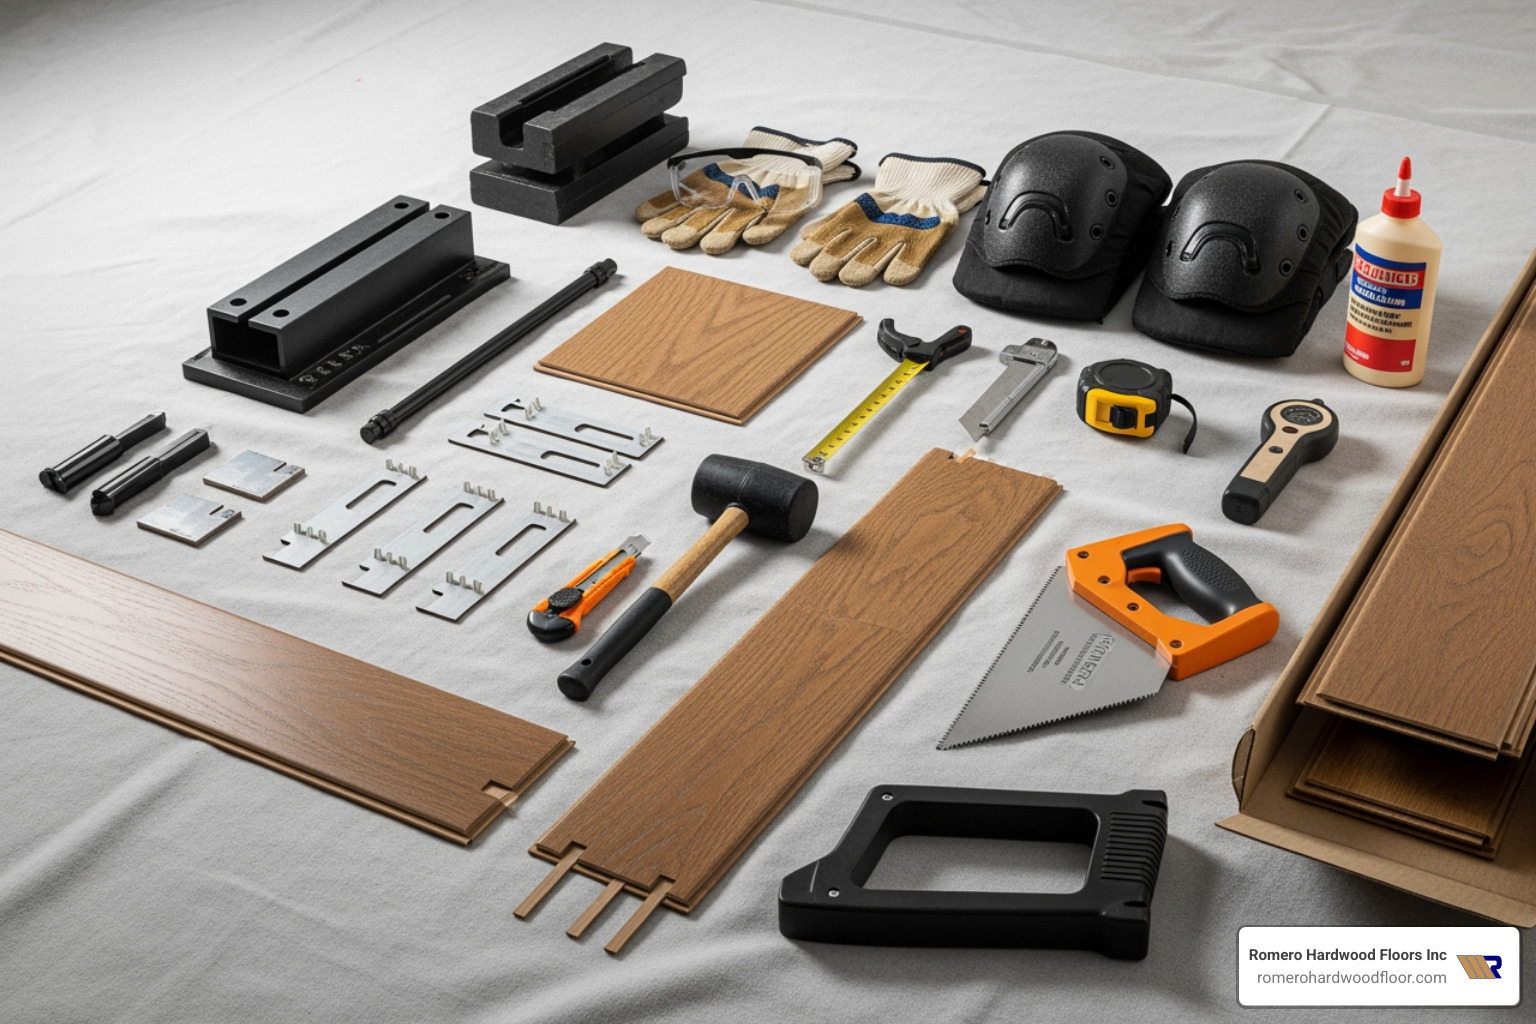
Plan for a 3-4 day project (2-3 days for acclimation, 1-2 for installation). Material costs range from $4.50–$16 per square foot. Factor in a waste allowance of 5%-7% for straight layouts and up to 15% for patterns like herringbone. Always wear safety glasses, gloves, a dust mask, and knee pads.
Gathering Your Tools and Materials
Having the right gear makes the process smoother. You’ll need:
- Cutting Tools: Miter saw, jigsaw
- Measuring & Marking: Tape measure, chalk line, straight edge
- Installation Tools: Tapping block, rubber mallet, pull bar, spacers (1/2-inch)
- Fastening Tools: Pneumatic nailer/stapler (for nail/staple-down), notched trowel (for glue-down)
- Prep Tools: Pry bar, moisture meter
- Safety Gear: Glasses, gloves, dust mask, knee pads
- Materials: Engineered hardwood planks, underlayment, moisture/vapor barrier (6-8 mil polyethylene film is common), adhesive or fasteners, and trim/moldings.
Step 1: Preparing the Subfloor
This is the most critical step. A poor subfloor guarantees a failed floor.
- Clean & Level: The subfloor must be clean, dry, and flat to within 3/16 inch over a 10-foot span. Sand down high spots and fill low spots with a leveling compound.
- Moisture Testing: Moisture is the enemy of wood. The moisture difference between the subfloor and flooring should not exceed 4%. For concrete, ensure it’s fully cured (at least 60 days) and test its moisture level. A vapor barrier is essential over concrete, especially below grade.
- Radiant Heat: If installing over radiant heat, turn the system off and let the floor reach room temperature. The floor’s surface temperature should not exceed 80-85°F during operation.
- Environment: The home’s HVAC system should be operational, maintaining a temperature of 60-75°F and humidity of 30-50% before and during installation.
For more details, see our Romero Hardwood Floors Installation Information.
Step 2: The Importance of Acclimation
Acclimation allows the flooring to adjust to the room’s temperature and humidity, preventing post-installation gaps or buckling. Let the unopened boxes of planks lie flat in the installation room for 48 to 72 hours. The room should be kept at a stable temperature (65-85°F) and humidity (40-60%). Skipping this step risks ruining your new floor.
Step-by-Step Guide to Installing Engineered Floors
With the prep work done, it’s time for the main event: installing engineered floors. The best method depends on your subfloor and flooring type.
| Installation Method | Skill Level | Best Subfloor | Cost (Material + Labor) | Feel Underfoot |
|---|---|---|---|---|
| Floating | Moderate (DIY) | Concrete, Wood | Moderate | Slightly less solid |
| Glue-Down | Moderate-High | Concrete, Wood | Moderate-High | Very solid |
| Staple-Down | Moderate-High | Wood | Moderate-High | Solid |
| Nail-Down | Moderate-High | Wood | Moderate-High | Solid |
For more about our services, visit our Romero Hardwood Floors Installation Information.
Method 1: Floating Installation for Engineered Floors
This DIY-friendly method is great for projects in Saugus or Stoneham, MA. Planks interlock and “float” over the subfloor.

- Lay Underlayment: Roll out the foam underlayment, butting the seams together without overlapping. Over concrete, first lay a 6-mil polyethylene vapor barrier, overlapping seams by 8 inches.
- Start the First Row: Begin in a corner along the longest wall. Use 1/2-inch spacers along the walls to create an expansion gap. Lay the first plank with its groove side facing the wall.
- Continue & Stagger: Snap or tap subsequent planks into place. Stagger the end joints of adjacent rows by at least 6-12 inches for strength and a natural look.
- Secure Planks: Use a tapping block and rubber mallet to gently tap planks for a tight fit. Maintain the 1/2-inch expansion gap around all fixed objects.
Method 2: Glue-Down Installation for Engineered Floors
This method creates a solid feel and is ideal for concrete subfloors in places like East Boston or Gloucester, MA.
- Prep & Adhesive: Ensure the subfloor is perfectly clean, flat, and dry. Select a quality urethane wood adhesive, as found on our Engineered wood floor adhesive options page.
- Spread Adhesive: Place 1/2-inch expansion spacers along the starting wall. Using a notched trowel at a 45-degree angle, spread adhesive over a small section (enough for 2-3 rows at a time).
- Lay Planks: Press the first plank into the adhesive, groove-side to the wall. Continue laying planks, ensuring a tight fit. Work from several cartons to blend wood variations.
- Apply Pressure & Clean Up: Use a 100-pound roller over the newly laid section to ensure full adhesive contact. Immediately wipe up any excess glue with the recommended cleaner. The floor needs 24-48 hours to cure before being walked on.
Method 3: Staple-Down Installation
This is a secure method for installing engineered floors over a wood subfloor (plywood or OSB) in homes in Melrose or Nahant, MA.
- Prep Subfloor: The wood subfloor must be clean, flat, and sound. Screw down any loose areas. Lay a vapor retarder (like asphalt-saturated paper) if the subfloor is over an unconditioned space.
- Start the First Row: Snap a working line parallel to the wall, accounting for the expansion gap. Face-nail the first row, pre-drilling to prevent splits. These nails will be hidden by baseboards.
- Use Stapler: Use a pneumatic stapler designed for flooring. Drive narrow-crowned staples through the tongue of each plank at a 45-degree angle. Space staples every 3-4 inches and 1-2 inches from each end.
- Continue & Finish: Continue laying rows, staggering end joints. The last row will likely need to be face-nailed.
Method 4: Nail-Down Installation
Similar to the staple-down method, this is also for wood subfloors and is common for thicker engineered planks in homes in Winchester or Woburn, MA.
- Prep & First Row: Preparation is identical to the staple-down method. The first row is also face-nailed into place.
- Use Nailer: Use a pneumatic cleat nailer. Cleats (L-shaped nails) are driven through the plank’s tongue at an angle.
- Fastener Spacing: Space cleats every 4-6 inches along the plank and 1-2 inches from the ends.
- Continue & Finish: Continue laying planks, maintaining the stagger and tapping them tight. Face-nail the final rows, countersink the nails, and fill with matching putty.
The Finishing Touches and Aftercare
Once the main installation is complete, it’s time for the details that create a stunning, professional finish and protect your floor’s edges.
Handling Obstacles and Transitions
Rooms are rarely perfect rectangles. Here’s how to handle common obstacles:
- Pipes & Obstacles: Use a jigsaw to cut around obstacles, always leaving an expansion gap.
- Door Casings: For a clean look, use a handsaw to undercut the bottom of door casings. This allows the plank to slide underneath for a seamless finish.
- Last Row: The last row often needs to be cut lengthwise. Use a pull bar to snug it into place. Ensure the ripped plank is at least 2 inches wide.
- Transitions & Trim: Install transition strips where the floor meets another surface (like tile or carpet). Finally, install baseboards and shoe molding, nailing them to the wall, not the floor. This allows the floor to move freely underneath.
Troubleshooting Common Problems
- Gaps and Buckling: Usually caused by improper acclimation or insufficient expansion gaps. Maintaining consistent indoor humidity (30-50%) is the best prevention.
- Squeaks and Creaks: On floating floors, talcum powder can sometimes reduce friction. On fastened floors, additional fasteners may be needed in problem spots.
- Minor Scratches: Use matching wood filler or touch-up markers to camouflage small nicks and scratches.
Long-Term Care and Maintenance
Proper care will ensure your engineered floor lasts for decades.
- Regular Cleaning: Sweep or vacuum regularly to remove abrasive dirt and grit.
- Damp Mopping Only: Use a slightly damp mop with a manufacturer-approved wood floor cleaner. Never use a wet mop or steam mop, as excess moisture can cause permanent damage.
- Protect the Surface: Place felt pads under all furniture legs and use area rugs in high-traffic zones.
- Control Humidity: Maintain consistent indoor humidity (30-50% RH) year-round to prevent the wood from expanding or contracting excessively.
- Refinishing: Depending on the veneer thickness, your floor can likely be professionally refinished to extend its life. For more details, see our page on Information on floor refinishing.
Frequently Asked Questions about Engineered Flooring
Is engineered hardwood the same as laminate flooring?
No. The key difference is the top layer. Engineered hardwood has a top layer of real wood veneer, giving it an authentic look and feel. Laminate flooring has a synthetic, photographic layer that mimics wood. Because it’s real wood, some engineered floors can be refinished; laminate cannot.
Can engineered hardwood be installed directly on concrete?
Yes, this is a major advantage over solid hardwood, but it requires careful preparation. Concrete emits moisture, so a 6-mil polyethylene vapor barrier is essential to prevent warping and mold. The recommended methods for installing engineered floors over concrete are the glue-down method (with a moisture-resistant adhesive) or the floating method (with a vapor barrier and underlayment). The subfloor must be clean, flat, and tested for moisture before installation.
How much does installing engineered floors cost?
The cost varies based on wood species, quality, and installation complexity. On average, materials can range from $4.50 to $16 per square foot. With professional installation, the total project cost can range from $4.50 to $48 per square foot.
Note: This is a general market average based on internet data and not a quote from Romero Hardwood Floors. Costs are influenced by wood species, veneer thickness, installation method, subfloor condition, and geographic location. We recommend getting a detailed estimate for your specific project.
Your Partner for Flawless Floors
Installing engineered floors is a fantastic way to improve the beauty, value, and comfort of your home. The versatility, durability, and cost-effectiveness of engineered hardwood make it an excellent choice for a wide range of applications, from basements to radiant heated rooms in Beverly, Peabody, or Salem, MA.
While a rewarding DIY project for those with moderate skill, the importance of proper preparation, choosing the right installation method, and executing the steps with precision cannot be overstated. A well-installed engineered floor will provide decades of enjoyment, while a poorly installed one can lead to frustrating and costly issues.
At Romero Hardwood Floors Inc., we pride ourselves on delivering perfect, long-lasting results for our residential and commercial clients across Revere, MA, and surrounding communities. Established in 2006, we bring over 15 years of expertise, competitive pricing, punctuality, and guaranteed workmanship to every project.
Whether you’re tackling a DIY installation and need advice, or prefer the peace of mind that comes with professional installation, we’re here to help. We understand the nuances of different subfloors and climates in Massachusetts, ensuring your engineered floors are installed to perfection.
Ready to transform your space with beautiful, durable engineered hardwood? Request an estimate for your project today, and let us help you achieve the flawless floors you deserve.
Like us on Facebook!